Hyundai Sonata 2014 Owner's Manual
Manufacturer: HYUNDAI, Model Year: 2014, Model line: Sonata, Model: Hyundai Sonata 2014Pages: 665, PDF Size: 17.43 MB
Page 541 of 665
6-7
What to do in an emergency
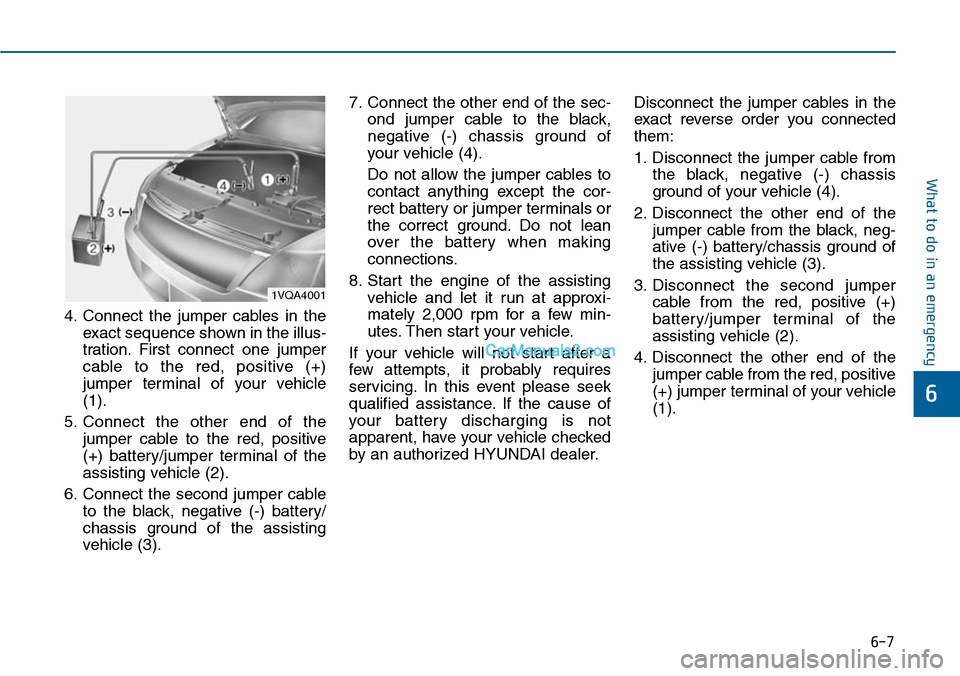
4. Connect the jumper cables in the
exact sequence shown in the illus-
tration. First connect one jumper
cable to the red, positive (+)
jumper terminal of your vehicle
(1).
5. Connect the other end of the
jumper cable to the red, positive
(+) battery/jumper terminal of the
assisting vehicle (2).
6. Connect the second jumper cable
to the black, negative (-) battery/
chassis ground of the assisting
vehicle (3).
7. Connect the other end of the sec-
ond jumper cable to the black,
negative (-) chassis ground of
your vehicle (4).
Do not allow the jumper cables to
contact anything except the cor-
rect battery or jumper terminals or
the correct ground. Do not lean
over the battery when making
connections.
8. Start the engine of the assisting
vehicle and let it run at approxi-
mately 2,000 rpm for a few min-
utes. Then start your vehicle.
If your vehicle will not start after a
few attempts, it probably requires
servicing. In this event please seek
qualified assistance. If the cause of
your battery discharging is not
apparent, have your vehicle checked
by an authorized HYUNDAI dealer.
Disconnect the jumper cables in the
exact reverse order you connected
them:
1. Disconnect the jumper cable from
the black, negative (-) chassis
ground of your vehicle (4).
2. Disconnect the other end of the
jumper cable from the black, neg-
ative (-) battery/chassis ground of
the assisting vehicle (3).
3. Disconnect the second jumper
cable from the red, positive (+)
battery/jumper terminal of the
assisting vehicle (2).
4. Disconnect the other end of the
jumper cable from the red, positive
(+) jumper terminal of your vehicle
(1).6
1VQA4001
Page 542 of 665
6-8
What to do in an emergency
If your temperature gauge indicates
overheating, you experience a loss
of power, or hear loud pinging or
knocking, the engine may be over-
heating. If this happens, you should:
1. Pull off the road and stop as soon
as it is safe to do so.
2. Place the shift lever in P (Park, for
automatic transaxle vehicle) or
neutral (for manual transaxle vehi-
cle) and set the parking brake. If
the air conditioning is ON, turn it
OFF.
3. If engine coolant is running out
under the vehicle or steam is com-
ing out from the hood, stop the
engine. Do not open the hood until
the coolant has stopped running
or the steaming has stopped. If
there is no visible loss of engine
coolant and no steam, leave the
engine running and check to be
sure the engine cooling fan is
operating. If the fan is not running,
turn the engine off.
4. Check for coolant leaking from the
radiator, hoses or under the vehi-
cle. (If the air conditioning had
been in use, it is normal for cold
water to be draining from it when
you stop.)
5. If engine coolant is leaking out,
stop the engine immediately and
we recommend that you call an
authorized HYUNDAI dealer for
assistance.
IF THE ENGINE OVERHEATS
While the engine is
running, keep hands,
clothing and tools
away from the mov-
ing parts such as the
cooling fan and drive
belt to prevent seri-
ous injury.
WARNING
NEVER remove the
radiator cap or the
drain plug while the
engine and radiator
are hot. Hot coolant
and steam may blow out under
pressure, causing serious
injury.
Turn the engine off and wait
until the engine cools down.
Use extreme care when remov-
ing the radiator cap. Wrap a
thick towel around it, and turn it
counterclockwise slowly to the
first stop. Step back while the
pressure is released from the
cooling system. When you are
sure all the pressure has been
released, press down on the
cap, using a thick towel, and
continue turning counterclock-
wise to remove it.
WARNING
Page 543 of 665
6-9
What to do in an emergency
6
6. If you cannot find the cause of the
overheating, wait until the engine
temperature has returned to nor-
mal. Then, if coolant has been
lost, carefully add coolant to the
reservoir to bring the fluid level in
the reservoir up to the halfway
mark.
7. Proceed with caution, keeping
alert for further signs of overheat-
ing. If overheating happens again,
we recommend that you call an
authorized HYUNDAI dealer for
assistance.
•Serious loss of coolant indi-
cates a leak in the cooling
system and we recommend
the system be checked by an
authorized HYUNDAI dealer.
•When the engine overheats
from low engine coolant, sud-
denly adding engine coolant
may cause cracks in the
engine. To prevent damage,
add engine coolant slowly in
small quantities.
CAUTION
IF YOU HAVE A FLAT TIRE
Changing a tire can be danger-
ous. Follow the instructions in
this section when changing a
tire to reduce the risk of serious
injury or death.
WARNING
Page 544 of 665
6-10
What to do in an emergency
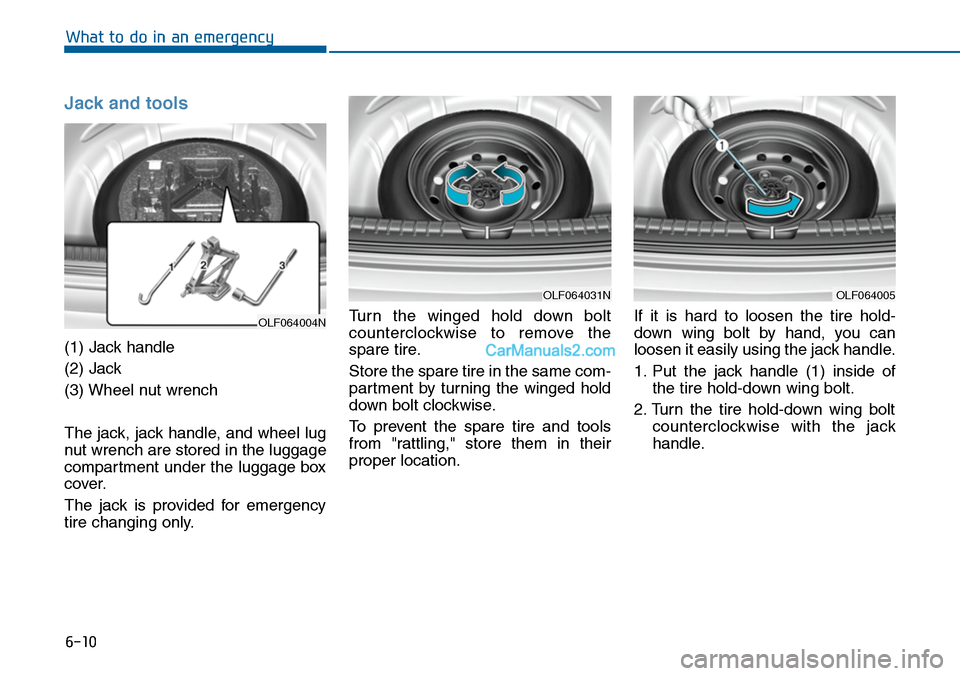
Jack and tools
(1) Jack handle
(2) Jack
(3) Wheel nut wrench
The jack, jack handle, and wheel lug
nut wrench are stored in the luggage
compartment under the luggage box
cover.
The jack is provided for emergency
tire changing only.
Tu r n t h e w i n g e d h o l d d o w n b o l t
counterclockwise to remove the
spare tire.
Store the spare tire in the same com-
partment by turning the winged hold
down bolt clockwise.
To prevent the spare tire and tools
from "rattling," store them in their
proper location.
If it is hard to loosen the tire hold-
down wing bolt by hand, you can
loosen it easily using the jack handle.
1. Put the jack handle (1) inside of
the tire hold-down wing bolt.
2. Turn the tire hold-down wing bolt
counterclockwise with the jack
handle.
OLF064004N
OLF064031NOLF064005
Page 545 of 665
6-11
What to do in an emergency
6
Changing tiresFollow these steps to change your
vehicle’s tire:
1. Park on a level, firm surface.
2. Move the shift lever into P (Park,
for automatic transaxle vehicle) or
neutral (for manual transaxle
vehicle), apply the parking brake,
and place the ignition switch in the
LOCK/OFF position.
3. Press the hazard warning flasher
button.
4. Remove the wheel lug nut wrench,
jack, jack handle, and spare tire
from the vehicle.
A vehicle can slip or roll off of a
jack causing serious injury or
death to you or those nearby.
Take the following safety pre-
cautions:
•Do not get under a vehicle
that is supported by a jack.
•NEVER attempt to change a
tire in the lane of traffic.
ALWAYS move the vehicle
completely off the road on
level, firm ground away from
traffic before trying to change
a tire. If you cannot find a
level, firm place off the road,
call a towing service for assis-
tance.
•Be sure to use the jack pro-
vided with the vehicle.
(Continued)
WARNING
(Continued)
•ALWAYS place the jack on the
designated jacking positions
on the vehicle and NEVER on
the bumpers or any other part
of the vehicle for jacking sup-
port.
•Do not start or run the engine
while the vehicle is on the
jack.
•Do not allow anyone to remain
in the vehicle while it is on the
jack.
•Keep children away from the
road and the vehicle.
Page 546 of 665
6-12
What to do in an emergency
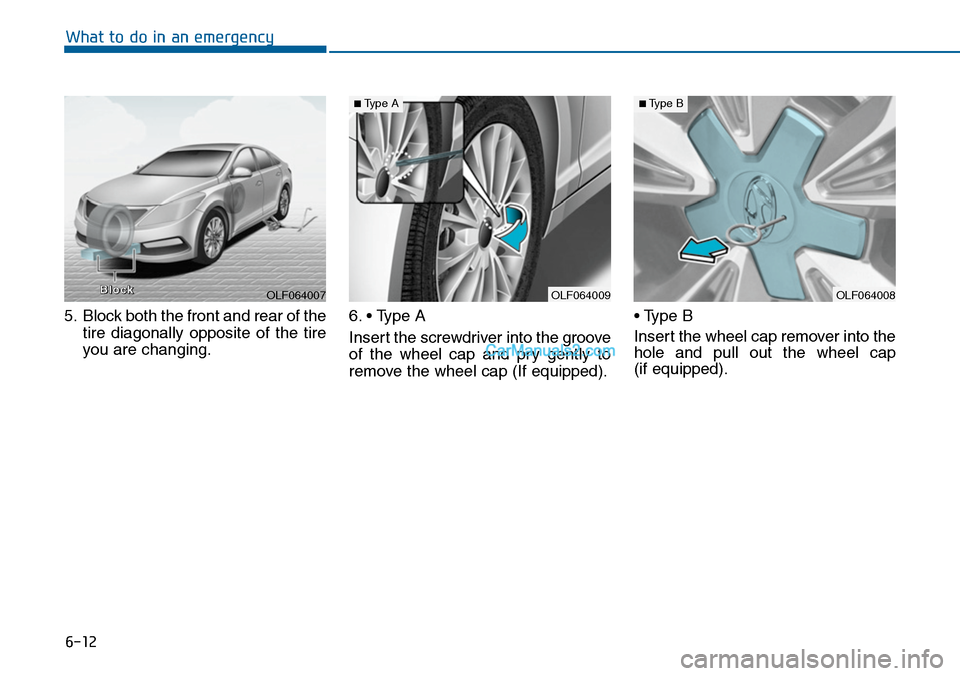
5. Block both the front and rear of the
tire diagonally opposite of the tire
you are changing.
6. • Type A
Insert the screwdriver into the groove
of the wheel cap and pry gently to
remove the wheel cap (If equipped).
• Type B
Insert the wheel cap remover into thehole and pull out the wheel cap (if equipped).
OLF064007BBlloocckkOLF064009
■Type A
OLF064008
■Type B
Page 547 of 665
6-13
What to do in an emergency
6
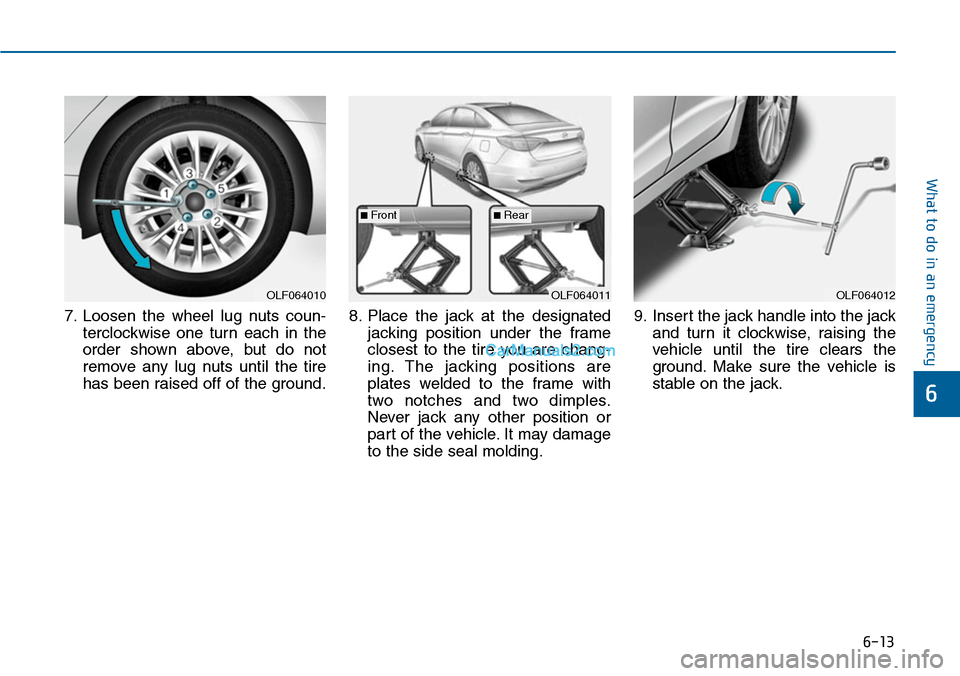
7. Loosen the wheel lug nuts coun-
terclockwise one turn each in the
order shown above, but do not
remove any lug nuts until the tire
has been raised off of the ground.
8. Place the jack at the designated
jacking position under the frame
closest to the tire you are chang-
ing. The jacking positions are
plates welded to the frame with
two notches and two dimples.
Never jack any other position or
part of the vehicle. It may damage
to the side seal molding.
9. Insert the jack handle into the jack
and turn it clockwise, raising the
vehicle until the tire clears the
ground. Make sure the vehicle is
stable on the jack.
OLF064012OLF064011OLF064010
■Front■Rear
Page 548 of 665
6-14
What to do in an emergency
10. Loosen the lug nuts with the
wheel lug nut wrench and
remove them with your fingers.
Remove the wheel from the
studs and lay it flat on the ground
out of the way. Remove any dirt
or debris from the studs, mount-
ing surfaces, and wheel.
11. Install the spare tire onto the
studs of the hub.
12. Tighten the lug nuts with your fin-
gers onto the studs with the
smaller end of the lug nuts clos-
est to the wheel.
13. Lower the vehicle to the ground
by turning the jack handle coun-
terclockwise.
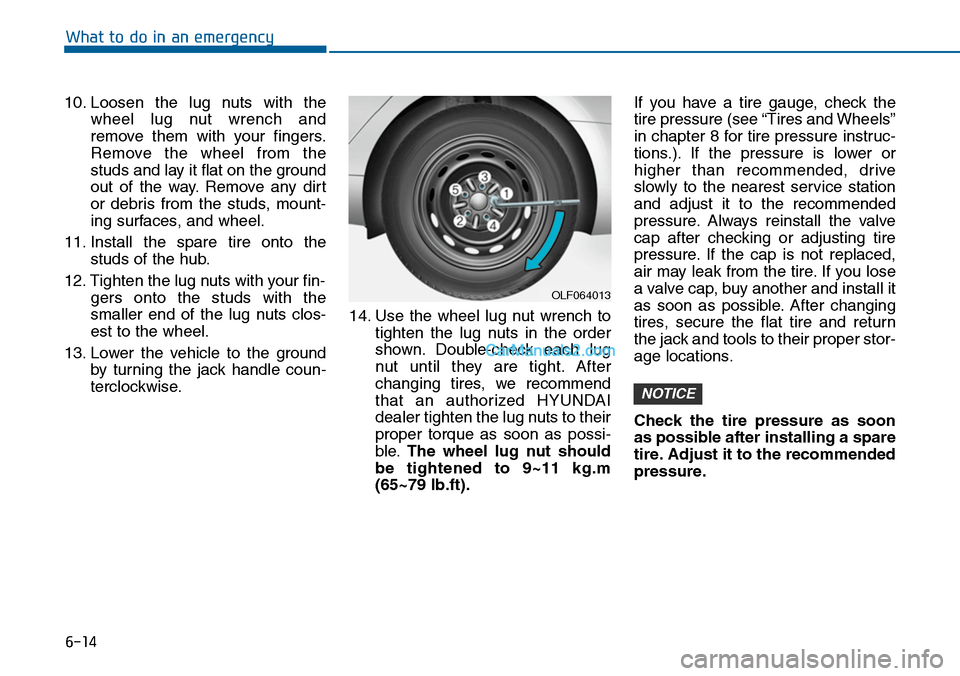
14. Use the wheel lug nut wrench to
tighten the lug nuts in the order
shown. Double-check each lug
nut until they are tight. After
changing tires, we recommend
that an authorized HYUNDAI
dealer tighten the lug nuts to their
proper torque as soon as possi-
ble.The wheel lug nut should
be tightened to 9~11 kg.m
(65~79 lb.ft).
If you have a tire gauge, check the
tire pressure (see “Tires and Wheels”
in chapter 8 for tire pressure instruc-
tions.). If the pressure is lower or
higher than recommended, drive
slowly to the nearest service station
and adjust it to the recommended
pressure. Always reinstall the valve
cap after checking or adjusting tire
pressure. If the cap is not replaced,
air may leak from the tire. If you lose
a valve cap, buy another and install it
as soon as possible. After changing
tires, secure the flat tire and return
the jack and tools to their proper stor-
age locations.
Check the tire pressure as soon
as possible after installing a spare
tire. Adjust it to the recommended
pressure.
NOTICE
OLF064013
Page 549 of 665
6-15
What to do in an emergency
6If any of the equipment such as the
jack, lug nuts, studs, or other equip-
ment is damaged or in poor condi-
tion, do not attempt to change the
tire and call for assistance.
Use of compact spare tires
(if equipped)
Compact spare tires are designed for
emergency use only. Drive carefully
on the compact spare tire and
always follow the safety precautions.
Yo u r v e h i c l e h a s m e t r i c t h r e a d s
on the studs and lug nuts. Make
certain during tire changing
that the same nuts that were
removed are reinstalled. If you
have to replace your lug nuts
make sure they have metric
threads to avoid damaging the
studs and ensure the wheel is
properly secured to the hub. We
recommend that you consult an
authorized HYUNDAI dealer for
assistance.
CAUTION
To prevent compact spare tire
failure and loss of control pos-
sibly resulting in an accident:
•Use the compact spare tire
only in an emergency.
•NEVER operate your vehicle
over 80 km/h (50 mph).
•Do not exceed the vehicle’s
maximum load rating or the
load carrying capacity shown
on the sidewall of the com-
pact spare tire.
•Do not use the compact spare
tire continuously. Repair or
replace the original tire as
soon as possible to avoid fail-
ure of the compact spare tire.
WARNING
Page 550 of 665
6-16
What to do in an emergency
When driving with the compact spare
tire mounted to your vehicle:
•Check the tire pressure after
installing the compact spare tire.
The compact spare tire should be
inflated to 420 kPa (60 psi).
•Do not take this vehicle through an
automatic car wash while the com-
pact spare tire is installed.
•Do not use the compact spare tire
on any other vehicle because this
tire has been designed especially
for your vehicle.
•The compact spare tire’s tread life
is shorter than a regular tire.
Inspect your compact spare tire
regularly and replace worn com-
pact spare tires with the same size
and design, mounted on the same
wheel.
•Do not use more than one compact
spare tire at a time.
•Do not tow a trailer while the com-
pact spare tire is installed.
When the original tire and wheel
are repaired and reinstalled on the
vehicle, the lug nut torque must be
set correctly. The correct lug nut
tightening torque is 9-11 kg.m (65-
79 lb.ft).
NOTICE
To prevent damaging the com-
pact spare tire and your vehicle:
•Drive slowly enough for the
road conditions to avoid all
hazards, such as a potholes
or debris.
•Avoid driving over obstacles.
The compact spare tire diame-
ter is smaller than the diame-
ter of a conventional tire and
reduces the ground clearance
approximately 25 mm (1 inch).
•Do not use tire chains on the
compact spare tire. Because
of the smaller size, a tire chain
will not fit properly.
•Do not use the compact spare
tire on any other wheels, nor
should standard tires, snow
tires, wheel covers or trim
rings be used with the com-
pact spare wheel.
CAUTION