steering Hyundai Sonata 2015 - RHD (UK, Australia) Owner's Guide
[x] Cancel search | Manufacturer: HYUNDAI, Model Year: 2015, Model line: Sonata, Model: Hyundai Sonata 2015Pages: 504, PDF Size: 10.88 MB
Page 163 of 504
3-79
Convenient features of your vehicle
3
Information
• If the vehicle is not on level ground
or the battery power has been inter-
rupted, the distance to empty func-
tion may not operate correctly.
• The distance to empty may differ
from the actual driving distance as
it is an estimate of the available
driving distance.
• The Trip Computer may not regis-
ter additional fuel if less than 6 litres
(1.6 gallons) of fuel are added to the
vehicle.
• The fuel economy and distance to
empty may vary significantly based
on driving conditions, driving
habits, and condition of the vehicle.
Average Fuel Economy (2)
• The average fuel economy is calcu-
lated from the total driving distance
and fuel consumption since the last
average fuel economy reset.
- Fuel economy range:
0.0 - 99.9 L/100km, km/L
• The average fuel economy can be
reset both manually and automati-
cally.
Manual reset
To clear the average fuel economy
manually, press the [OK] button on
the steering wheel for more than 1
second when the average fuel econo-
my is displayed.
Automatic reset
To adjust the average fuel economy
to reset automatically whenever refu-
elling, select the “Auto Reset” mode
in User Setting menu of the LCD dis-
play (Refer to “LCD Display”).
Under “Auto Reset” mode, the aver-
age fuel economy will be cleared to
zero (---) when the vehicle speed
exceeds 1 km/h after refuelling more
than 6 litres (1.6 gallons).
Information
The average fuel economy is not dis-
played if the vehicle has not been driv-
en for more than 10 seconds or 300
metres, since the ignition switch or the
Engine Start/Stop button was turned
on.
Instant Fuel Economy (3)
• This mode displays the instant fuel
economy during the last few sec-
onds when the vehicle speed is
more than 10 km/h.
- Fuel economy range:
0 - 30 L/100km, km/L
i
i
Page 168 of 504
3-84
Convenient features of your vehicle
Information - Electronic
Brake force Distribution (EBD)
System Warning Light
When the ABS Warning Light is on or
both ABS and Parking Brake & Brake
Fluid Warning Lights are on, the
speedometer, odometer, or tripmeter
may not work. Also, the EPS Warning
Light may illuminate and the steering
effort may increase or decrease.
In this case, we recommend you have
the vehicle inspected by an authorised
HYUNDAI dealer as soon as possible.Electric Parking Brake
(EPB) Warning Light
(if equipped)
This warning light illuminates:
• Once you set the ignition switch or
the Engine Start/Stop button to the
ON position.
- It illuminates for approximately 3
seconds and then goes off.
• When there is a malfunction with
the EPB.
In this case, we recommend that
you have the vehicle inspected by
an authorised HYUNDAI dealer.
Information - Electric Parking
Brake (EPB) Warning Light
The Electric Parking Brake (EPB)
Warning Light may illuminate when
the Electronic Stability control (ESC)
Indicator Light comes on to indicate
that the ESC is not working properly
(This does not indicate malfunction of
the EPB).i
i
Electronic Brake force
Distribution (EBD) System
Warning Light
When both ABS and Parking
Brake & Brake Fluid Warning
Lights are on, the brake system
will not work normally and you
may experience an unexpected
and dangerous situation during
sudden braking.
In this case, avoid high speed
driving and abrupt braking.
We recommend you have the
vehicle inspected by an autho-
rised HYUNDAI dealer as soon
as possible.
WARNINGEPB
Page 169 of 504
3-85
Convenient features of your vehicle
3
Electric Power
Steering (EPS)
Warning Light
This warning light illuminates:
• Once you set the ignition switch or
the Engine Start/Stop button to the
ON position.
- This indicator light comes on after
the ignition key is turned to the
ON position and then goes out
after approximately 3 seconds.
• When there is a malfunction with
the EPS.
In this case, we recommend that
you have the vehicle inspected by
an authorised HYUNDAI dealer.
Malfunction Indicator
Lamp (MIL)
This warning light illuminates:
• Once you set the ignition switch or
the Engine Start/Stop button to the
ON position.
- It remains on until the engine is
started.
• When there is a malfunction with
the emission control system.
In this case, we recommend that
you have the vehicle inspected by
an authorised HYUNDAI dealer.
- Malfunction Indicator
Lamp (MIL)
Driving with the Malfunction
Indicator Lamp (MIL) on may cause
damage to the emission control
systems which could affect dri-
vability and/or fuel economy.- Petrol Engine
If the Malfunction Indicator Lamp
(MIL) illuminates, potential catalyt-
ic converter damage is possible
which could result in loss of
engine power.
In this case, we recommend that
you have the vehicle inspected by
an authorised HYUNDAI dealer as
soon as possible.
NOTICE
NOTICE
Page 179 of 504
3-95
Convenient features of your vehicle
3
One-touch turn signal function
(if equipped)
To activate a one-touch turn signal
function, move the turn signal lever
slightly and then release it. The lane
change signals will blink 3, 5 or 7
times.
You can activate/deactivate the One
Touch Turn Signal function or choose
the number of blinks (3, 5, or 7) from
the User Settings Mode on the LCD
display.For more details, refer to
"LCD Display" in this chapter.
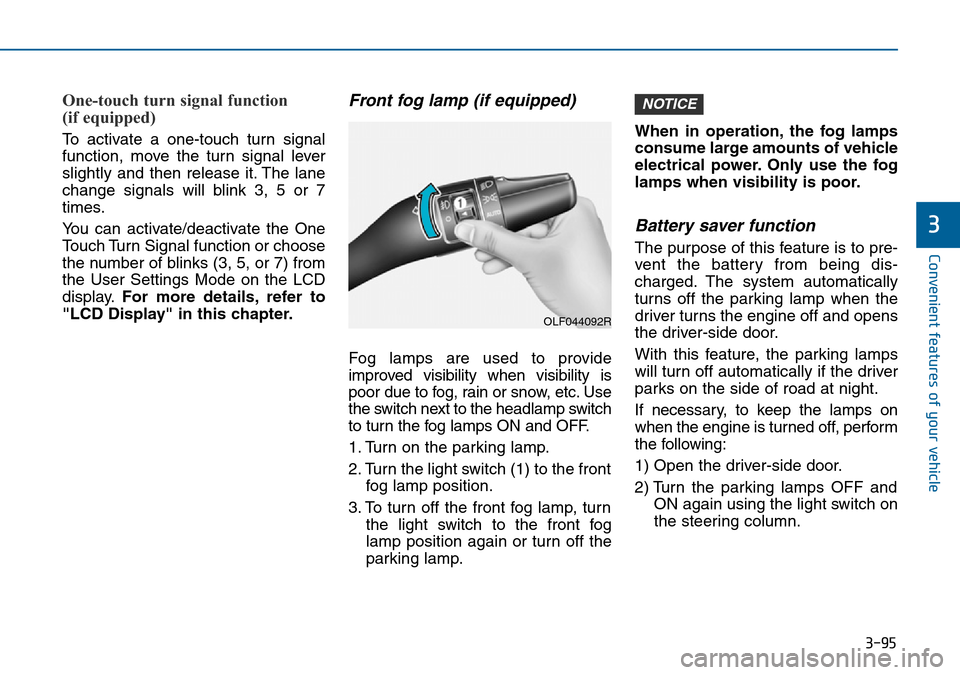
Front fog lamp (if equipped)
Fog lamps are used to provide
improved visibility when visibility is
poor due to fog, rain or snow, etc. Use
the switch next to the headlamp switch
to turn the fog lamps ON and OFF.
1. Turn on the parking lamp.
2. Turn the light switch (1) to the front
fog lamp position.
3. To turn off the front fog lamp, turn
the light switch to the front fog
lamp position again or turn off the
parking lamp.When in operation, the fog lamps
consume large amounts of vehicle
electrical power. Only use the fog
lamps when visibility is poor.
Battery saver function
The purpose of this feature is to pre-
vent the battery from being dis-
charged. The system automatically
turns off the parking lamp when the
driver turns the engine off and opens
the driver-side door.
With this feature, the parking lamps
will turn off automatically if the driver
parks on the side of road at night.
If necessary, to keep the lamps on
when the engine is turned off, perform
the following:
1) Open the driver-side door.
2) Turn the parking lamps OFF and
ON again using the light switch on
the steering column.
NOTICE
OLF044092R
Page 240 of 504
Multimedia System
Multimedia system .................................................4-2
AUX, USB and iPod®port ...............................................4-2
Antenna ...............................................................................4-3
Steering wheel audio control ........................................4-4
Audio / Video / Navigation system (AVN) ..................4-5
Bluetooth®Wireless Technology hands-free ............4-5
How Vehicle Audio Works ...............................................4-6
System Controllers and Functions
- 3.8 inch MONO TFT ..........................................4-20
Setup ..................................................................................4-21
RADIO .................................................................................4-24
System Controllers and Functions
- 4.3 inch COLOUR TFT LCD
.....................................4-30
Radio mode .......................................................................4-34
Media mode ......................................................................4-36
Audio CD mode ................................................................4-37
MP3 CD mode ..................................................................4-40
USB mode ........................................................................4-43
iPod
®mode .......................................................................4-46
AUX mode ........................................................................4-48
My music mode................................................................4-49
Bluetooth®Wireless Technology audio mode ..........4-52
Setup ..................................................................................4-63
Rear view camera ...........................................................4-69
4
Page 243 of 504
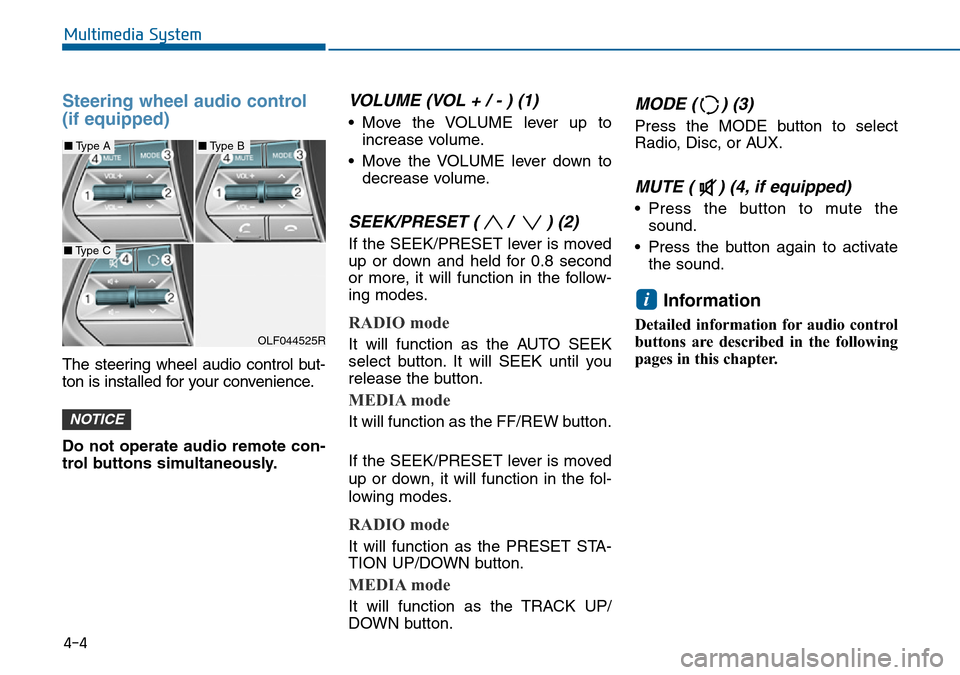
Steering wheel audio control
(if equipped)
The steering wheel audio control but-
ton is installed for your convenience.
Do not operate audio remote con-
trol buttons simultaneously.
VOLUME (VOL + / - ) (1)
• Move the VOLUME lever up to
increase volume.
• Move the VOLUME lever down to
decrease volume.
SEEK/PRESET ( / ) (2)
If the SEEK/PRESET lever is moved
up or down and held for 0.8 second
or more, it will function in the follow-
ing modes.
RADIO mode
It will function as the AUTO SEEK
select button. It will SEEK until you
release the button.
MEDIA mode
It will function as the FF/REW button.
If the SEEK/PRESET lever is moved
up or down, it will function in the fol-
lowing modes.
RADIO mode
It will function as the PRESET STA-
TION UP/DOWN button.
MEDIA mode
It will function as the TRACK UP/
DOWN button.
MODE ( ) (3)
Press the MODE button to select
Radio, Disc, or AUX.
MUTE ( ) (4, if equipped)
• Press the button to mute the
sound.
• Press the button again to activate
the sound.
Information
Detailed information for audio control
buttons are described in the following
pages in this chapter.
i
NOTICE
4-4
Multimedia System
OLF044525R
■Type A■Type B
■Type C
Page 268 of 504
4-29
Multimedia System
4
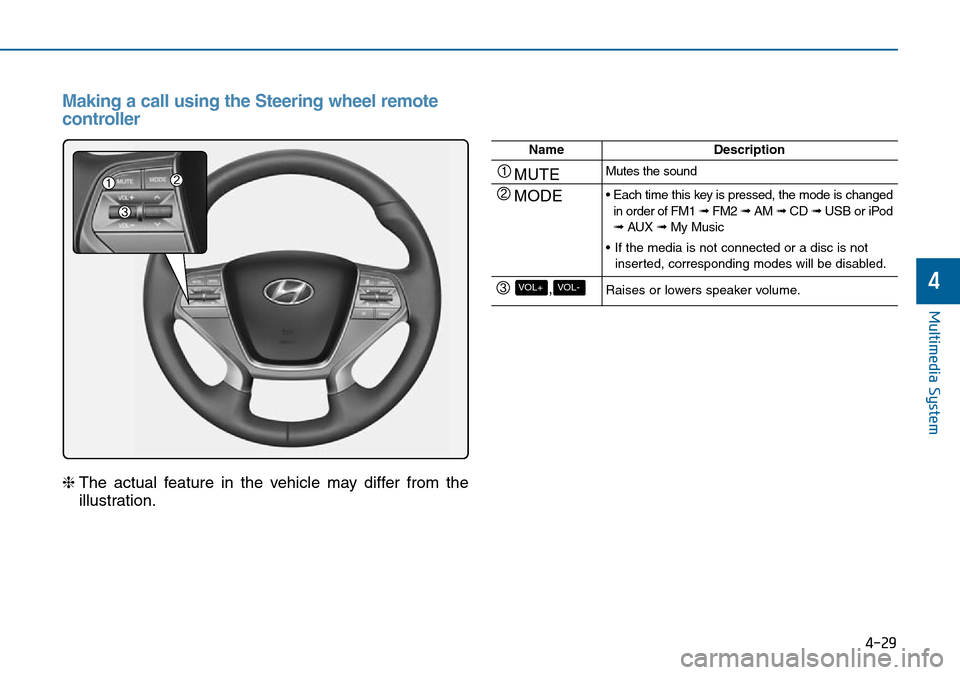
Making a call using the Steering wheel remote
controller
❈The actual feature in the vehicle may differ from the
illustration.
NameDescription
MUTEMutes the sound
MODE• Each time this key is pressed, the mode is changed
in order of FM1 ➟ FM2 ➟ AM➟ CD ➟ USB or iPod
➟ AUX ➟ My Music
• If the media is not connected or a disc is not
inserted, corresponding modes will be disabled.
,VOL-VOL+Raises or lowers speaker volume.
Page 271 of 504
4-32
Multimedia System
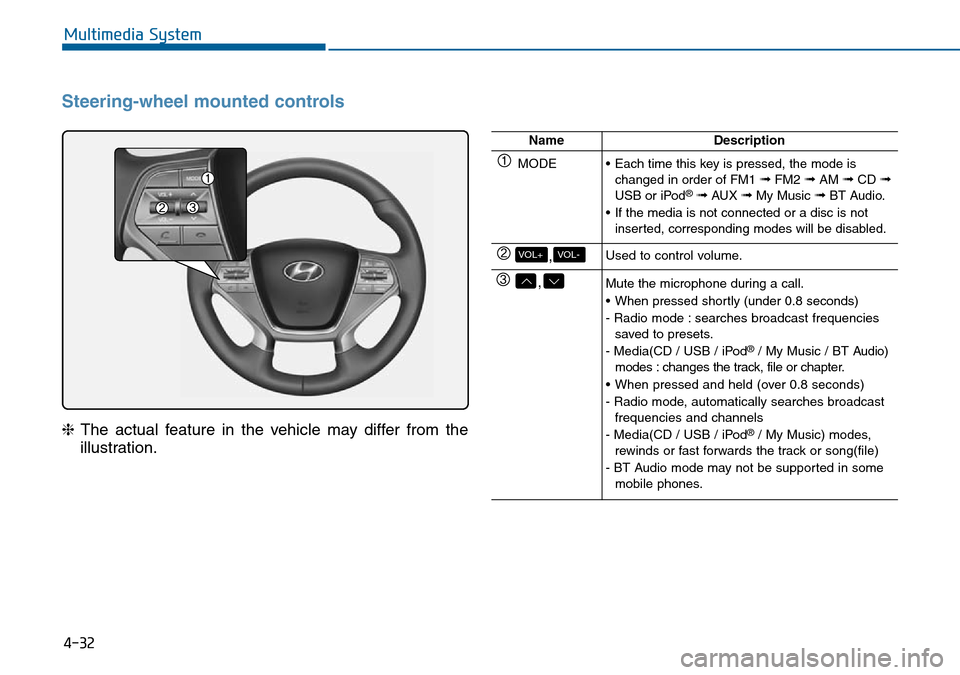
Steering-wheel mounted controls
❈The actual feature in the vehicle may differ from the
illustration.
NameDescription
MODE• Each time this key is pressed, the mode is
changed in order of FM1 ➟FM2 ➟AM ➟CD ➟USB or iPod®➟ AUX ➟My Music ➟BT Audio.
• If the media is not connected or a disc is not
inserted, corresponding modes will be disabled.
,VOL-VOL+Used to control volume.
,Mute the microphone during a call.
• When pressed shortly (under 0.8 seconds)
- Radio mode : searches broadcast frequencies
saved to presets.
- Media(CD / USB / iPod
®/ My Music / BT Audio)
modes : changes the track, file or chapter.
• When pressed and held (over 0.8 seconds)
- Radio mode, automatically searches broadcast
frequencies and channels
- Media(CD / USB / iPod
®/ My Music) modes,
rewinds or fast forwards the track or song(file)
- BT Audio mode may not be supported in some
mobile phones.
Page 295 of 504
4-56
Multimedia System
Bluetooth® Wireless Technology
(for Bluetooth®Wireless
Technologyequipped model)
Pairing a
Bluetooth®Wireless
Technology wireless technolo-
gy Device
What is
Bluetooth®Wireless
Technology Pairing?
Pairing refers to the process of syn-
chronizing your
Bluetooth®Wireless
Technology phone or device with the
car audio system for connection.
Pairing is necessary to connect and
use the
Bluetooth®Wireless
Technology feature.
Pairing Key / Key on
the Steering Remote Controller
When No Devices have been Paired
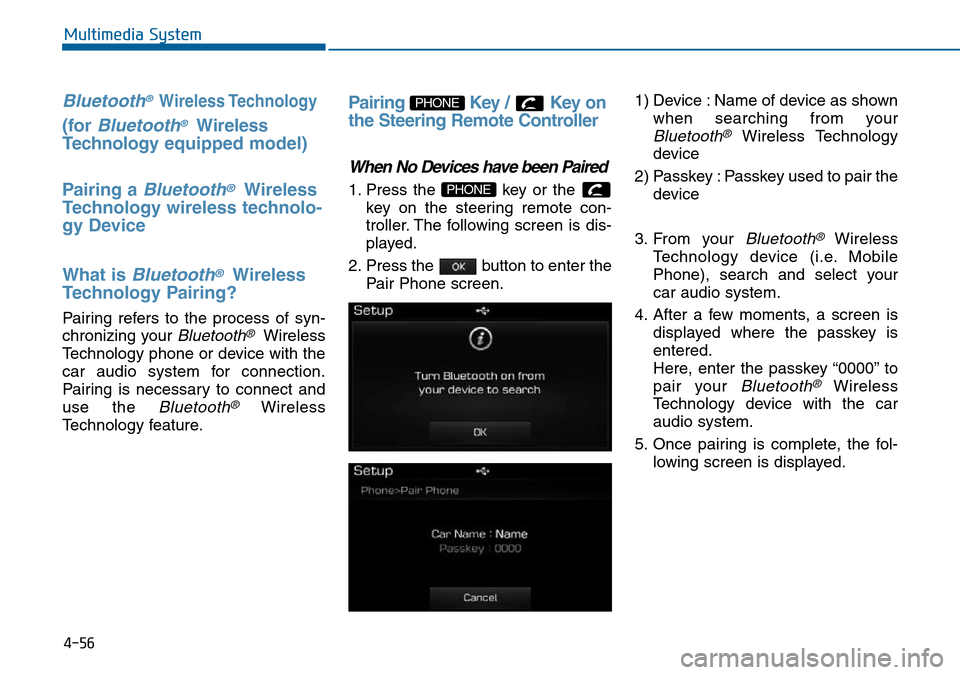
1. Press the key or the
key on the steering remote con-
troller. The following screen is dis-
played.
2. Press the button to enter the
Pair Phone screen.1) Device : Name of device as shown
when searching from your
Bluetooth®Wireless Technology
device
2) Passkey : Passkey used to pair the
device
3. From your
Bluetooth®Wireless
Technology device (i.e. Mobile
Phone), search and select your
car audio system.
4. After a few moments, a screen is
displayed where the passkey is
entered.
Here, enter the passkey “0000” to
pair your
Bluetooth®Wireless
Technology device with the car
audio system.
5. Once pairing is complete, the fol-
lowing screen is displayed.
PHONE
PHONE
Page 296 of 504
4-57
Multimedia System
4
Information
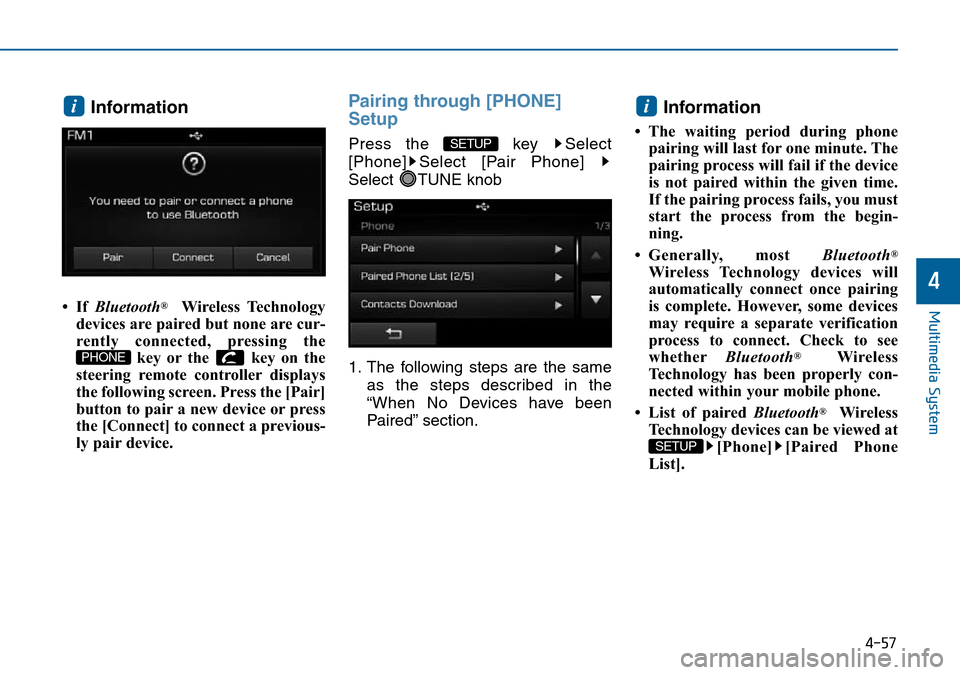
•If Bluetooth®Wireless Technology
devices are paired but none are cur-
rently connected, pressing the
key or the key on the
steering remote controller displays
the following screen. Press the [Pair]
button to pair a new device or press
the [Connect] to connect a previous-
ly pair device.
Pairing through [PHONE]
Setup
Press the key Select
[Phone] Select [Pair Phone]
Select TUNE knob
1. The following steps are the same
as the steps described in the
“When No Devices have been
Paired” section.
Information
• The waiting period during phone
pairing will last for one minute. The
pairing process will fail if the device
is not paired within the given time.
If the pairing process fails, you must
start the process from the begin-
ning.
• Generally, most Bluetooth
®
Wireless Technology devices will
automatically connect once pairing
is complete. However, some devices
may require a separate verification
process to connect. Check to see
whetherBluetooth
®Wireless
Technology has been properly con-
nected within your mobile phone.
• List of paired Bluetooth
®Wireless
Technology devices can be viewed at
[Phone] [Paired Phone
List].
SETUP
i
SETUP
PHONE
i