belt Hyundai Sonata 2015 - RHD (UK, Australia) Workshop Manual
[x] Cancel search | Manufacturer: HYUNDAI, Model Year: 2015, Model line: Sonata, Model: Hyundai Sonata 2015Pages: 504, PDF Size: 10.88 MB
Page 345 of 504
![Hyundai Sonata 2015 - RHD (UK, Australia) Workshop Manual 5-32
Driving your vehicle
To cancel :
1. Depress the brake pedal.
2. Press the [AUTO HOLD] switch.
The AUTO HOLD indicator will turn
off.
Information
• The Auto Hold does not operate
when:
- The dr](/img/35/16797/w960_16797-344.png "Hyundai Sonata 2015 - RHD (UK, Australia) Workshop Manual 5-32
Driving your vehicle
To cancel :
1. Depress the brake pedal.
2. Press the [AUTO HOLD] switch.
The AUTO HOLD indicator will turn
off.
Information
• The Auto Hold does not operate
when:
- The dr")
5-32
Driving your vehicle
To cancel :
1. Depress the brake pedal.
2. Press the [AUTO HOLD] switch.
The AUTO HOLD indicator will turn
off.
Information
• The Auto Hold does not operate
when:
- The driver's seat belt is unbuckled
and driver's door is opened
- The engine bonnet is opened
- The boot is opened
- The shift lever is in P (Park)
- The EPB is applied
• For your safety, the Auto Hold auto-
matically switches to EPB if:
- The driver's seat belt is unbuckled
and driver's door is opened
- The engine bonnet is opened
whilst the shift lever is in D (Drive)
- The boot is opened whilst the shift
lever is in R (Reverse)
- The vehicle is at a standstill for
more than 10 minutes
- The vehicle is standing on a steep
slope
- The vehicle moved several times
(Continued)
i
OLF054020R
L L
i i
g g
h h
t t
o o
f f
f fTo prevent, unexpected and
sudden vehicle movement,
ALWAYS press your foot on the
brake pedal to cancel the Auto
Hold before you:
- Drive downhill.
- Drive the vehicle in R (Reverse).
- Park the vehicle.
WARNING
Page 347 of 504
5-34
Driving your vehicle
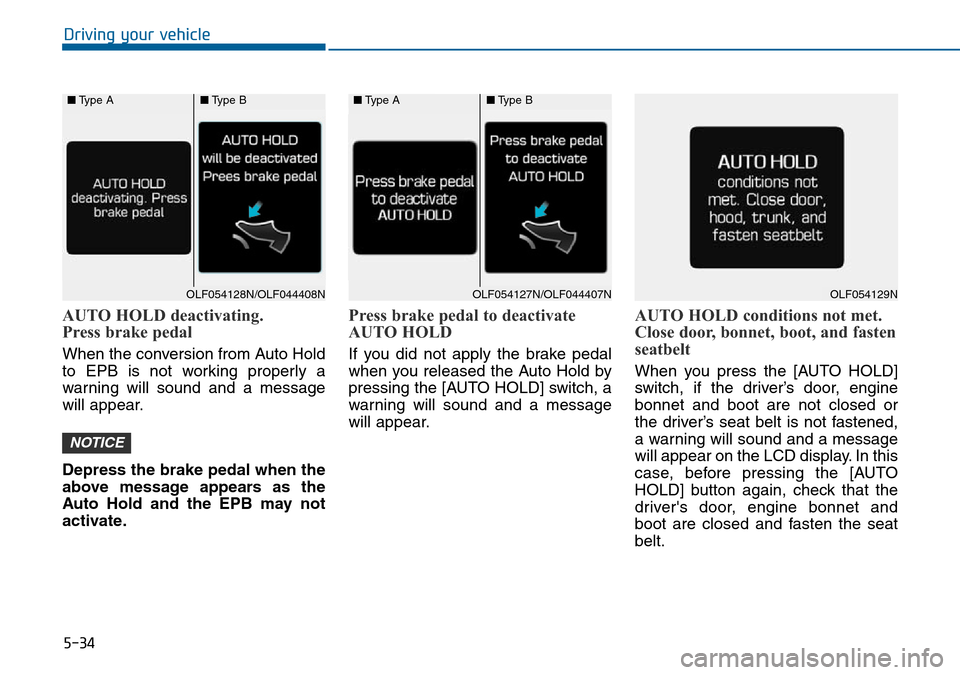
AUTO HOLD deactivating.
Press brake pedal
When the conversion from Auto Hold
to EPB is not working properly a
warning will sound and a message
will appear.
Depress the brake pedal when the
above message appears as the
Auto Hold and the EPB may not
activate.
Press brake pedal to deactivate
AUTO HOLD
If you did not apply the brake pedal
when you released the Auto Hold by
pressing the [AUTO HOLD] switch, a
warning will sound and a message
will appear.
AUTO HOLD conditions not met.
Close door, bonnet, boot, and fasten
seatbelt
When you press the [AUTO HOLD]
switch, if the driver’s door, engine
bonnet and boot are not closed or
the driver’s seat belt is not fastened,
a warning will sound and a message
will appear on the LCD display. In this
case, before pressing the [AUTO
HOLD] button again, check that the
driver's door, engine bonnet and
boot are closed and fasten the seat
belt.
NOTICE
■Type A■Type B
OLF054128N/OLF044408NOLF054129N
■Type A■Type B
OLF054127N/OLF044407N
Page 399 of 504
6-8
What to do in an emergency
If your temperature gauge indicates
overheating, you experience a loss
of power, or hear loud pinging or
knocking, the engine may be over-
heating. If this happens, you should:
1. Pull off the road and stop as soon
as it is safe to do so.
2. Place the shift lever in P (Park, for
automatic transaxle vehicle) or
neutral (for manual transaxle vehi-
cle) and set the parking brake. If
the air conditioning is ON, turn it
OFF.
3. If engine coolant is running out
under the vehicle or steam is com-
ing out from the bonnet, stop the
engine. Do not open the bonnet
until the coolant has stopped run-
ning or the steaming has stopped.
If there is no visible loss of engine
coolant and no steam, leave the
engine running and check to be
sure the engine cooling fan is
operating. If the fan is not running,
turn the engine off.4. Check for coolant leaking from the
radiator, hoses or under the vehi-
cle. (If the air conditioning had
been in use, it is normal for cold
water to be draining from it when
you stop.)
5. If engine coolant is leaking out,
stop the engine immediately and
we recommend that you call an
authorised HYUNDAI dealer for
assistance.
IF THE ENGINE OVERHEATS
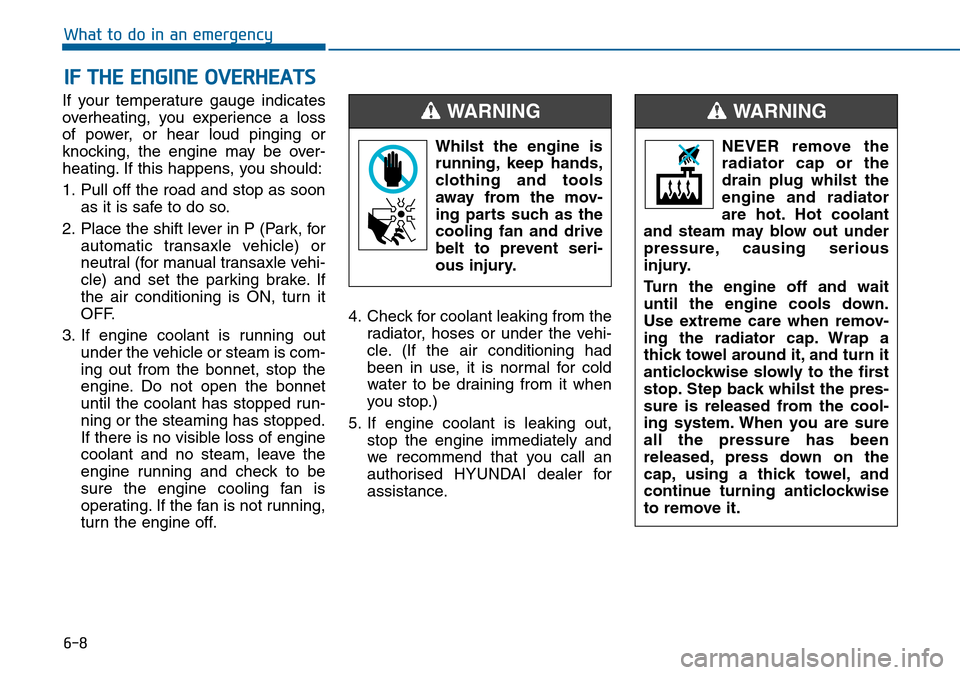
Whilst the engine is
running, keep hands,
clothing and tools
away from the mov-
ing parts such as the
cooling fan and drive
belt to prevent seri-
ous injury.
WARNING
NEVER remove the
radiator cap or the
drain plug whilst the
engine and radiator
are hot. Hot coolant
and steam may blow out under
pressure, causing serious
injury.
Turn the engine off and wait
until the engine cools down.
Use extreme care when remov-
ing the radiator cap. Wrap a
thick towel around it, and turn it
anticlockwise slowly to the first
stop. Step back whilst the pres-
sure is released from the cool-
ing system. When you are sure
all the pressure has been
released, press down on the
cap, using a thick towel, and
continue turning anticlockwise
to remove it.
WARNING
Page 419 of 504
7-8
Maintenance
At least twice a year:
• Check radiator, heater and air condi-
tioning hoses for leaks or damage.
• Check windscreen washer spray
and wiper operation. Clean wiper
blades with clean cloth dampened
with washer fluid.
• Check headlamp alignment.
• Check muffler, exhaust pipes,
shields and clamps.
• Check the seat belts for wear and
function.
At least once a year:
• Clean body and door drain holes.
• Lubricate door hinges and bonnet
hinges.
• Lubricate door and bonnet locks
and latches.
• Lubricate door rubber weather
strips.
• Check the air conditioning system.
• Inspect and lubricate automatic
transaxle linkage and controls.
• Clean the battery and terminals.
• Check the brake fluid level.
Page 421 of 504
Maintenance
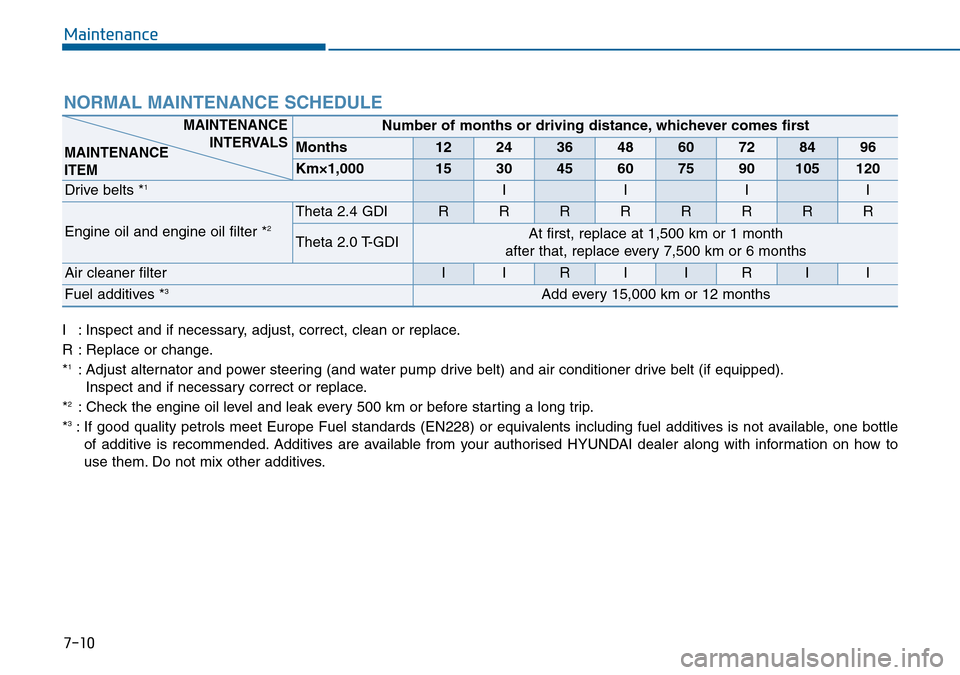
7-10 I : Inspect and if necessary, adjust, correct, clean or replace.
R : Replace or change.
*
1: Adjust alternator and power steering (and water pump drive belt) and air conditioner drive belt (if equipped).
Inspect and if necessary correct or replace.
*
2: Check the engine oil level and leak every 500 km or before starting a long trip.
*3: If good quality petrols meet Europe Fuel standards (EN228) or equivalents including fuel additives is not available, one bottle
of additive is recommended. Additives are available from your authorised HYUNDAI dealer along with information on how to
use them. Do not mix other additives.
NORMAL MAINTENANCE SCHEDULE
Number of months or driving distance, whichever comes first
Months1224364860728496
Km×1,000153045607590105120
Drive belts *1IIII
Engine oil and engine oil filter *2Theta 2.4 GDI RRRRRRRR
Theta 2.0 T-GDI At first, replace at 1,500 km or 1 month
after that, replace every 7,500 km or 6 months
Air cleaner filterIIRIIRII
Fuel additives *3Add every 15,000 km or 12 months
MAINTENANCE
INTERVALS
MAINTENANCE
ITEM
Page 427 of 504
7-16
Maintenance
EXPLANATION OF SCHEDULED MAINTENANCE ITEMS
Engine oil and filter
The engine oil and filter should be
changed at the intervals specified in
the maintenance schedule. If the
vehicle is being driven in severe con-
ditions, more frequent oil and filter
changes are required.
Drive belts
Inspect all drive belts for evidence of
cuts, cracks, excessive wear or oil
saturation and replace if necessary.
Drive belts should be checked peri-
odically for proper tension and
adjusted as necessary.
Fuel filter (cartridge)
A clogged filter can limit the speed at
which the vehicle may be driven,
damage the emission system and
cause multiple issues such as hard
starting. If an excessive amount of
foreign matter accumulates in the
fuel tank, the filter may require
replacement more frequently.
After installing a new filter, run the
engine for several minutes, and
check for leaks at the connections.
We recommend that the fuel filter be
replaced by an authorised HYUNDAI
dealer.
Fuel lines, fuel hoses and con-
nections
Check the fuel lines, fuel hoses and
connections for leakage and dam-
age. We recommend that the fuel
lines, fuel hoses and connections be
replaced by an authorised HYUNDAI
dealer.
Vapour hose and fuel filler cap
The vapour hose and fuel filler cap
should be inspected at those inter-
vals specified in the maintenance
schedule. Make sure that a new
vapour hose or fuel filler cap is cor-
rectly replaced.
When you are inspecting the
belt, place the ignition switch to
the LOCK/OFF or ACC position.
CAUTION
Page 457 of 504
7-46
Maintenance
4. Tyre ply composition and
material
The number of layers or plies of rub-
ber-coated fabric that are in the tyre.
Tyre manufacturers also must indi-
cate the materials in the tyre, which
include steel, nylon, polyester, and
others. The letter "R" means radial
ply construction; the letter "D" means
diagonal or bias ply construction;
and the letter "B" means belted-bias
ply construction.
5. Maximum permissible infla-
tion pressure
This number is the greatest amount
of air pressure that should be put in
the tyre. Do not exceed the maximum
permissible inflation pressure. Refer
to the Tyre and Loading Information
label for recommended inflation
pressure.
6. Maximum load rating
This number indicates the maximum
load in kilograms and pounds that
can be carried by the tyre. When
replacing the tyres on the vehicle,
always use a tyre that has the same
load rating as the factory installed
tyre.
7. Uniform tyre quality grading
Quality grades can be found where
applicable on the tyre sidewall
between tread shoulder and maxi-
mum section width.
For example:
TREADWEAR 200
TRACTION AA
TEMPERATURE A
Tread wear
The tread wear grade is a compara-
tive rating based on the wear rate of
the tyre when tested under controlled
conditions on a specified govern-
ment test course. For example, a tyre
graded 150 would wear one-and-a-
half times (1½) as well on the gov-
ernment course as a tyre graded
100.
The relative performance of tyres
depends upon the actual conditions
of their use, however, and may
depart significantly from the norm
because of variations in driving
habits, service practices and differ-
ences in road characteristics and cli-
mate.
These grades are molded on the
side-walls of passenger vehicle
tyres. The tyres available as standard
or optional equipment on your vehi-
cles may vary with respect to grade.
Page 491 of 504
7-80
Maintenance
Cleaning the lap/shoulder belt
webbing
Clean the belt webbing with any mild
soap solution recommended for
cleaning upholstery or carpet. Follow
the instructions provided with the
soap. Do not bleach or re-dye the
webbing because this may weaken it.
Cleaning the interior window
glass
If the interior glass surfaces of the
vehicle become fogged (that is, cov-
ered with an oily, greasy or waxy
film), they should be cleaned with
glass cleaner. Follow the directions
on the glass cleaner container.
Do not scrape or scratch the
inside of the rear window. This
may result in damage to the rear
window defroster grid.
CAUTION