change engin Hyundai Sonata 2015 Owner's Manual
[x] Cancel search | Manufacturer: HYUNDAI, Model Year: 2015, Model line: Sonata, Model: Hyundai Sonata 2015Pages: 603, PDF Size: 14.7 MB
Page 35 of 603
2-8
Seat belts must be snug against your
hips and chest to work properly.
When the seatback is reclined, the
shoulder belt cannot do its job
because it will not be snug against
your chest. Instead, it will be in front
of you. During an accident, you could
be thrown into the seat belt, causing
neck or other injuries.
The more the seatback is reclined,
the greater chance the passenger’s
hips will slide under the lap belt or
the passenger’s neck will strike the
shoulder belt.
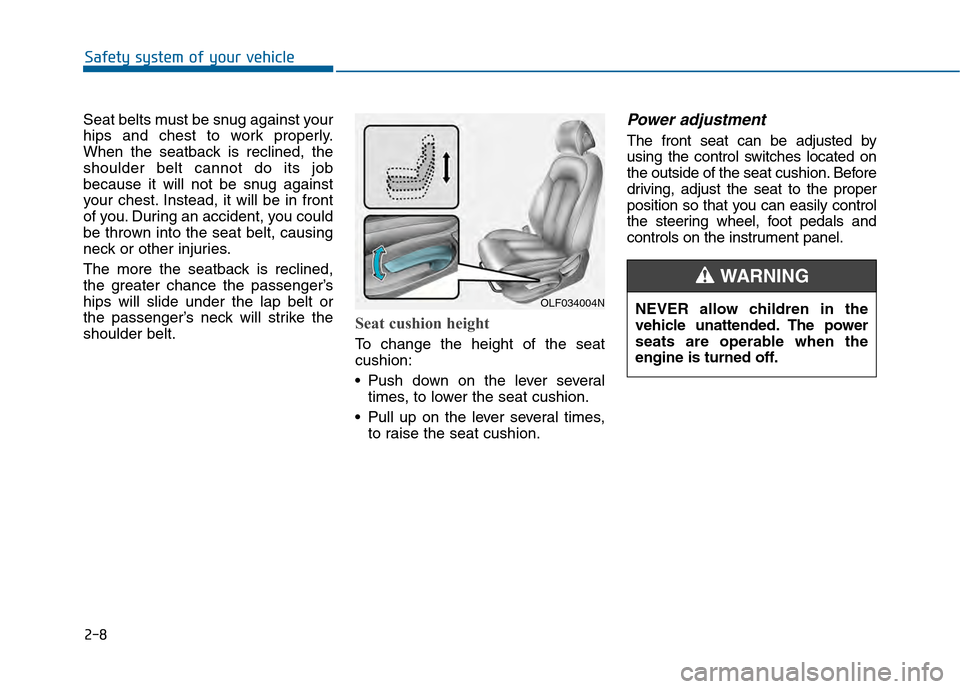
Seat cushion height
To change the height of the seat
cushion:
Push down on the lever severaltimes, to lower the seat cushion.
Pull up on the lever several times, to raise the seat cushion.
Power adjustment
The front seat can be adjusted by
using the control switches located on
the outside of the seat cushion. Before
driving, adjust the seat to the proper
position so that you can easily control
the steering wheel, foot pedals and
controls on the instrument panel.
Safety system of your vehicle
OLF034004NNEVER allow children in the
vehicle unattended. The power
seats are operable when the
engine is turned off.
WARNING
Page 47 of 603
2-20
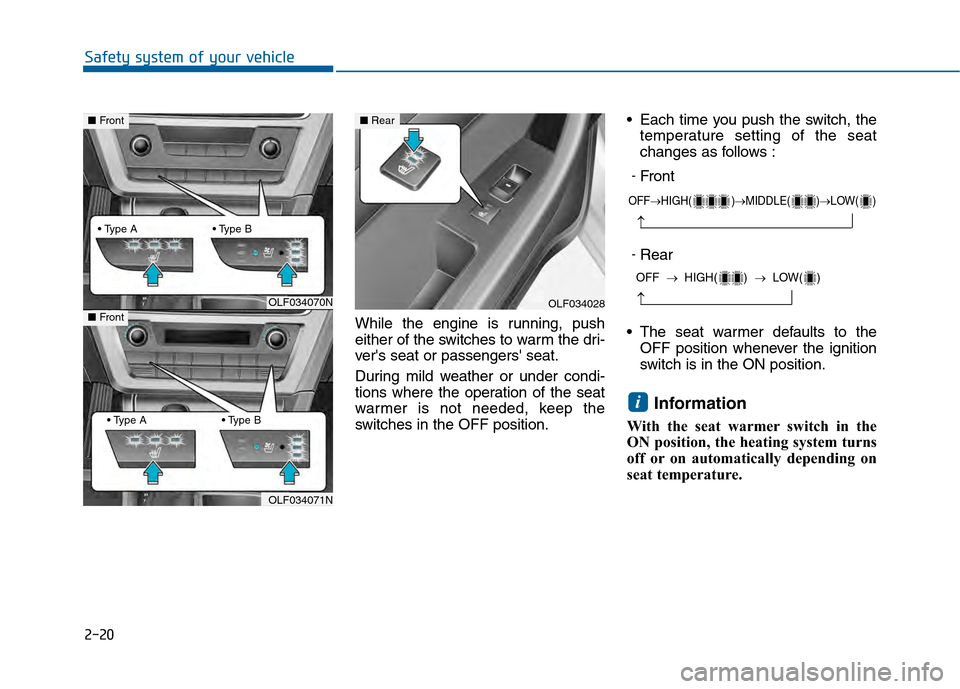
Safety system of your vehicleWhile the engine is running, push
either of the switches to warm the dri-
ver's seat or passengers' seat.
During mild weather or under condi-
tions where the operation of the seat
warmer is not needed, keep the
switches in the OFF position. Each time you push the switch, the
temperature setting of the seat
changes as follows :
The seat warmer defaults to the OFF position whenever the ignition
switch is in the ON position.
Information
With the seat warmer switch in the
ON position, the heating system turns
off or on automatically depending on
seat temperature.
i
OFF→ HIGH( )→ MIDDLE( )→ LOW( )
→
OFF → HIGH( ) → LOW( )
→OLF034070N
OLF034071N
■Front
■ FrontOLF034028
■Rear
-Rear
-Front
Page 48 of 603
2-21
Safety system of your vehicle
2
Air ventilation seats (if equipped)
The air ventilation seats are provided
to cool the front seats by blowing air
through small vent holes on the sur-
face of the seat cushions and seat-
backs.When the operation of the air ventila-
tion seats are not needed, keep the
switches in the OFF position.
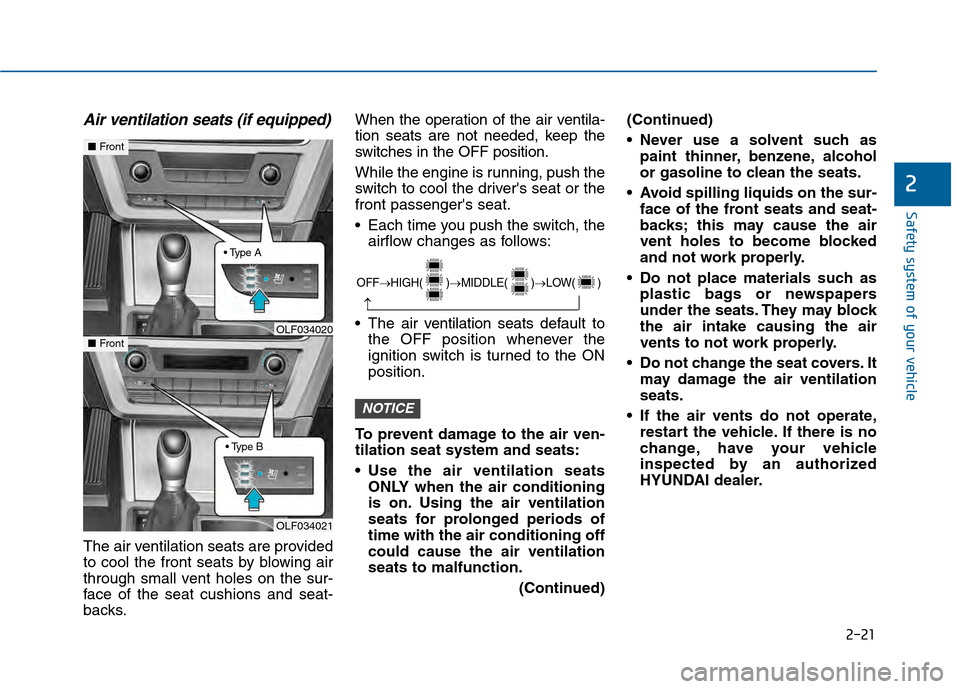
While the engine is running, push the
switch to cool the driver's seat or the
front passenger's seat.
Each time you push the switch, the
airflow changes as follows:
The air v entilation seats def ault to
the OFF position whenever the
ignition switch is turned to the ON
position.
To prevent damage to the air ven-
tilation seat system and seats:
Use the air ventilation seats ONLY when the air conditioning
is on. Using the air ventilation
seats for prolonged periods of
time with the air conditioning off
could cause the air ventilation
seats to malfunction.
(Continued)(Continued)
Never use a solvent such as
paint thinner, benzene, alcohol
or gasoline to clean the seats.
Avoid spilling liquids on the sur- face of the front seats and seat-
backs; this may cause the air
vent holes to become blocked
and not work properly.
Do not place materials such as plastic bags or newspapers
under the seats. They may block
the air intake causing the air
vents to not work properly.
Do not change the seat covers. It may damage the air ventilation
seats.
If the air vents do not operate, restart the vehicle. If there is no
change, have your vehicle
inspected by an authorized
HYUNDAI dealer.
NOTICE
OLF034021
■ Front
■Front
OLF034020
OFF→
HIGH( )→ MIDDLE( )→ LOW( )
→
Page 94 of 603
2-67
Safety system of your vehicle
2
Additional Safety Precautions
Passengers should not move out of
or change seats while the vehicle is
moving.A passenger who is not
wearing a seat belt during a crash or
emergency stop can be thrown
against the inside of the vehicle,
against other occupants, or be ejected
from the vehicle.
Do not use any accessories on seat
belts. Devices claiming to improve
occupant comfort or reposition the
seat belt can reduce the protection
provided by the seat belt and increase
the chance of serious injury in a crash
Do not modify the front seats.
Modification of the front seats could
interfere with the operation of the sup-
plemental restraint system sensing
components or side air bags.
Do not place items under the front
seats. Placing items under the front
seats could interfere with the opera-
tion of the supplemental restraint sys-
tem sensing components and wiring
harnesses.
Do not cause impact to the doors.
Impact to the doors when the Engine
Start/Stop button is in the ON position
may cause the air bags to inflate. Modifications to accommodate
disabilities.
If you require modifica-
tion to your vehicle to accommodate
a disability, contact the HYUNDAI
Customer Connect Center at 1-877-
378-8727.
Adding equipment to or modify- ing your air bag equipped vehicle
If you modify your vehicle by changing
your vehicle's frame, bumper system,
front end or side sheet metal or ride
height, this may affect the operation of
your vehicle's air bag system.
(Continued)
If components of the air bag
system must be discarded, or if
the vehicle must be scrapped,
certain safety precautions
must be observed. Consult an
authorized HYUNDAI dealer for
the necessary information.
Failure to follow these precau-
tions could increase the risk of
personal injury.
Page 117 of 603
3-22
Convenient features of your vehicle
S
ST
T E
EE
ER
R I
IN
N G
G
W
W H
HE
EE
EL
L
Electric Power Steering (EPS)
The system assists you with steering
the vehicle. If the engine is turned off
or if the power steering system
becomes inoperative, you may still
steer the vehicle, but it will require
increased steering effort.
Should you notice any change in the
effort required to steer during normal
vehicle operation, have the system
checked by an authorized HYUNDAI
dealer.
Information
The following symptoms may occur
during normal vehicle operation:
• The steering effort may be high
immediately after placing the igni-
tion switch in the ON position.
This happens as the system per-
forms the EPS system diagnostics.
When the diagnostics is completed,
the steering wheel will return to its
normal condition.
• A click noise may be heard from the EPS relay after the ignition switch is
in the ON or OFF position.
• Motor noise may be heard when the vehicle is at stop or at a low driving
speed.
• When you operate the steering wheel in low temperature, abnormal
noise may occur. If temperature
rises, the noise will disappear. This
is a normal condition.
i
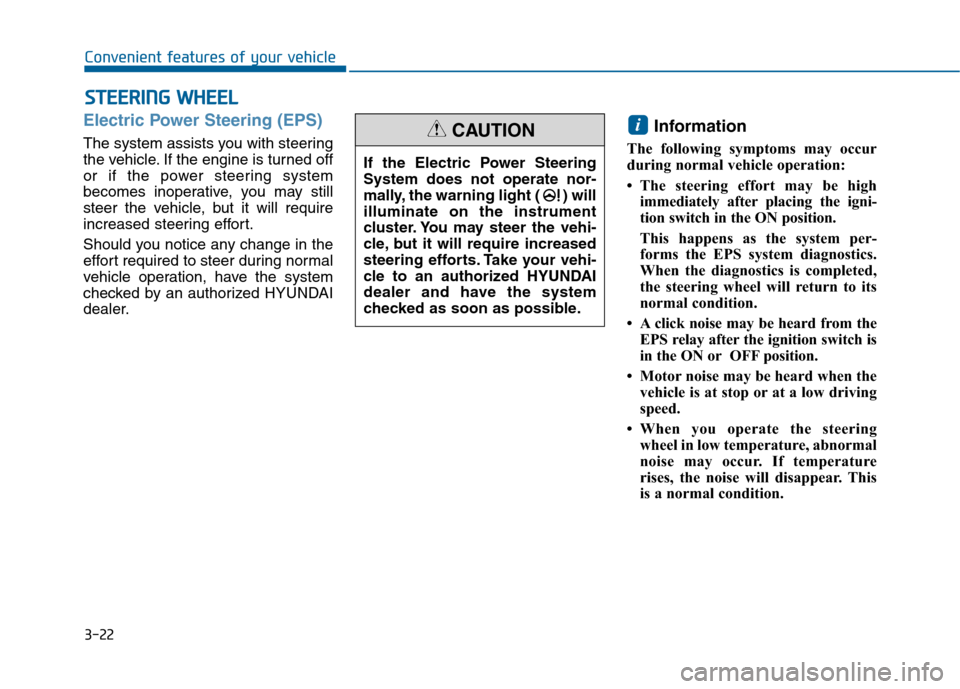
If the Electric Power Steering
System does not operate nor-
mally, the warning light ( ) will
illuminate on the instrument
cluster. You may steer the vehi-
cle, but it will require increased
steering efforts. Take your vehi-
cle to an authorized HYUNDAI
dealer and have the system
checked as soon as possible.
CAUTION
Page 118 of 603
3-23
Convenient features of your vehicle
3
Tilt Steering / Telescope Steering
Adjust the steering wheel so it points
toward your chest, not toward your
face. Make sure you can see the
instrument panel warning lights and
gauges. After adjusting, push the
steering wheel both up and down to
be certain it is locked in position.
Always adjust the position of the
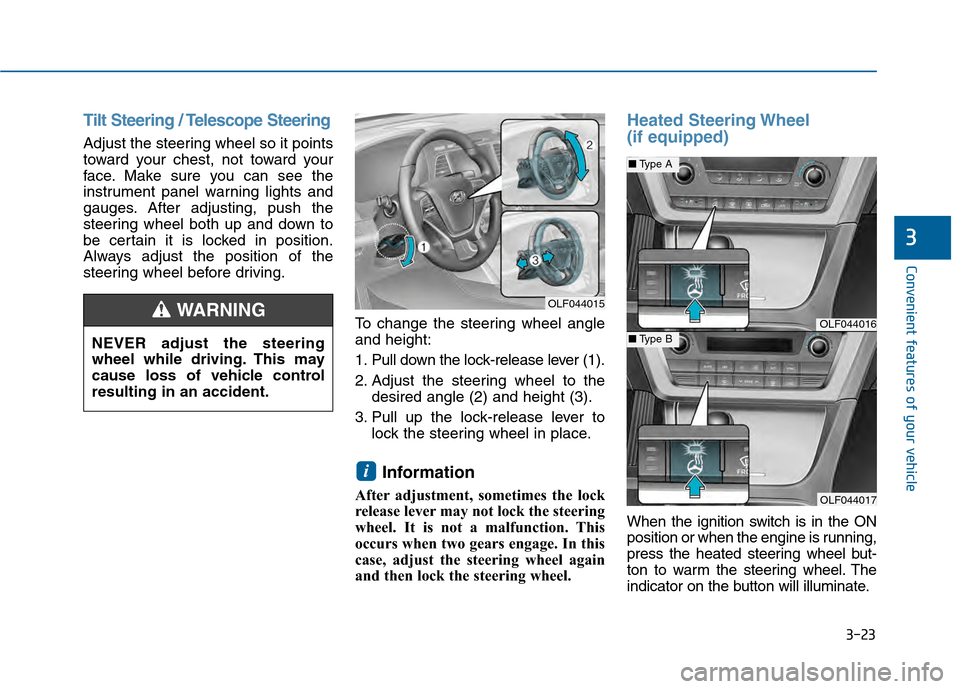
steering wheel before driving.To change the steering wheel angle
and height:
1. Pull down the lock-release lever (1).
2. Adjust the steering wheel to thedesired angle (2) and height (3).
3. Pull up the lock-release lever to lock the steering wheel in place.
Information
After adjustment, sometimes the lock
release lever may not lock the steering
wheel. It is not a malfunction. This
occurs when two gears engage. In this
case, adjust the steering wheel again
and then lock the steering wheel.
Heated Steering Wheel
(if equipped)
When the ignition switch is in the ON
position or when the engine is running,
press the heated steering wheel but-
ton to warm the steering wheel. The
indicator on the button will illuminate.
i
OLF044015
OLF044016
OLF044017
■Type A
■Type BNEVER adjust the steering
wheel while driving. This may
cause loss of vehicle control
resulting in an accident.
WARNING
Page 161 of 603
3-66
Convenient features of your vehicle
LCD Display Control
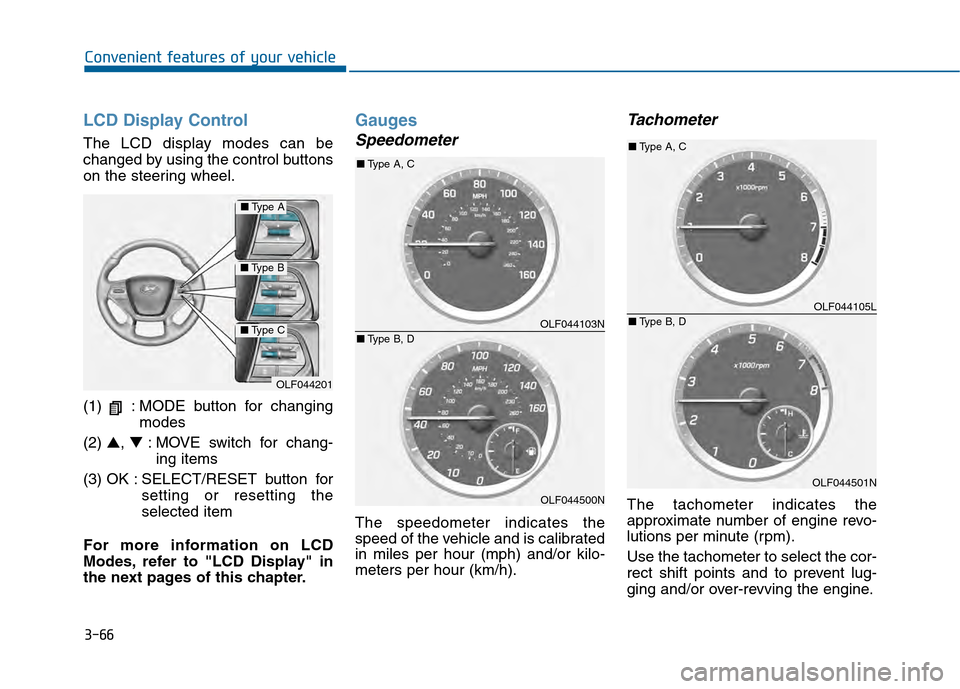
The LCD display modes can be
changed by using the control buttons
on the steering wheel.
(1) : MODE button for changingmodes
(2) ▲, ▼: MOVE switch for chang-
ing items
(3) OK : SELECT/RESET button for setting or resetting the
selected item
For more information on LCD
Modes, refer to "LCD Display" in
the next pages of this chapter.
Gauges
Speedometer
The speedometer indicates the
speed of the vehicle and is calibrated
in miles per hour (mph) and/or kilo-
meters per hour (km/h).
Tachometer
The tachometer indicates the
approximate number of engine revo-
lutions per minute (rpm).
Use the tachometer to select the cor-
rect shift points and to prevent lug-
ging and/or over-revving the engine.
OLF044201
■ Type A
■Type B
■Type COLF044103N
OLF044500N
■Type A, C
■ Type B, D
OLF044105L
OLF044501N
■Type A, C
■ Type B, D
Page 174 of 603
3-79
Convenient features of your vehicle
3
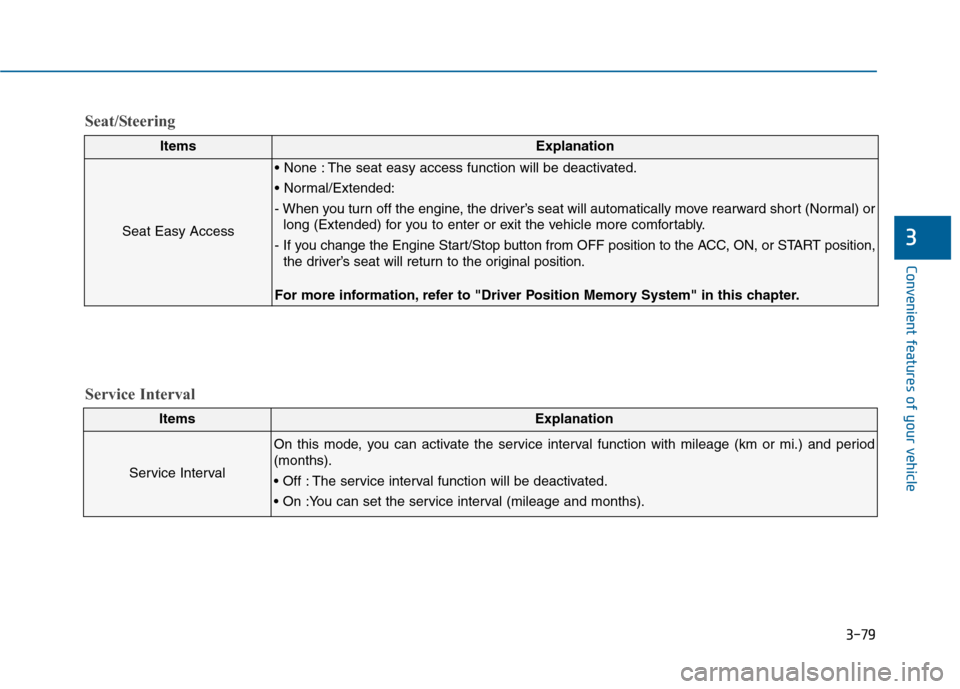
ItemsExplanation
Seat Easy Access
The seat easy access function will be deactivated.
- When you turn off the engine, the driver’s seat will automatically move rearward short (Normal) orlong (Extended) for you to enter or exit the vehicle more comfortably.
- If you change the Engine Start/Stop button from OFF position to the ACC, ON, or START position, the driver’s seat will return to the original position.
For more information, refer to "Driver Position Memory System" in this chapter.
ItemsExplanation
Service Interval
On this mode, you can activate the service interval function with mileage (km or mi.) and period
(months).
The service interval function will be deactivated.
Service Interval
Seat/Steering
Page 177 of 603
3-82
Convenient features of your vehicle
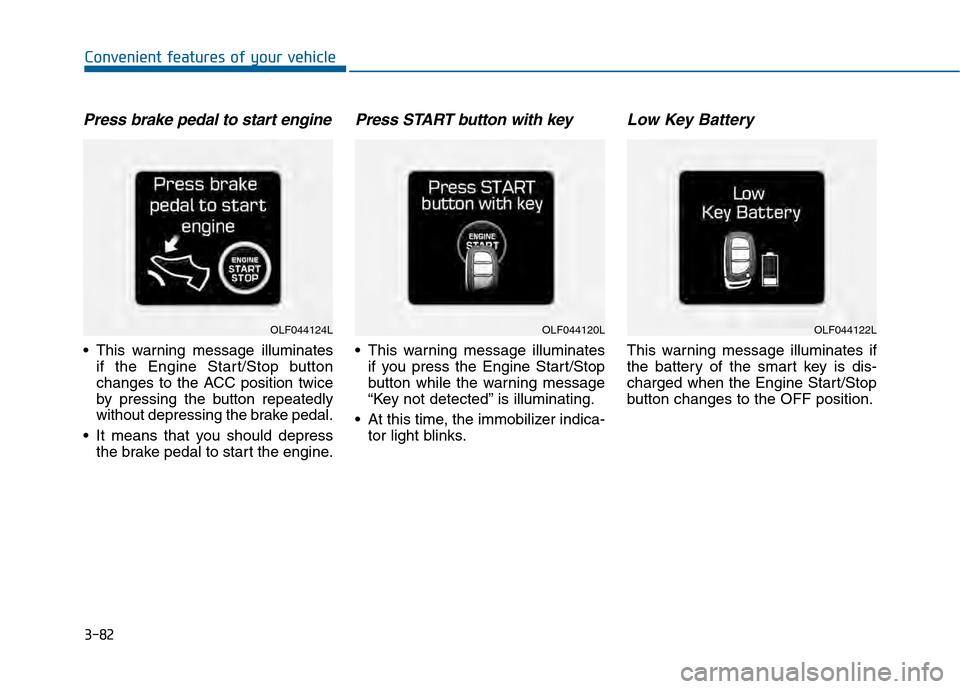
Press brake pedal to start engine
This warning message illuminatesif the Engine Start/Stop button
changes to the ACC position twice
by pressing the button repeatedly
without depressing the brake pedal.
It means that you should depress the brake pedal to start the engine.
Press START button with key
This warning message illuminatesif you press the Engine Start/Stop
button while the warning message
“Key not detected” is illuminating.
At this time, the immobilizer indica- tor light blinks.
Low Key Battery
This warning message illuminates if
the battery of the smart key is dis-
charged when the Engine Start/Stop
button changes to the OFF position.
OLF044124LOLF044120LOLF044122L
Page 226 of 603
3-131
Convenient features of your vehicle
3
System Operation
Ventilation
1. Select the Face Level mode.
2. Set the air intake control to theoutside (fresh) air position.
3. Set the temperature control to the desired position.
4. Set the fan speed control to the desired speed.
Heating
1. Select the Floor Level mode.
2. Set the air intake control to theoutside (fresh) air position.
3. Set the temperature control to the desired position.
4. Set the fan speed control to the desired speed.
5. If dehumidified heating is desired, turn the air conditioning system on.
If the windshield fogs up, select the
Floor & Defrost mode or press
the Front Defrost mode.
Operation Tips
To keep dust or unpleasant fumes from entering the car through the
ventilation system, temporarily set
the air intake control to the recircu-
lated air position. Return the con-
trol to the fresh air position when
the irritation has passed. This will
help keep the driver alert and com-
fortable.
To prevent the inside of the wind- shield from fogging, set the air
intake control to the fresh air posi-
tion and fan speed to the desired
position, turn on the air conditioning
system, and adjust the temperature
control to desired temperature.
Air conditioning
All HYUNDAI Air Conditioning
Systems are filled with environmen-
tally friendly R-134a refrigerant.
1. Start the engine.
2. Push the air conditioning button.
3. Set the mode to the Face Level mode.
4. Set the air intake control to the recirculated air position. However,
prolonged operation of the recircu-
lated air position will excessively
dry the air. In this case, change the
air position.
5. Adjust the fan speed control and temperature control to maintain
maximum comfort.
When maximum cooling is desired,
set the temperature control to the
extreme left position then set the fan
speed control to the highest speed.