clock Hyundai Sonata 2016 Owner's Manual - RHD (UK, Australia)
[x] Cancel search | Manufacturer: HYUNDAI, Model Year: 2016, Model line: Sonata, Model: Hyundai Sonata 2016Pages: 504, PDF Size: 12.45 MB
Page 16 of 504
1-5
Your vehicle at a glance
1
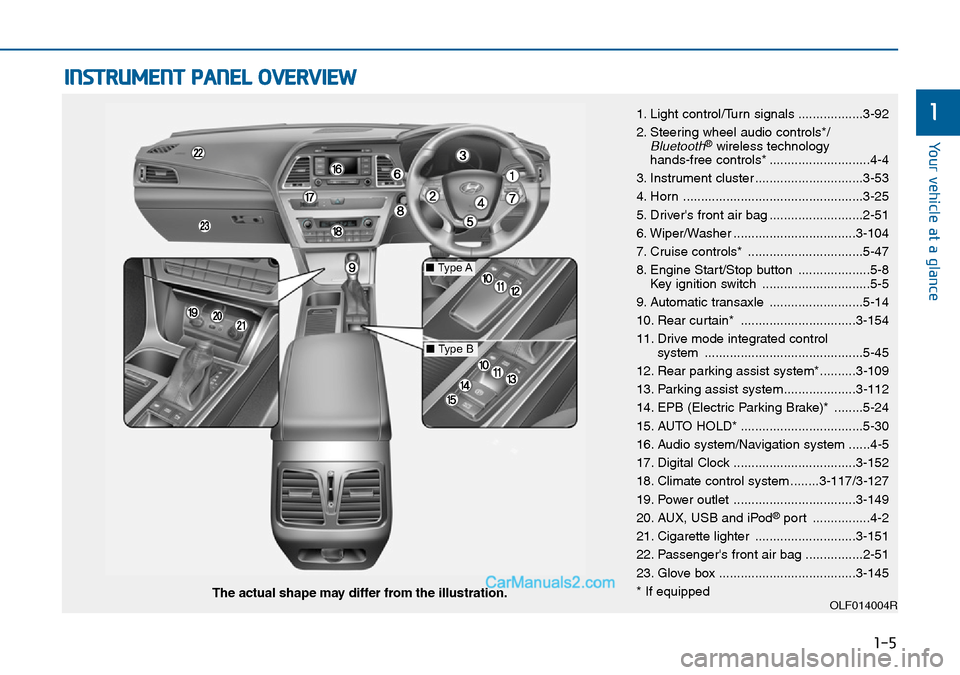
INSTRUMENT PANEL OVERVIEW
1. Light control/Turn signals ..................3-92
2. Steering wheel audio controls*/
Bluetooth®wireless technology
hands-free controls* ............................4-4
3. Instrument cluster ..............................3-53
4. Horn ..................................................3-25
5. Driver's front air bag ..........................2-51
6. Wiper/Washer ..................................3-104
7. Cruise controls* ................................5-47
8. Engine Start/Stop button ....................5-8
Key ignition switch ..............................5-5
9. Automatic transaxle ..........................5-14
10. Rear curtain* ................................3-154
11. Drive mode integrated control
system ............................................5-45
12. Rear parking assist system*..........3-109
13. Parking assist system....................3-112
14. EPB (Electric Parking Brake)* ........5-24
15. AUTO HOLD* ..................................5-30
16. Audio system/Navigation system ......4-5
17. Digital Clock ..................................3-152
18. Climate control system ........3-117/3-127
19. Power outlet ..................................3-149
20. AUX, USB and iPod
®port ................4-2
21. Cigarette lighter ............................3-151
22. Passenger's front air bag ................2-51
23. Glove box ......................................3-145
* If equipped
OLF014004RThe actual shape may differ from the illustration.
■Type A
■Type B
Page 22 of 504
To reduce the risk of serious
injury or death from an inflating
air bag, take the following pre-
cautions:
•Adjust the driver’s seat as far
to the rear as possible whilst
maintaining the ability to main-
tain full control of the vehicle.
•Adjust the front passenger
seat as far to the rear as possi-
ble.
(Continued)
WARNING
2-5
Safety system of your vehicle
2
Safety precautions
Adjusting the seats so that you are sit-
ting in a safe, comfortable position
plays an important role in driver and
passenger safety together with the
seat belts and air bags in an accident.
Air bags
You can take steps to reduce the risk
of being injured by an inflating air
bag. Sitting too close to an air bag
greatly increases the risk of injury in
the event the air bag inflates. Move
your seat as far back as possible
from front air bags, whilst still main-
taining control of the vehicle.
Do not use a cushion that
reduces friction between the seat
and the passenger. The passen-
ger's hips may slide under the
lap portion of the seat belt during
an accident or a sudden stop.
Serious or fatal internal injuries
could result because the seat
belt cannot operate properly.
WARNING
(Continued)
•Hold the steering wheel by the
rim with hands at the 9 o’clock
and 3 o’clock positions to min-
imise the risk of injuries to
your hands and arms.
•NEVER place anything
between anyone and an
airbag.
•Do not allow the front passen-
ger to place feet or legs on the
instrument panel to minimise
the risk of leg injuries.
Page 69 of 504
2-52
Safety system of your vehicle
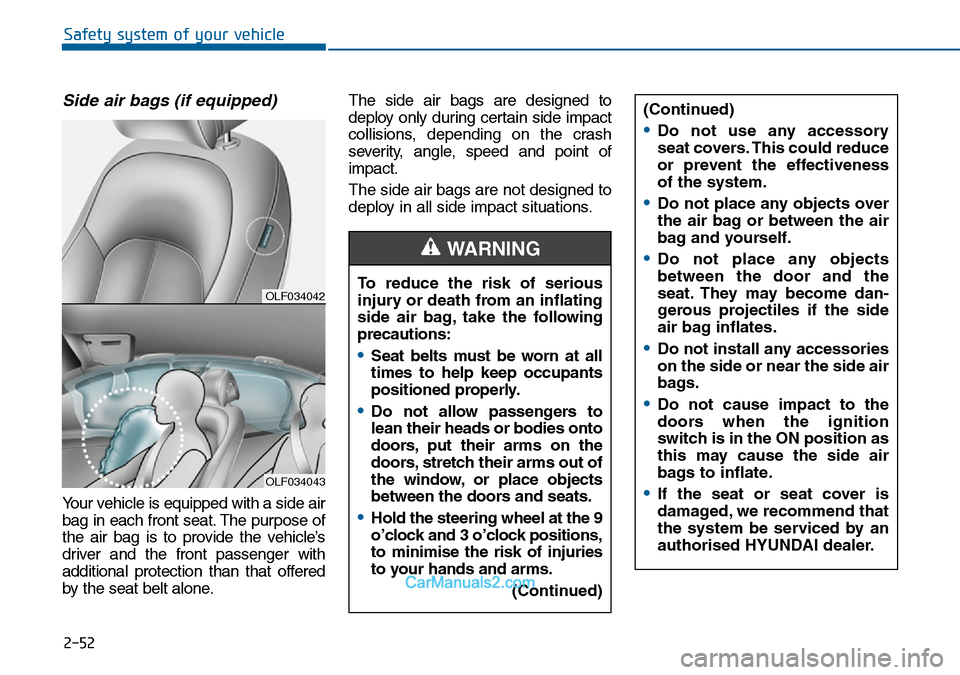
Side air bags (if equipped)
Your vehicle is equipped with a side air
bag in each front seat. The purpose of
the air bag is to provide the vehicle’s
driver and the front passenger with
additional protection than that offered
by the seat belt alone.The side air bags are designed to
deploy only during certain side impact
collisions, depending on the crash
severity, angle, speed and point of
impact.
The side air bags are not designed to
deploy in all side impact situations.
OLF034042
OLF034043
(Continued)
•Do not use any accessory
seat covers. This could reduce
or prevent the effectiveness
of the system.
•Do not place any objects over
the air bag or between the air
bag and yourself.
•Do not place any objects
between the door and the
seat. They may become dan-
gerous projectiles if the side
air bag inflates.
•Do not install any accessories
on the side or near the side air
bags.
•Do not cause impact to the
doors when the ignition
switch is in the ON position as
this may cause the side air
bags to inflate.
•If the seat or seat cover is
damaged, we recommend that
the system be serviced by an
authorised HYUNDAI dealer.
To reduce the risk of serious
injury or death from an inflating
side air bag, take the following
precautions:
•Seat belts must be worn at all
times to help keep occupants
positioned properly.
•Do not allow passengers to
lean their heads or bodies onto
doors, put their arms on the
doors, stretch their arms out of
the window, or place objects
between the doors and seats.
•Hold the steering wheel at the 9
o’clock and 3 o’clock positions,
to minimise the risk of injuries
to your hands and arms.
(Continued)
WARNING
Page 87 of 504
Convenient features of your vehicle
3
Interior features.................................................3-147
Ashtray ............................................................................3-147
Cup holder.......................................................................3-147
Sunvisor ...........................................................................3-149
Power outlet ...................................................................3-149
Cigarette lighter ............................................................3-151
Clock .................................................................................3-152
Clothes hanger ..............................................................3-153
Floor mat anchor(s)......................................................3-153
Rear curtain....................................................................3-154
Side curtain.....................................................................3-155
3
Page 133 of 504
3-49
Convenient features of your vehicle
3
Information
• The Smart Boot function will not
work if any of the following occurs:
- The smart key is close to a radio
transmitter such as a radio station
or an airport which can interfere
with normal operation of the
transmitter.
- The smart key is near a mobile two
way radio system or a mobile
phone.
- Another vehicle's smart key is
being operated close to your vehi-
cle.
• The detecting range may decrease
or increase when :
- One side of the tyre is raised to
replace a tyre or to inspect the
vehicle.
- The vehicle is slantingly parked on
a slope or unpaved road, etc.
Fuel filler door
Opening the fuel filler door
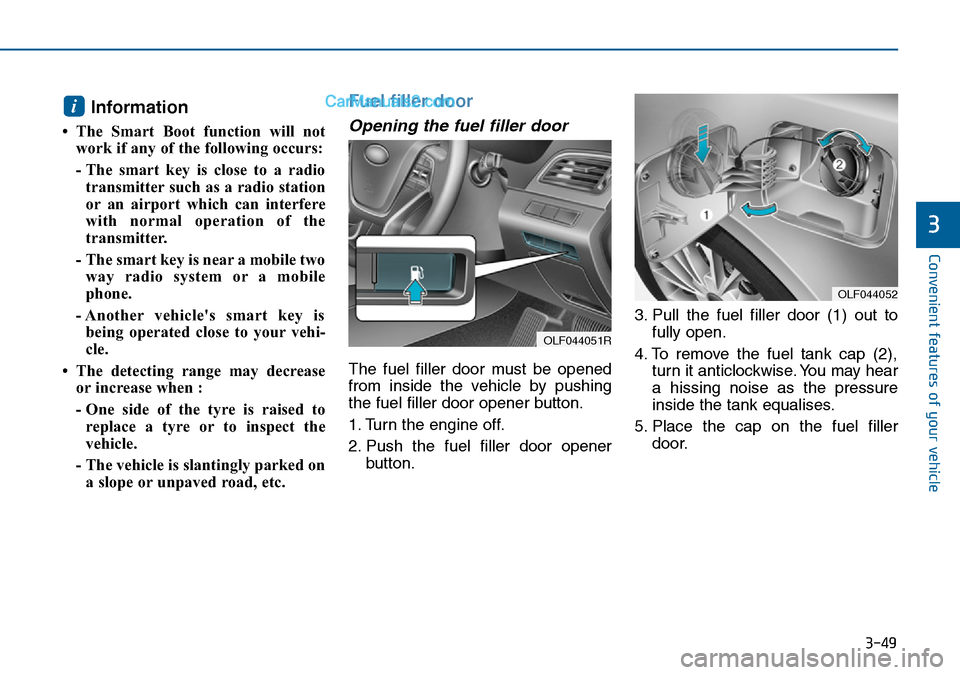
The fuel filler door must be opened
from inside the vehicle by pushing
the fuel filler door opener button.
1. Turn the engine off.
2. Push the fuel filler door opener
button.3. Pull the fuel filler door (1) out to
fully open.
4. To remove the fuel tank cap (2),
turn it anticlockwise. You may hear
a hissing noise as the pressure
inside the tank equalises.
5. Place the cap on the fuel filler
door.
i
OLF044052
OLF044051R
Page 134 of 504
3-50
Convenient features of your vehicle
Information
If the fuel filler door does not open
because ice has formed around it, tap
lightly or push on the door to break
the ice and release the door. Do not
pry on the door. If necessary, spray
around the door with an approved de-
icer fluid (do not use radiator anti-
freeze) or move the vehicle to a warm
place and allow the ice to melt.
Closing the fuel filler door
1. To install the fuel tank cap, turn it
clockwise until it “clicks” one time.
2. Close the fuel filler door until it is
latched securely.i
Petrol is highly flammable and
explosive. Failure to follow
these guidelines may result in
SERIOUS INJURY or DEATH:
•Read and follow all warnings
posted at the gas station.
•Before refuelling, note the
location of the Emergency
Petrol Shut-Off, if available, at
the gas station.
•Before touching the fuel noz-
zle, you should eliminate the
potential build-up of static
electricity by touching a metal
part of the vehicle, a safe dis-
tance away from the fuel filler
neck, nozzle, or other gas
source, with your bare hand.
(Continued)
WARNING
(Continued)
•Do not use mobile phones
whilst refuelling. Electric cur-
rent and/or electronic interfer-
ence from mobile phones can
potentially ignite fuel vapours
and cause a fire.
•Do not get back into a vehicle
once you have begun refu-
elling. You can generate a
build-up of static electricity by
touching, rubbing or sliding
against any item or fabric capa-
ble of producing static electric-
ity. Static electricity discharge
can ignite fuel vapours causing
a fire. If you must re-enter the
vehicle, you should once again
eliminate potentially danger-
ous static electricity discharge
by touching a metal part of the
vehicle, away from the fuel filler
neck, nozzle or other petrol
source, with your bare hand.
(Continued)
Page 231 of 504
3-147
Convenient features of your vehicle
3
INTERIOR FEATURES
Ashtray (if equipped)
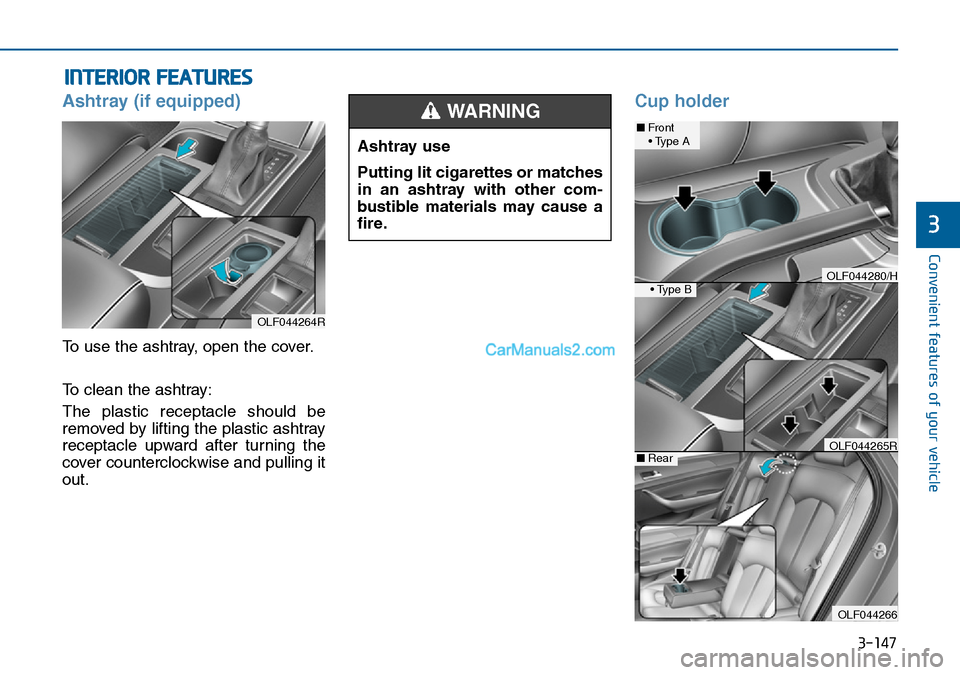
To use the ashtray, open the cover.
To clean the ashtray:
The plastic receptacle should be
removed by lifting the plastic ashtray
receptacle upward after turning the
cover counterclockwise and pulling it
out.
Cup holder
OLF044264R
Ashtray use
Putting lit cigarettes or matches
in an ashtray with other com-
bustible materials may cause a
fire.
WARNING ■Front
• Type A
• Type B
■Rear
OLF044266
OLF044280/H
OLF044265R
Page 236 of 504
3-152
Convenient features of your vehicle
Clock
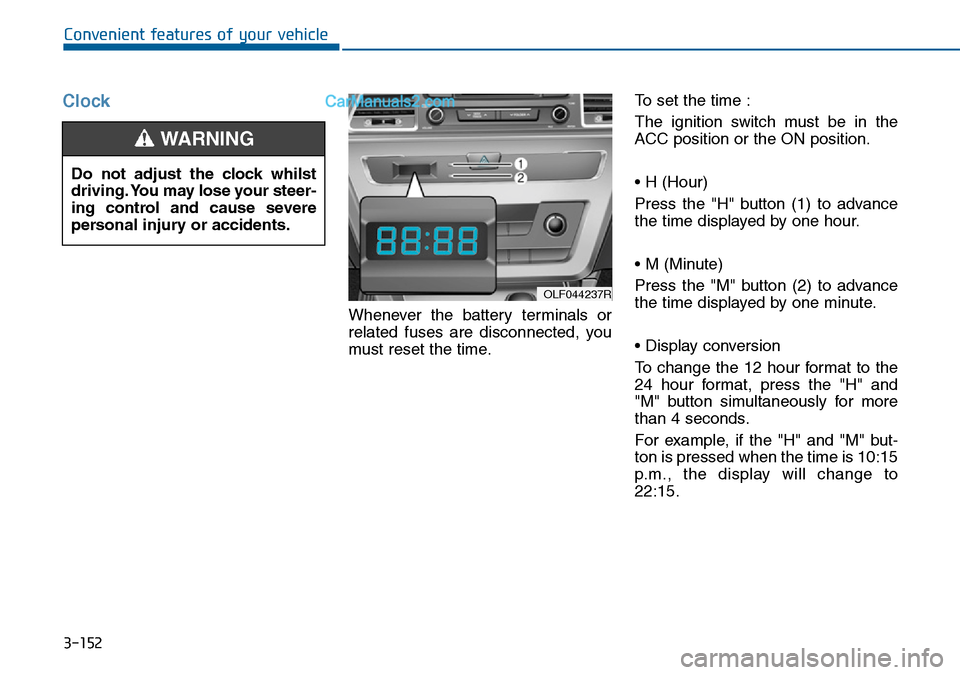
Whenever the battery terminals or
related fuses are disconnected, you
must reset the time.To set the time :
The ignition switch must be in the
ACC position or the ON position.
• H (Hour)
Press the "H" button (1) to advance
the time displayed by one hour.
• M (Minute)
Press the "M" button (2) to advance
the time displayed by one minute.
• Display conversion
To change the 12 hour format to the
24 hour format, press the "H" and
"M" button simultaneously for more
than 4 seconds.
For example, if the "H" and "M" but-
ton is pressed when the time is 10:15
p.m., the display will change to
22:15.
OLF044237R
Do not adjust the clock whilst
driving. You may lose your steer-
ing control and cause severe
personal injury or accidents.
WARNING
Page 311 of 504
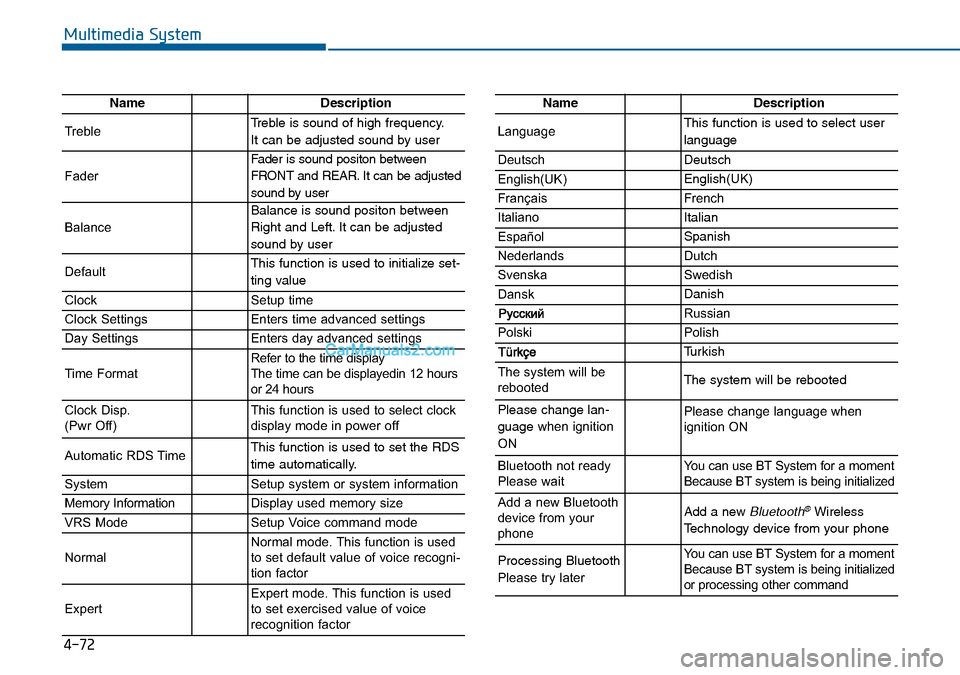
4-72
Multimedia System
NameDescription
TrebleTreble is sound of high frequency.
It can be adjusted sound by user
Fader
Fader is sound positon between
FRONT and REAR. It can be adjusted
sound by user
Balance
Balance is sound positon between
Right and Left. It can be adjusted
sound by user
DefaultThis function is used to initialize set-
ting value
ClockSetup time
Clock SettingsEnters time advanced settings
Day SettingsEnters day advanced settings
Time FormatRefer to the time display
The time can be displayedin 12 hours
or 24 hours
Clock Disp.
(Pwr Off)This function is used to select clock
display mode in power off
Automatic RDS TimeThis function is used to set the RDS
time automatically.
SystemSetup system or system information
Memory InformationDisplay used memory size
VRS ModeSetup Voice command mode
NormalNormal mode. This function is used
to set default value of voice recogni-
tion factor
ExpertExpert mode. This function is used
to set exercised value of voice
recognition factor
NameDescription
LanguageThis function is used to select user
language
DeutschDeutsch
English(UK)English(UK)
FrançaisFrench
Italiano Italian
EspañolSpanish
NederlandsDutch
SvenskaSwedish
DanskDanish
Russian
PolskiPolish
Turkish
The system will be
rebootedThe system will be rebooted
Please change lan-
guage when ignition
ONPlease change language when
ignition ON
Bluetooth not ready
Please waitYou can use BT System for a moment
Because BT system is being initialized
Add a new Bluetooth
device from your
phoneAdd a new Bluetooth®Wireless
Technology device from your phone
Processing Bluetooth
Please try laterYou can use BT System for a moment
Because BT system is being initialized
or processing other command
Page 399 of 504
6-8
What to do in an emergency
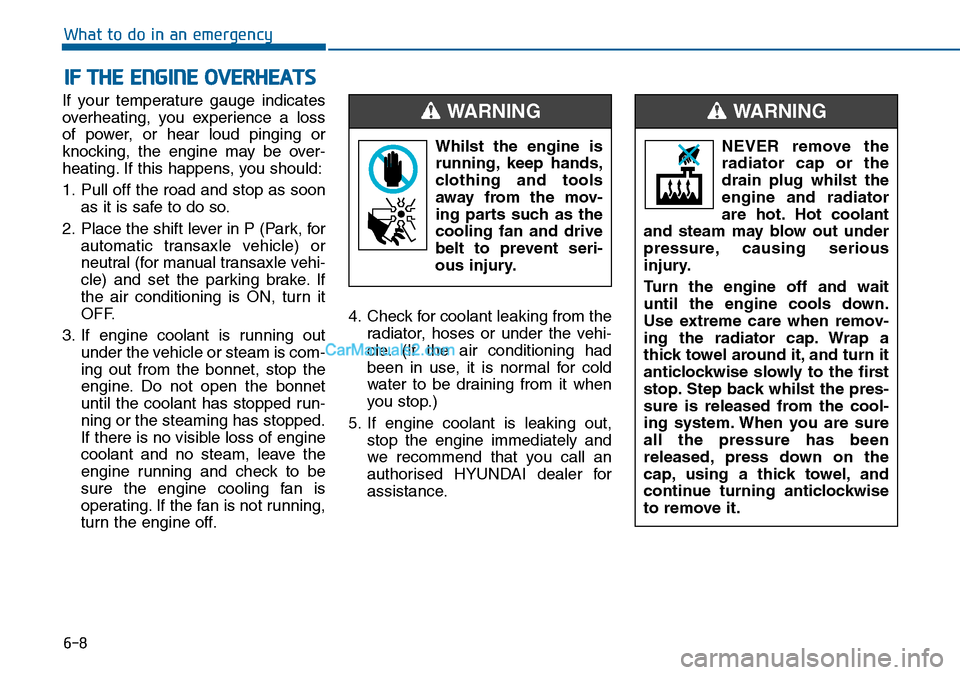
If your temperature gauge indicates
overheating, you experience a loss
of power, or hear loud pinging or
knocking, the engine may be over-
heating. If this happens, you should:
1. Pull off the road and stop as soon
as it is safe to do so.
2. Place the shift lever in P (Park, for
automatic transaxle vehicle) or
neutral (for manual transaxle vehi-
cle) and set the parking brake. If
the air conditioning is ON, turn it
OFF.
3. If engine coolant is running out
under the vehicle or steam is com-
ing out from the bonnet, stop the
engine. Do not open the bonnet
until the coolant has stopped run-
ning or the steaming has stopped.
If there is no visible loss of engine
coolant and no steam, leave the
engine running and check to be
sure the engine cooling fan is
operating. If the fan is not running,
turn the engine off.4. Check for coolant leaking from the
radiator, hoses or under the vehi-
cle. (If the air conditioning had
been in use, it is normal for cold
water to be draining from it when
you stop.)
5. If engine coolant is leaking out,
stop the engine immediately and
we recommend that you call an
authorised HYUNDAI dealer for
assistance.
IF THE ENGINE OVERHEATS
Whilst the engine is
running, keep hands,
clothing and tools
away from the mov-
ing parts such as the
cooling fan and drive
belt to prevent seri-
ous injury.
WARNING
NEVER remove the
radiator cap or the
drain plug whilst the
engine and radiator
are hot. Hot coolant
and steam may blow out under
pressure, causing serious
injury.
Turn the engine off and wait
until the engine cools down.
Use extreme care when remov-
ing the radiator cap. Wrap a
thick towel around it, and turn it
anticlockwise slowly to the first
stop. Step back whilst the pres-
sure is released from the cool-
ing system. When you are sure
all the pressure has been
released, press down on the
cap, using a thick towel, and
continue turning anticlockwise
to remove it.
WARNING