ENGINE LIGHT Hyundai Sonata 2017 Owner's Manual
[x] Cancel search | Manufacturer: HYUNDAI, Model Year: 2017, Model line: Sonata, Model: Hyundai Sonata 2017Pages: 563, PDF Size: 17.7 MB
Page 16 of 563
I
IN
N S
ST
T R
R U
U M
M E
EN
N T
T
P
P A
A N
N E
EL
L
O
O V
VE
ER
R V
V I
IE
E W
W
1-5
Your vehicle at a glance
1
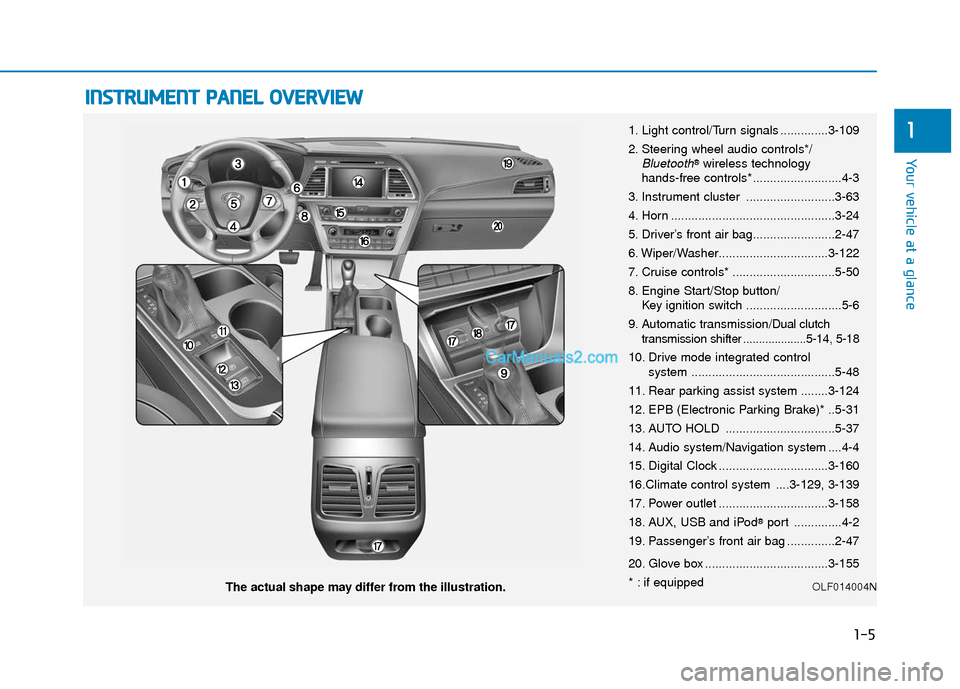
The actual shape may differ from the illustration. 1. Light control/Turn signals ..............3-109
2. Steering wheel audio controls*/
Bluetooth®wireless technology
hands-free controls* ..........................4-3
3. Instrument cluster ..........................3-63
4. Horn ................................................3-24
5. Driver’s front air bag........................2-47
6. Wiper/Washer................................3-122
7. Cruise controls* ..............................5-50
8. Engine Start/Stop button/ Key ignition switch ............................5-6
9. Automatic transmission/
Dual clutch
transmission shifter ....................5-14, 5-18
10. Drive mode integrated control system ..........................................5-48
11. Rear parking assist system ........3-124
12. EPB (Electronic Parking Brake)* ..5-31
13. AUTO HOLD ................................5-37
14. Audio system/Navigation system ....4-4
15. Digital Clock ................................3-160
16.Climate control system ....3-129, 3-139
17. Power outlet ................................3-158
18. AUX, USB and iPod
®port ..............4-2
19. Passenger’s front air bag ..............2-47
20. Glove box ....................................3-155
* : if equipped
OLF014004N
Page 68 of 563
2-51
Safety system of your vehicle
2
How Does the Air Bag System
Operate?
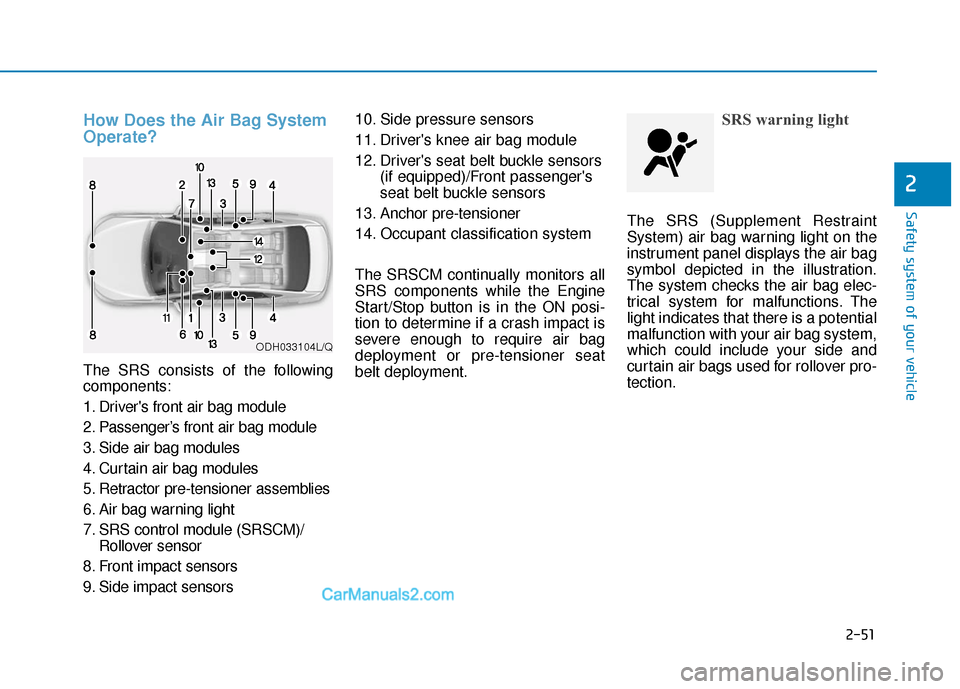
The SRS consists of the following
components:
1. Driver's front air bag module
2. Passenger’s front air bag module
3. Side air bag modules
4. Curtain air bag modules
5. Retractor pre-tensioner assemblies
6. Air bag warning light
7. SRS control module (SRSCM)/Rollover sensor
8. Front impact sensors
9. Side impact sensors 10. Side pressure sensors
11. Driver's knee air bag module
12. Driver's seat belt buckle sensors
(if equipped)/Front passenger's
seat belt buckle sensors
13. Anchor pre-tensioner
14. Occupant classification system
The SRSCM continually monitors all
SRS components while the Engine
Start/Stop button is in the ON posi-
tion to determine if a crash impact is
severe enough to require air bag
deployment or pre-tensioner seat
belt deployment.
SRS warning light
The SRS (Supplement Restraint
System) air bag warning light on the
instrument panel displays the air bag
symbol depicted in the illustration.
The system checks the air bag elec-
trical system for malfunctions. The
light indicates that there is a potential
malfunction with your air bag system,
which could include your side and
curtain air bags used for rollover pro-
tection.
ODH033104L/Q
Page 69 of 563
2-52
Safety system of your vehicleDuring a frontal collision, sensors will
detect the vehicle’s deceleration. If
the rate of deceleration is high
enough, the control unit will inflate
the front air bags.
The front air bags help protect the
driver and front passenger by
responding to frontal impacts in
which seat belts alone cannot pro-
vide adequate restraint. When need-
ed, the side air bags help provide
protection in the event of a side
impact or rollover.
Air bags are activated (able toinflate if necessary) only when the
ignition switch is in the ON position.
Air bags inflate in the event of cer- tain frontal or side collisions to help
protect the occupants from serious
physical injury.
There is no single speed at which the air bags will inflate. Generally,
air bags are designed to inflate
based upon the severity of a colli-
sion and its direction. These two
factors determine whether the sen-
sors produce an electronic deploy-
ment/inflation signal. Air bag deployment depends on a
number of factors including vehicle
speed, angles of impact and the
density and stiffness of the vehicles
or objects which your vehicle
impacts during a collision. The
determining factors are not limited
to those mentioned above.
The front air bags will completely inflate and deflate in an instant. It is
virtually impossible for you to see
the air bags inflate during an acci-
dent. It is much more likely that you
will simply see the deflated air bags
hanging out of their storage com-
partments after the collision.
In addition to inflating in certain side collisions, vehicles equipped
with a rollover sensor, side and
curtain air bags will inflate if the
sensing system detects a rollover.
When a rollover is detected, side
and curtain air bags will remain
inflated longer to help provide pro-
tection from ejection, especially
when used in conjunction with the
seat belts.
If your SRS malfunctions, the air
bag may not inflate properly dur-
ing an accident increasing the
risk of serious injury or death.
If any of the following condi-
tions occur, your SRS is mal-
functioning:
The light does not turn on for
approximately six seconds
when the ignition switch is in
the ON position.
The light stays on after illumi-
nating for approximately six
seconds.
The light comes on while the
vehicle is in motion.
The light blinks when the
engine is running.
Have an authorized HYUNDAI
dealer inspect the SRS as soon
as possible if any of these con-
ditions occur.
WARNING
Page 83 of 563
2-66
Safety system of your vehicle
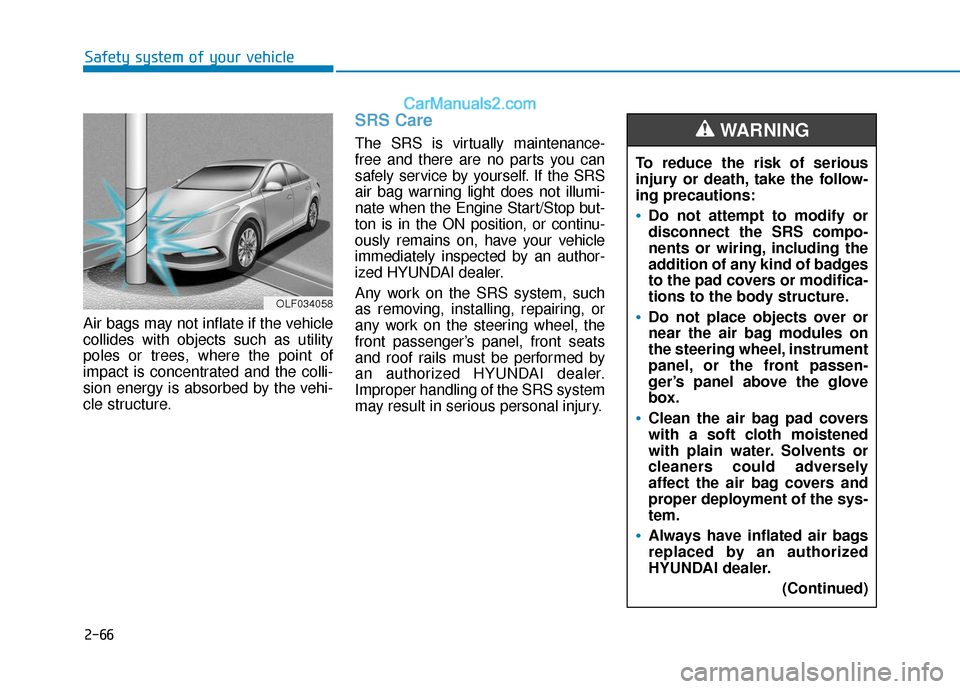
Air bags may not inflate if the vehicle
collides with objects such as utility
poles or trees, where the point of
impact is concentrated and the colli-
sion energy is absorbed by the vehi-
cle structure.
SRS Care
The SRS is virtually maintenance-
free and there are no parts you can
safely service by yourself. If the SRS
air bag warning light does not illumi-
nate when the Engine Start/Stop but-
ton is in the ON position, or continu-
ously remains on, have your vehicle
immediately inspected by an author-
ized HYUNDAI dealer.
Any work on the SRS system, such
as removing, installing, repairing, or
any work on the steering wheel, the
front passenger’s panel, front seats
and roof rails must be performed by
an authorized HYUNDAI dealer.
Improper handling of the SRS system
may result in serious personal injury. To reduce the risk of serious
injury or death, take the follow-
ing precautions:
Do not attempt to modify or
disconnect the SRS compo-
nents or wiring, including the
addition of any kind of badges
to the pad covers or modifica-
tions to the body structure.
Do not place objects over or
near the air bag modules on
the steering wheel, instrument
panel, or the front passen-
ger’s panel above the glove
box.
Clean the air bag pad covers
with a soft cloth moistened
with plain water. Solvents or
cleaners could adversely
affect the air bag covers and
proper deployment of the sys-
tem.
Always have inflated air bags
replaced by an authorized
HYUNDAI dealer.
(Continued)
WARNING
OLF034058
Page 89 of 563
3-4
Convenient features of your vehicle
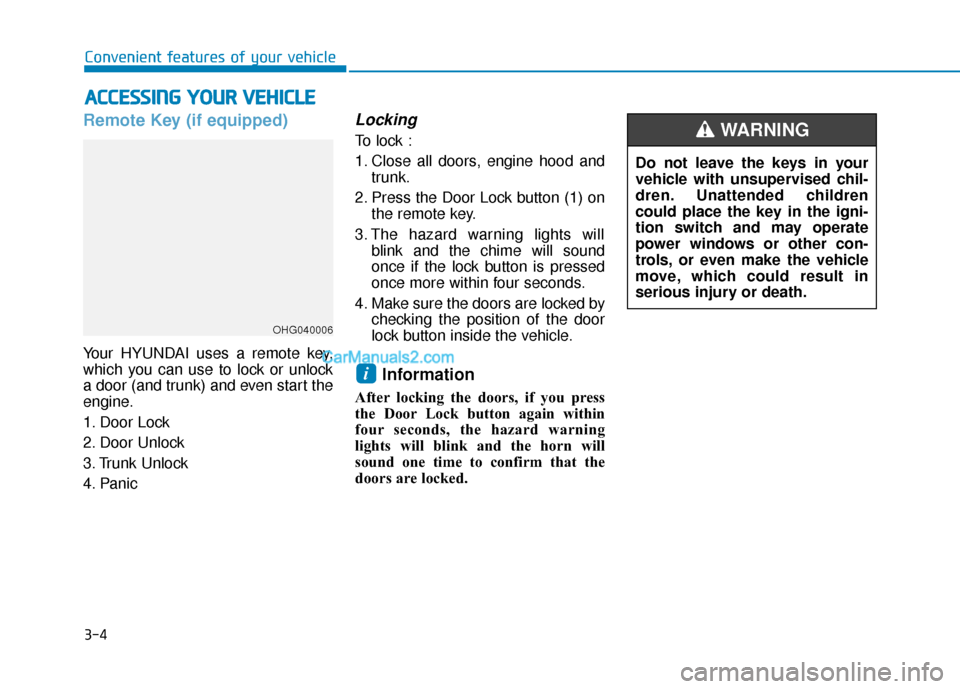
Remote Key (if equipped)
Your HYUNDAI uses a remote key,
which you can use to lock or unlock
a door (and trunk) and even start the
engine.
1. Door Lock
2. Door Unlock
3. Trunk Unlock
4. Panic
Locking
To lock :
1. Close all doors, engine hood andtrunk.
2. Press the Door Lock button (1) on the remote key.
3. The hazard warning lights will blink and the chime will sound
once if the lock button is pressed
once more within four seconds.
4. Make sure the doors are locked by checking the position of the door
lock button inside the vehicle.
Information
After locking the doors, if you press
the Door Lock button again within
four seconds, the hazard warning
lights will blink and the horn will
sound one time to confirm that the
doors are locked.
i
A AC
CC
CE
E S
SS
SI
IN
N G
G
Y
Y O
O U
UR
R
V
V E
EH
H I
IC
C L
LE
E
OHG040006
Do not leave the keys in your
vehicle with unsupervised chil-
dren. Unattended children
could place the key in the igni-
tion switch and may operate
power windows or other con-
trols, or even make the vehicle
move, which could result in
serious injury or death.
WARNING
Page 93 of 563
3-8
Convenient features of your vehicle
Smart Key (if equipped)
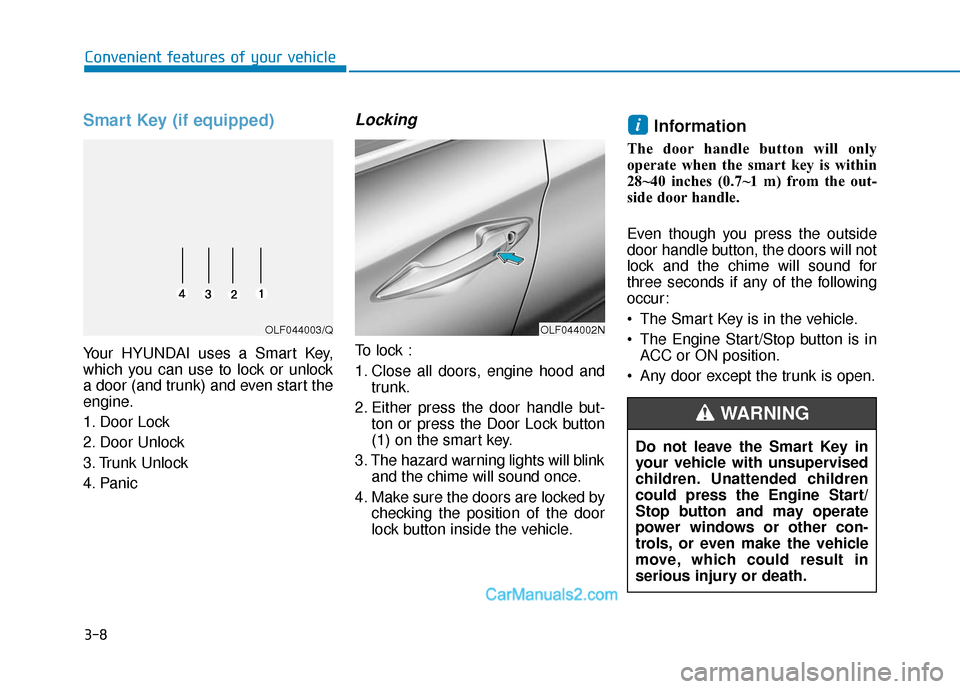
Your HYUNDAI uses a Smart Key,
which you can use to lock or unlock
a door (and trunk) and even start the
engine.
1. Door Lock
2. Door Unlock
3. Trunk Unlock
4. Panic
Locking
To lock :
1. Close all doors, engine hood andtrunk.
2. Either press the door handle but- ton or press the Door Lock button
(1) on the smart key.
3. The hazard warning lights will blink and the chime will sound once.
4. Make sure the doors are locked by checking the position of the door
lock button inside the vehicle.
Information
The door handle button will only
operate when the smart key is within
28~40 inches (0.7~1 m) from the out-
side door handle.
Even though you press the outside
door handle button, the doors will not
lock and the chime will sound for
three seconds if any of the following
occur:
The Smart Key is in the vehicle.
The Engine Start/Stop button is inACC or ON position.
Any door except the trunk is open.
i
OLF044002NOLF044003/Q
Do not leave the Smart Key in
your vehicle with unsupervised
children. Unattended children
could press the Engine Start/
Stop button and may operate
power windows or other con-
trols, or even make the vehicle
move, which could result in
serious injury or death.
WARNING
Page 95 of 563
3-10
Convenient features of your vehicle
Panic button
Press the Panic button (4) and hold
for more than one second. The horn
sounds and hazard warning lights
blink for about 30 seconds. To cancel
the panic mode, press any button on
the Smart Key.
Start-up
You can start the engine without
inserting the key.
For more information, refer to the
“Engine Start/Stop Button” sec-
tion in chapter 5.
To prevent damaging the smart key:
Keep the smart key away fromwater or any liquid and fire. If the
inside of the smart key gets
damp (due to drinks or mois-
ture), or is heated, internal cir-
cuit may malfunction, excluding
the car from the warranty.
Avoid dropping or throwing the smart key.
Protect the smart key from extreme temperatures.
Mechanical key
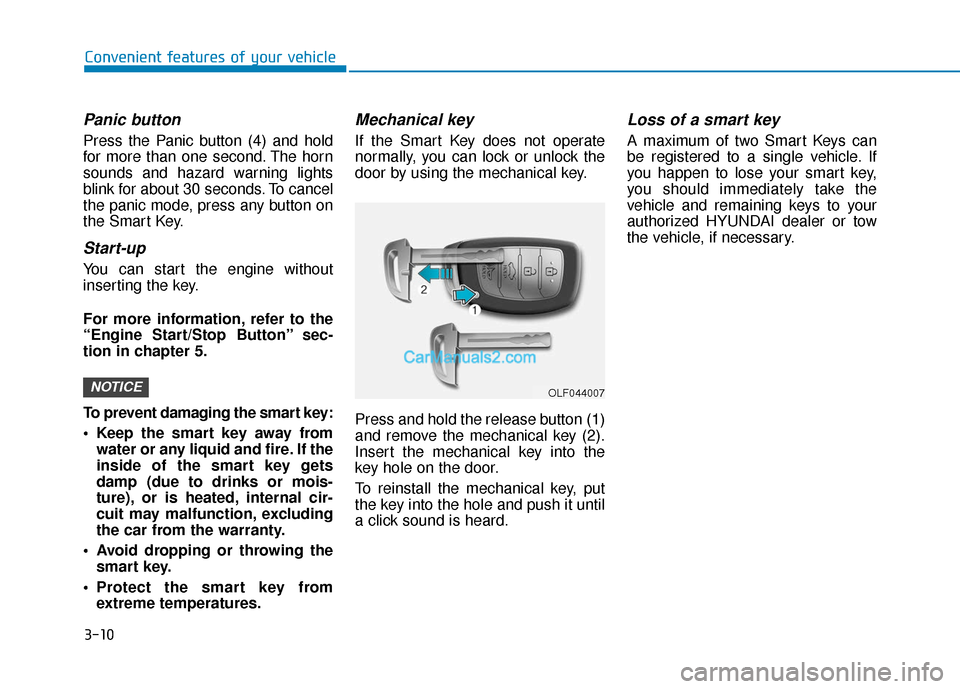
If the Smart Key does not operate
normally, you can lock or unlock the
door by using the mechanical key.
Press and hold the release button (1)
and remove the mechanical key (2).
Insert the mechanical key into the
key hole on the door.
To reinstall the mechanical key, put
the key into the hole and push it until
a click sound is heard.
Loss of a smart key
A maximum of two Smart Keys can
be registered to a single vehicle. If
you happen to lose your smart key,
you should immediately take the
vehicle and remaining keys to your
authorized HYUNDAI dealer or tow
the vehicle, if necessary.
NOTICEOLF044007
Page 104 of 563
3-19
Convenient features of your vehicle
This system helps to protect your
vehicle and valuables. The horn will
sound and the hazard warning lights
will blink continuously if any of the
following occurs:
- A door is opened without using theremote key or smart key.
- The trunk is opened without using the remote key or smart key.
- The engine hood is opened.
The alarm continues for 30 seconds, then the system resets. To turn off
the alarm, unlock the doors with
the remote key or smart key.
The Theft Alarm System automati-
cally sets 30 seconds after you lock
the doors and the trunk. For the sys-
tem to activate, you must lock the
doors and the trunk from outside the
vehicle with the remote key or smart
key or by pressing the button on the
outside of the door handles with the
smart key in your possession.
The hazard warning lights will blink
and the chime will sound once to
indicate the system is armed. Once the security system is set,
opening any door, the trunk, or the
hood without using the remote key or
smart key will cause the alarm to
activate.
The Theft Alarm System will not set if
the hood, the trunk, or any door is
not fully closed. If the system will not
set, check the hood, the trunk, or the
doors are fully closed.
Do not attempt to alter this system or
add other devices to it.Information
• Do not lock the doors until all pas-
sengers have left the vehicle. If the
remaining passenger leaves the
vehicle when the system is armed,
the alarm will be activated.
• If the vehicle is not disarmed with the remote key or smart key, open the
doors by using the mechanical key
and place the ignition switch in the
ON position (for remote key) or start
the engine (for smart key) by direct-
ly pressing the ignition switch with
the smart key.
• When the system is disarmed but a door or trunk is not opened within 30
seconds, the system will be rearmed.
i
T TH
H E
EF
FT
T -
-A
A L
LA
A R
RM
M
S
S Y
Y S
ST
T E
EM
M
3
Page 107 of 563
3-22
Convenient features of your vehicle
S
ST
T E
EE
ER
R I
IN
N G
G
W
W H
HE
EE
EL
L
Electric Power Steering (EPS)
The system assists you with steering
the vehicle. If the engine is turned off
or if the power steering system
becomes inoperative, you may still
steer the vehicle, but it will require
increased steering effort.
Should you notice any change in the
effort required to steer during normal
vehicle operation, have the system
checked by an authorized HYUNDAI
dealer.
Information
The following symptoms may occur
during normal vehicle operation:
• The steering effort may be high
immediately after placing the igni-
tion switch in the ON position.
This happens as the system per-
forms the EPS system diagnostics.
When the diagnostics is completed,
the steering wheel will return to its
normal condition.
• A click noise may be heard from the EPS relay after the ignition switch is
in the ON or OFF position.
• Motor noise may be heard when the vehicle is at a stop or at a low driv-
ing speed.
• When you operate the steering wheel in low temperature, abnormal
noise may occur. If temperature
rises, the noise will disappear. This
is a normal condition.
i
If the Electric Power Steering
System does not operate nor-
mally, the warning light ( ) will
illuminate on the instrument
cluster. You may steer the vehi-
cle, but it will require increased
steering efforts. Take your vehi-
cle to an authorized HYUNDAI
dealer and have the system
checked as soon as possible.
CAUTION
Page 108 of 563
3-23
Convenient features of your vehicle
3
Tilt Steering / Telescope Steering
Adjust the steering wheel so it points
toward your chest, not toward your
face. Make sure you can see the
instrument panel warning lights and
gauges. After adjusting, push the
steering wheel both up and down to
be certain it is locked in position.
Always adjust the position of the
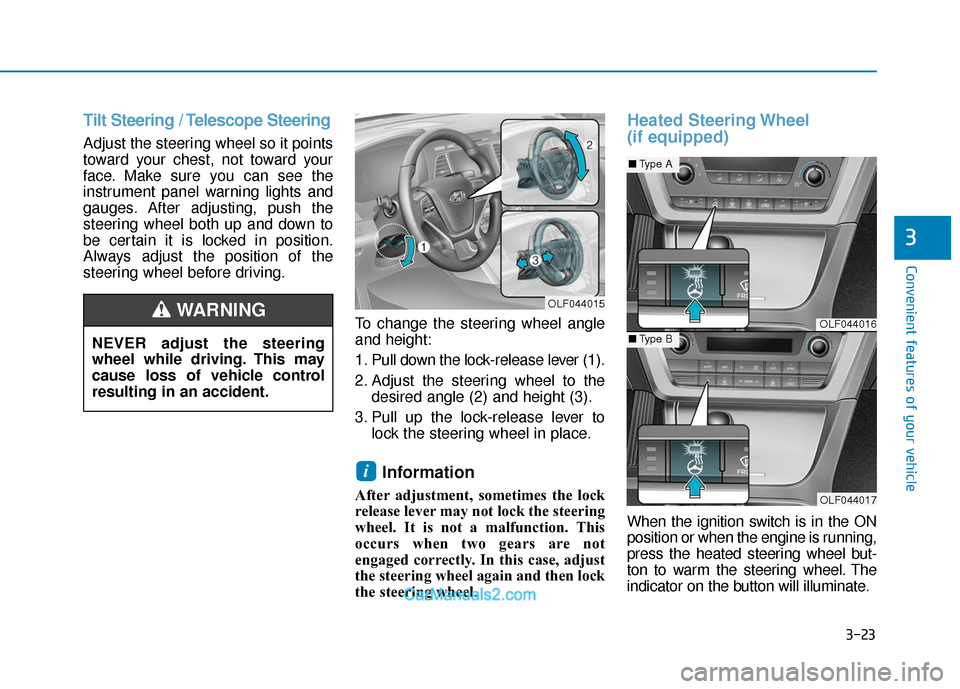
steering wheel before driving.To change the steering wheel angle
and height:
1. Pull down the lock-release lever (1).
2. Adjust the steering wheel to thedesired angle (2) and height (3).
3. Pull up the lock-release lever to lock the steering wheel in place.
Information
After adjustment, sometimes the lock
release lever may not lock the steering
wheel. It is not a malfunction. This
occurs when two gears are not
engaged correctly. In this case, adjust
the steering wheel again and then lock
the steering wheel.
Heated Steering Wheel
(if equipped)
When the ignition switch is in the ON
position or when the engine is running,
press the heated steering wheel but-
ton to warm the steering wheel. The
indicator on the button will illuminate.
i
OLF044015
OLF044016
OLF044017
■Type A
■Type BNEVER adjust the steering
wheel while driving. This may
cause loss of vehicle control
resulting in an accident.
WARNING