Oul Hyundai Sonata 2019 Owner's Manual
[x] Cancel search | Manufacturer: HYUNDAI, Model Year: 2019, Model line: Sonata, Model: Hyundai Sonata 2019Pages: 522, PDF Size: 15.66 MB
Page 401 of 522
6-30
Introduction
With the Tire Mobility Kit you stay
mobile even after experiencing a tire
puncture.
The system of compressor and seal-
ing compound effectively and com-
fortably seals most punctures in a
passenger car tire caused by nails
or similar objects and reinflates the
tire.
After you ensured that the tire is
properly sealed you can drive cau-
tiously on the tire (distance up to 200
km (120 miles)) at a max. speed of
80 km/h (50 mph) in order to reach a
service station or tire dealer to have
the tire replaced.
It is possible that some tires, espe-
cially with larger punctures or dam-
age to the sidewall, cannot be sealed
completely.
Air pressure loss in the tire may
adversely affect tire performance.
For this reason, you should avoid
abrupt steering or other driving
maneuvers, especially if the vehicle
is heavily loaded or if a trailer is in
use.The Tire Mobility Kit is not designed
or intended as a permanent tire
repair method and is to be used for
one tire only. This instruction shows
you step by step how to temporarily
seal the puncture simply and reliably.
Read the section "Notes on the safe
use of the Tire Mobility Kit".
What to do in an emergency
Do not use the Tire Mobility Kit
to repair punctures in the tire
walls. This can result in an acci-
dent due to tire failure.
WARNING
Have your tire repaired as soon
as possible. The tire may loose
air pressure at any time after
inflating with the Tire Mobility Kit.
WARNING
When two or more tires are flat,
do not use the tire mobility kit
because the supported one
sealant of Tire Mobility Kit is
only used for one flat tire.
CAUTION
Do not use the TMK if a tire is
severely damaged by driving run
flat or with insufficient air pres-
sure.
Only punctured areas located
within the tread region of the tire
can be sealed using the TMK.
WARNING
Page 405 of 522
6-34
5. Plug the compressor power cord(3) into the vehicle power outlet.
Only use the front passenger side
power outlet when connecting the
power cord.
6. With the ignition switch in the ON position, switch on the compres-
sor and let it run for approximately
5~7 minutes to fill the sealant up
to proper pressure. (refer to the
Tire and Wheels, chapter 8). The
inflation pressure of the tire after
filling is unimportant and will be
checked/corrected later.
Be careful not to overinflate the
tire and stay away from the tire
when filling it. 7. Switch off the compressor.
8. Detach the hoses from the sealant
bottle connector and from the tire
valve.
Return the Tire Mobility Kit to its stor-
age location in the vehicle.
NOTICE
What to do in an emergency
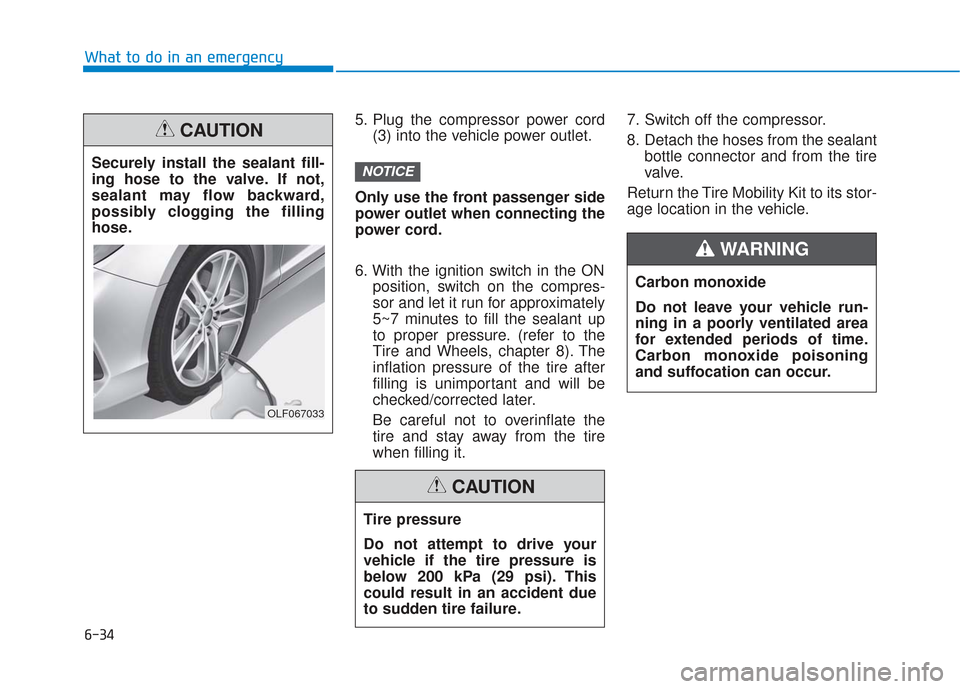
Securely install the sealant fill-
ing hose to the valve. If not,
sealant may flow backward,
possibly clogging the filling
hose.
CAUTION
OLF067033
Tire pressure
Do not attempt to drive your
vehicle if the tire pressure is
below 200 kPa (29 psi). This
could result in an accident due
to sudden tire failure.
CAUTION
Carbon monoxide
Do not leave your vehicle run-
ning in a poorly ventilated area
for extended periods of time.
Carbon monoxide poisoning
and suffocation can occur.
WARNING
Page 407 of 522
6-36
3. Plug the compressor power cordinto the vehicle power outlet.
4. Adjust the tire inflation pressure to the recomended tire inflation.
With the ignition swithched on, proceed as follows.
- To increase the inflation pres- sure : Switch on the compres-
sor. To check the current inflation
pressure setting, briefly switch
off the compressor.
- To reduce the inflation pres- sure: Press the button (9) on the
compressor.
Do not let the compressor run for
more than 10 minutes, otherwise
the device will overheat and may
be damaged.
Information
The pressure gauge may show higher
than actual reading when the com-
pressor is running. To get an accurate
tire reading, the compressor needs to
be turned off.
i
NOTICE
What to do in an emergency
The tire inflation pressure must
be at least 220 kPa (32 psi). If it
is not, do not continue driving.
Call for road side service or
towing.
WARNING
If the inflation pressure is not
maintained, drive the vehicle a
second time, refer to
Distributing the sealant. Then
repeat steps 1 to 4.
Use of the TMK may be ineffec-
tual for tire damage larger than
approximately 4 mm (0.16 in).
We recommend that you con-
tact an authorized HYUNDAI
dealer if the tire cannot be made
roadworthy with the Tire
Mobility Kit.
CAUTION
Tire pressure sensor
The sealant on the tire pressure
sensor and wheel should be
removed when you replace the
tire with a new one and inspect
the tire pressure sensors at an
authorized dealer.
When reinstalling the repaired
or replaced tire and wheel on
the vehicle, tighten the wheel
lug nut to 11~13 kgf·m (79~94
lbf·ft).
CAUTION
Page 408 of 522
6-37
What to do in an emergency
6
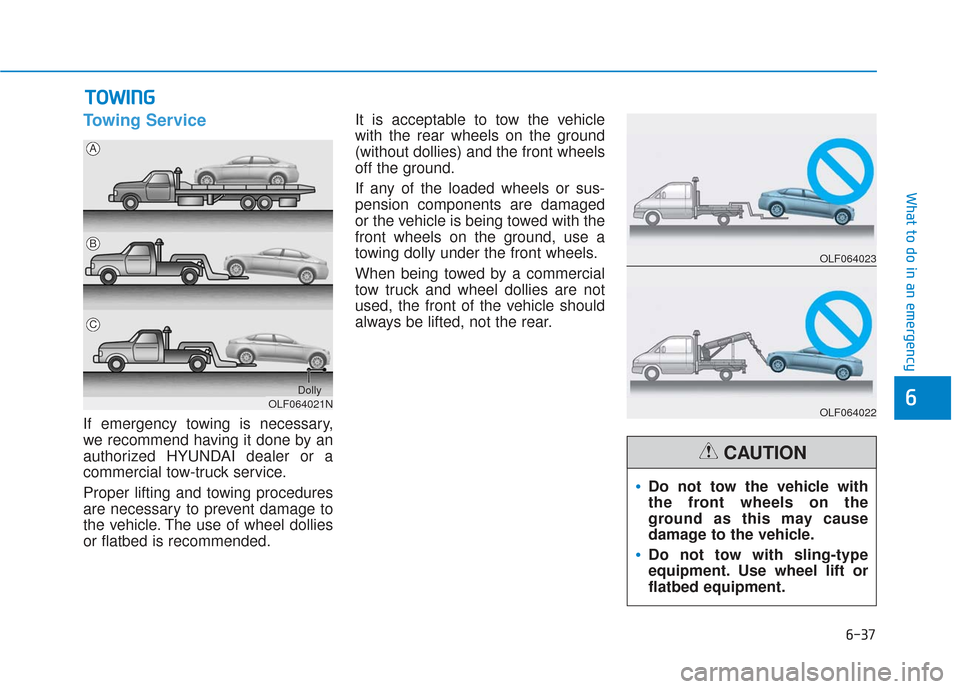
Towing Service
If emergency towing is necessary,
we recommend having it done by an
authorized HYUNDAI dealer or a
commercial tow-truck service.
Proper lifting and towing procedures
are necessary to prevent damage to
the vehicle. The use of wheel dollies
or flatbed is recommended.It is acceptable to tow the vehicle
with the rear wheels on the ground
(without dollies) and the front wheels
off the ground.
If any of the loaded wheels or sus-
pension components are damaged
or the vehicle is being towed with the
front wheels on the ground, use a
towing dolly under the front wheels.
When being towed by a commercial
tow truck and wheel dollies are not
used, the front of the vehicle should
always be lifted, not the rear.
T T
O
O W
W I
IN
N G
G
OLF064021N
A
B
C
Dolly
OLF064023
OLF064022
Do not tow the vehicle with
the front wheels on the
ground as this may cause
damage to the vehicle.
Do not tow with sling-type
equipment. Use wheel lift or
flatbed equipment.
CAUTION
Page 410 of 522
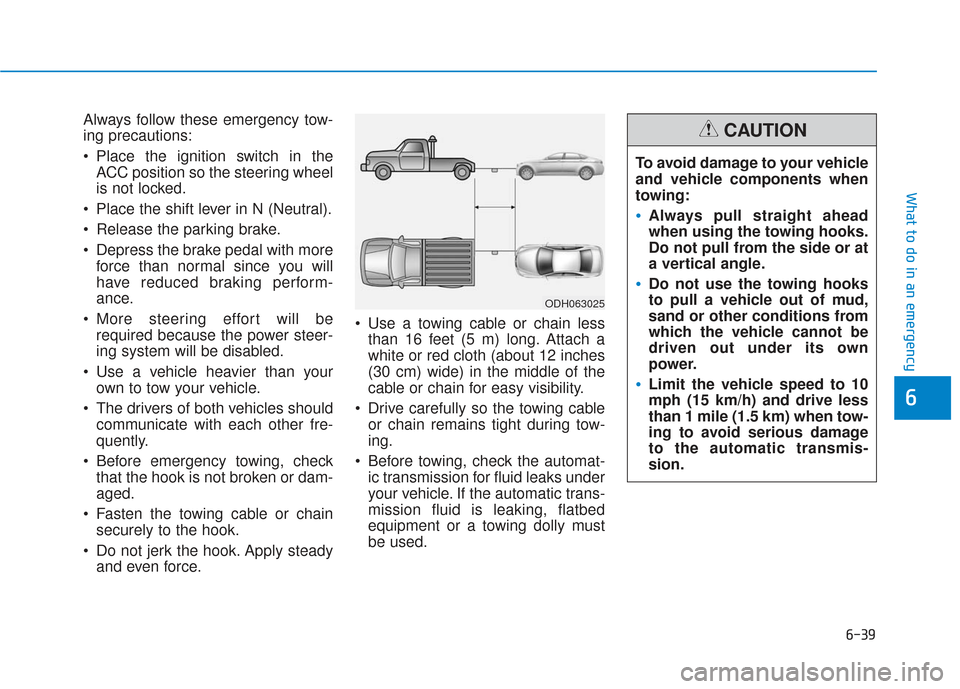
Always follow these emergency tow-
ing precautions:
Place the ignition switch in theACC position so the steering wheel
is not locked.
Place the shift lever in N (Neutral).
Release the parking brake.
Depress the brake pedal with more force than normal since you will
have reduced braking perform-
ance.
More steering effort will be required because the power steer-
ing system will be disabled.
Use a vehicle heavier than your own to tow your vehicle.
The drivers of both vehicles should communicate with each other fre-
quently.
Before emergency towing, check that the hook is not broken or dam-
aged.
Fasten the towing cable or chain securely to the hook.
Do not jerk the hook. Apply steady and even force. Use a towing cable or chain less
than 16 feet (5 m) long. Attach a
white or red cloth (about 12 inches
(30 cm) wide) in the middle of the
cable or chain for easy visibility.
Drive carefully so the towing cable or chain remains tight during tow-
ing.
Before towing, check the automat- ic transmission for fluid leaks under
your vehicle. If the automatic trans-
mission fluid is leaking, flatbed
equipment or a towing dolly must
be used.
ODH063025
To avoid damage to your vehicle
and vehicle components when
towing:
Always pull straight ahead
when using the towing hooks.
Do not pull from the side or at
a vertical angle.
Do not use the towing hooks
to pull a vehicle out of mud,
sand or other conditions from
which the vehicle cannot be
driven out under its own
power.
Limit the vehicle speed to 10
mph (15 km/h) and drive less
than 1 mile (1.5 km) when tow-
ing to avoid serious damage
to the automatic transmis-
sion.
CAUTION
What to do in an emergency
6-39
6
Page 416 of 522
7-6
Maintenance
M
MA
AI
IN
N T
TE
EN
N A
AN
N C
CE
E
S
S E
E R
R V
V I
IC
C E
E S
S
You should exercise the utmost care
to prevent damage to your vehicle
and injury to yourself whenever per-
forming any maintenance or inspec-
tion procedures.
We recommend you have your vehi-
cle maintained and repaired by an
authorized HYUNDAI dealer. An
authorized HYUNDAI dealer meets
HYUNDAI's high service quality
standards and receives technical
support from HYUNDAI in order to
provide you with a high level of serv-
ice satisfaction.
Owner’s Responsibility
Maintenance service and record reten-
tion are the owner’s responsibility.
You should retain documents that
show proper maintenance has been
performed on your vehicle in accor-
dance with the scheduled mainte-
nance service charts shown on the
following pages. You need this infor-
mation to establish your compliance
with the servicing and maintenance
requirements of your vehicle war-
ranties. Detailed warranty information is pro-
vided in your Owner's Handbook &
Warranty Information booklet.
Repairs and adjustments required as
a result of improper maintenance or
a lack of required maintenance are
not covered.
Owner Mainte
nance
Precautions
Inadequate, incomplete or insuffi-
cient servicing may result in opera-
tional problems with your vehicle that
could lead to vehicle damage, an
accident, or personal injury. This
chapter provides instructions only for
the maintenance items that are easy
to perform. Several procedures can
be done only by an authorized
HYUNDAI dealer with special tools.
Your vehicle should not be modified
in any way. Such modifications may
adversely affect the performance,
safety or durability of your vehicle
and may, in addition, violate condi-
tions of the limited warranties cover-
ing the vehicle.
Certain modifications may also be in
violation of regulations established by
the U.S. Department of Transportation
and other federal or state agencies. Improper owner maintenance dur-
ing the warranty period may affect
warranty coverage. For details,
read the separate Owner's
Handbook & Warranty Information
booklet provided with the vehicle.
If you're unsure about any service
or maintenance procedure, have it
done by an authorized HYUNDAI
dealer.
NOTICE
Page 417 of 522
7-7
7
Maintenance
O
OW
W N
NE
ER
R
M
M A
AI
IN
N T
TE
EN
N A
AN
N C
CE
E
The following lists are vehicle checks
and inspections that should be per-
formed by the owner or an author-
ized HYUNDAI dealer at the frequen-
cies indicated to help ensure safe,
dependable operation of your vehi-
cle.
Any adverse conditions should be
brought to the attention of your deal-
er as soon as possible.
These Owner Maintenance vehicle
checks are generally not covered by
warranties and you may be charged
for labor, parts and lubricants used.
Performing maintenance work
on a vehicle can be dangerous.
If you lack sufficient knowledge
and experience or the proper
tools and equipment to do the
work, have it done by an author-
ized HYUNDAI dealer. ALWAYS
follow these precautions for
performing maintenance work:
Park your vehicle on level
ground, move the shift lever
into the P (Park, for automatic
transmission vehicle) posi-
tion, apply the parking brake,
place the ignition switch in
the LOCK/OFF position.
Block the tires (front and back)
to prevent the vehicle from
moving.
Remove loose clothing or jew-
elry that can become entan-
gled in moving parts.
(Continued)
WARNING (Continued)
If you must run the engine
during maintenance, do so
out doors or in an area with
plenty of ventilation.
Keep flames, sparks, or smok-
ing materials away from the
battery and fuel-related parts.
Page 420 of 522
Maintenance
7-10
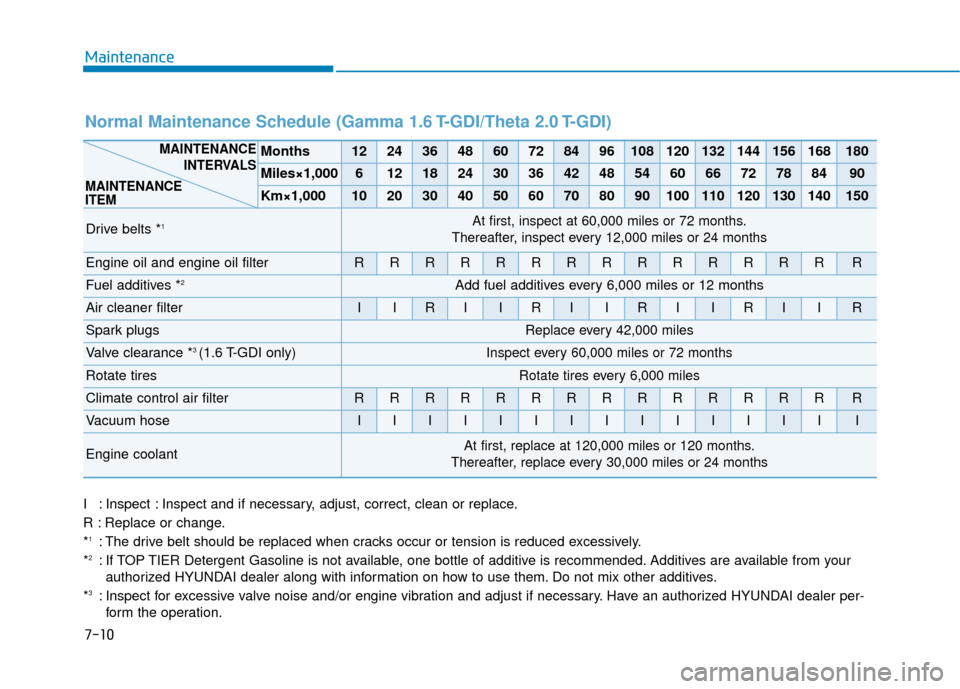
I : Inspect : Inspect and if necessary, adjust, correct, clean or replace.
R : Replace or change.
*
1: The drive belt should be replaced when cracks occur or tension is reduced excessively.
*2: If TOP TIER Detergent Gasoline is not available, one bottle of additive is recommended. Additives are available from your authorized HYUNDAI dealer along with information on how to use them. Do not mix other additives.
*
3: Inspect for excessive valve noise and/or engine vibration and adjust if necessary. Have an authorized HYUNDAI dealer per- form the operation.
Normal Maintenance Schedule (Gamma 1.6 T-GDI/Theta 2.0 T-GDI)
Months1224364860728496108120132144156168180
Miles×1,00061218243036424854606672788490
Km×1,000102030405060708090100110120130140150
Drive belts *1At first, inspect at 60,000 miles or 72 months.
Thereafter, inspect every 12,000 miles or 24 months
Engine oil and engine oil filterRRRRRRRRRRRRRRR
Fuel additives *2Add fuel additives every 6,000 miles or 12 months
Air cleaner filterIIRIIRIIRIIRIIR
Spark plugsReplace every 42,000 miles
Valve clearance *3 (1.6 T-GDI only)Inspect every 60,000 miles or 72 months
Rotate tiresRotate tires every 6,000 miles
Climate control air filter RRRRRRRRRRRRRRR
Vacuum hoseIIIIIIIIIIIIIII
Engine coolantAt first, replace at 120,000 miles or 120 months.
Thereafter, replace every 30,000 miles or 24 months
MAINTENANCE INTERVALS
MAINTENANCE
ITEM
Page 425 of 522
7
Maintenance
7-15
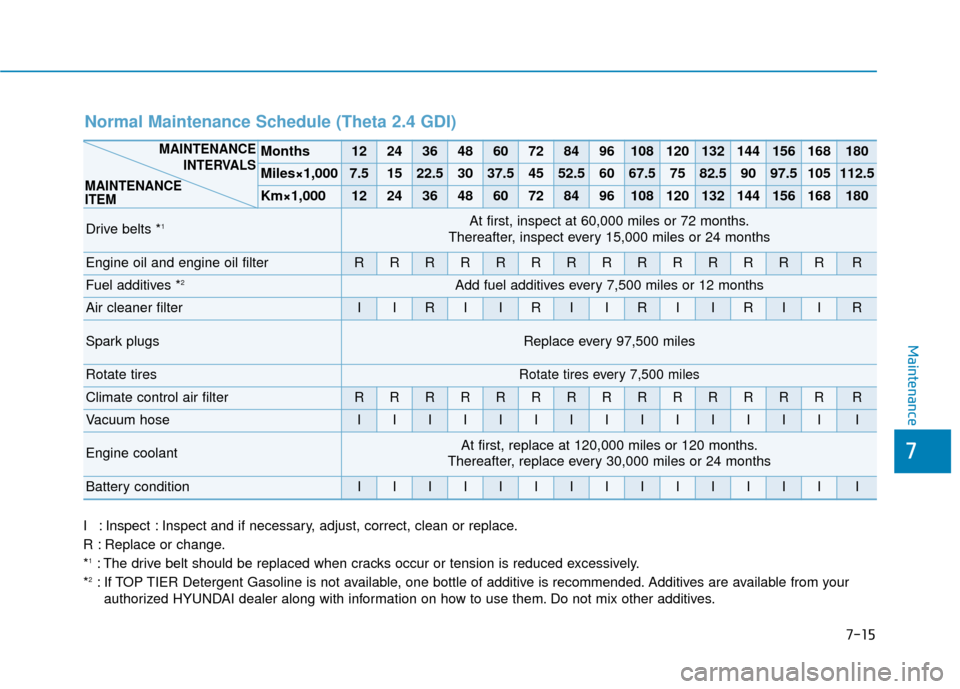
I : Inspect : Inspect and if necessary, adjust, correct, clean or replace.
R : Replace or change.
*
1: The drive belt should be replaced when cracks occur or tension is reduced excessively.
*2: If TOP TIER Detergent Gasoline is not available, one bottle of additive is recommended. Additives are available from your authorized HYUNDAI dealer along with information on how to use them. Do not mix other additives.
Normal Maintenance Schedule (Theta 2.4 GDI)
Months1224364860728496108120132144156168180
Miles×1,0007.51522.53037.54552.56067.57582.59097.5105112.5
Km×1,0001224364860728496108120132144156168180
Drive belts *1At first, inspect at 60,000 miles or 72 months.
Thereafter, inspect every 15,000 miles or 24 months
Engine oil and engine oil filterRRRRRRRRRRRRRRR
Fuel additives *2Add fuel additives every 7,500 miles or 12 months
Air cleaner filterIIRIIRIIRIIRIIR
Spark plugsReplace every 97,500 miles
Rotate tiresRotate tires every 7,500 miles
Climate control air filterRRRRRRRRRRRRRRR
Vacuum hoseIIIIIIIIIIIIIII
Engine coolantAt first, replace at 120,000 miles or 120 months.
Thereafter, replace every 30,000 miles or 24 months
Battery conditionIIIIIIIIIIIIIII
MAINTENANCE
INTERVALS
MAINTENANCE
ITEM
Page 430 of 522
7-20
Maintenance
E
EX
X P
PL
LA
A N
N A
AT
TI
IO
O N
N
O
O F
F
S
S C
C H
H E
ED
D U
U L
LE
E D
D
M
M A
AI
IN
N T
TE
EN
N A
AN
N C
CE
E
I
IT
T E
EM
M S
S
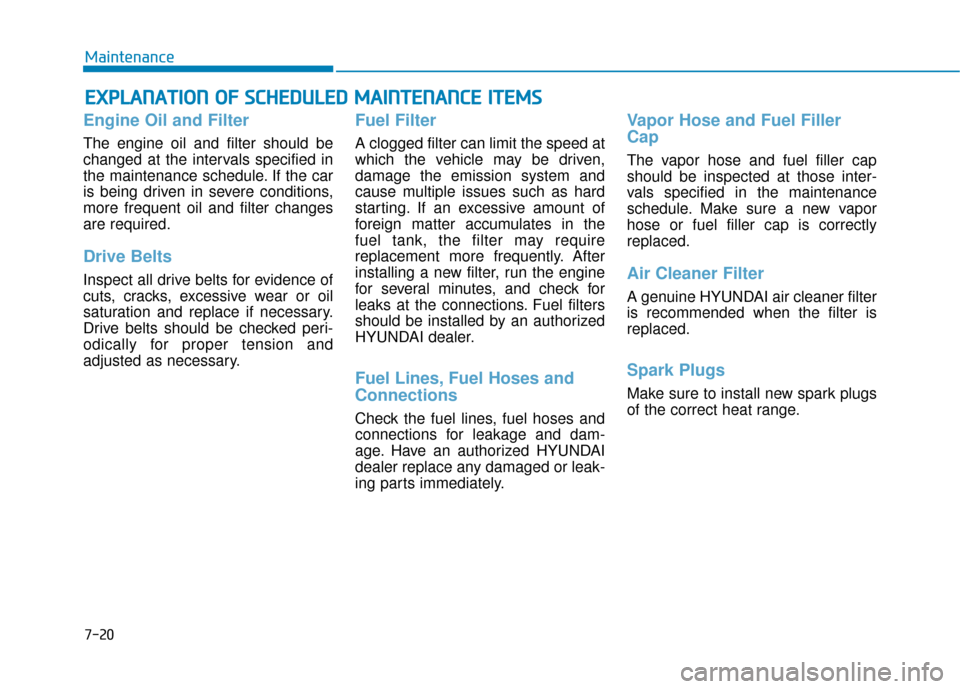
Engine Oil and Filter
The engine oil and filter should be
changed at the intervals specified in
the maintenance schedule. If the car
is being driven in severe conditions,
more frequent oil and filter changes
are required.
Drive Belts
Inspect all drive belts for evidence of
cuts, cracks, excessive wear or oil
saturation and replace if necessary.
Drive belts should be checked peri-
odically for proper tension and
adjusted as necessary.
Fuel Filter
A clogged filter can limit the speed at
which the vehicle may be driven,
damage the emission system and
cause multiple issues such as hard
starting. If an excessive amount of
foreign matter accumulates in the
fuel tank, the filter may require
replacement more frequently. After
installing a new filter, run the engine
for several minutes, and check for
leaks at the connections. Fuel filters
should be installed by an authorized
HYUNDAI dealer.
Fuel Lines, Fuel Hoses and
Connections
Check the fuel lines, fuel hoses and
connections for leakage and dam-
age. Have an authorized HYUNDAI
dealer replace any damaged or leak-
ing parts immediately.
Vapor Hose and Fuel Filler
Cap
The vapor hose and fuel filler cap
should be inspected at those inter-
vals specified in the maintenance
schedule. Make sure a new vapor
hose or fuel filler cap is correctly
replaced.
Air Cleaner Filter
A genuine HYUNDAI air cleaner filter
is recommended when the filter is
replaced.
Spark Plugs
Make sure to install new spark plugs
of the correct heat range.