Hyundai Sonata Hybrid 2013 Owner's Manual
Manufacturer: HYUNDAI, Model Year: 2013, Model line: Sonata Hybrid, Model: Hyundai Sonata Hybrid 2013Pages: 425, PDF Size: 36.95 MB
Page 371 of 425
757
Maintenance
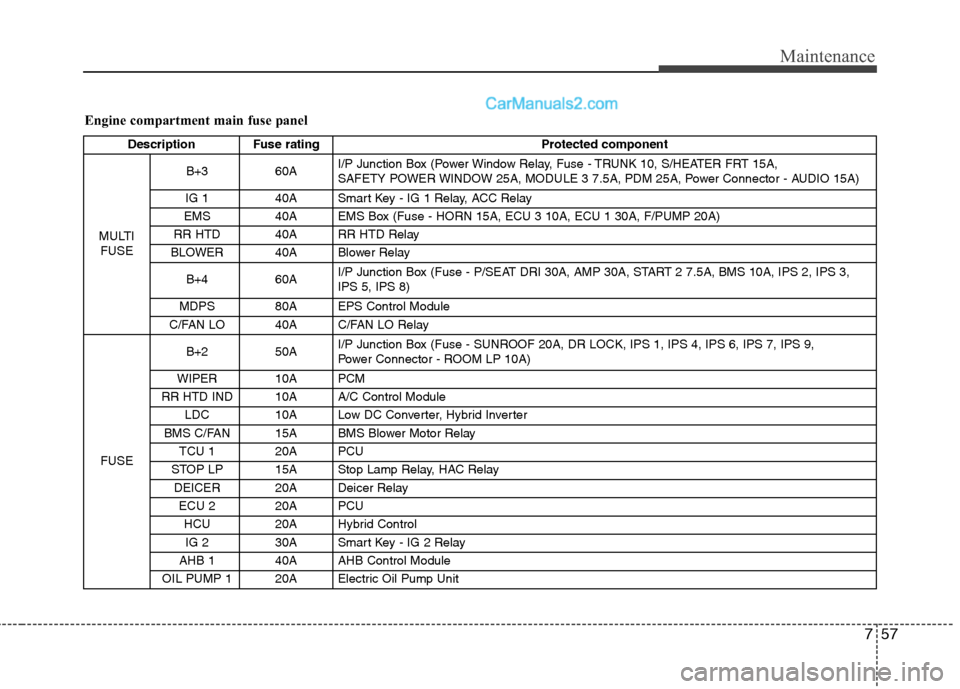
Engine compartment main fuse panel
Description Fuse rating Protected component
MULTI
FUSEB+3 60AI/P Junction Box (Power Window Relay, Fuse - TRUNK 10, S/HEATER FRT 15A,
SAFETY POWER WINDOW 25A, MODULE 3 7.5A, PDM 25A, Power Connector - AUDIO 15A)
IG 1 40A Smart Key - IG 1 Relay, ACC Relay
EMS 40A EMS Box (Fuse - HORN 15A, ECU 3 10A, ECU 1 30A, F/PUMP 20A)
RR HTD 40A RR HTD Relay
BLOWER 40A Blower Relay
B+4 60AI/P Junction Box (Fuse - P/SEAT DRI 30A, AMP 30A, START 2 7.5A, BMS 10A, IPS 2, IPS 3,
IPS 5, IPS 8)
MDPS 80A EPS Control Module
C/FAN LO 40A C/FAN LO Relay
FUSEB+2 50AI/P Junction Box (Fuse - SUNROOF 20A, DR LOCK, IPS 1, IPS 4, IPS 6, IPS 7, IPS 9,
Power Connector - ROOM LP 10A)
WIPER 10A PCM
RR HTD IND 10A A/C Control Module
LDC 10A Low DC Converter, Hybrid Inverter
BMS C/FAN 15A BMS Blower Motor Relay
TCU 1 20A PCU
STOP LP 15A Stop Lamp Relay, HAC Relay
DEICER 20A Deicer Relay
ECU 2 20A PCU
HCU 20A Hybrid Control
IG 2 30A Smart Key - IG 2 Relay
AHB 1 40A AHB Control Module
OIL PUMP 1 20A Electric Oil Pump Unit
Page 372 of 425
Maintenance
58 7
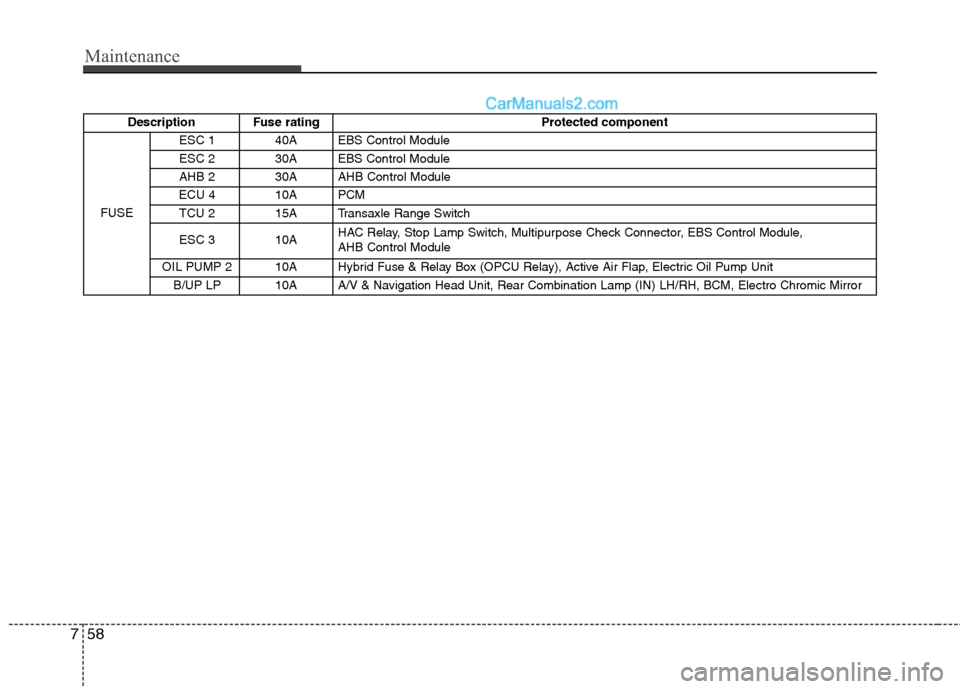
Description Fuse rating Protected component
FUSEESC 1 40A EBS Control Module
ESC 2 30A EBS Control Module
AHB 2 30A AHB Control Module
ECU 4 10A PCM
TCU 2 15A Transaxle Range Switch
ESC 3 10AHAC Relay, Stop Lamp Switch, Multipurpose Check Connector, EBS Control Module,
AHB Control Module
OIL PUMP 2 10A Hybrid Fuse & Relay Box (OPCU Relay), Active Air Flap, Electric Oil Pump Unit
B/UP LP 10A A/V & Navigation Head Unit, Rear Combination Lamp (IN) LH/RH, BCM, Electro Chromic Mirror
Page 373 of 425
759
Maintenance
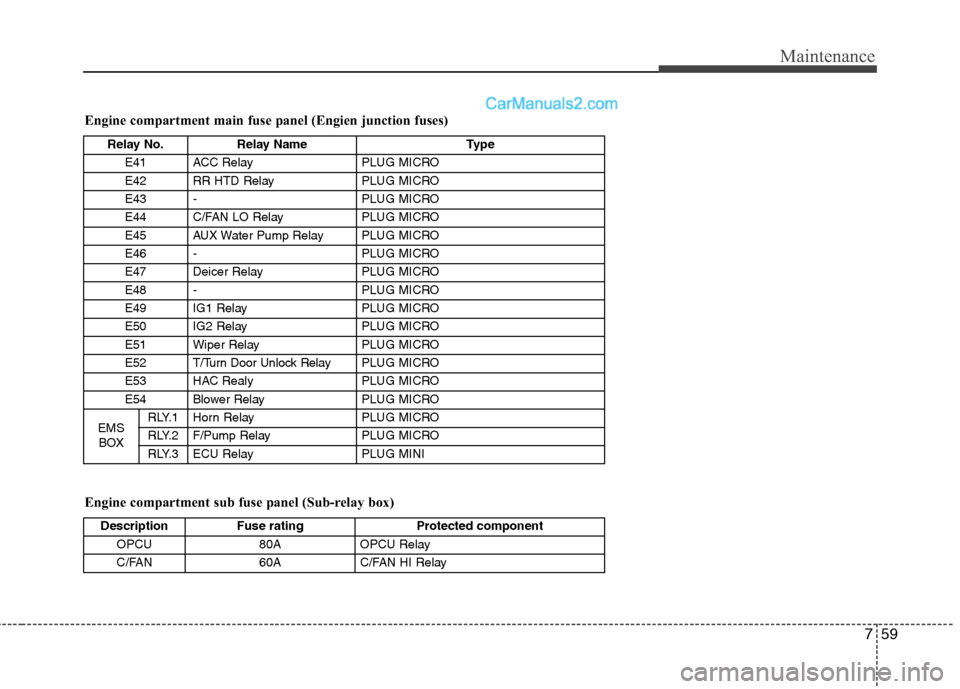
Engine compartment sub fuse panel (Sub-relay box) Engine compartment main fuse panel (Engien junction fuses)
Description Fuse rating Protected component
OPCU 80A OPCU Relay
C/FAN 60A C/FAN HI Relay
Relay No. Relay Name Type
E41 ACC Relay PLUG MICRO
E42 RR HTD Relay PLUG MICRO
E43 - PLUG MICRO
E44 C/FAN LO Relay PLUG MICRO
E45 AUX Water Pump Relay PLUG MICRO
E46 - PLUG MICRO
E47 Deicer Relay PLUG MICRO
E48 - PLUG MICRO
E49 IG1 Relay PLUG MICRO
E50 IG2 Relay PLUG MICRO
E51 Wiper Relay PLUG MICRO
E52 T/Turn Door Unlock RelayPLUG MICRO
E53 HAC Realy PLUG MICRO
E54 Blower Relay PLUG MICRO
EMS
BOXRLY.1 Horn Relay PLUG MICRO
RLY.2 F/Pump Relay PLUG MICRO
RLY.3 ECU Relay PLUG MINI
Page 374 of 425
Maintenance
60 7
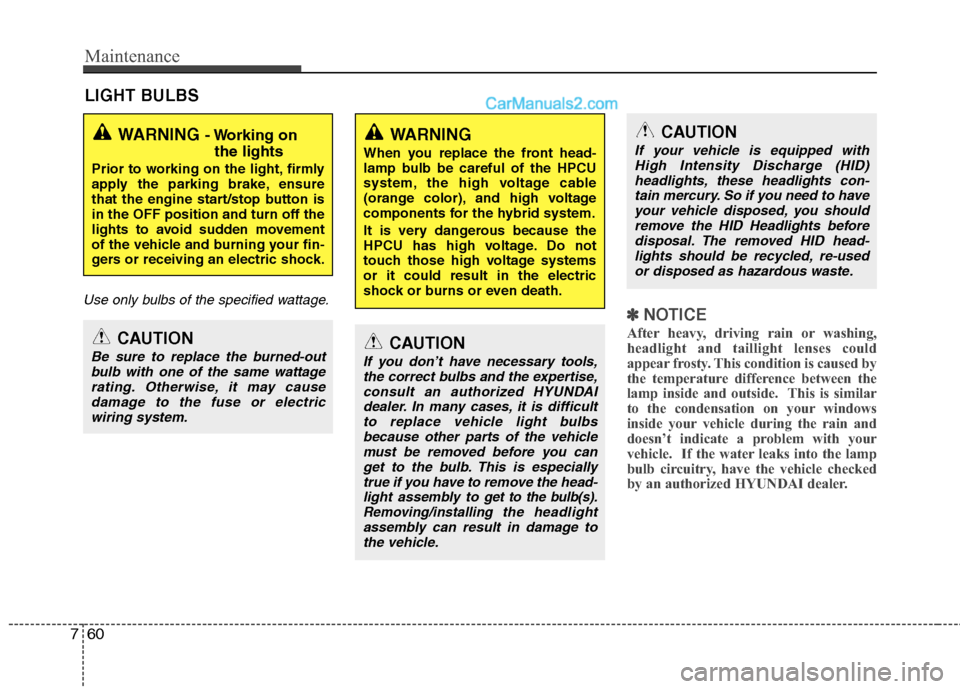
LIGHT BULBS
Use only bulbs of the specified wattage.
✽
✽
NOTICE
After heavy, driving rain or washing,
headlight and taillight lenses could
appear frosty. This condition is caused by
the temperature difference between the
lamp inside and outside. This is similar
to the condensation on your windows
inside your vehicle during the rain and
doesn’t indicate a problem with your
vehicle. If the water leaks into the lamp
bulb circuitry, have the vehicle checked
by an authorized HYUNDAI dealer.
WARNING - Working on
the lights
Prior to working on the light, firmly
apply the parking brake, ensure
that the engine start/stop button is
in the OFF position and turn off the
lights to avoid sudden movement
of the vehicle and burning your fin-
gers or receiving an electric shock.
CAUTION
Be sure to replace the burned-out
bulb with one of the same wattage
rating. Otherwise, it may cause
damage to the fuse or electric
wiring system.CAUTION
If you don’t have necessary tools,
the correct bulbs and the expertise,
consult an authorized HYUNDAI
dealer. In many cases, it is difficult
to replace vehicle light bulbs
because other parts of the vehicle
must be removed before you can
get to the bulb. This is especially
true if you have to remove the head-
light assembly to
get to the bulb(s).
Removing/installingthe headlight
assembly can result in damage to
the vehicle.
WARNING
When you replace the front head-
lamp bulb be careful of the HPCU
system, the high voltage cable
(orange color), and high voltage
components for the hybrid system.
It is very dangerous because the
HPCU has high voltage. Do not
touch those high voltage systems
or it could result in the electric
shock or burns or even death.
CAUTION
If your vehicle is equipped with
High Intensity Discharge (HID)
headlights, these headlights con-
tain mercury. So if you need to have
your vehicle disposed, you should
remove the HID Headlights before
disposal. The removed HID head-
lights should be recycled, re-used
or disposed as hazardous waste.
Page 375 of 425
761
Maintenance
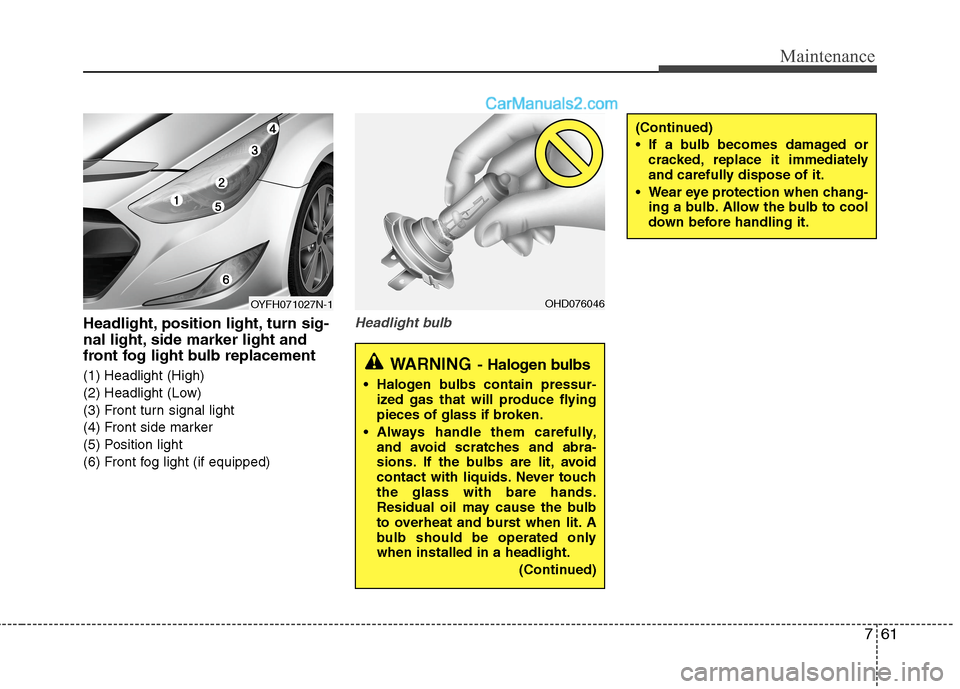
Headlight, position light, turn sig-
nal light, side marker light and
front fog light bulb replacement
(1) Headlight (High)
(2) Headlight (Low)
(3) Front turn signal light
(4) Front side marker
(5) Position light
(6) Front fog light (if equipped)
Headlight bulb
(Continued)
If a bulb becomes damaged or
cracked, replace it immediately
and carefully dispose of it.
Wear eye protection when chang-
ing a bulb. Allow the bulb to cool
down before handling it.
OHD076046
WARNING- Halogen bulbs
Halogen bulbs contain pressur-
ized gas that will produce flying
pieces of glass if broken.
Always handle them carefully,
and avoid scratches and abra-
sions. If the bulbs are lit, avoid
contact with liquids. Never touch
the glass with bare hands.
Residual oil may cause the bulb
to overheat and burst when lit. A
bulb should be operated only
when installed in a headlight.
(Continued)
OYFH071027N-1
Page 376 of 425
Maintenance
62 7
Front side marker / Position light
If the light bulb is not operating, have the
vehicle checked by an authorized
HYUNDAI dealer.
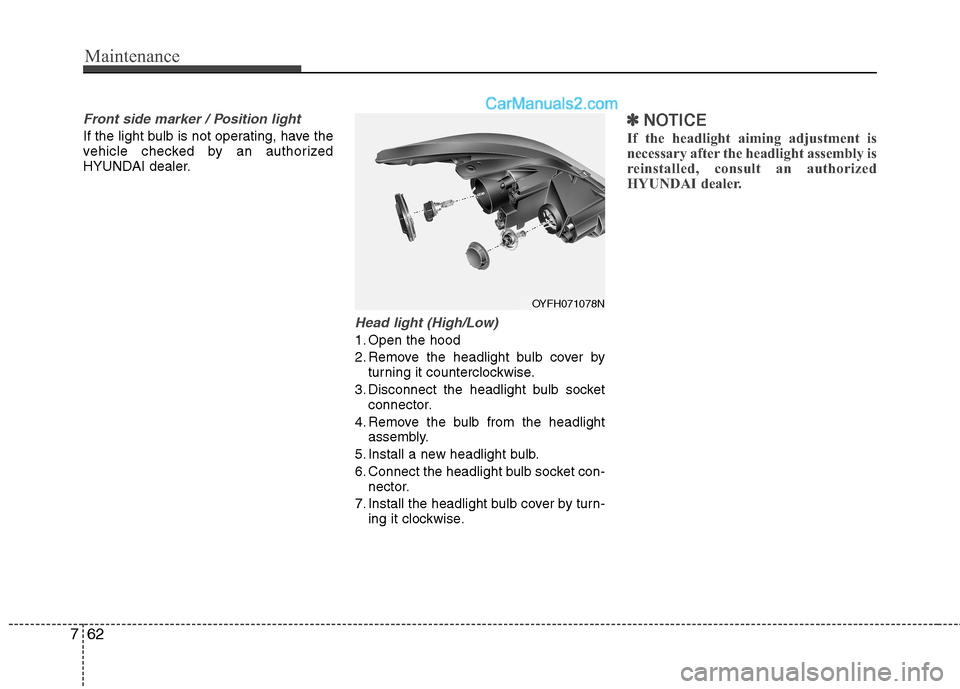
Head light (High/Low)
1. Open the hood
2. Remove the headlight bulb cover by
turning it counterclockwise.
3. Disconnect the headlight bulb socket
connector.
4. Remove the bulb from the headlight
assembly.
5. Install a new headlight bulb.
6. Connect the headlight bulb socket con-
nector.
7. Install the headlight bulb cover by turn-
ing it clockwise.
✽ ✽
NOTICE
If the headlight aiming adjustment is
necessary after the headlight assembly is
reinstalled, consult an authorized
HYUNDAI dealer.
OYFH071078N
Page 377 of 425
763
Maintenance
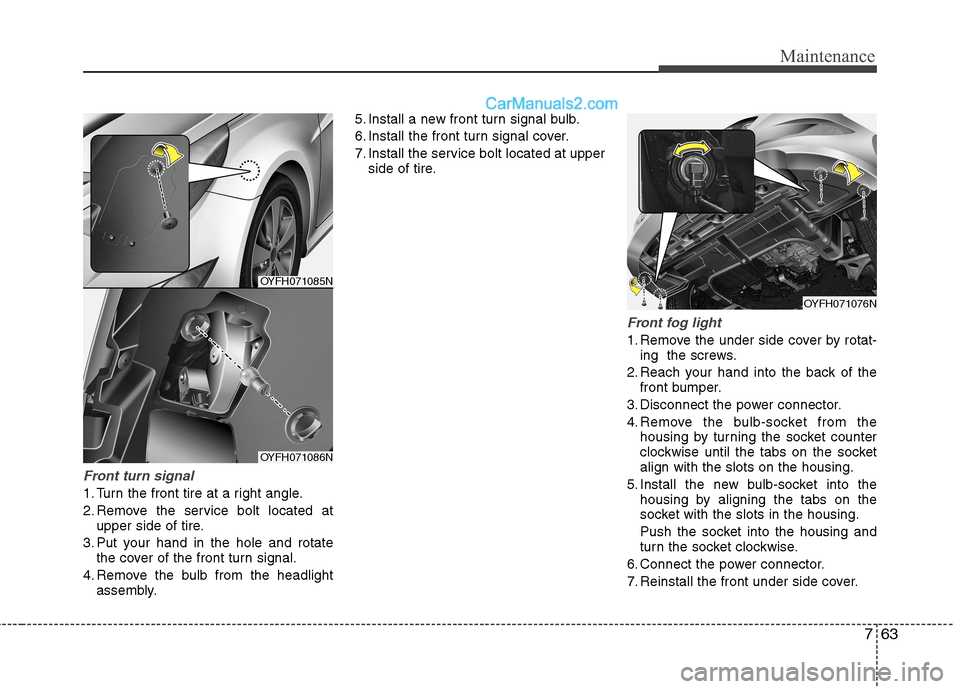
Front turn signal
1. Turn the front tire at a right angle.
2. Remove the service bolt located at
upper side of tire.
3. Put your hand in the hole and rotate
the cover of the front turn signal.
4. Remove the bulb from the headlight
assembly.5. Install a new front turn signal bulb.
6. Install the front turn signal cover.
7. Install the service bolt located at upper
side of tire.
Front fog light
1. Remove the under side cover by rotat-
ing the screws.
2. Reach your hand into the back of the
front bumper.
3. Disconnect the power connector.
4. Remove the bulb-socket from the
housing by turning the socket counter
clockwise until the tabs on the socket
align with the slots on the housing.
5. Install the new bulb-socket into the
housing by aligning the tabs on the
socket with the slots in the housing.
Push the socket into the housing and
turn the socket clockwise.
6. Connect the power connector.
7. Reinstall the front under side cover.
OYFH071076N
OYFH071085N
OYFH071086N
Page 378 of 425
Maintenance
64 7
Side repeater light bulb replace-
ment (if equipped)
If the light bulb is not operating, have the
vehicle checked by an authorized
HYUNDAI dealer.
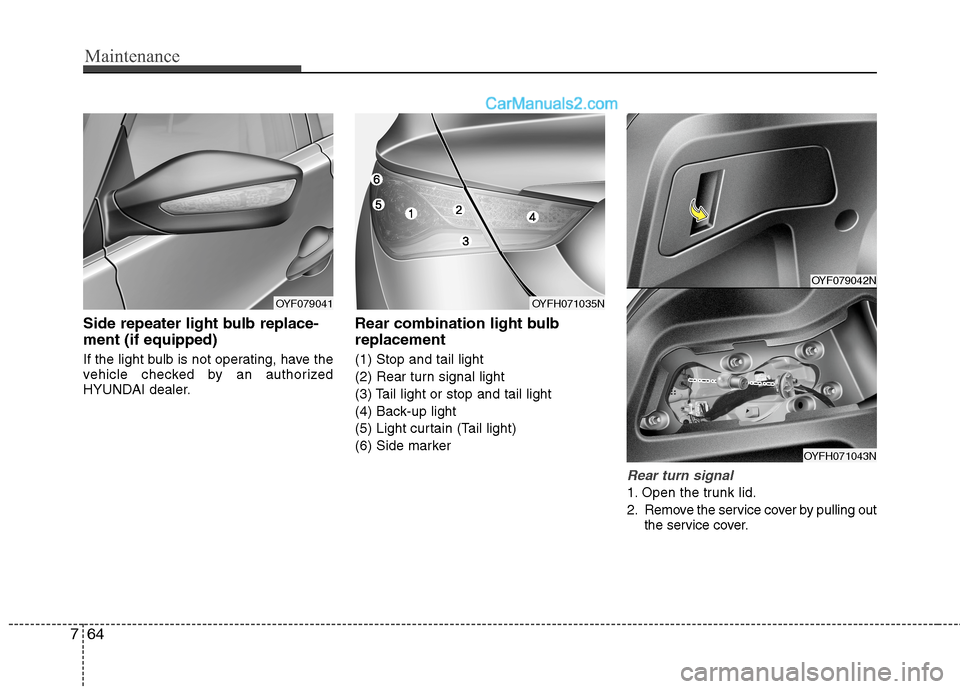
Rear combination light bulb
replacement
(1) Stop and tail light
(2) Rear turn signal light
(3) Tail light or stop and tail light
(4) Back-up light
(5) Light curtain (Tail light)
(6) Side marker
Rear turn signal
1. Open the trunk lid.
2. Remove the service cover by pulling out
the service cover.
OYF079042N
OYFH071043N
OYFH071035NOYF079041
Page 379 of 425
765
Maintenance
3. Remove the socket from the assembly
by turning the socket counterclockwise
until the tabs on the socket align with
the slots on the assembly.
4. Remove the bulb from the socket by
pressing it in and rotating it counter-
clockwise until the tabs on the bulb
align with the slots in the socket. Pull
the bulb out of the socket.
5. Insert a new bulb by inserting it into
the socket and rotating it until it locks
into place.
6. Install the socket in the assembly by
aligning the tabs on the socket with the
slots in the assembly. Push the socket
into the assembly and turn the socket
clockwise.
7. Install the service cover by putting it
into the service hole.
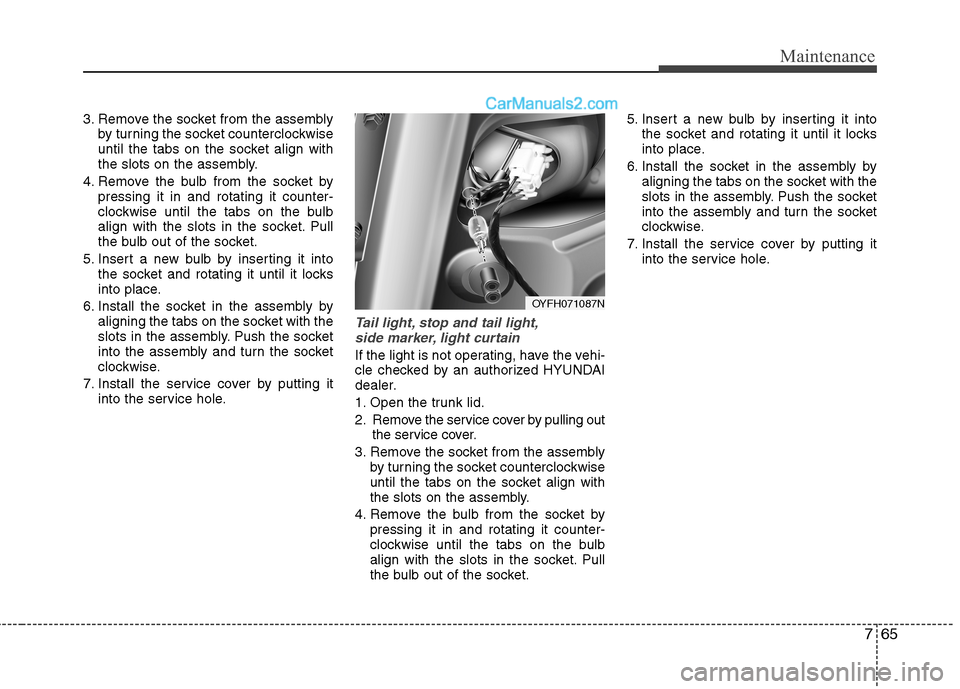
Tail light, stop and tail light,
side marker, light curtain
If the light is not operating, have the vehi-
cle checked by an authorized HYUNDAI
dealer.
1. Open the trunk lid.
2. Remove the service cover by pulling out
the service cover.
3. Remove the socket from the assembly
by turning the socket counterclockwise
until the tabs on the socket align with
the slots on the assembly.
4. Remove the bulb from the socket by
pressing it in and rotating it counter-
clockwise until the tabs on the bulb
align with the slots in the socket. Pull
the bulb out of the socket.5. Insert a new bulb by inserting it into
the socket and rotating it until it locks
into place.
6. Install the socket in the assembly by
aligning the tabs on the socket with the
slots in the assembly. Push the socket
into the assembly and turn the socket
clockwise.
7. Install the service cover by putting it
into the service hole.
OYFH071087N
Page 380 of 425
Maintenance
66 7
OYF079036/OYFH071079N/OYFH071080N/OYFH071081N/OYFH071082N/OYFH071083N/OYFH071084N
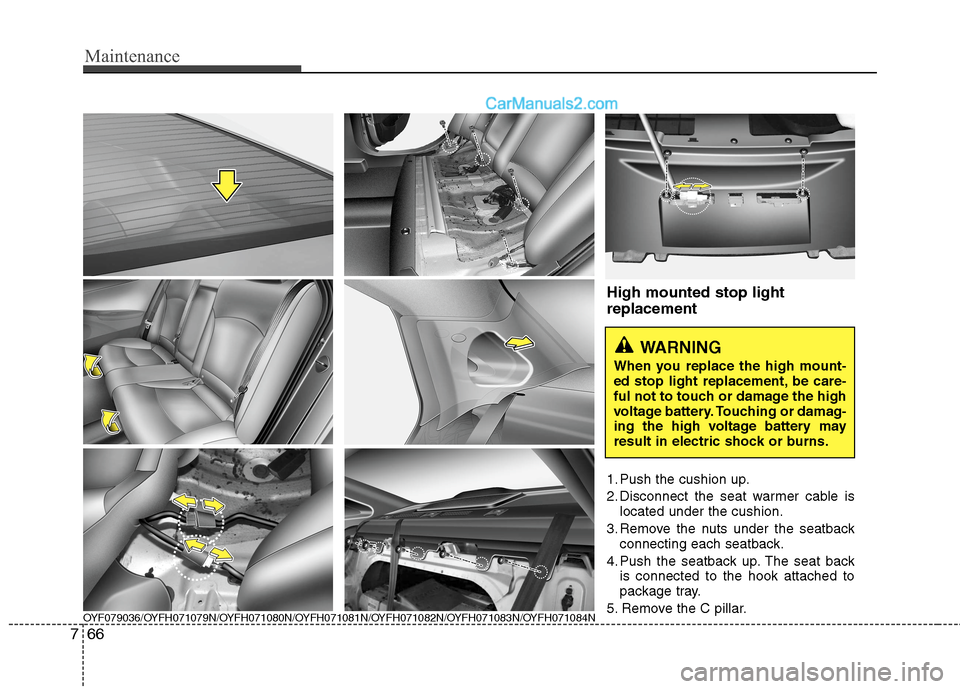
High mounted stop light
replacement
1. Push the cushion up.
2. Disconnect the seat warmer cable is
located under the cushion.
3. Remove the nuts under the seatback
connecting each seatback.
4. Push the seatback up. The seat back
is connected to the hook attached to
package tray.
5. Remove the C pillar.
WARNING
When you replace the high mount-
ed stop light replacement, be care-
ful not to touch or damage the high
voltage battery. Touching or damag-
ing the high voltage battery may
result in electric shock or burns.