warning light HYUNDAI SONATA HYBRID 2019 Owner's Manual
[x] Cancel search | Manufacturer: HYUNDAI, Model Year: 2019, Model line: SONATA HYBRID, Model: HYUNDAI SONATA HYBRID 2019Pages: 546, PDF Size: 78.75 MB
Page 140 of 546
3-4
Convenient features of your vehicle
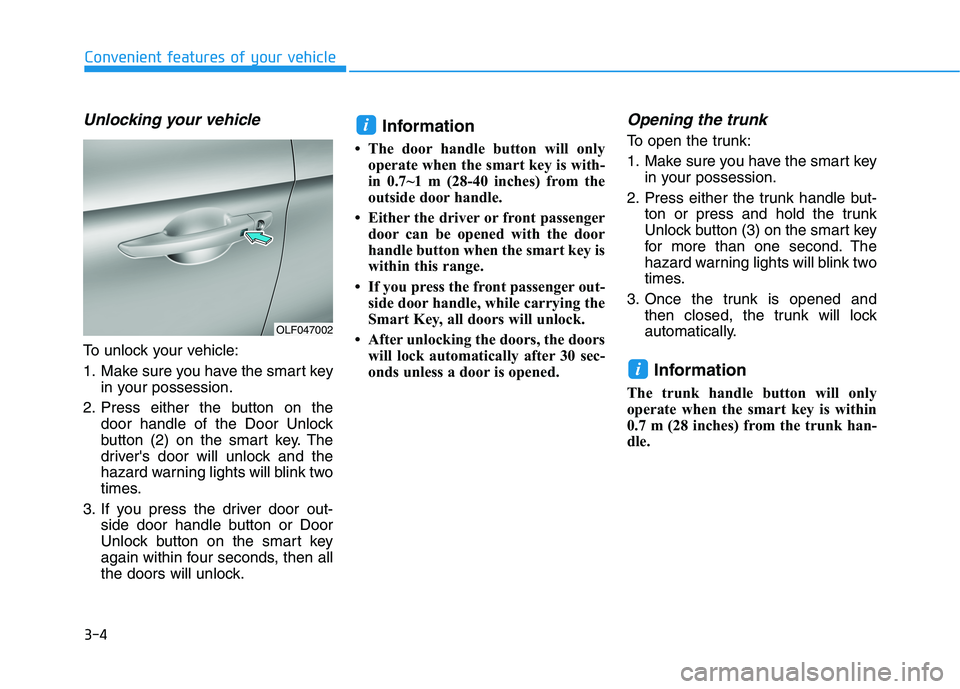
Unlocking your vehicle
To unlock your vehicle:
1. Make sure you have the smart keyin your possession.
2. Press either the button on the door handle of the Door Unlock
button (2) on the smart key. The
driver's door will unlock and the
hazard warning lights will blink two
times.
3. If you press the driver door out- side door handle button or Door
Unlock button on the smart key
again within four seconds, then all
the doors will unlock. Information
The door handle button will only operate when the smart key is with-
in 0.7~1 m (28-40 inches) from the
outside door handle.
Either the driver or front passenger door can be opened with the door
handle button when the smart key is
within this range.
If you press the front passenger out- side door handle, while carrying the
Smart Key, all doors will unlock.
After unlocking the doors, the doors will lock automatically after 30 sec-
onds unless a door is opened.
Opening the trunk
To open the trunk:
1. Make sure you have the smart key in your possession.
2. Press either the trunk handle but- ton or press and hold the trunk
Unlock button (3) on the smart key
for more than one second. The
hazard warning lights will blink two
times.
3. Once the trunk is opened and then closed, the trunk will lock
automatically.
Information
The trunk handle button will only
operate when the smart key is within
0.7 m (28 inches) from the trunk han-
dle.
i
i
OLF047002
Page 141 of 546
3-5
Convenient features of your vehicle
3
Panic button
Press the Panic button (4) and hold
for more than one second. The horn
sounds and hazard warning lights
blink for about 30 seconds. To cancel
the panic mode, press any button on
the Smart Key.
Start-up
You can start the engine without
inserting the key.
For more information, refer to the
"Engine Start/Stop Button" sec-
tion in chapter 5.
To prevent damaging the smart key:
• Keep the smart key in a cool, dryplace to avoid damage or mal-
function. Exposure to moisture
or high temperature may cause
the internal circuit of the smart
key to malfunction which may
not be covered under warranty.
Avoid dropping or throwing the smart key.
Protect the smart key from extreme temperatures. Always have the smart key with
you when leaving the vehicle. If
the smart key is left near the vehi-
cle, the vehicle battery may be dis-
charged.
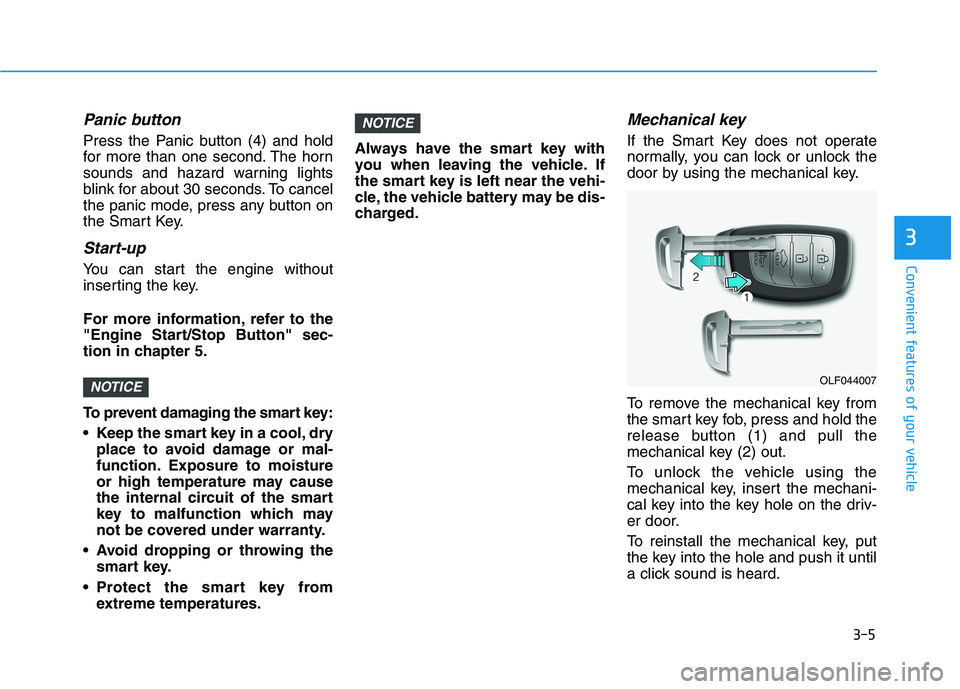
Mechanical key
If the Smart Key does not operate
normally, you can lock or unlock the
door by using the mechanical key.
To remove the mechanical key from
the smart key fob, press and hold the
release button (1) and pull the
mechanical key (2) out.
To unlock the vehicle using the
mechanical key, insert the mechani-
cal key into the key hole on the driv-
er door.
To reinstall the mechanical key, put
the key into the hole and push it until
a click sound is heard.
NOTICE
NOTICEOLF044007
Page 149 of 546
3-13
Convenient features of your vehicle
3
This system helps to protect your
vehicle and valuables. The horn will
sound and the hazard warning lights
will blink continuously if any of the
following occurs:
- A door is opened without using thesmart key.
- The trunk is opened without using the smart key.
- The hood is opened.
The alarm continues for 30 seconds,
then the system resets. To turn off
the alarm, unlock the doors with
smart key.
The Theft Alarm System automati-
cally sets 30 seconds after you lock
the doors and the trunk. For the sys-
tem to activate, you must lock the
doors and the trunk from outside the
vehicle with the smart key or by
pressing the button on the outside of
the door handle with the smart key in
your possession.
The hazard warning lights will blink and the chime will sound once to
indicate the system is armed. Once the security system is set,
opening any door, the trunk, or the
hood without using the smart key will
cause the alarm to activate.
The Theft Alarm System will not set if
the hood, the trunk, or any door is
not fully closed. If the system will not
set, check the hood, the trunk, or thedoors are fully closed. Do not attempt to alter this system or
add other devices to it.
Information
Do not lock the doors until all pas- sengers have left the vehicle. If the
remaining passenger leaves the
vehicle when the system is armed,
the alarm will be activated.
If the vehicle is not disarmed with the smart key, open the doors by
using the mechanical key and start
hybrid system by directly pressing
the switch with the smart key.
If the system is disarmed by unlock- ing the vehicle, but neither a door or
the trunk is opened within 30 sec-
onds, the doors will relock and the
system will rearm automatically.i
TTHH EEFFTT --AA LLAA RRMM SS YY SSTT EEMM
Page 152 of 546
3-16
Convenient features of your vehicleS
S TT EEEERR IINN GG WW HHEEEELL
Electric Power Steering (EPS)
The system assists you with steering
the vehicle. If the engine is turned off
or if the power steering system
becomes inoperative, you may still
steer the vehicle, but it will require
increased steering effort.
Should you notice any change in the
effort required to steer during normal
vehicle operation, have the system
checked by an authorized HYUNDAI
dealer. Information
The following symptoms may occur
during normal vehicle operation:
The steering effort may be high immediately after placing the engine
Start/Stop button is in the ON posi-
tion.
This happens as the system per-
forms the EPS system diagnostics.
When the diagnostics are complet-
ed, the steering wheel will return to
its normal condition.
A click noise may be heard from the EPS relay after the engine Start/Stop
button is in the ON/OFF position.
Motor noise may be heard when the vehicle is at a stop or at a low driving
speed.
If the outside ambient temperature is low, when you operate the steer-
ing wheel a noise from the electric
power steering may occur. As the
temperature increases, the noise will
disappear.
i
If the Electric Power Steering System does not operate nor-
mally, the warning light ( ) willilluminate on the instrument
cluster. You may steer the vehi-
cle, but it will require increased
steering efforts. Take your vehi-
cle to an authorized HYUNDAI
dealer and have the system
checked as soon as possible.
CAUTION
Page 153 of 546
3-17
Convenient features of your vehicle
3
Tilt Steering / Telescope Steering
When adjusting the steering wheel to
a comfortable position, adjust the
steering wheel so that it points
toward your chest, not toward your
face. Make sure you can see the
instrument panel warning lights and
gauges. After adjusting, push the
steering wheel both up and down to
be certain it is locked in position.
Always adjust the position of the
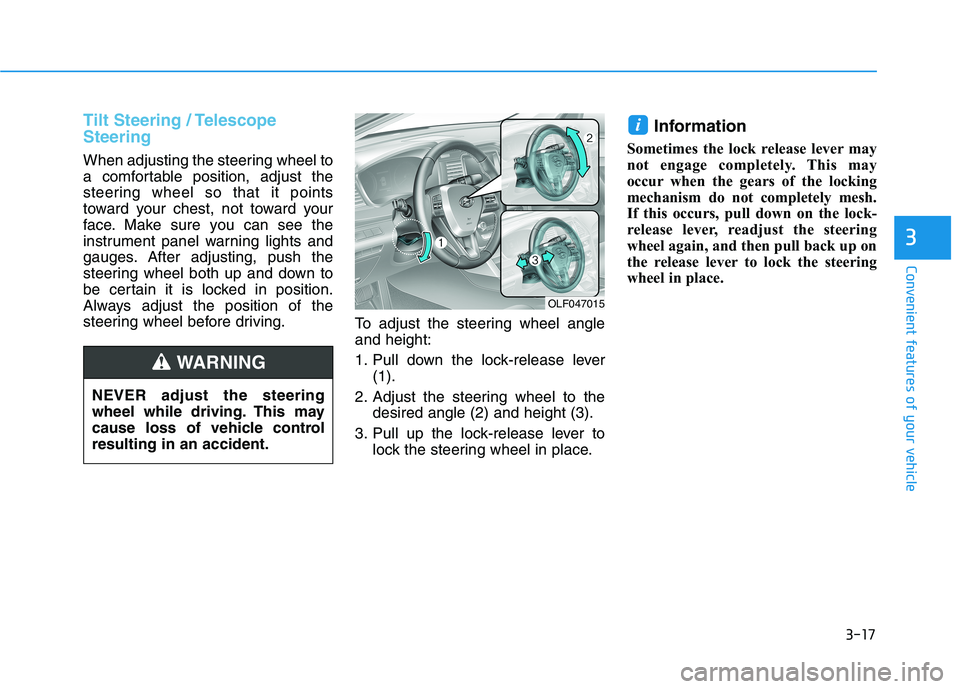
steering wheel before driving.To adjust the steering wheel angleand height:
1. Pull down the lock-release lever
(1).
2. Adjust the steering wheel to the desired angle (2) and height (3).
3. Pull up the lock-release lever to lock the steering wheel in place. Information
Sometimes the lock release lever may
not engage completely. This may
occur when the gears of the locking
mechanism do not completely mesh.
If this occurs, pull down on the lock-
release lever, readjust the steering
wheel again, and then pull back up on
the release lever to lock the steering
wheel in place.
i
OLF047015
NEVER adjust the steering
wheel while driving. This may
cause loss of vehicle controlresulting in an accident.
WARNING
Page 160 of 546
3-24
Convenient features of your vehicle
Programming HomeLink®
Please note the following:
When programming a garage door
opener, it is advised to park the
vehicle outside of the garage.
It is recommended that a new bat- tery be placed in the hand-held
transmitter of the device being pro-
grammed to HomeLink ®
for quicker
training and accurate transmission
of the radio-frequency signal.
Some vehicles may require the engine Start/Stop button to be
placed in the ACC position for pro-
gramming and/or operation ofHomeLink ®
.
In the event that there are still pro- gramming difficulties or questions
after following the programming
steps listed below, contactHomeLink ®
at: www.homelink.com
or by calling 1-800-355-3515.
Rolling code programming
Rolling code devices which are
"code-protected" and manufactured
after 1996 may be determined by the
following:
Reference the device owner’s manual for verification.
The handheld transmitter appears to program the HomeLink ®
Universal Transceiver but does not
activate the device.
Press and hold the trained HomeLink button. The device has
the rolling code feature if the indi-
cator light flashes rapidly and then
turns solid after 2 seconds.
Before programming HomeLink
®
to a garage door opener or gate
operator, make sure people and
objects are out of the way of the
device to prevent potential harm
or damage.WARNING
Page 168 of 546
3-32
Convenient features of your vehicle
Power Windows
Engine Start/Stop button must be in
the ON position to be able to raise or
lower the windows. Each door has a
Power Window switch to control that
door’s window. The driver has a
Power Window Lock switch which
can block the operation of passenger
windows. The power windows will
operate for approximately 30 sec-
onds after engine Start/Stop button
is in the ACC or OFF position.
However, if the front doors are
opened, the Power Windows cannot
be operated even within the 30 sec-
ond period.Information
In cold and wet climates, power win- dows may not work properly due to
freezing conditions.
While driving with the rear win- dows down or with the sunroof (if
equipped) opened (or partially
opened), your vehicle may demon-
strate a wind buffeting or pulsation
noise. This noise is normal and can
be reduced or eliminated by taking
the following actions. If the noise
occurs with one or both of the rear
windows down, partially lower both
front windows approximately
2.5 cm (one inch). If you experience
the noise with the sunroof open,
slightly close the sunroof.
Window opening and closing
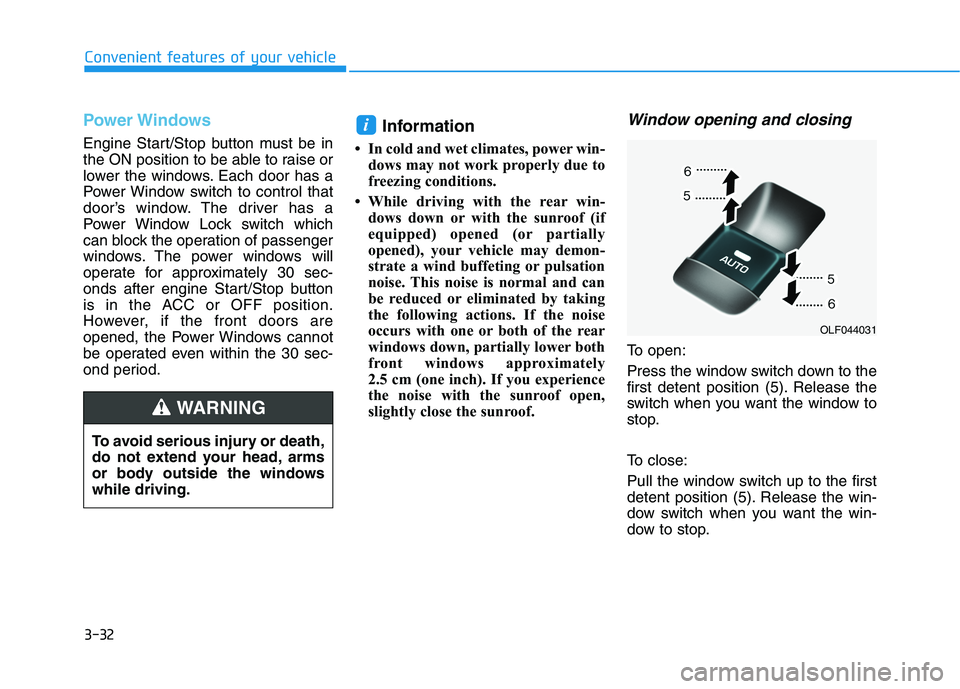
To open:
Press the window switch down to the
first detent position (5). Release the
switch when you want the window to
stop.
To close:
Pull the window switch up to the first
detent position (5). Release the win-
dow switch when you want the win-
dow to stop.
i
To avoid serious injury or death,
do not extend your head, arms
or body outside the windowswhile driving.
WARNING
OLF044031
Page 174 of 546
3-38
Convenient features of your vehicle
Periodically remove any dirt thatmay accumulate on the sunroof guide rail or between the sun-
roof and roof panel, which can
make a noise.
Do not try to open the sunroof when the temperature is below
freezing or when the sunroof is
covered with snow or ice, other-wise the motor could be dam-
aged. In cold and wet climates,
the sunroof may not work prop-
erly.
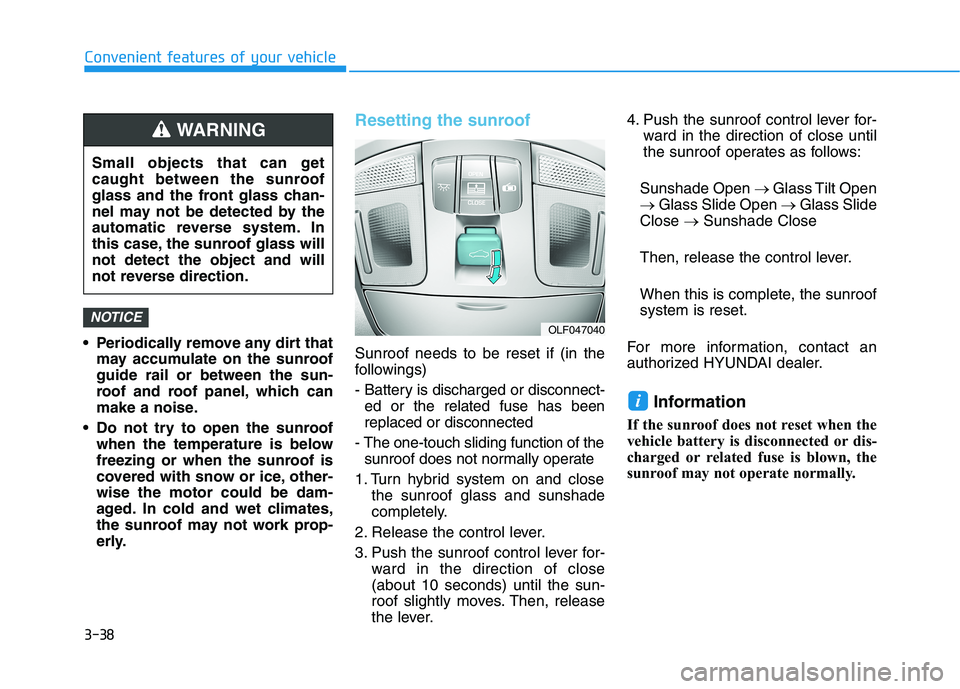
Resetting the sunroof
Sunroof needs to be reset if (in the
followings)
- Battery is discharged or disconnect-ed or the related fuse has been replaced or disconnected
- The one-touch sliding function of the sunroof does not normally operate
1. Turn hybrid system on and close the sunroof glass and sunshade
completely.
2. Release the control lever.
3. Push the sunroof control lever for- ward in the direction of close (about 10 seconds) until the sun-
roof slightly moves. Then, release
the lever. 4. Push the sunroof control lever for-
ward in the direction of close until
the sunroof operates as follows:
Sunshade Open Glass Tilt Open
Glass Slide Open Glass Slide
Close Sunshade Close
Then, release the control lever.
When this is complete, the sunroof system is reset.
For more information, contact an
authorized HYUNDAI dealer.
Information
If the sunroof does not reset when the
vehicle battery is disconnected or dis-
charged or related fuse is blown, the
sunroof may not operate normally.
i
NOTICE
Small objects that can get
caught between the sunroof
glass and the front glass chan-
nel may not be detected by the
automatic reverse system. In
this case, the sunroof glass willnot detect the object and will
not reverse direction.
WARNING
OLF047040
Page 175 of 546
3-39
Convenient features of your vehicle
3
Hood
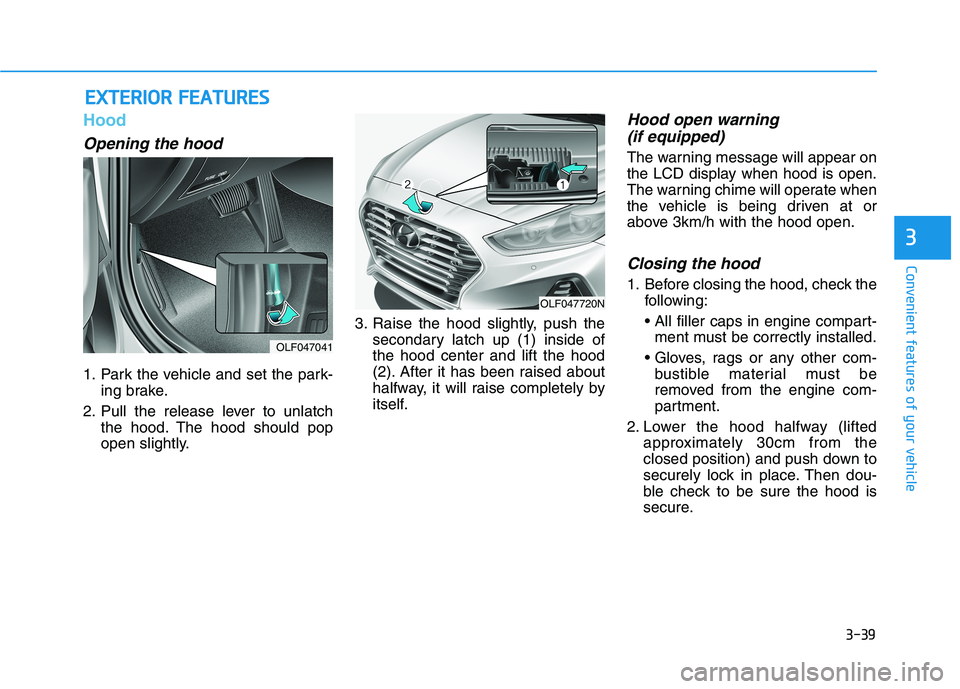
Opening the hood
1. Park the vehicle and set the park-ing brake.
2. Pull the release lever to unlatch the hood. The hood should pop
open slightly. 3. Raise the hood slightly, push the
secondary latch up (1) inside ofthe hood center and lift the hood
(2). After it has been raised about
halfway, it will raise completely by
itself.
Hood open warning
(if equipped)
The warning message will appear on
the LCD display when hood is open.
The warning chime will operate when
the vehicle is being driven at or
above 3km/h with the hood open.
Closing the hood
1. Before closing the hood, check the following:
ment must be correctly installed.
bustible material must be
removed from the engine com-
partment.
2. Lower the hood halfway (lifted approximately 30cm from the
closed position) and push down to
securely lock in place. Then dou-
ble check to be sure the hood is
secure.
EEXX TTEERR IIOO RR FF EE AA TTUU RREESS
OLF047041
OLF047720N
Page 176 of 546
3-40
Convenient features of your vehicle
Trunk
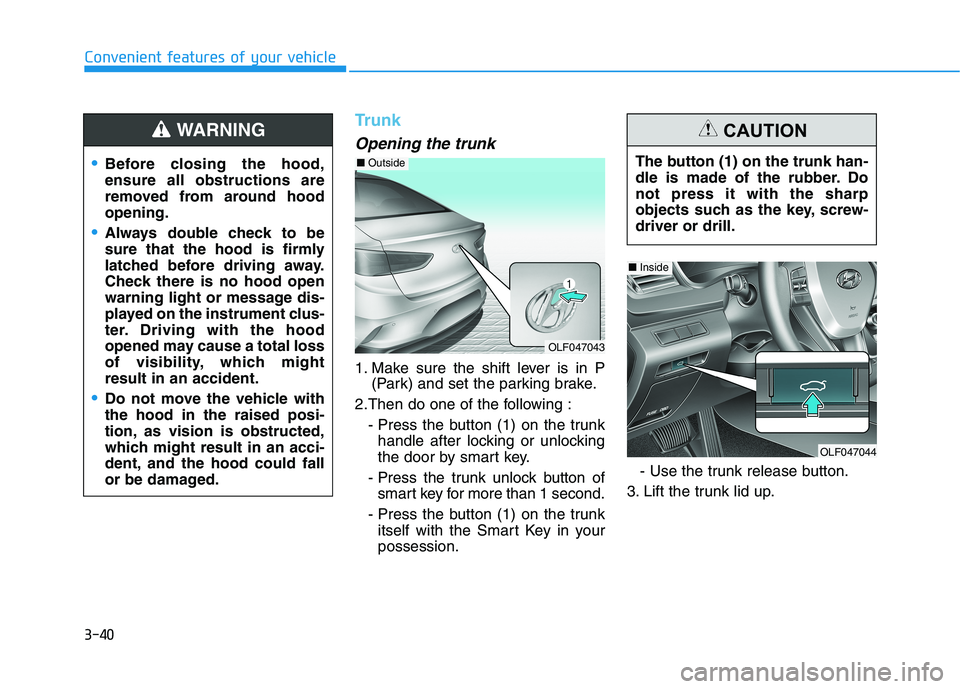
Opening the trunk
1. Make sure the shift lever is in P(Park) and set the parking brake.
2.Then do one of the following : - Press the button (1) on the trunkhandle after locking or unlocking
the door by smart key.
- Press the trunk unlock button of smart key for more than 1 second.
- Press the button (1) on the trunk itself with the Smart Key in yourpossession. - Use the trunk release button.
3. Lift the trunk lid up.
Before closing the hood, ensure all obstructions are
removed from around hoodopening.
Always double check to be
sure that the hood is firmly
latched before driving away.
Check there is no hood open
warning light or message dis-
played on the instrument clus-
ter. Driving with the hood
opened may cause a total loss
of visibility, which mightresult in an accident.
Do not move the vehicle with the hood in the raised posi-
tion, as vision is obstructed,
which might result in an acci-
dent, and the hood could fall
or be damaged.
WARNING
OLF047043
■ Outside
The button (1) on the trunk han-
dle is made of the rubber. Donot press it with the sharp
objects such as the key, screw-driver or drill.
CAUTION
OLF047044
■Inside