Body repair Hyundai Terracan 2003 Owner's Manual
[x] Cancel search | Manufacturer: HYUNDAI, Model Year: 2003, Model line: Terracan, Model: Hyundai Terracan 2003Pages: 349, PDF Size: 4.56 MB
Page 171 of 349
DO-IT-YOURSELF MAINTENANCE 6-25
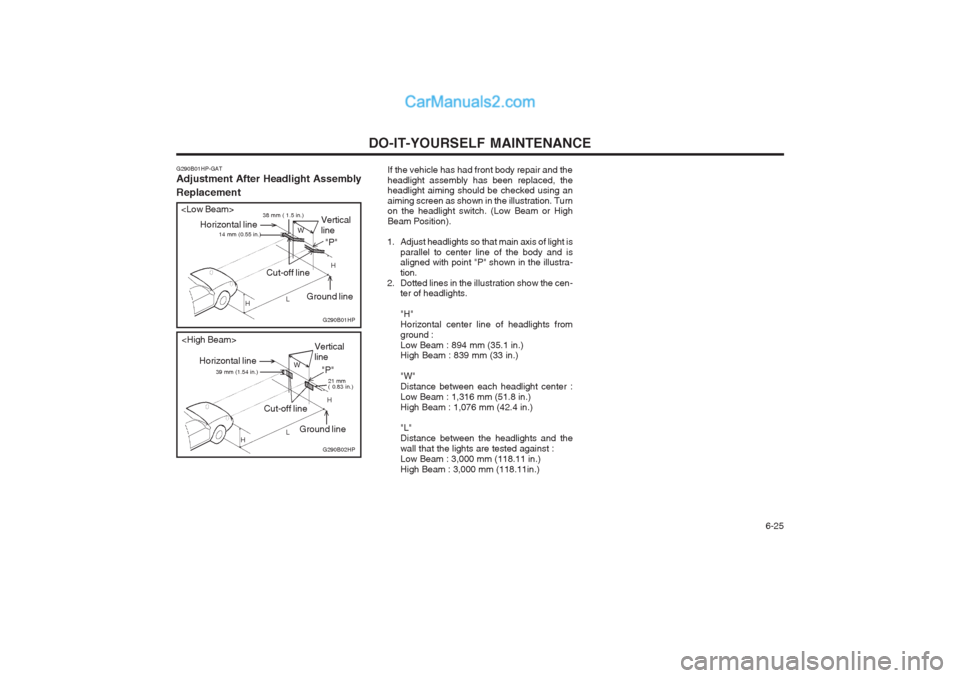
If the vehicle has had front body repair and the headlight assembly has been replaced, the headlight aiming should be checked using an aiming screen as shown in the illustration. Turn on the headlight switch. (Low Beam or High Beam Position).
1. Adjust headlights so that main axis of light is parallel to center line of the body and is aligned with point "P" shown in the illustra- tion.
2. Dotted lines in the illustration show the cen- ter of headlights. "H" Horizontal center line of headlights fromground :Low Beam : 894 mm (35.1 in.) High Beam : 839 mm (33 in.) "W" Distance between each headlight center :Low Beam : 1,316 mm (51.8 in.)High Beam : 1,076 mm (42.4 in.) "L" Distance between the headlights and thewall that the lights are tested against :Low Beam : 3,000 mm (118.11 in.)High Beam : 3,000 mm (118.11in.)
G290B02HP
Vertical line
Cut-off line Ground line
L W
H
H "P"
21 mm ( 0.83 in.)
Horizontal line 39 mm (1.54 in.)
Vertical line
Cut-off line Ground line
L W
H
H "P"
38 mm ( 1.5 in.)
14 mm (0.55 in.)Horizontal line
G290B01HP-GAT Adjustment After Headlight Assembly Replacement
G290B01HP
Page 222 of 349
CONTROLS AND EQUIPMENT
1- 28 B240C01HP-GAT SRS CareThe SRS is virtually maintenance-free and so there are no parts you can safely service byyourself. The entire SRS system must be in-
spected by an authorized Hyundai dealer 10
years after the date that the vehicle was man-ufactured. Any work on the SRS system, such as remov-
ing, installing, repairing, or any work on thesteering wheel must be performed by a quali-fied Hyundai technician. Improper handling ofthe SRS system may result in serious personal injury.
WARNING:
o Extreme Hazard! Do not use a rearward facing restraint on a seat protected by an airbag in front of it!
o Modification to SRS components or wir- ing, including the addition of any kind ofbadges to the pad covers or modifica-tions to the body structure, can adverse-ly affect SRS performance and lead topossible injury.
o For cleaning the airbag pad covers, use only a soft, dry cloth or one which hasbeen moistened with plain water. Sol-vents or cleaners could adversely affectthe airbag covers and proper deploy-ment of the system.
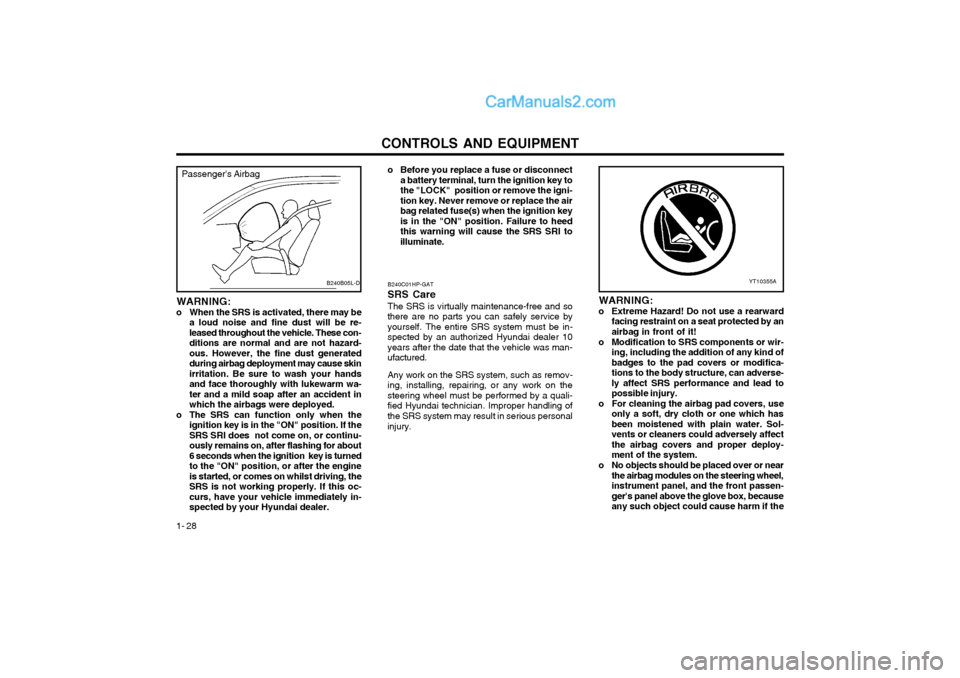
o No objects should be placed over or near the airbag modules on the steering wheel,instrument panel, and the front passen-ger's panel above the glove box, becauseany such object could cause harm if the
YT10355A
Passenger's Airbag
B240B05L-D
WARNING:
o When the SRS is activated, there may be a loud noise and fine dust will be re- leased throughout the vehicle. These con-ditions are normal and are not hazard-ous. However, the fine dust generatedduring airbag deployment may cause skinirritation. Be sure to wash your handsand face thoroughly with lukewarm wa-ter and a mild soap after an accident inwhich the airbags were deployed.
o The SRS can function only when the ignition key is in the "ON" position. If theSRS SRI does not come on, or continu-ously remains on, after flashing for about6 seconds when the ignition key is turnedto the "ON" position, or after the engineis started, or comes on whilst driving, theSRS is not working properly. If this oc-curs, have your vehicle immediately in-spected by your Hyundai dealer. o Before you replace a fuse or disconnect
a battery terminal, turn the ignition key tothe "LOCK" position or remove the igni-tion key. Never remove or replace the airbag related fuse(s) when the ignition keyis in the "ON" position. Failure to heedthis warning will cause the SRS SRI toilluminate.
Page 302 of 349
APPEARANCE CARE 4-1
NOTE: The underbody should never be steam
cleaned since the underbody coating may be removed by this process.
During the interim period between power
washing the underbody, the more vulnera-ble areas such as wheelarches should behosed off, particularly during the winter sea-son to prevent prolonged contact of roadsalt with the body.
Ensure that the various drain points located
at bottom of the door panels are kept clear,to prevent water becoming trapped withinthe cavities. Wherever possible, the parkingof the vehicle in a confined, poorly ventilat-ed location (e.g.) garage should be avoidedwhen the vehicle is wet or covered withsnow or ice. Under these conditions, theinternal cavities of the vehicle will remaindamp for long periods of time which en-courage corrosion. Parking the vehicle wheregood ventilation exists is preferable. JE050A1-E
VALETING
Regular cleaning of the exterior paintwork serves
two important functions. Firstly, the removal ofabrasive dirt and contaminants will maintain thelustre of the paintwork and will preventdiscolouration and dulling due to prolonged con-tact.
Secondly, the presence of damage through
impact or abrasion will be apparent allowingearly rectification to be made thus preventingcorrosion from becoming established andspreading beneath the paint film. To avoid "wa-ter spotting" the vehicle should not be washedin direct sunlight particularly in the case ofvehicles having dark body colours. The heatfrom the sun rays is absorbed by the paint filmincreasing the surface temperature. This actioncauses water used for washing to evaporatequickly leaving behind the deposits from thewater and the shampoo used.
Use only a shampoo intended for the purpose
and ensure that the body work is thoroughlywetted to soften the dirt film prior to attemptingto remove this.
After removing the dirt film with a soft sponge,
the body work should be thoroughly rinsed andthen dried with a good quality chamois leatherto prevent streaking or spotting of the paintwork. Household detergents, solvents and abrasive
cleaning materials should not be used in orderto avoid damaging the paint film.
SE000A1-E
4. APPEARANCE
CARE
ZE020A1-E
APPEARANCE CARE
In using the most advanced design and con-
struction practices, every Hyundai is built to retain its original factory finish for many years.However, long term durability is also greatlydependant upon maintaining the various pro-tection systems and coatings used in manufac-ture since constant exposure to the elementswill eventually result in their breakdown andloss of effectiveness. The following sugges-tions are made to assist in the maintenance ofthe vehicle bodywork.
ZE020B1-E
Underbody Coatings Every Hyundai passenger car receives a full
underbody and cavity injection treatment duringproduction. In order that this treatment mayretain maximum effectiveness, it is recommend-ed that the underbody receives a power washand a thorough inspection after each winterseason. In doing so any accumulations of mud,which act as moisture traps and combine withroad salts to accelerate corrosion, will be re-moved. Should any damage to or deteriorationof the underbody coating be apparent, the ad-vice of a Hyundai dealer regarding the use of acompatible repair material should be sought. ZE020C1-E
Interior During the winter period, it is possible that the
carpet within the passenger compartment maybecome wet. The carpet should not be allowedto remain in this condition for prolonged periodssince the carpet may begin to create mustysmells and promote internal corrosion of thefloorpan.
4
Page 303 of 349
APPEARANCE CARE
4-2 JE070A1-E
POLISHING
The exterior paint work should be polished with
a proprietary wax polish when water no longer collects in bead form on the paint work. Theinstructions of the product manufacturer shouldbe adhered to. JE120A1-E
WINDOWS A proprietary glass cleaner should be used toclean the inside of the windows. However, therear heated windscreen must only be cleanedusing a light horizontal cleaning action. Careshould be exercised to avoid the use of abra-sive cleaners or contact with items of jewellerywhich may damage the heating elements.
Plastic wheel covers should be cleaned using a
sponge and water. Cast alloy wheels should becleaned using a mild soap or neutral detergent.Abrasive compounds must not be used since inthe event of these damaging the lacquer coat-ing, oxidisation of the aluminium wheel willoccur, spoiling the appearance.
The use of a toothbrush will facilitate cleaning
between the wheel "spokes". and ensure that accidental spillages are imme-diately flushed with water.
Do not use abrasive cleaning materials whichmay damage the bumpers.Avoid subjecting the bumpers to high tempera-tures such as may be encountered in high bakepaint ovens. JE110A1-E
INTERIOR VALETING
The soft trim and carpets should be maintainedwith the regular use of a vacuum cleaner. Heavysoiling should be removed with a dry cleaningagent recommended for this purpose followingthe instructions of the product manufacturer.Paint thinner, solvents or other such cleaningmaterials should not be used since damage tothe upholstery may result.
JE060A1-E
STAIN/SPOT REMOVAL Should tree sap, dead insects or tar prove to be
difficult to remove from the paint film, turpentineor a proprietary paint cutting compound may beused. Ensure that the area to be cleaned is notrubbed intensively to prevent breaking throughthe colour coat and exposing the under coat.
JE080A1-E
BUMPER MAINTENANCE The special material from which the bumpers
are manufactured warrants special attention topreserve the appearance of the bumpers. Avoidcontact with battery electrolyte or brake fluid JE090A1-E
ACCIDENT REPAIRS
In the event of the body work sustaining dam-age, the following points should be noted priorto repairs being undertaken. If body panels are replaced or repaired, anti corrosion treatment must be applied to therepair area. The product used must be compat-ible with those used in manufacture. It is recom-mended that repairs are entrusted to a Hyundaidealer to ensure that replacement parts usedare of the same high quality as those used inmanufacture of the vehicle and that the correctrepair methods and materials will ensure ade-quate levels of corrosion protection and thecontinued validity of the Anti Perforation War-ranty. JE100A1-E
SEAT BELTS
Seat belts should be cleaned only with a mild soap solution. Strong detergents, solvens orbleaches may damage the belt webbing andtherefore reduce the effectiveness of the belt.Belts which display signs of fraying, wear or cutshould be replaced.
Page 334 of 349
OWNER MAINTENANCE
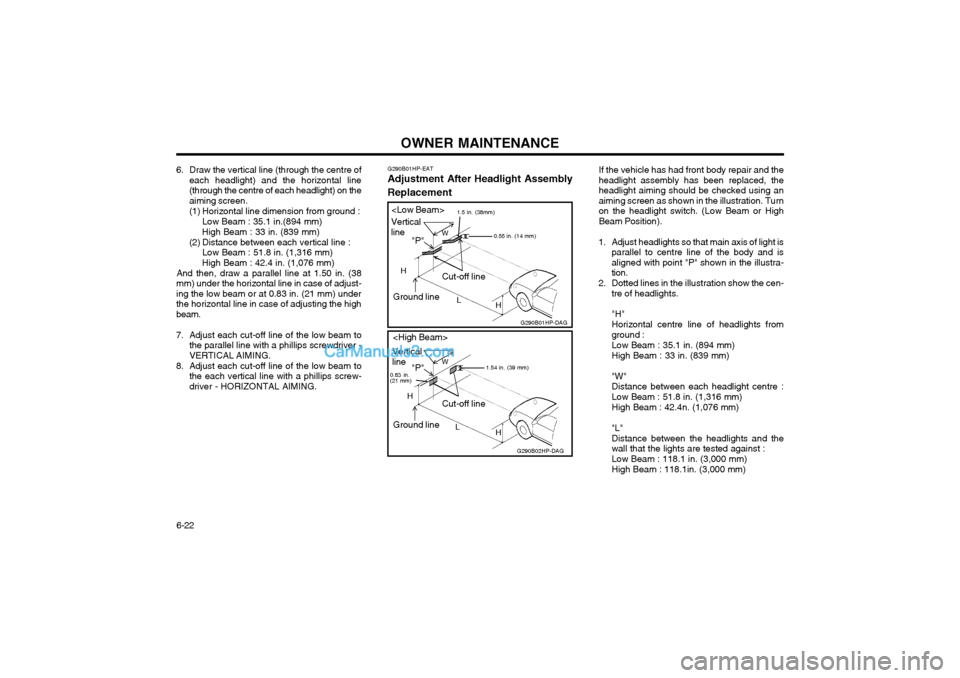
6-22 If the vehicle has had front body repair and the headlight assembly has been replaced, theheadlight aiming should be checked using anaiming screen as shown in the illustration. Turnon the headlight switch. (Low Beam or HighBeam Position).
1. Adjust headlights so that main axis of light is parallel to centre line of the body and isaligned with point "P" shown in the illustra-tion.
2. Dotted lines in the illustration show the cen- tre of headlights. "H" Horizontal centre line of headlights from ground : Low Beam : 35.1 in. (894 mm)High Beam : 33 in. (839 mm) "W" Distance between each headlight centre :Low Beam : 51.8 in. (1,316 mm) High Beam : 42.4n. (1,076 mm) "L" Distance between the headlights and the wall that the lights are tested against : Low Beam : 118.1 in. (3,000 mm) High Beam : 118.1in. (3,000 mm)
G290B01HP-EAT
Adjustment After Headlight Assembly Replacement
6. Draw the vertical line (through the centre of
each headlight) and the horizontal line (through the centre of each headlight) on theaiming screen.
(1) Horizontal line dimension from ground :
Low Beam : 35.1 in.(894 mm)
High Beam : 33 in. (839 mm)
(2) Distance between each vertical line : Low Beam : 51.8 in. (1,316 mm)
High Beam : 42.4 in. (1,076 mm)
And then, draw a parallel line at 1.50 in. (38
mm) under the horizontal line in case of adjust- ing the low beam or at 0.83 in. (21 mm) underthe horizontal line in case of adjusting the highbeam.
7. Adjust each cut-off line of the low beam to the parallel line with a phillips screwdriver - VERTICAL AIMING.
8. Adjust each cut-off line of the low beam to the each vertical line with a phillips screw-driver - HORIZONTAL AIMING.
G290B02HP-DAGG290B01HP-DAG
Cut-off line
L
W
H H
"P"
1.5 in. (38mm)Vertical line
0.55 in. (14 mm)
Cut-off line
L
W
H
H
"P"
Vertical line
1.54 in. (39 mm)
0.83 in. (21 mm)
Ground line
Ground line