power steering Hyundai Terracan 2003 Owner's Manual
[x] Cancel search | Manufacturer: HYUNDAI, Model Year: 2003, Model line: Terracan, Model: Hyundai Terracan 2003Pages: 349, PDF Size: 4.56 MB
Page 21 of 349
FEATURES OF YOUR HYUNDAI 1- 13
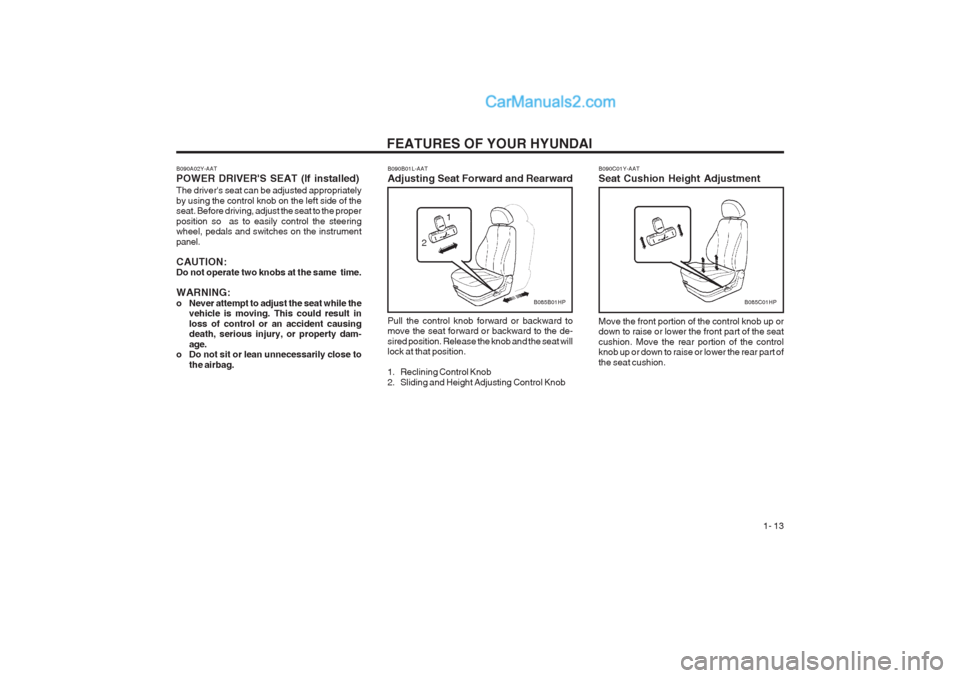
B090B01L-AAT Adjusting Seat Forward and Rearward
Pull the control knob forward or backward to move the seat forward or backward to the de- sired position. Release the knob and the seat will lock at that position.
1. Reclining Control Knob
2. Sliding and Height Adjusting Control KnobB085B01HP
1
2
B090A02Y-AAT POWER DRIVER'S SEAT (If installed) The driver's seat can be adjusted appropriately by using the control knob on the left side of the seat. Before driving, adjust the seat to the proper position so as to easily control the steering wheel, pedals and switches on the instrument panel. CAUTION: Do not operate two knobs at the same time. WARNING:
o Never attempt to adjust the seat while the
vehicle is moving. This could result inloss of control or an accident causing death, serious injury, or property dam- age.
o Do not sit or lean unnecessarily close to
the airbag. B090C01Y-AAT Seat Cushion Height Adjustment Move the front portion of the control knob up or down to raise or lower the front part of the seat cushion. Move the rear portion of the control knob up or down to raise or lower the rear part of the seat cushion.
B085C01HP
Page 41 of 349
FEATURES OF YOUR HYUNDAI 1- 33
8
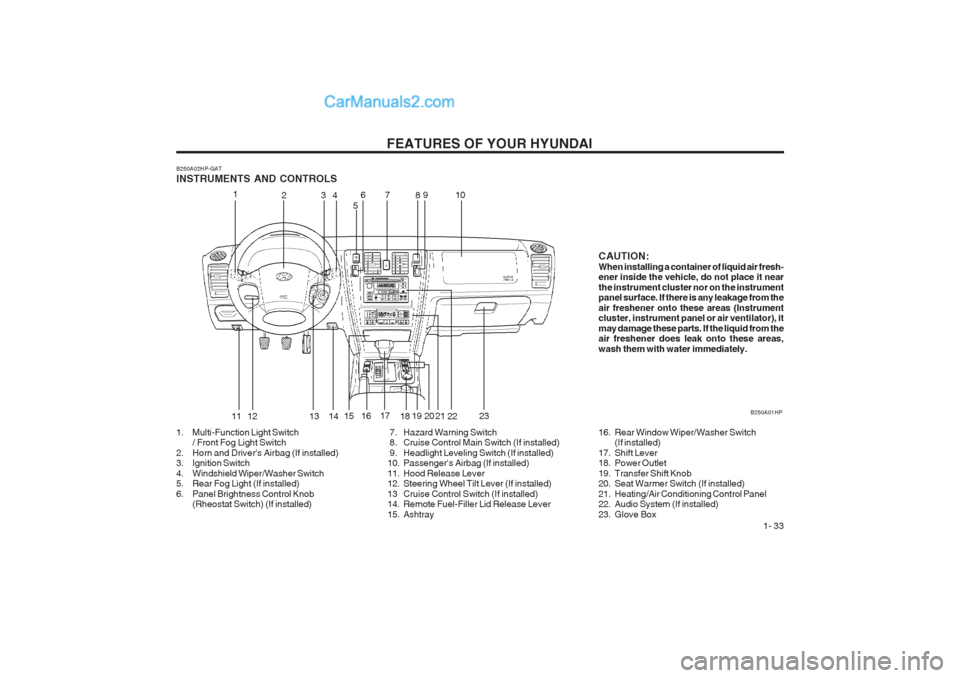
B250A02HP-GAT INSTRUMENTS AND CONTROLS
1. Multi-Function Light Switch
/ Front Fog Light Switch
2. Horn and Driver's Airbag (If installed)
3. Ignition Switch
4. Windshield Wiper/Washer Switch
5. Rear Fog Light (If installed)
6. Panel Brightness Control Knob (Rheostat Switch) (If installed) 7. Hazard Warning Switch
8. Cruise Control Main Switch (If installed)
9. Headlight Leveling Switch (If installed)
10. Passenger's Airbag (If installed)
11. Hood Release Lever
12. Steering Wheel Tilt Lever (If installed)
13 Cruise Control Switch (If installed)
14. Remote Fuel-Filler Lid Release Lever
15. Ashtray B250A01HP1
23 4
56
11 79
12 13 15 16
17
18
19 2014
16. Rear Window Wiper/Washer Switch(If installed)
17. Shift Lever
18. Power Outlet
19. Transfer Shift Knob
20. Seat Warmer Switch (If installed)
21. Heating/Air Conditioning Control Panel
22. Audio System (If installed)
23. Glove Box21
10
2223 CAUTION: When installing a container of liquid air fresh- ener inside the vehicle, do not place it near the instrument cluster nor on the instrument panel surface. If there is any leakage from the air freshener onto these areas (Instrument cluster, instrument panel or air ventilator), it may damage these parts. If the liquid from the air freshener does leak onto these areas, wash them with water immediately.
Page 114 of 349
DRIVING YOUR HYUNDAI
2- 8
o Do not "ride" the brakes. This can cause them
to overheat and malfunction. Instead, when you are driving down a long hill, slow down and shift to a lower gear. When you do this, engine braking will help slow the car.
o Slow down before shifting to a lower gear.
Otherwise, the lower gear may not be en- gaged.
o Always use the parking brake. Do not depend on placing the transmission in "P" to keep the car from moving.
o Exercise extreme caution when driving on a
slippery surface. Be especially careful when braking, accelerating or shifting gears. On a slippery surface, an abrupt change in vehicle speed can cause the drive wheels to lose traction and the vehicle to go out of control.
WARNING:
o Avoid high cornering speeds.
o Do not make quick steering wheel move- ments, such as sharp lane changes orfast, sharp turns.
o Always wear your seat belts.
o The risk of rollover is greatly increased if you lose control of your vehicle at high-way speeds.
o Loss of control often occurs if two or more
wheels drop off the roadway and the driver oversteers to reenter the roadway.
o In the event your vehicle leaves the road- way, do not steer sharply. Instead, slow down before pulling back into the travel lanes. C120A02A-AAT ANTI-LOCK BRAKE SYSTEM (If installed) The Anti-Lock Brake System (ABS) is designed to prevent wheel lock-up during sudden braking or on hazardous road surfaces. The ABS control module monitors the wheel speed and controls the pressure applied to each brake. Thus, in emergency situations or on slick roads, ABS will increase vehicle control during braking. NOTE: During ABS operation, a slight pulsation may be felt in the brake pedal when the brakes are applied. Also, a noise may be heard in the engine compartment while braking. These conditions are normal and indicate that the anti-lock brake system is functioning prop- erly.
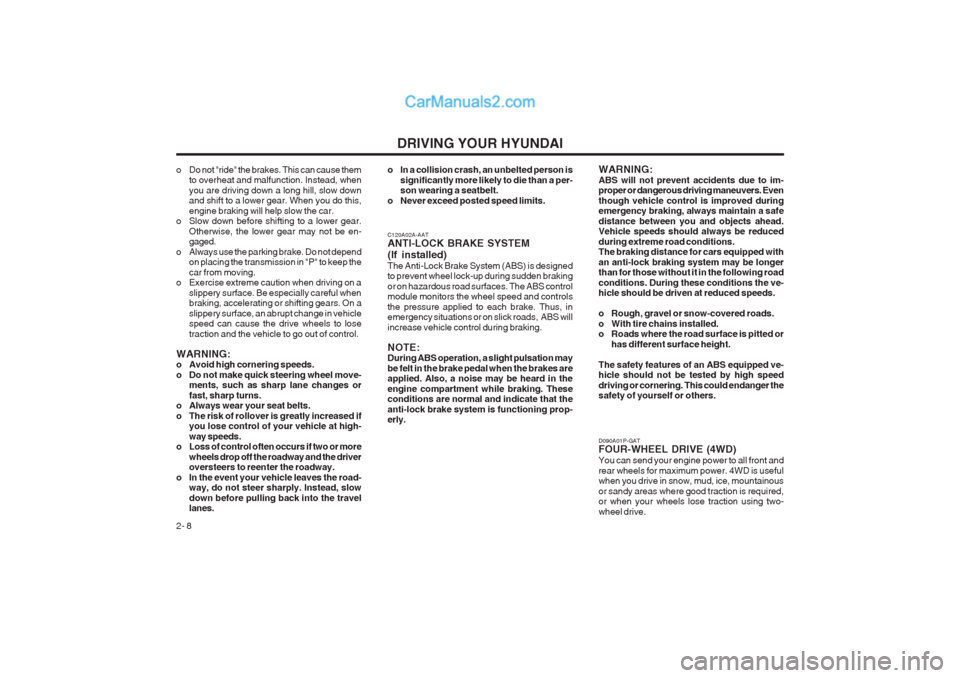
D090A01P-GAT FOUR-WHEEL DRIVE (4WD) You can send your engine power to all front and rear wheels for maximum power. 4WD is useful when you drive in snow, mud, ice, mountainous or sandy areas where good traction is required, or when your wheels lose traction using two- wheel drive.
WARNING:ABS will not prevent accidents due to im- proper or dangerous driving maneuvers. Even though vehicle control is improved during emergency braking, always maintain a safe distance between you and objects ahead. Vehicle speeds should always be reduced during extreme road conditions. The braking distance for cars equipped with an anti-lock braking system may be longer than for those without it in the following road conditions. During these conditions the ve- hicle should be driven at reduced speeds.
o Rough, gravel or snow-covered roads.
o With tire chains installed.
o Roads where the road surface is pitted or
has different surface height.
The safety features of an ABS equipped ve-hicle should not be tested by high speed driving or cornering. This could endanger the safety of yourself or others.
o In a collision crash, an unbelted person is
significantly more likely to die than a per-son wearing a seatbelt.
o Never exceed posted speed limits.
Page 115 of 349
DRIVING YOUR HYUNDAI 2- 9
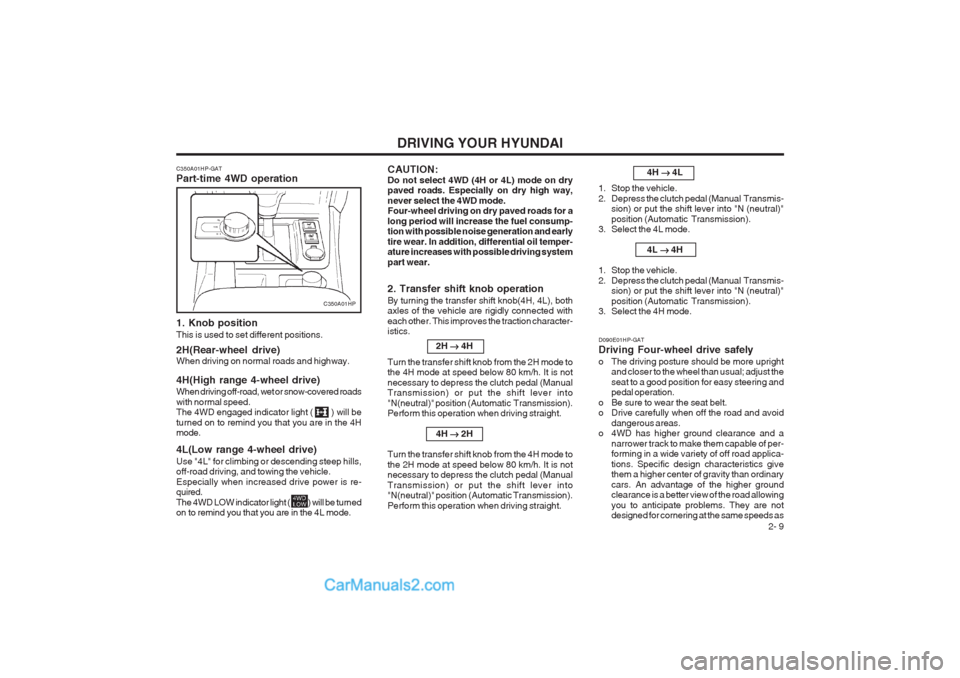
C350A01HP-GAT Part-time 4WD operation
1. Knob position This is used to set different positions. 2H(Rear-wheel drive) When driving on normal roads and highway. 4H(High range 4-wheel drive) When driving off-road, wet or snow-covered roads with normal speed. The 4WD engaged indicator light ( ) will be turned on to remind you that you are in the 4H mode. 4L(Low range 4-wheel drive) Use "4L" for climbing or descending steep hills, off-road driving, and towing the vehicle. Especially when increased drive power is re- quired. The 4WD LOW indicator light ( ) will be turned on to remind you that you are in the 4L mode.
2. Transfer shift knob operation By turning the transfer shift knob(4H, 4L), both axles of the vehicle are rigidly connected with each other. This improves the traction character- istics.2H ��
��
� 4H
Turn the transfer shift knob from the 2H mode tothe 4H mode at speed below 80 km/h. It is not necessary to depress the clutch pedal (Manual Transmission) or put the shift lever into "N(neutral)" position (Automatic Transmission). Perform this operation when driving straight.
4H ��
��
� 2H
Turn the transfer shift knob from the 4H mode to the 2H mode at speed below 80 km/h. It is not necessary to depress the clutch pedal (Manual Transmission) or put the shift lever into "N(neutral)" position (Automatic Transmission). Perform this operation when driving straight.
C350A01HP
D090E01HP-GAT Driving Four-wheel drive safely
o The driving posture should be more uprightand closer to the wheel than usual; adjust the seat to a good position for easy steering and pedal operation.
o Be sure to wear the seat belt.
o Drive carefully when off the road and avoid dangerous areas.
o 4WD has higher ground clearance and a
narrower track to make them capable of per-forming in a wide variety of off road applica- tions. Specific design characteristics give them a higher center of gravity than ordinary cars. An advantage of the higher ground clearance is a better view of the road allowing you to anticipate problems. They are not designed for cornering at the same speeds as 4H
��
��
� 4L
1. Stop the vehicle.
2. Depress the clutch pedal (Manual Transmis- sion) or put the shift lever into "N (neutral)"position (Automatic Transmission).
3. Select the 4L mode.
4L ��
��
� 4H
1. Stop the vehicle.
2. Depress the clutch pedal (Manual Transmis- sion) or put the shift lever into "N (neutral)"position (Automatic Transmission).
3. Select the 4H mode.
CAUTION: Do not select 4WD (4H or 4L) mode on dry paved roads. Especially on dry high way, never select the 4WD mode. Four-wheel driving on dry paved roads for a long period will increase the fuel consump- tion with possible noise generation and early tire wear. In addition, differential oil temper- ature increases with possible driving system part wear.
Page 116 of 349
DRIVING YOUR HYUNDAI
2- 10
conventional 2-wheel drive vehicles any more than low-slung sports cars are designed to perform satisfactorily under off-road condi- tions. If at all possible, avoid sharp turns or abrupt maneuvers. As with other vehicles of this type, failure to operate this vehicle cor- rectly may result in loss of control or vehicle rollover.
o Do not grip the inside or spokes of the steer-
ing wheel when driving off-road. The steering wheel could jerk and injure your hands. Al- ways firmly hold the outer steering wheel when you are driving off-road.
o Drive at lower speeds in strong crosswinds. Because of your vehicle’s high center of gravity, its stability will be affected in cross- winds. Slower speeds ensure better vehicle control.
o Check your brake condition once you are out
of mud or water. Press the brake several times as you move slowly until your feel normal braking forces return.
o Four-wheel driving on flat and normal roads
can result in a severe binding condition when turning the steering wheel.
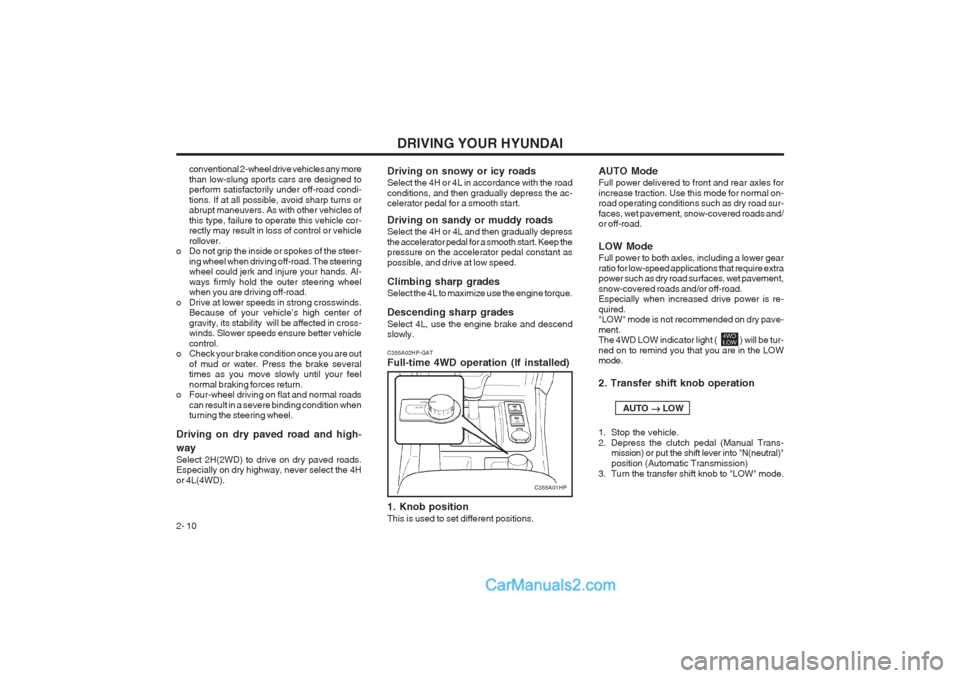
Driving on dry paved road and high- way Select 2H(2WD) to drive on dry paved roads. Especially on dry highway, never select the 4H or 4L(4WD). C355A02HP-GAT Full-time 4WD operation (If installed) 1. Knob position This is used to set different positions.Driving on snowy or icy roads Select the 4H or 4L in accordance with the road conditions, and then gradually depress the ac- celerator pedal for a smooth start. Driving on sandy or muddy roads Select the 4H or 4L and then gradually depress the accelerator pedal for a smooth start. Keep the pressure on the accelerator pedal constant as possible, and drive at low speed. Climbing sharp grades Select the 4L to maximize use the engine torque. Descending sharp grades Select 4L, use the engine brake and descend slowly. AUTO Mode Full power delivered to front and rear axles for increase traction. Use this mode for normal on- road operating conditions such as dry road sur- faces, wet pavement, snow-covered roads and/ or off-road. LOW Mode Full power to both axles, including a lower gear ratio for low-speed applications that require extra power such as dry road surfaces, wet pavement, snow-covered roads and/or off-road. Especially when increased drive power is re- quired. "LOW" mode is not recommended on dry pave- ment. The 4WD LOW indicator light ( ) will be tur- ned on to remind you that you are in the LOW mode. 2. Transfer shift knob operation AUTO
��
��
� LOW
1. Stop the vehicle.
2. Depress the clutch pedal (Manual Trans- mission) or put the shift lever into "N(neutral)"position (Automatic Transmission)
3. Turn the transfer shift knob to "LOW" mode.
C355A01HP
Page 143 of 349
VEHICLE MAINTENANCE REQUIREMENTS 5-5
I
R I III I III I I I III
R I
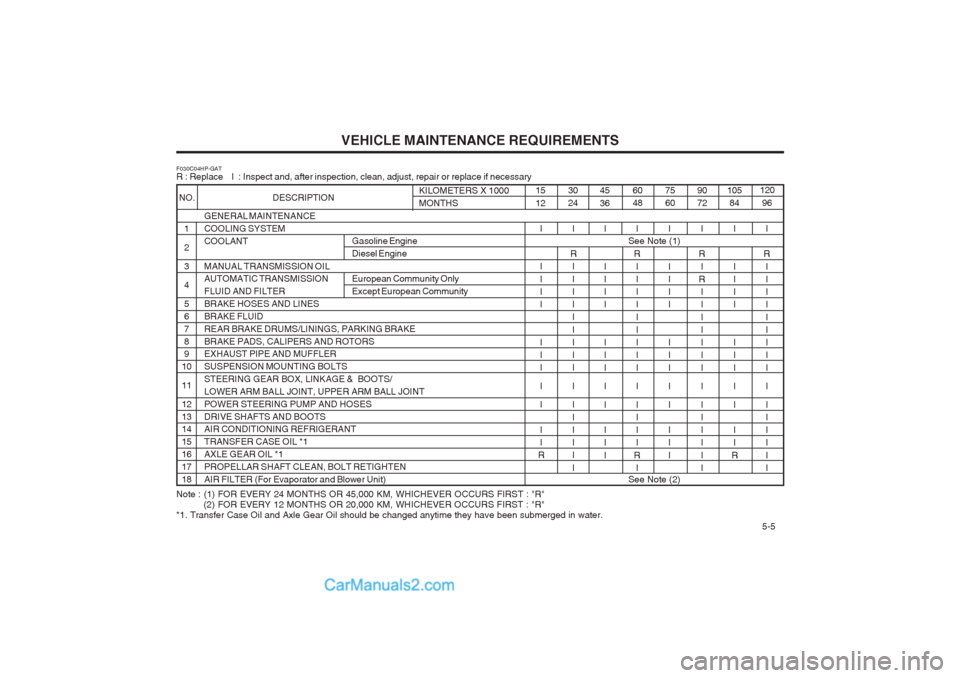
GENERAL MAINTENANCECOOLING SYSTEMCOOLANT MANUAL TRANSMISSION OIL AUTOMATIC TRANSMISSION FLUID AND FILTERBRAKE HOSES AND LINESBRAKE FLUIDREAR BRAKE DRUMS/LININGS, PARKING BRAKEBRAKE PADS, CALIPERS AND ROTORS EXHAUST PIPE AND MUFFLER SUSPENSION MOUNTING BOLTSSTEERING GEAR BOX, LINKAGE & BOOTS/LOWER ARM BALL JOINT, UPPER ARM BALL JOINTPOWER STEERING PUMP AND HOSESDRIVE SHAFTS AND BOOTS AIR CONDITIONING REFRIGERANT TRANSFER CASE OIL *1AXLE GEAR OIL *1PROPELLAR SHAFT CLEAN, BOLT RETIGHTENAIR FILTER (For Evaporator and Blower Unit)
1 23 4 5 678 9
10 1112 13 14 15161718
F030C04HP-GAT R : Replace I : Inspect and, after inspection, clean, adjust, repair or replace if necessary
Note : (1) FOR EVERY 24 MONTHS OR 45,000 KM, WHICHEVER OCCURS FIRST : "R"
(2) FOR EVERY 12 MONTHS OR 20,000 KM, WHICHEVER OCCURS FIRST : "R"
*1. Transfer Case Oil and Axle Gear Oil should be changed anytime they have been submerged in water.
NO. DESCRIPTION
I
R I III I III I I I III I I15 12 30 24
45 36 60 48
75609072105
84 120
96KILOMETERS X 1000 MONTHS
I
R I I III I III I I I III I I I III I I I I I I I I
I I I II I II I I I I
R I I III I I I I I I I II
R I
R
I I I III I I I III I I I I III I I I I I I I
R
European Community Only Except European Community
See Note (1)Gasoline Engine Diesel Engine
See Note (2)
Page 146 of 349
VEHICLE MAINTENANCE REQUIREMENTS
5- 8
F070E01HP-GAT
o Automatic Transmission Fluid and
Filter
The fluid level should be in the "HOT" range of the dipstick, after the engine and transmission are at normal operating temperature. Check the automatic transmission fluid level with the en- gine running and the transmission in neutral, with the parking brake properly applied. Use DEXRON- II or III when adding or changing
fluid. F070F01A-AAT
o Brake Hoses and LinesVisually check for proper installation, chafing, cracks, deterioration and any leakage. Replace any deteriorated or damaged parts immediate- ly. F070G02A-AAT o Brake FluidCheck brake fluid level in the brake fluid reser- voir. The level should be between "MIN" and "MAX" marks on the side of the reservoir. Use only hydraulic brake fluid conforming to DOT 3 or DOT 4. F070H01A-AAT
o Rear Brake Drums/ Linings,
Parking Brake
Check the rear brake drums and linings for scoring, burning, leaking fluid, broken parts, and excessive wear. Inspect the parking brake system including the parking brake lever and cables. For detailed service procedures, refer to the Shop Manual. F070J01A-AAT o Brake Pads, Calipers and RotorsCheck the pads for excessive wear, discs for run out and wear, and calipers for fluid leakage. F070K01A-AAT o Exhaust Pipe and Muffler Visually inspect the exhaust pipes, muffler and hangers for cracks, deterioration, or damage. Start the engine and listen carefully for any exhaust gas leakage. Tighten connections or replace parts as necessary. F070L01A-AAT o Suspension Mounting BoltsCheck the suspension connections for loose- ness or damage. Retighten to the specified torque. F070N01A-AAT
o Power Steering Pump, Belt and
Hoses
Check the power steering pump and hoses for leakage and damage. Replace any damaged or leaking parts immediately. Inspect the power steering belt for evidence of cuts, cracks, ex- cessive wear, oiliness and proper tension. Re- place or adjust it if necessary. F070P01A-AAT o Driveshafts and Boots Check the drive shafts, boots and clamps for cracks, deterioration, or damage. Replace any damaged parts and, if necessary, repack the grease. F070Q01A-AAT
o Air Conditioning RefrigerantCheck the air conditioning lines and connec- tions for leakage and damage. Check air condi- tioning performance according to the relevant shop manual if necessary.
F070M01B-AAT
o Steering Gear Box, Linkage & Boots/
Lower Arm Ball Joint, Upper Arm Ball Joint
With the vehicle stopped and engine off, check for excessive free-play in the steering wheel. Check the linkage for bends or damage. Check the dust boots and ball joints for deterioration, cracks, or damage. Replace any damaged parts.
Page 147 of 349
DO-IT-YOURSELF MAINTENANCE 6-1
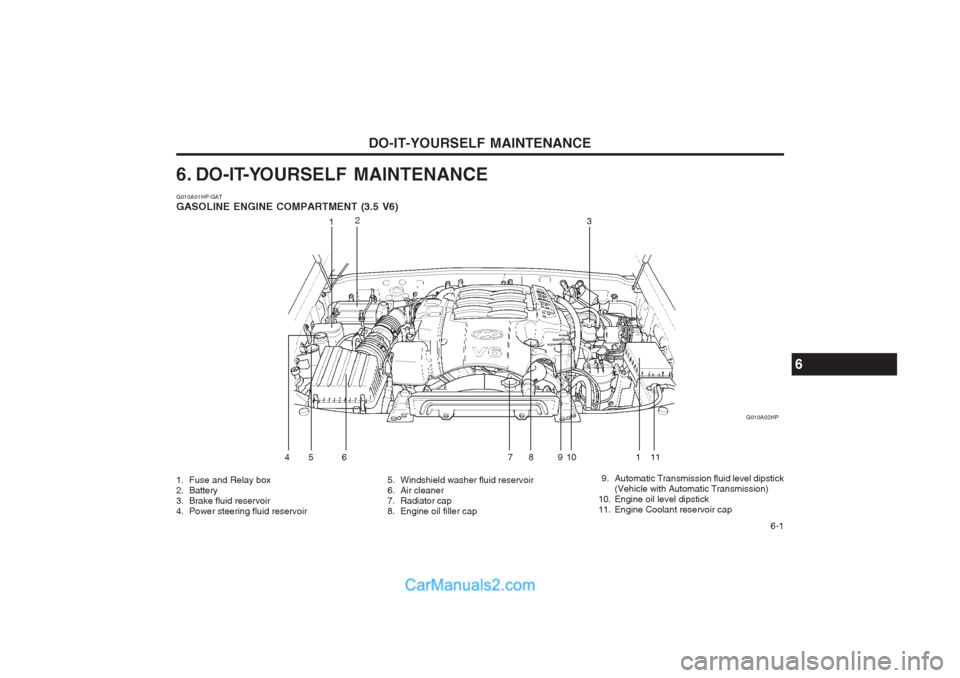
6. DO-IT-YOURSELF MAINTENANCE G010A01HP-GAT GASOLINE ENGINE COMPARTMENT (3.5 V6)
1. Fuse and Relay box
2. Battery
3. Brake fluid reservoir
4. Power steering fluid reservoir5. Windshield washer fluid reservoir
6. Air cleaner
7. Radiator cap
8. Engine oil filler cap 9. Automatic Transmission fluid level dipstick
(Vehicle with Automatic Transmission)
10. Engine oil level dipstick
11. Engine Coolant reservoir cap G010A02HP
1
2
3
4 5 6 7 8 9 10 11
6
1
Page 148 of 349
DO-IT-YOURSELF MAINTENANCE
6-2
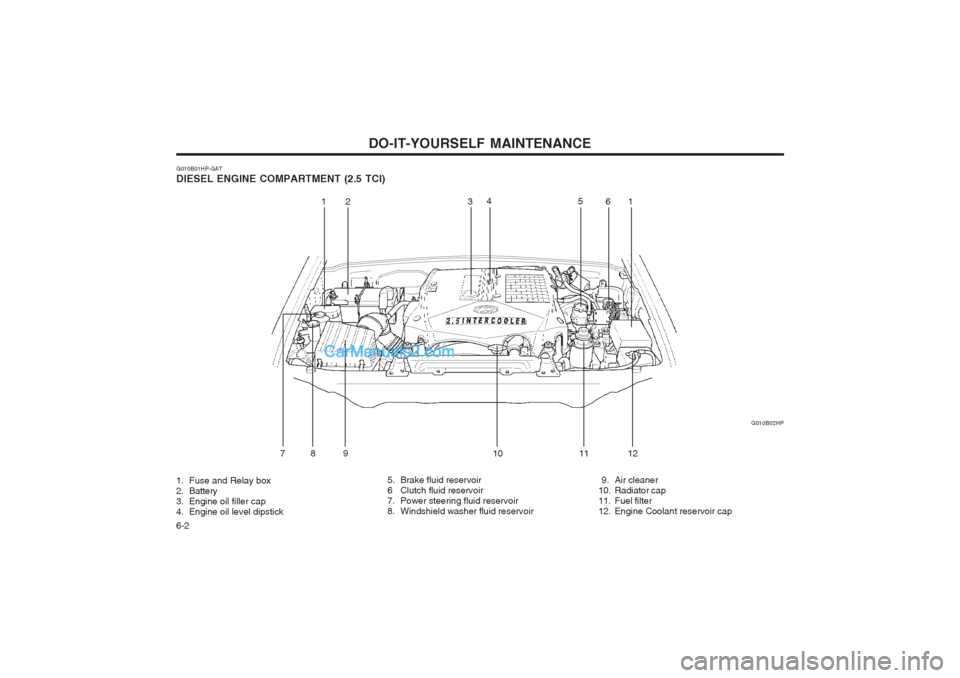
G010B01HP-GAT DIESEL ENGINE COMPARTMENT (2.5 TCI) G010B02HP
1. Fuse and Relay box
2. Battery
3. Engine oil filler cap
4. Engine oil level dipstick 5. Brake fluid reservoir
6 Clutch fluid reservoir
7. Power steering fluid reservoir
8. Windshield washer fluid reservoir
9. Air cleaner
10. Radiator cap
11. Fuel filter
12. Engine Coolant reservoir cap
12 3
4
56
78 9 1 0 11 121
Page 149 of 349
DO-IT-YOURSELF MAINTENANCE 6-3
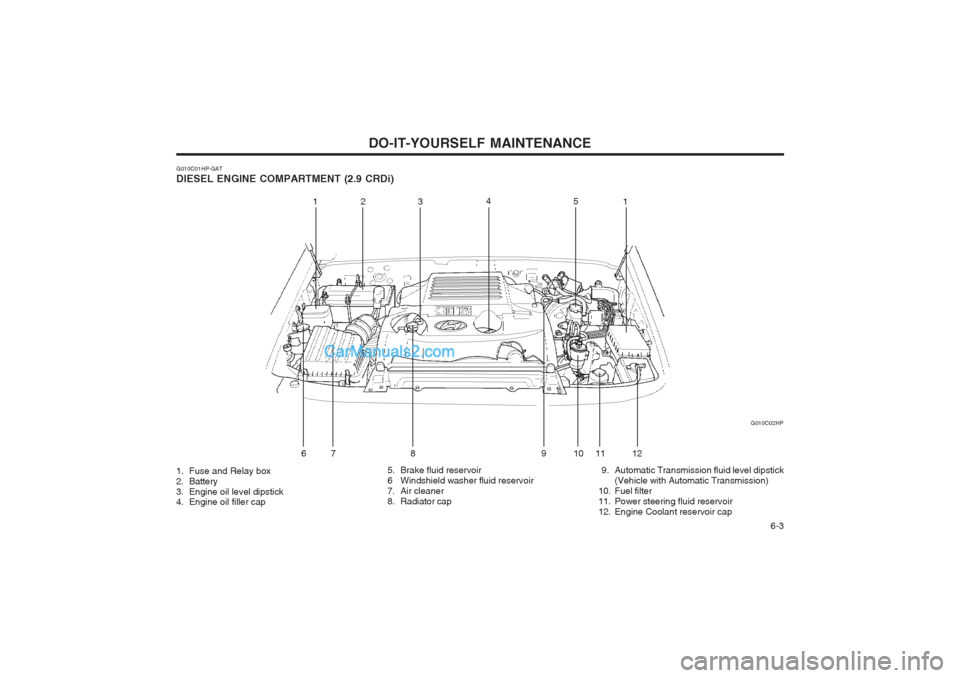
G010C01HP-GAT DIESEL ENGINE COMPARTMENT (2.9 CRDi) G010C02HP
1. Fuse and Relay box
2. Battery
3. Engine oil level dipstick
4. Engine oil filler cap 5. Brake fluid reservoir
6 Windshield washer fluid reservoir
7. Air cleaner
8. Radiator cap
9. Automatic Transmission fluid level dipstick
(Vehicle with Automatic Transmission)
10. Fuel filter
11. Power steering fluid reservoir
12. Engine Coolant reservoir cap
12 3 4
5
6 7 8 9 11 121
10