radiator Hyundai Terracan 2003 Owner's Manual
[x] Cancel search | Manufacturer: HYUNDAI, Model Year: 2003, Model line: Terracan, Model: Hyundai Terracan 2003Pages: 349, PDF Size: 4.56 MB
Page 50 of 349
FEATURES OF YOUR HYUNDAI
1- 42
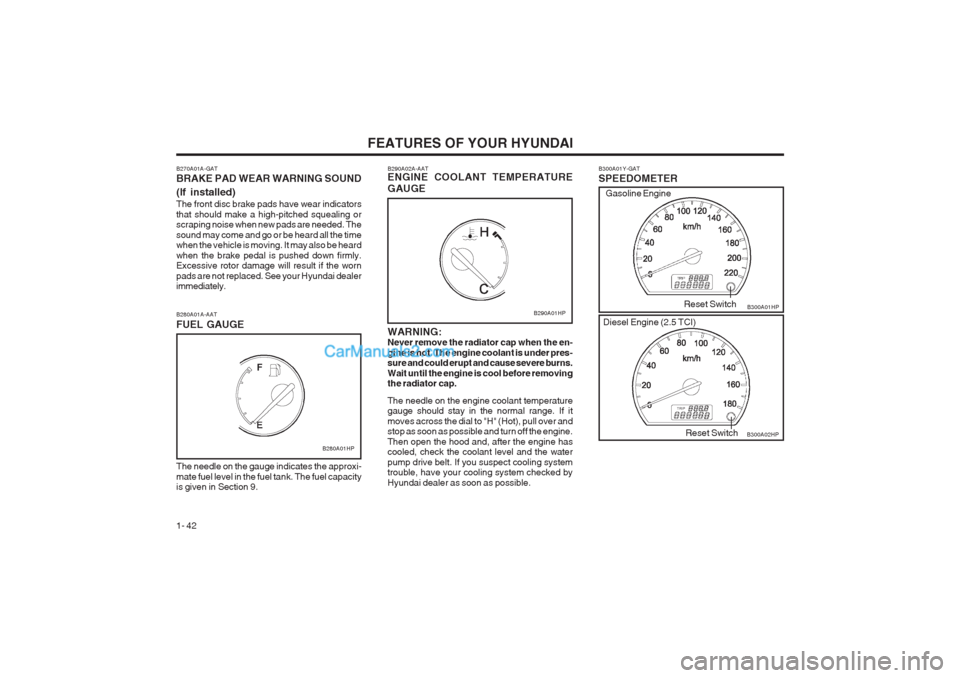
B300A01Y-GAT SPEEDOMETER B300A01HP
B300A02HP
Reset Switch
Reset Switch
Gasoline Engine
Diesel Engine (2.5 TCI)
B280A01A-AAT FUEL GAUGE
B280A01HP
The needle on the gauge indicates the approxi- mate fuel level in the fuel tank. The fuel capacity is given in Section 9. B290A02A-AAT ENGINE COOLANT TEMPERATURE GAUGE WARNING: Never remove the radiator cap when the en- gine is hot. The engine coolant is under pres- sure and could erupt and cause severe burns. Wait until the engine is cool before removing the radiator cap. The needle on the engine coolant temperature gauge should stay in the normal range. If it moves across the dial to "H" (Hot), pull over and stop as soon as possible and turn off the engine. Then open the hood and, after the engine has cooled, check the coolant level and the water pump drive belt. If you suspect cooling system trouble, have your cooling system checked by Hyundai dealer as soon as possible.
B290A01HP
B270A01A-GAT BRAKE PAD WEAR WARNING SOUND (If installed) The front disc brake pads have wear indicators that should make a high-pitched squealing or scraping noise when new pads are needed. The sound may come and go or be heard all the time when the vehicle is moving. It may also be heard when the brake pedal is pushed down firmly. Excessive rotor damage will result if the worn pads are not replaced. See your Hyundai dealer immediately.
Page 63 of 349
FEATURES OF YOUR HYUNDAI 1- 55
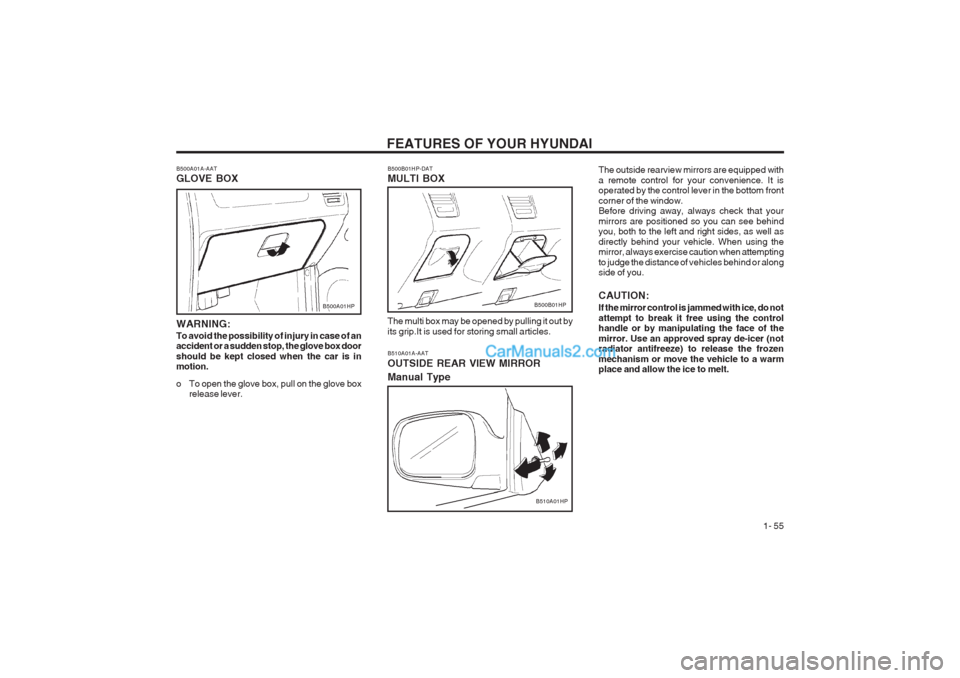
B510A01A-AAT OUTSIDE REAR VIEW MIRROR Manual Type
B510A01HPThe outside rearview mirrors are equipped with a remote control for your convenience. It is operated by the control lever in the bottom front corner of the window. Before driving away, always check that your mirrors are positioned so you can see behind you, both to the left and right sides, as well as directly behind your vehicle. When using the mirror, always exercise caution when attempting to judge the distance of vehicles behind or along side of you. CAUTION: If the mirror control is jammed with ice, do not attempt to break it free using the control handle or by manipulating the face of the mirror. Use an approved spray de-icer (not radiator antifreeze) to release the frozen mechanism or move the vehicle to a warm place and allow the ice to melt.
B500A01A-AAT GLOVE BOX
B500A01HP
WARNING: To avoid the possibility of injury in case of an accident or a sudden stop, the glove box door should be kept closed when the car is in motion.
o To open the glove box, pull on the glove box release lever.B500B01HP
The multi box may be opened by pulling it out by its grip.It is used for storing small articles.
B500B01HP-DAT MULTI BOX
Page 69 of 349
FEATURES OF YOUR HYUNDAI 1- 61
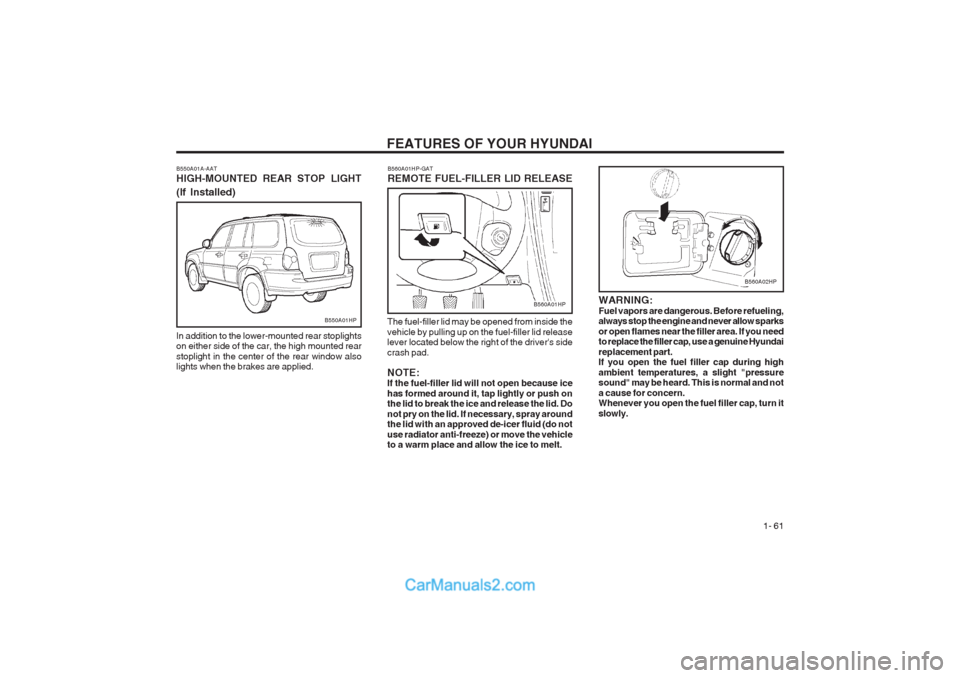
WARNING: Fuel vapors are dangerous. Before refueling, always stop the engine and never allow sparks or open flames near the filler area. If you need to replace the filler cap, use a genuine Hyundai replacement part. If you open the fuel filler cap during high ambient temperatures, a slight "pressure sound" may be heard. This is normal and not a cause for concern. Whenever you open the fuel filler cap, turn it slowly.
B550A01A-AAT HIGH-MOUNTED REAR STOP LIGHT (If Installed)
In addition to the lower-mounted rear stoplights on either side of the car, the high mounted rear stoplight in the center of the rear window also lights when the brakes are applied.
B550A01HP
B560A01HP-GAT REMOTE FUEL-FILLER LID RELEASE
The fuel-filler lid may be opened from inside the vehicle by pulling up on the fuel-filler lid release lever located below the right of the driver's side crash pad. NOTE: If the fuel-filler lid will not open because ice has formed around it, tap lightly or push on the lid to break the ice and release the lid. Do not pry on the lid. If necessary, spray around the lid with an approved de-icer fluid (do not use radiator anti-freeze) or move the vehicle to a warm place and allow the ice to melt.
B560A01HP
B560A02HP
Page 126 of 349
WHAT TO DO IN AN EMERGENCY
3-2 tinue to apply water to the affected area with a sponge or cloth.
o The gas produced by the battery during the
jump-start operation is highly explosive. Do not smoke or allow a spark or an open flame in the vicinity.
o The battery being used to provide the jump
start must be 12-volt. If you cannot determine that it is a 12-volt battery, do not attempt to use it for the jump start.
o To jump start a car with a discharged battery,
follow this procedure exactly:
1. If the booster battery is installed in another vehicle, be sure the two vehicles are nottouching.
2. Turn off all unnecessary lights and acces-
sories in both vehicles.
3. Attach the clamps of the jumper cable in the
exact location shown in the illustration. First, attach one clamp of the jumper cable to the positive (+) post or cable of the discharged battery. Then attach the other end of the same cable to the positive (+) post or cable of the booster battery. Next, using the other cable, attach one clamp to the negative (-) post or cable of the booster battery. Then attach the other end of that cable to a solid metal part of the engine away from the battery. Do not connect the cable to any moving part.
4. Start the engine in the car with the booster battery and let it run for a few minutes. This will help to assure that the booster battery is fully charged. During the jumping operation,run the engine in this vehicle at about 2000 rpm.
5. Start the engine in the car with the discharged battery using the normal starting procedure. After the engine starts, leave the jumper cables connected and let the engine run at fast idle or about 2000 rpm for several min- utes.
6. Carefully remove the jumper cables in the reverse order of attachment.
If you do not know why your battery became discharged (because the lights were left on, etc.), have the charging system checked by your Hyundai dealer. visible loss of coolant and no steam, leave theengine running and check to be sure the engine cooling fan is operating. If the fan is not running, turn the engine off.
4. Check to see if the water pump drive belt is
missing. If it is not missing, check to see that it is tight. If the drive belt seems to be satis- factory, check for engine coolant leaking from the radiator, hoses or under the car. (If the air conditioning had been in use, it is normal for cold water to be draining from it when you stop).
WARNING: While the engine is running, keep hands and clothing away from moving parts such as the fan and drive belts to prevent injury.
5. If the water pump drive belt is broken or coolant is leaking out, stop the engine im- mediately and call the nearest Hyundai deal- er for assistance.
WARNING: Do not remove the radiator cap when the engine is hot. This can allow coolant to be blown out of the opening and cause serious burns.
6. If you cannot find the cause of the overheat- ing, wait until the engine temperature has returned to normal. Then, if coolant has been lost, carefully add coolant to the reservoir (Page 6-8) to bring the fluid level in the reser- voir up to the halfway mark.
D030A01HP-AAT IF THE ENGINE OVERHEATS If your temperature gauge indicates overheating, you experience a loss of power, or hear loud pinging or knocking, the engine is probably too hot. If this happens to you, you should:
1. Pull off the road and stop as soon as it is safe
to do so.
2. Place the gear selector lever in "P" (auto- matic), or neutral (manual transmission) and set the parking brake. If the air conditioning is on, turn it off.
3. If engine coolant is running out under the car or steam is coming out from under the hood, stop the engine. Do not open the hood until the engine coolant has stopped running or the steaming has stopped. If there is no
Page 147 of 349
DO-IT-YOURSELF MAINTENANCE 6-1
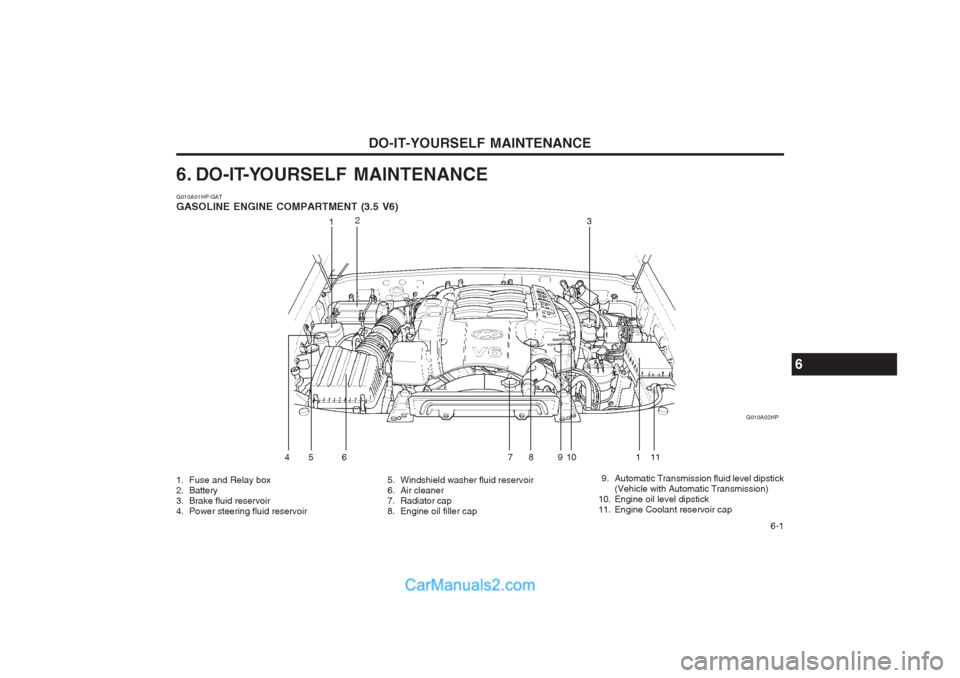
6. DO-IT-YOURSELF MAINTENANCE G010A01HP-GAT GASOLINE ENGINE COMPARTMENT (3.5 V6)
1. Fuse and Relay box
2. Battery
3. Brake fluid reservoir
4. Power steering fluid reservoir5. Windshield washer fluid reservoir
6. Air cleaner
7. Radiator cap
8. Engine oil filler cap 9. Automatic Transmission fluid level dipstick
(Vehicle with Automatic Transmission)
10. Engine oil level dipstick
11. Engine Coolant reservoir cap G010A02HP
1
2
3
4 5 6 7 8 9 10 11
6
1
Page 148 of 349
DO-IT-YOURSELF MAINTENANCE
6-2
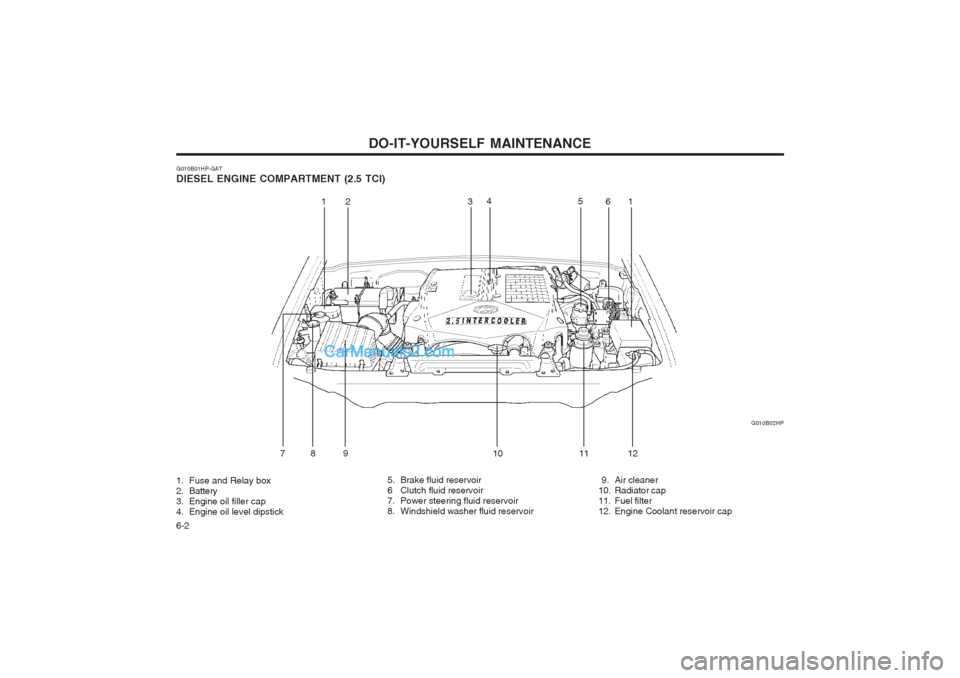
G010B01HP-GAT DIESEL ENGINE COMPARTMENT (2.5 TCI) G010B02HP
1. Fuse and Relay box
2. Battery
3. Engine oil filler cap
4. Engine oil level dipstick 5. Brake fluid reservoir
6 Clutch fluid reservoir
7. Power steering fluid reservoir
8. Windshield washer fluid reservoir
9. Air cleaner
10. Radiator cap
11. Fuel filter
12. Engine Coolant reservoir cap
12 3
4
56
78 9 1 0 11 121
Page 149 of 349
DO-IT-YOURSELF MAINTENANCE 6-3
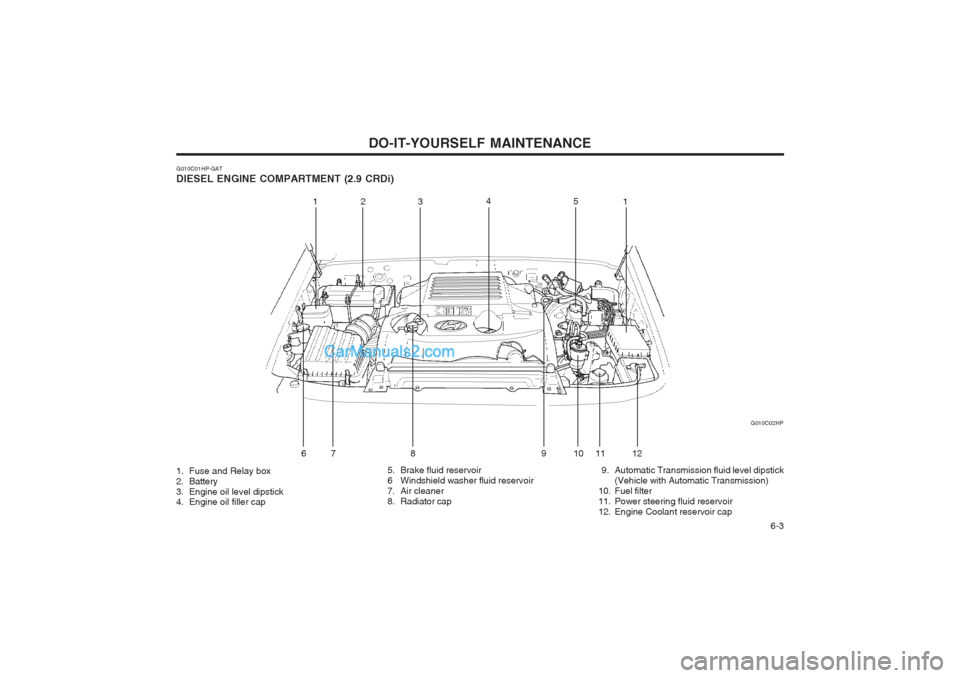
G010C01HP-GAT DIESEL ENGINE COMPARTMENT (2.9 CRDi) G010C02HP
1. Fuse and Relay box
2. Battery
3. Engine oil level dipstick
4. Engine oil filler cap 5. Brake fluid reservoir
6 Windshield washer fluid reservoir
7. Air cleaner
8. Radiator cap
9. Automatic Transmission fluid level dipstick
(Vehicle with Automatic Transmission)
10. Fuel filter
11. Power steering fluid reservoir
12. Engine Coolant reservoir cap
12 3 4
5
6 7 8 9 11 121
10
Page 154 of 349
DO-IT-YOURSELF MAINTENANCE
6-8
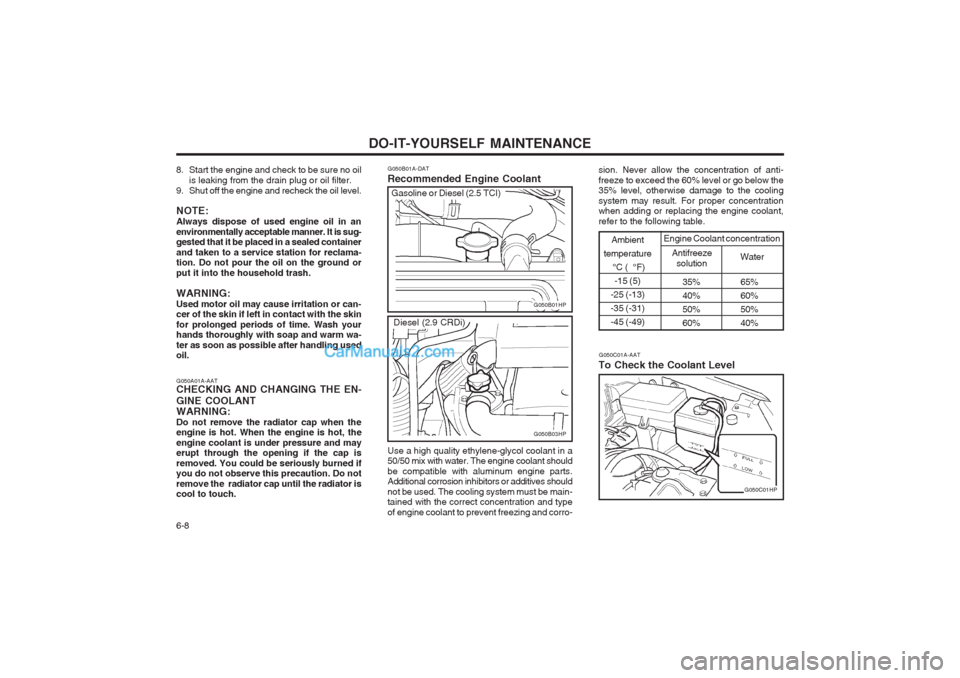
G050B01A-DAT Recommended Engine Coolant
35% 65%
40% 60%
50% 50%
60% 40%
Ambient
temperature °C ( °F)-15 (5)
-25 (-13) -35 (-31)-45 (-49)
Antifreeze solution Water
Engine Coolant concentration
G050B01HP
G050C01A-AAT
To Check the Coolant Level
G050C01HP
Use a high quality ethylene-glycol coolant in a 50/50 mix with water. The engine coolant should be compatible with aluminum engine parts. Additional corrosion inhibitors or additives should not be used. The cooling system must be main- tained with the correct concentration and type of engine coolant to prevent freezing and corro-
Gasoline or Diesel (2.5 TCI)
G050B03HP
Diesel (2.9 CRDi) sion. Never allow the concentration of anti- freeze to exceed the 60% level or go below the 35% level, otherwise damage to the cooling system may result. For proper concentration when adding or replacing the engine coolant, refer to the following table.
8. Start the engine and check to be sure no oil
is leaking from the drain plug or oil filter.
9. Shut off the engine and recheck the oil level. NOTE: Always dispose of used engine oil in anenvironmentally acceptable manner. It is sug- gested that it be placed in a sealed container and taken to a service station for reclama- tion. Do not pour the oil on the ground or put it into the household trash. WARNING: Used motor oil may cause irritation or can- cer of the skin if left in contact with the skin for prolonged periods of time. Wash your hands thoroughly with soap and warm wa- ter as soon as possible after handling used oil. G050A01A-AAT CHECKING AND CHANGING THE EN- GINE COOLANT WARNING: Do not remove the radiator cap when the engine is hot. When the engine is hot, the engine coolant is under pressure and may erupt through the opening if the cap is removed. You could be seriously burned if you do not observe this precaution. Do not remove the radiator cap until the radiator is cool to touch.
Page 155 of 349
DO-IT-YOURSELF MAINTENANCE 6-9
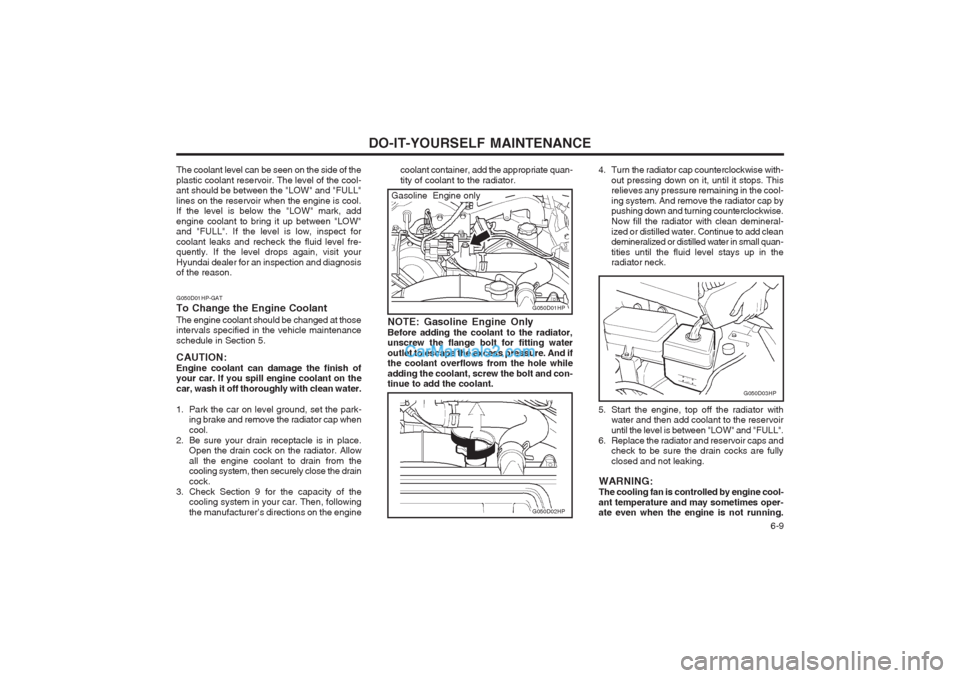
coolant container, add the appropriate quan- tity of coolant to the radiator.
G050D03HP
G050D01HP
G050D02HP
NOTE: Gasoline Engine Only Before adding the coolant to the radiator, unscrew the flange bolt for fitting water outlet to escape the excess pressure. And if the coolant overflows from the hole while adding the coolant, screw the bolt and con- tinue to add the coolant. 4. Turn the radiator cap counterclockwise with-
out pressing down on it, until it stops. Thisrelieves any pressure remaining in the cool- ing system. And remove the radiator cap by pushing down and turning counterclockwise. Now fill the radiator with clean demineral-ized or distilled water. Continue to add clean demineralized or distilled water in small quan- tities until the fluid level stays up in the radiator neck.
5. Start the engine, top off the radiator with water and then add coolant to the reservoir until the level is between "LOW" and "FULL".
6. Replace the radiator and reservoir caps and check to be sure the drain cocks are fullyclosed and not leaking.
WARNING:The cooling fan is controlled by engine cool-
ant temperature and may sometimes oper- ate even when the engine is not running.
Gasoline Engine only
The coolant level can be seen on the side of the plastic coolant reservoir. The level of the cool- ant should be between the "LOW" and "FULL" lines on the reservoir when the engine is cool. If the level is below the "LOW" mark, add engine coolant to bring it up between "LOW" and "FULL". If the level is low, inspect for coolant leaks and recheck the fluid level fre- quently. If the level drops again, visit your Hyundai dealer for an inspection and diagnosis of the reason.
G050D01HP-GAT To Change the Engine CoolantThe engine coolant should be changed at those intervals specified in the vehicle maintenance schedule in Section 5. CAUTION: Engine coolant can damage the finish of your car. If you spill engine coolant on the car, wash it off thoroughly with clean water.
1. Park the car on level ground, set the park-
ing brake and remove the radiator cap when cool.
2. Be sure your drain receptacle is in place. Open the drain cock on the radiator. Allowall the engine coolant to drain from the cooling system, then securely close the drain cock.
3. Check Section 9 for the capacity of the cooling system in your car. Then, followingthe manufacturer’s directions on the engine
Page 157 of 349
DO-IT-YOURSELF MAINTENANCE 6-11
G090A01HP-AAT FILLING THE WASHER RESERVOIR
G090A01HP
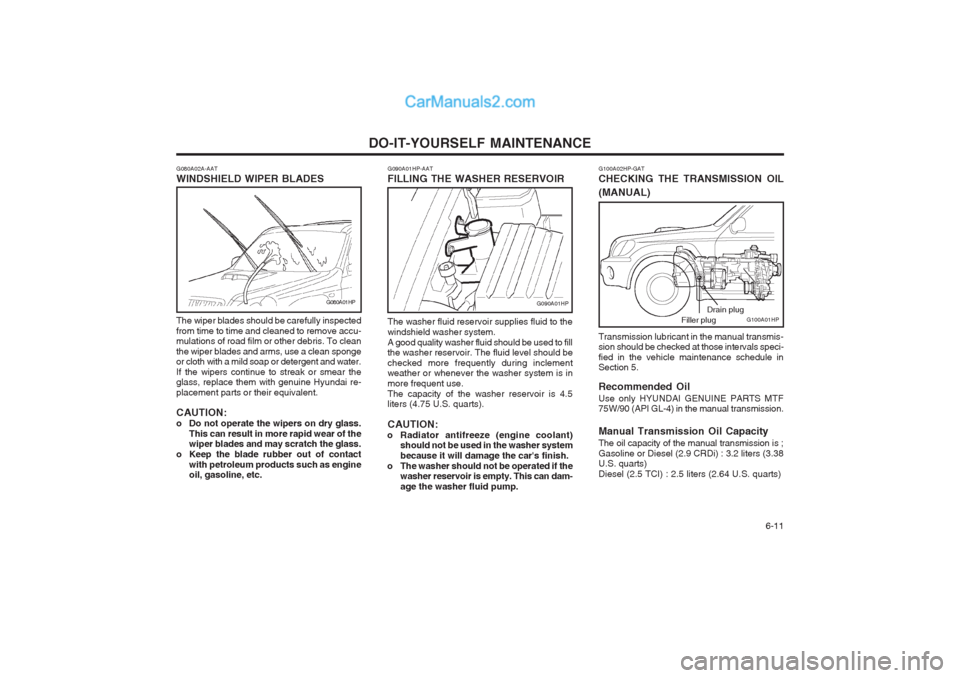
The washer fluid reservoir supplies fluid to the windshield washer system.A good quality washer fluid should be used to fill the washer reservoir. The fluid level should be checked more frequently during inclement weather or whenever the washer system is in more frequent use.The capacity of the washer reservoir is 4.5 liters (4.75 U.S. quarts). CAUTION:
o Radiator antifreeze (engine coolant) should not be used in the washer system because it will damage the car's finish.
o The washer should not be operated if the washer reservoir is empty. This can dam-age the washer fluid pump.
G100A02HP-GAT CHECKING THE TRANSMISSION OIL (MANUAL)
G100A01HP
Drain plug
Filler plug
Transmission lubricant in the manual transmis- sion should be checked at those intervals speci- fied in the vehicle maintenance schedule in Section 5. Recommended Oil Use only HYUNDAI GENUINE PARTS MTF 75W/90 (API GL-4) in the manual transmission. Manual Transmission Oil Capacity The oil capacity of the manual transmission is ; Gasoline or Diesel (2.9 CRDi) : 3.2 liters (3.38 U.S. quarts) Diesel (2.5 TCI) : 2.5 liters (2.64 U.S. quarts)
G080A02A-AAT WINDSHIELD WIPER BLADES
The wiper blades should be carefully inspected from time to time and cleaned to remove accu- mulations of road film or other debris. To clean the wiper blades and arms, use a clean sponge or cloth with a mild soap or detergent and water. If the wipers continue to streak or smear the glass, replace them with genuine Hyundai re- placement parts or their equivalent. CAUTION:
o Do not operate the wipers on dry glass. This can result in more rapid wear of the wiper blades and may scratch the glass.
o Keep the blade rubber out of contact with petroleum products such as engineoil, gasoline, etc.
G080A01HP