brake fluid Hyundai Terracan 2005 Owner's Guide
[x] Cancel search | Manufacturer: HYUNDAI, Model Year: 2005, Model line: Terracan, Model: Hyundai Terracan 2005Pages: 539, PDF Size: 18.03 MB
Page 356 of 539
1
CONTROLS AND EQUIPMENT
51
B260H02A-EAT
Parking Brake/ Low Brake Fluid LevelWarning Light WARNING:
In the event of problems being sus- pected with the braking system, theadvice of the nearest Hyundai dealer must be sought before the vehicle is driven. Driving the vehicle witheither an electrical or hydraulic brak- ing system defect may be danger- ous, resulting in accident or per-sonal injury. Warning Light Operation The parking brake/low brake fluid level warning light will be illuminated when-ever the ignition switch is turned to the "ON" position irrespective of whether or not the parking brake is applied andmust be extinguished when the engine starts and the parking brake released. If the warning light fails to extinguish orilluminates at any other time, the ve- hicle must be brought to rest in a safe location and the level of brake fluid inthe reservoir checked. If the fluid level is incorrect, fluid conforming to DOT 3 or DOT 4 specifications should beadded. If, after correcting the brake fluid level, the warning light continues to be illuminated, the advice of thenearest Hyundai dealer must be sought before the vehicle is driven again. Your Hyundai is equipped with a di-agonally split dual braking system which will ensure that in the event of one of the brake circuits becomingdefective, approximately fifty per cent of the normal braking performance will be available.If failure of one of the circuits occurs,the required amount of pedal effort,pedal travel and stopping distance will be increased. Use of the gearbox is recommended to assist in bringing thevehicle to rest. The vehicle must not be driven once brake failure has occurred until the system has been repaired andis functioning normally. The braking system employs a vacuum servo in order that the pedal efforts arereduced. Power for the servo is de- rived from the engine and therefore, in the event of the engine stopping or thevehicle being towed, pedal efforts will be substantially increased.
!
Page 387 of 539
1CONTROLS AND EQUIPMENT
82
!
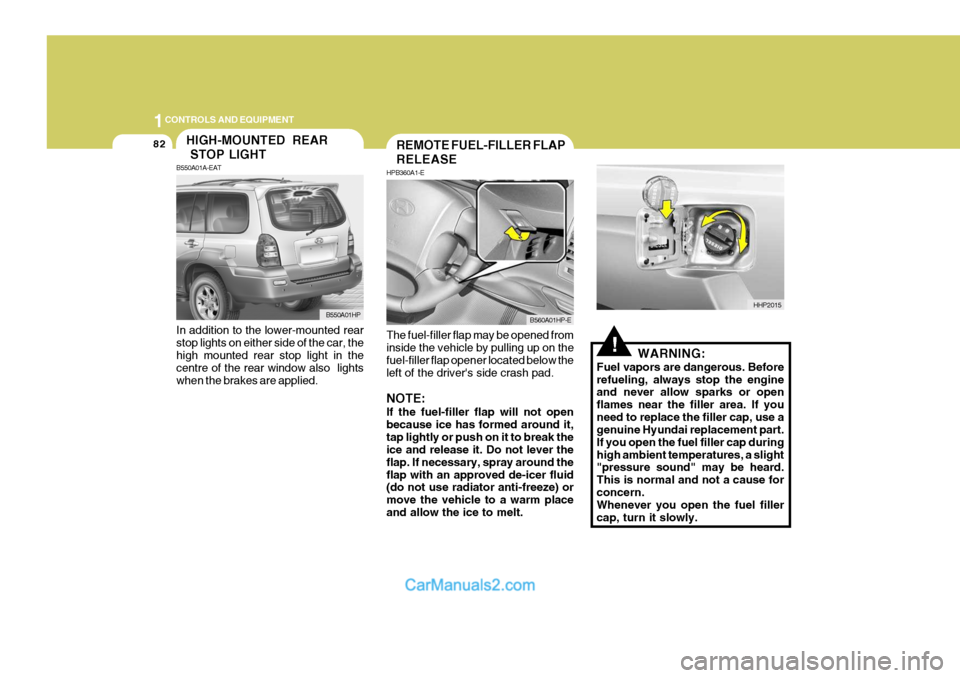
The fuel-filler flap may be opened from inside the vehicle by pulling up on the fuel-filler flap opener located below theleft of the driver's side crash pad. NOTE: If the fuel-filler flap will not open because ice has formed around it,tap lightly or push on it to break the ice and release it. Do not lever the flap. If necessary, spray around theflap with an approved de-icer fluid (do not use radiator anti-freeze) or move the vehicle to a warm placeand allow the ice to melt. WARNING:
Fuel vapors are dangerous. Beforerefueling, always stop the engine and never allow sparks or open flames near the filler area. If youneed to replace the filler cap, use a genuine Hyundai replacement part. If you open the fuel filler cap duringhigh ambient temperatures, a slight "pressure sound" may be heard. This is normal and not a cause forconcern. Whenever you open the fuel filler cap, turn it slowly.
REMOTE FUEL-FILLER FLAP RELEASE
HPB360A1-E
B560A01HP-E
HHP2015
In addition to the lower-mounted rear stop lights on either side of the car, the high mounted rear stop light in the centre of the rear window also lightswhen the brakes are applied.
HIGH-MOUNTED REAR STOP LIGHT
B550A01A-EAT
B550A01HP
Page 425 of 539
2 DRIVING YOUR HYUNDAI
12
!
C090I01E-EAT
CAUTION:
o Shift into "R" and "P" only when the vehicle has completely stopped.
o Do not accelerate the engine in reverse or any of the forward posi-tions with the brakes applied.
o Always apply the footbrake when shifting from "P" or "N" to "R","D", "2" or "L" position.
o Do not use the "P" (Park) posi- tion in place of the parking brake.Always set the parking brake,shift the transmission into "P" (Park) and turn off the ignition when you leave the vehicle, evenmomentarily. Never leave the ve- hicle unattended whilst the en- gine is running.
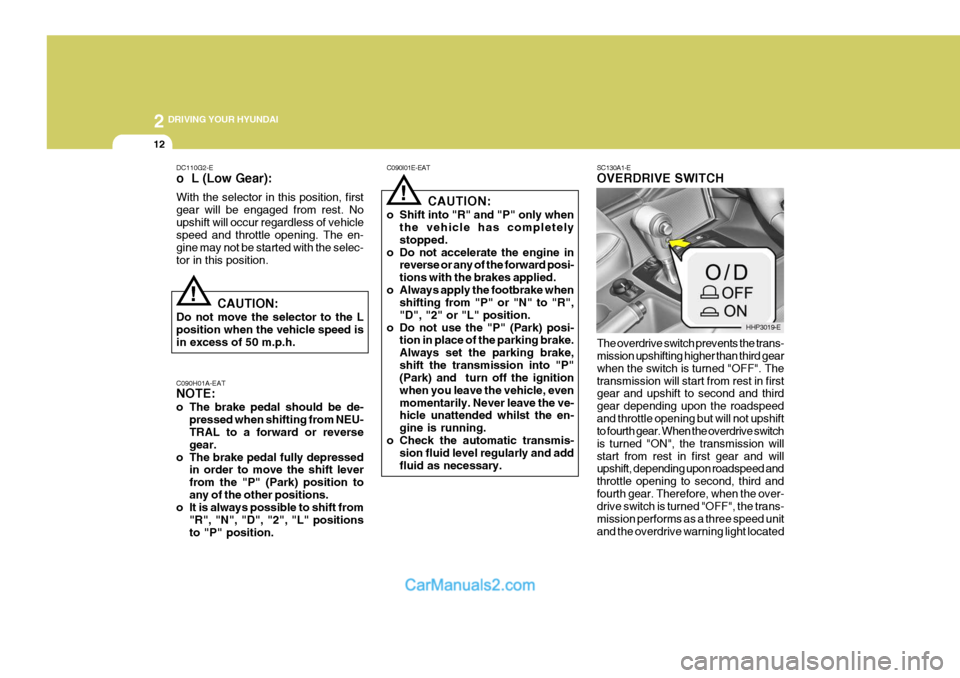
o Check the automatic transmis- sion fluid level regularly and addfluid as necessary. SC130A1-E OVERDRIVE SWITCH The overdrive switch prevents the trans- mission upshifting higher than third gear when the switch is turned "OFF". Thetransmission will start from rest in first gear and upshift to second and third gear depending upon the roadspeedand throttle opening but will not upshift to fourth gear. When the overdrive switch is turned "ON", the transmission willstart from rest in first gear and will upshift, depending upon roadspeed and throttle opening to second, third andfourth gear. Therefore, when the over- drive switch is turned "OFF", the trans- mission performs as a three speed unitand the overdrive warning light located
!
DC110G2-E o L (Low Gear): With the selector in this position, first gear will be engaged from rest. Noupshift will occur regardless of vehicle speed and throttle opening. The en- gine may not be started with the selec-tor in this position.
CAUTION:
Do not move the selector to the Lposition when the vehicle speed isin excess of 50 m.p.h. C090H01A-EAT NOTE:
o The brake pedal should be de- pressed when shifting from NEU- TRAL to a forward or reverse gear.
o The brake pedal fully depressed in order to move the shift leverfrom the "P" (Park) position toany of the other positions.
o It is always possible to shift from
"R", "N", "D", "2", "L" positionsto "P" position.
HHP3019-E
Page 443 of 539
2 DRIVING YOUR HYUNDAI
30
14. When going down a hill, shift into alower gear and use the engine brak- ing effect. When ascending a long grade, downshift the transmission to alower gear and reduce speed to reduce chances of engine over- loading and/or overheating.
15.If you have to stop whilst going uphill, do not hold the vehicle inplace by pressing on the accelera-tor. This can cause the automatic transmission to overheat. Use the parking brake or footbrake.
NOTE: When towing, check transmission fluid more frequently.
HPC200E1-E Trailer or Vehicle Towing Tips
1. Before towing, check towbar and
safety cable connections as well as proper operation of the trailer run- ning lights, brake lights, and turn signals.
2. Always drive your vehicle at a mod- erate speed (Less than 60 MPH).
3. Trailer towing requires more fuel than normal conditions.
4. To maintain engine braking effi-
ciency and electrical charging per-formance, do not use fifth gear (manual transmission).
5. Always secure items in the trailer to prevent load shift whilst driving.
6. Check the condition and air pres-
sure of all tyres on the trailer and your car. Low tyre pressure can seriously affect the handling. Also check the spare tyre.
7. The vehicle/trailer combination is more affected by crosswind andbuffeting.When being passed by a large ve- hicle, keep a constant speed and steer straight ahead. If there is toomuch wind buffeting slow down to get out of the other vehicle's air turbulence. 8. When parking your car and trailer,
especially on a hill, be sure to followall the normal precautions. Turn your front wheel into the curb, set the parking brake firmly, and putthe transmission in 1st or Reverse (manual) or Park (automatic). In addition, place wheel chocks at eachof the trailer's tyres.
9. If the trailer has electric brakes,
start your vehicle and trailer mov-ing, and then apply the trailer brake controller by hand to be sure the brakes are working. This lets youcheck your electrical connection at the same time.
10.During your trip, check occasion- ally to be sure that the load issecure, and that the lights and any trailer brakes are still working.
11.Avoid jerky starts, sudden accel- eration or sudden stops.
12.Avoid sharp turns and rapid lane changes.
13.Avoid holding the brake pedal down
too long or too frequently. This couldcause the brakes to overheat, re- sulting in reduced braking efficiency.
Page 465 of 539
44APPEARANCE CARE
4
JE070A1-E POLISHING The exterior paint work should be pol- ished with a proprietary wax polish when water no longer collects in beadform on the paint work. The instruc- tions of the product manufacturer should be adhered to. JE080A1-E BUMPER MAINTENANCE The special material from which the bumpers are manufactured warrantsspecial attention to preserve the ap- pearance of the bumpers. Avoid con- tact with battery electrolyte or brakefluid and ensure that accidental spill- ages are immediately flushed with water.Do not use abrasive cleaning materi- als which may damage the bumpers. Avoid subjecting the bumpers to hightemperatures such as may be encoun- tered in high bake paint ovens.
JE090A1-E ACCIDENT REPAIRS In the event of the body work sustain- ing damage, the following points shouldbe noted prior to repairs being under- taken. If body panels are replaced or re-paired, anti corrosion treatment must be applied to the repair area. The product used must be compatible withthose used in manufacture. It is rec- ommended that repairs are entrusted to a Hyundai dealer to ensure thatreplacement parts used are of the same high quality as those used in manufac- ture of the vehicle and that the correctrepair methods and materials will en- sure adequate levels of corrosion pro- tection and the continued validity of theAnti Perforation Warranty.
JE060A1-E STAIN/SPOT REMOVAL Should tree sap, dead insects or tar prove to be difficult to remove from thepaint film, turpentine or a proprietary paint cutting compound may be used. Ensure that the area to be cleaned isnot rubbed intensively to prevent break- ing through the colour coat and expos- ing the under coat.
Page 469 of 539
5VEHICLE MAINTENANCE REQUIREMENTS
2
NOTE:The inspection and testing of cer-
tain electronic fuel injection/engine management and automatic trans- mission control systems requirespecialised electronic equipment specifically designed for Hyundai vehicles. The use of general pur-pose electrical test equipment may result in damage to the control unit microprocessors.
DF020C2-E
Specified Scheduled Procedures
The specified scheduled procedures
are listed in the maintenance chartsbeginning at page 5-3. The operationsspecified must be performed at the time or mileage intervals shown irre- spective of whether the mileage inter-val has been reached before the speci- fied time interval.
Certain lubricants and components
degrade with both time and mileage(eg, engine oil and brake fluid) and therefore it is not permissable to basethe maintenance schedule upon mile- age alone. It is strongly recommended DF020F1-E
SERVICE HISTORY
It is important that all scheduled main-
tenance services are recorded in the warranty and service passport to en- sure that proof of maintenance is avail- able when warranty service is required.
that the maintenance operations areperformed by a Hyundai dealer be-cause of the need for specialized knowl- edge and tooling and to ensure that no possibility of invalidating the manufac-turers warranty exists.
The maintenance schedules relate to
vehicles operated under normal condi-tions, vehicles which are operated under adverse conditions will require more frequent maintenance which isdescribed at page 5-6. NOTE:
Service schedules may change de-
pending on individual country needs. Please ask your localHyundai dealer for a copy of the service schedule that relates to that country.MAINTENANCE AND SER- VICING REQUIREMENTS
DF020A1-E To ensure the continued reliability and safety of the vehicle, certain routine maintenance operations are requiredat specific mileage or time intervals.It is the responsibility of the vehicleowner to ensure that the maintenanceschedules shown in both this Owner's Manual and the Warranty and Service Passport are adhered to.The new vehicle warranty may beinvalidated if the routine maintenanceoperations are not performed in line with the recommendations outlined and the safety and durability of the vehicleadversely affected.It is recommended that all mainte-nance operations with the exception ofthe daily operating checks are en- trusted to a Hyundai dealer to ensure that the latest repair and maintenanceprocedures and specialized servicing tools are employed. In addition, the use of genuine Hyundai replacementparts will ensure that the vehicle safety and performance will not be compro- mised.
Page 472 of 539
5
VEHICLE MAINTENANCE REQUIREMENTS
5
20 24
I
R II I I
RR II I I I I I I I I I I I I I I I
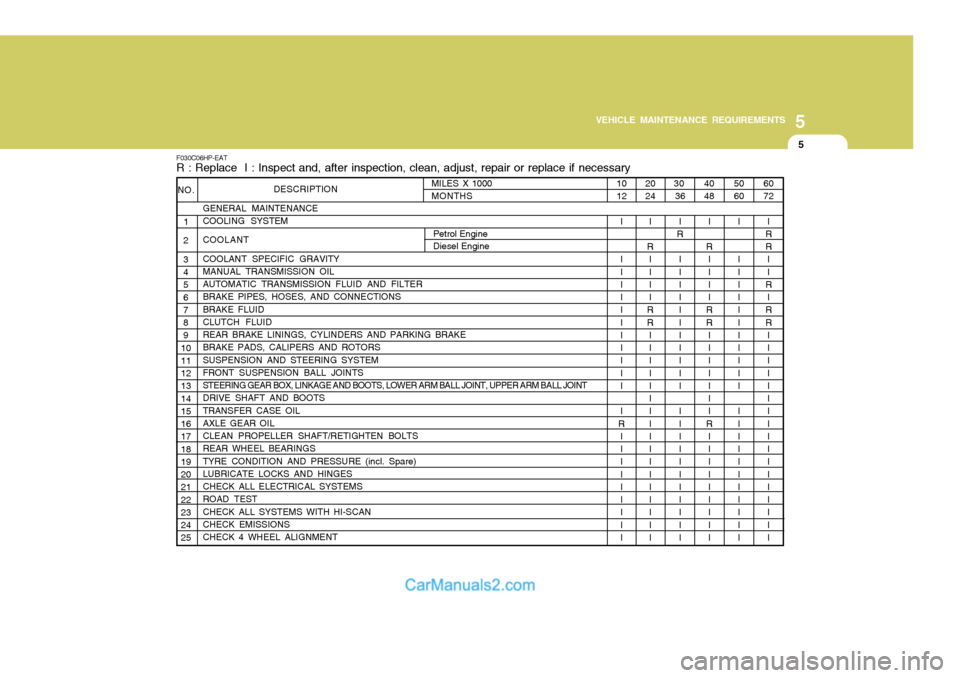
F030C06HP-EAT R : Replace I : Inspect and, after inspection, clean, adjust, repair or replace if necessary
DESCRIPTION
GENERAL MAINTENANCE COOLING SYSTEM COOLANT COOLANT SPECIFIC GRAVITY MANUAL TRANSMISSION OIL AUTOMATIC TRANSMISSION FLUID AND FILTER BRAKE PIPES, HOSES, AND CONNECTIONS BRAKE FLUID CLUTCH FLUID
REAR BRAKE LININGS, CYLINDERS AND PARKING BRAKE BRAKE PADS, CALIPERS AND ROTORS SUSPENSION AND STEERING SYSTEM FRONT SUSPENSION BALL JOINTS
STEERING GEAR BOX, LINKAGE AND BOOTS, LOWER ARM BALL JOINT, UPPER ARM BALL JOINT
DRIVE SHAFT AND BOOTS TRANSFER CASE OIL AXLE GEAR OIL CLEAN PROPELLER SHAFT/RETIGHTEN BOLTS REAR WHEEL BEARINGS TYRE CONDITION AND PRESSURE (incl. Spare) LUBRICATE LOCKS AND HINGES CHECK ALL ELECTRICAL SYSTEMS ROAD TEST CHECK ALL SYSTEMS WITH HI-SCAN CHECK EMISSIONS CHECK 4 WHEEL ALIGNMENT
NO.
1
2 3 4 5 6 7 8 9
1011 12 13 14 15 16 17 18 19 20 21 22 23 24 25
60 72
I
RR II
R
I
RR II I I I I I I I I I I I I I I I
50 60
I I I I I I I I I I I I I I I I I I I I I I I
40 48
I
R II I I
RR II I I I I I
R I I I I I I I I I
30
36
I
R
I I I I I I I I I I I I I I I I I I I I I I
10 12
I I I I I I I I I I I I I
R I I I I I I I I I
MILES X 1000MONTHS
Petrol Engine Diesel Engine
Page 473 of 539
5VEHICLE MAINTENANCE REQUIREMENTS
6
ENGINE OIL AND FILTER AIR CLEANER FILTER SPARK PLUGS (FOR PETROL ENGINE) TIMING BELTBRAKE PADS, CALIPERS AND ROTORSREAR BRAKE LININGS, CYLINDERS AND PARKING BRAKESTEERING GEAR BOX, LINKAGE AND BOOTS/LOWER ARM BALL JOINT, UPPER ARM BALL JOINT DRIVE SHAFTS AND BOOTS MANUAL TRANSMISSION OILAUTOMATIC TRANSMISSION FLUID AND FILTERTRANSFER CASE OIL *1AXLE GEAR OIL *1MAINTENANCE UNDER SEVERE USAGE CONDITIONS A, B, C, F, H A, B, F, G, H, I, JC, EG, H, I, JD, E, F, GC, D, E, G, H, I C, D, E, G, H, I C, D, E, F C, D, E, F A, C, D, E, F, G, H, I, JA, C, E, F, G, H, IC, E, G, H, IC, E, G, H, I
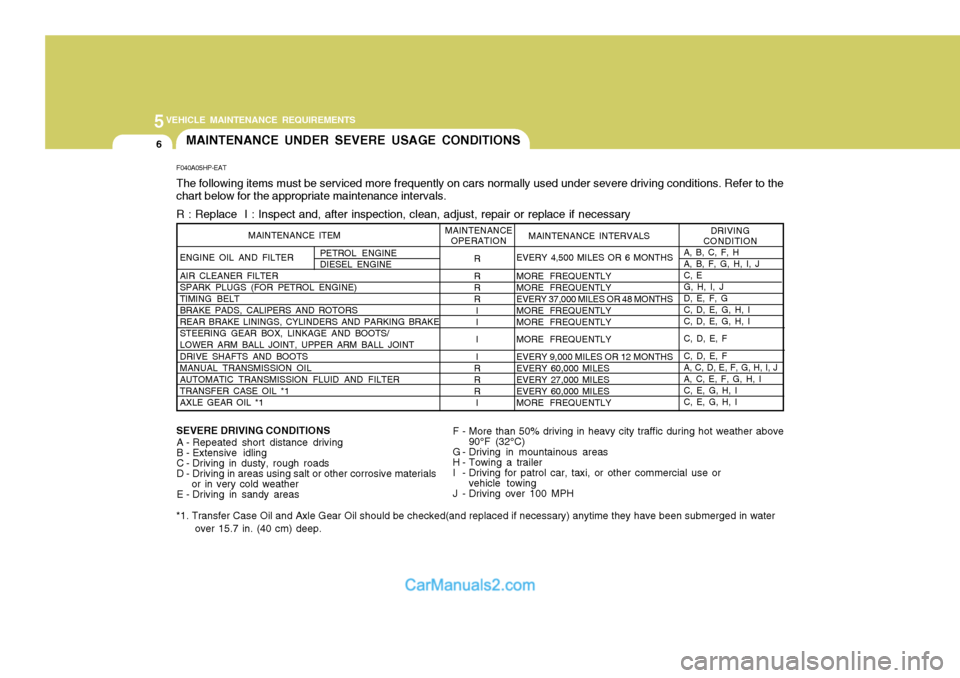
F040A05HP-EAT The following items must be serviced more frequently on cars normally used under severe driving conditions. Refer to the chart below for the appropriate maintenance intervals. R : Replace I : Inspect and, after inspection, clean, adjust, repair or replace if necessary
R R RR
II II
R RR IEVERY 4,500 MILES OR 6 MONTHS MORE FREQUENTLY MORE FREQUENTLYEVERY 37,000 MILES OR 48 MONTHSMORE FREQUENTLYMORE FREQUENTLY MORE FREQUENTLYEVERY 9,000 MILES OR 12 MONTHS EVERY 60,000 MILESEVERY 27,000 MILESEVERY 60,000 MILESMORE FREQUENTLY
DRIVING
CONDITION
MAINTENANCE INTERVALS
MAINTENANCE
OPERATION
MAINTENANCE ITEM
SEVERE DRIVING CONDITIONS
A - Repeated short distance driving
B - Extensive idling
C - Driving in dusty, rough roads
D - Driving in areas using salt or other corrosive materials or in very cold weather
E - Driving in sandy areas F - More than 50% driving in heavy city traffic during hot weather above
90°F (32°C)
G - Driving in mountainous areas
H - Towing a trailer
I - Driving for patrol car, taxi, or other commercial use or vehicle towing
J - Driving over 100 MPH
*1. Transfer Case Oil and Axle Gear Oil should be checked(and replaced if necessary) anytime they have been submerged in water over 15.7 in. (40 cm) deep.
PETROL ENGINE DIESEL ENGINE
Page 476 of 539
5
VEHICLE MAINTENANCE REQUIREMENTS
9
F070C01A-AAT
o Coolant
The coolant should be changed at
the intervals specified in the mainte- nance schedule. F070D01HP-AAT
o Manual transmission oil
Inspect the manual transmission oil according to the maintenance sched- ule.
NOTE: If the oil level is low, check forpossible leaks before adding oil. Do not overfill. F070E02HP-GAT
o Automatic transmission fluid and filter
The fluid level should be in the "HOT"
range of the dipstick, after engine and transmission and filter are at normal operating temperature. Check the Au-tomatic and filter Transmission and filter Fluid level with the engine running and the transmission and filter inneutral, with the parking brake properly applied. Use MOBIL DEXRON-II when adding or changing fluid.
F070F01A-AAT
o Brake hoses and lines
Visually check for proper installation,
chafing, cracks, deterioration and any leakage. Replace any deteriorated or damaged parts immediately. F070G02A-AAT o Brake fluid Check brake fluid level in the brake fluid reservoir. The level should be between "MIN" and "MAX" marks on the side of the reservoir. Use onlyhydraulic brake fluid conforming to DOT 3 or DOT 4. F070H01HP-AAT
o Rear brake linings, pad and parking brake Check the rear brake linings and pads for scoring, burning, leaking fluid, bro-ken parts, and excessive wear. In- spect the parking brake system in- cluding the parking brake lever andcables. For detailed service proce- dures, refer to the Shop Manual.
Page 477 of 539
5VEHICLE MAINTENANCE REQUIREMENTS
10
F070J01A-AAT
o Brake pads, calipers and rotors
Check the pads for excessive wear, discs for run out and wear, and cali- pers for fluid leakage. F070K01A-AAT o Exhaust pipe and muffler Visually inspect the exhaust pipes, muffler and hangers for cracks, dete- rioration, or damage. Start the engineand listen carefully for any exhaust gas leakage. Tighten connections or replace parts as necessary. F070L01A-AAT
o Suspension mounting bolts
Check the suspension connections for
looseness or damage. Retighten to the specified torque.
F070M01B-AAT
o Steering gear box, linkage & boots/lower arm ball joint, upper arm ball joint
With the vehicle stopped and engine
off, check for excessive free-play in the steering wheel. Check the linkage for bends or dam-
age. Check the dust boots and ball joints for deterioration, cracks, or dam- age. Replace any damaged parts. F070N01A-AAT
o Power steering pump, belt and hoses
Check the power steering pump and
hoses for leakage and damage. Re- place any damaged or leaking parts immediately. Inspect the power steer-ing belt for evidence of cuts, cracks, excessive wear, oiliness and proper tension. Replace or adjust it if neces-sary.
F070P01HP-AAT
o Drive shafts and boots
Check the drive shafts, boots and
clamps for cracks, deterioration, ordamage. Replace any damaged partsand, if necessary, repack the grease.
F070Q01A-AAT
o Air conditioning refrigerant
Check the air conditioning lines and
connections for leAakage and dam-age. Check air conditioning perfor- mance according to the relevant shop manual if necessary.