airbag off Hyundai Terracan 2005 Owner's Manual
[x] Cancel search | Manufacturer: HYUNDAI, Model Year: 2005, Model line: Terracan, Model: Hyundai Terracan 2005Pages: 539, PDF Size: 18.03 MB
Page 14 of 539
YOUR VEHICLE AT A GLANCE
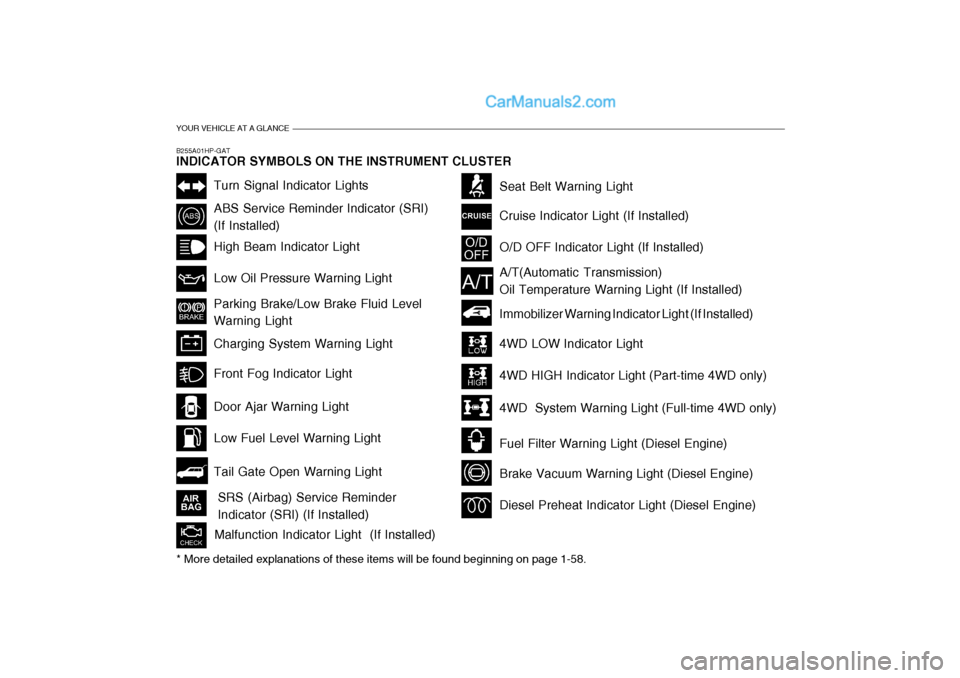
B255A01HP-GAT INDICATOR SYMBOLS ON THE INSTRUMENT CLUSTER
Turn Signal Indicator Lights
ABS Service Reminder Indicator (SRI) (If Installed) High Beam Indicator Light Low Oil Pressure Warning Light Parking Brake/Low Brake Fluid Level Warning Light Charging System Warning Light
Tail Gate Open Warning Light
Door Ajar Warning Light Low Fuel Level Warning Light
Front Fog Indicator Light
O/D OFF Indicator Light (If Installed)
Immobilizer Warning Indicator Light (If Installed)
SRS (Airbag) Service Reminder Indicator (SRI) (If Installed) Seat Belt Warning Light Cruise Indicator Light (If Installed)
Malfunction Indicator Light (If Installed)
A/T(Automatic Transmission) Oil Temperature Warning Light (If Installed)
4WD LOW Indicator Light 4WD HIGH Indicator Light (Part-time 4WD only)
4WD System Warning Light (Full-time 4WD only)
Fuel Filter Warning Light (Diesel Engine)
Brake Vacuum Warning Light (Diesel Engine)
* More detailed explanations of these items will be found beginning on page 1-58.
Diesel Preheat Indicator Light (Diesel Engine)
Page 33 of 539
1
FEATURES OF YOUR HYUNDAI
19
!
!WARNING:
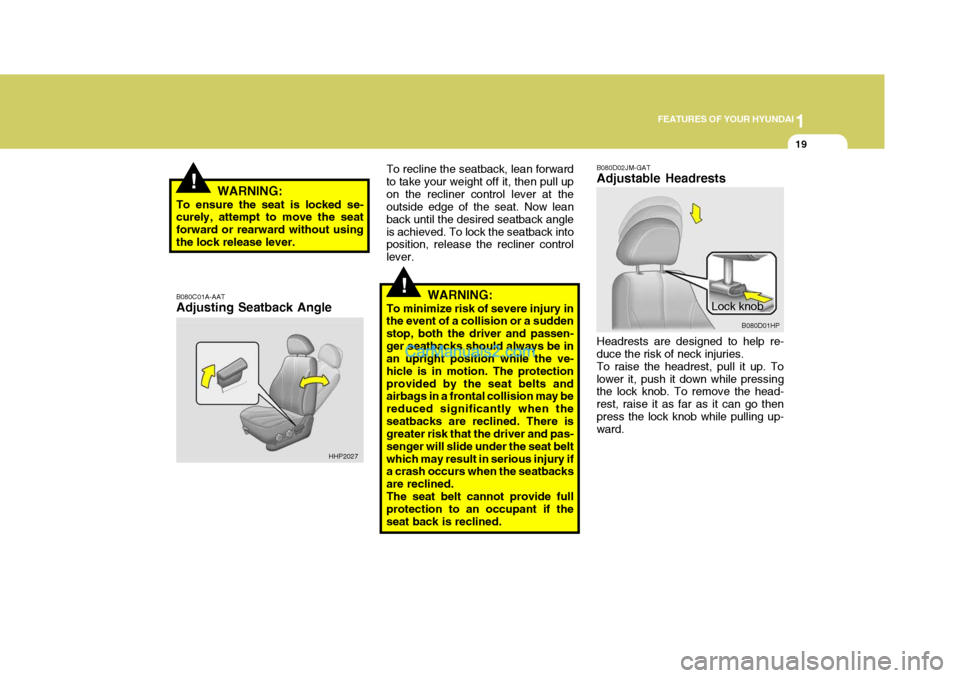
To ensure the seat is locked se- curely, attempt to move the seat forward or rearward without usingthe lock release lever. B080C01A-AAT Adjusting Seatback Angle To recline the seatback, lean forward to take your weight off it, then pull upon the recliner control lever at the outside edge of the seat. Now lean back until the desired seatback angleis achieved. To lock the seatback into position, release the recliner control lever.
WARNING:
To minimize risk of severe injury in the event of a collision or a sudden stop, both the driver and passen-ger seatbacks should always be in an upright position while the ve- hicle is in motion. The protectionprovided by the seat belts and airbags in a frontal collision may be reduced significantly when theseatbacks are reclined. There is greater risk that the driver and pas- senger will slide under the seat beltwhich may result in serious injury if a crash occurs when the seatbacks are reclined.The seat belt cannot provide full protection to an occupant if the seat back is reclined.
HHP2027 B080D02JM-GAT Adjustable Headrests
Lock knobB080D01HP
Headrests are designed to help re- duce the risk of neck injuries. To raise the headrest, pull it up. Tolower it, push it down while pressing the lock knob. To remove the head- rest, raise it as far as it can go thenpress the lock knob while pulling up- ward.
Page 59 of 539
1
FEATURES OF YOUR HYUNDAI
45
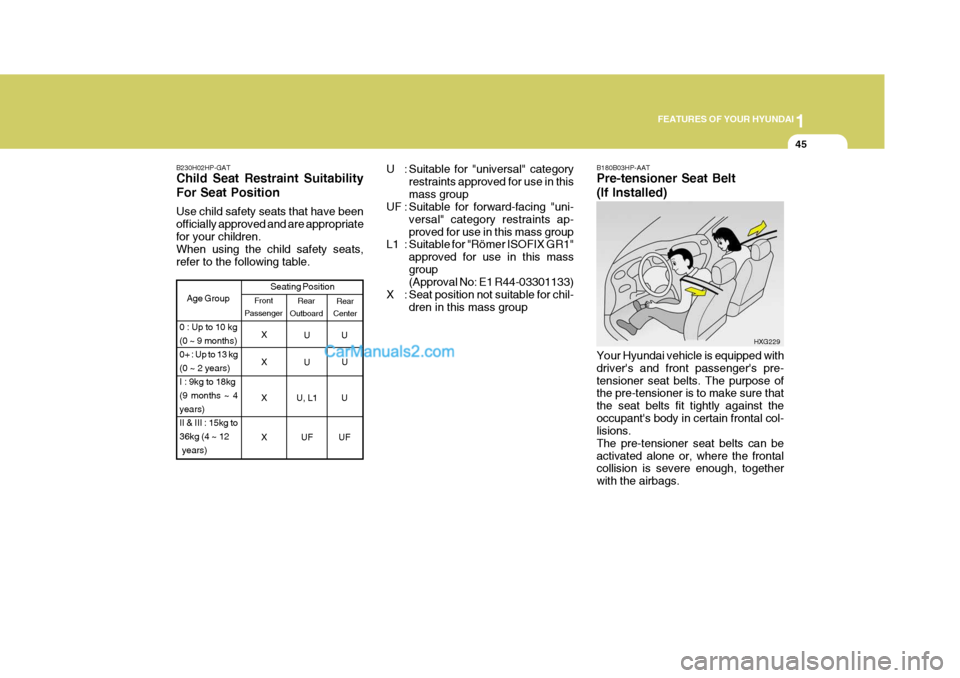
B230H02HP-GAT Child Seat Restraint Suitability For Seat Position Use child safety seats that have been officially approved and are appropriatefor your children. When using the child safety seats, refer to the following table.
Rear
Center
Age Group Seating Position
UU
X UU
Rear
Outboard
Front
Passenger
0 : Up to 10 kg (0 ~ 9 months)0+ : Up to 13 kg(0 ~ 2 years)I : 9kg to 18kg(9 months ~ 4years)II & III : 15kg to36kg (4 ~ 12 years) X
X U, L1 U XU
FUF
U : Suitable for "universal" category
restraints approved for use in this mass group
UF : Suitable for forward-facing "uni-
versal" category restraints ap-proved for use in this mass group
L1 : Suitable for "Römer ISOFIX GR1"
approved for use in this massgroup (Approval No: E1 R44-03301133)
X : Seat position not suitable for chil- dren in this mass group B180B03HP-AAT Pre-tensioner Seat Belt (If Installed) Your Hyundai vehicle is equipped with driver's and front passenger's pre-tensioner seat belts. The purpose of the pre-tensioner is to make sure that the seat belts fit tightly against theoccupant's body in certain frontal col- lisions. The pre-tensioner seat belts can beactivated alone or, where the frontal collision is severe enough, together with the airbags.
HXG229
Page 61 of 539
1
FEATURES OF YOUR HYUNDAI
47
!WARNING:
o Pre-tensioners are designed to operate only one time. After acti- vation, pre-tensioner seat belts must be replaced. All seat belts,of any type, should always be replaced after they have been worn during a collision.
o The pre-tensioner seat belt as- sembly mechanisms become hotduring activation. Do not touchthe pre-tensioner seat belt as- semblies for several minutes af- ter they have been activated.
o Do not attempt to inspect or re- place the pre-tensioner seat beltsyourself. This must be done byan authorized Hyundai dealer.
o Do not strike the pre-tensioner
seat belt assemblies.
o Do not attempt to service or re- pair the pre-tensioner seat beltsystem in any manner.! CAUTION:
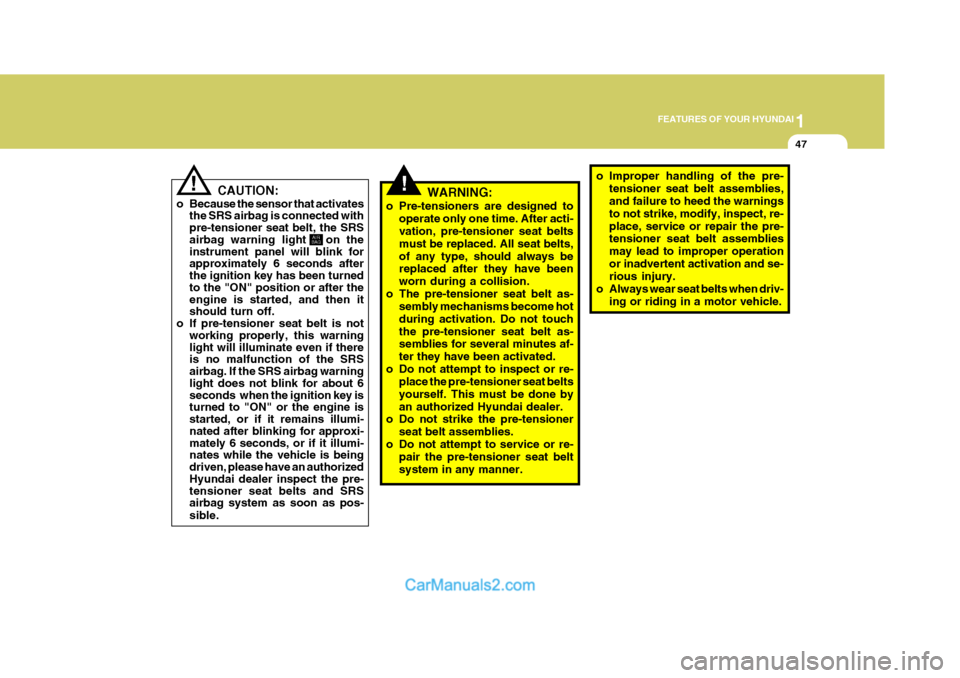
o Because the sensor that activates the SRS airbag is connected with pre-tensioner seat belt, the SRS airbag warning light on the instrument panel will blink for approximately 6 seconds after the ignition key has been turned to the "ON" position or after the engine is started, and then it should turn off.
o If pre-tensioner seat belt is not working properly, this warning light will illuminate even if there is no malfunction of the SRS airbag. If the SRS airbag warning light does not blink for about 6 seconds when the ignition key is turned to "ON" or the engine is started, or if it remains illumi- nated after blinking for approxi- mately 6 seconds, or if it illumi- nates while the vehicle is being driven, please have an authorized Hyundai dealer inspect the pre- tensioner seat belts and SRS airbag system as soon as pos- sible.
AIR
BAG
o Improper handling of the pre-
tensioner seat belt assemblies, and failure to heed the warnings to not strike, modify, inspect, re-place, service or repair the pre- tensioner seat belt assemblies may lead to improper operationor inadvertent activation and se- rious injury.
o Always wear seat belts when driv-
ing or riding in a motor vehicle.
Page 62 of 539
1FEATURES OF YOUR HYUNDAI
48
!
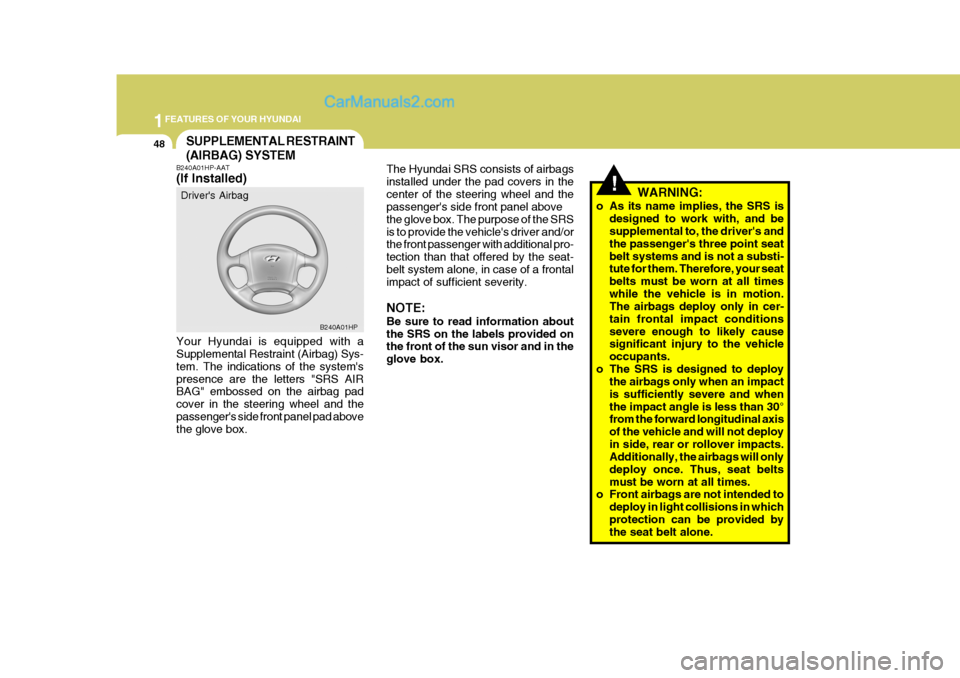
The Hyundai SRS consists of airbags installed under the pad covers in thecenter of the steering wheel and the passenger's side front panel above the glove box. The purpose of the SRSis to provide the vehicle's driver and/or the front passenger with additional pro- tection than that offered by the seat-belt system alone, in case of a frontal impact of sufficient severity. NOTE: Be sure to read information about the SRS on the labels provided on the front of the sun visor and in the glove box. WARNING:
o As its name implies, the SRS is designed to work with, and be supplemental to, the driver's and the passenger's three point seatbelt systems and is not a substi- tute for them. Therefore, your seat belts must be worn at all timeswhile the vehicle is in motion. The airbags deploy only in cer- tain frontal impact conditionssevere enough to likely cause significant injury to the vehicle occupants.
o The SRS is designed to deploy the airbags only when an impactis sufficiently severe and whenthe impact angle is less than 30° from the forward longitudinal axis of the vehicle and will not deployin side, rear or rollover impacts. Additionally, the airbags will only deploy once. Thus, seat beltsmust be worn at all times.
o Front airbags are not intended to
deploy in light collisions in whichprotection can be provided by the seat belt alone.
SUPPLEMENTAL RESTRAINT (AIRBAG) SYSTEM
B240A01HP-AAT (If Installed)
Your Hyundai is equipped with a Supplemental Restraint (Airbag) Sys- tem. The indications of the system'spresence are the letters "SRS AIR BAG" embossed on the airbag pad cover in the steering wheel and thepassenger's side front panel pad above the glove box. Driver's Airbag
B240A01HP
Page 69 of 539
1
FEATURES OF YOUR HYUNDAI
55
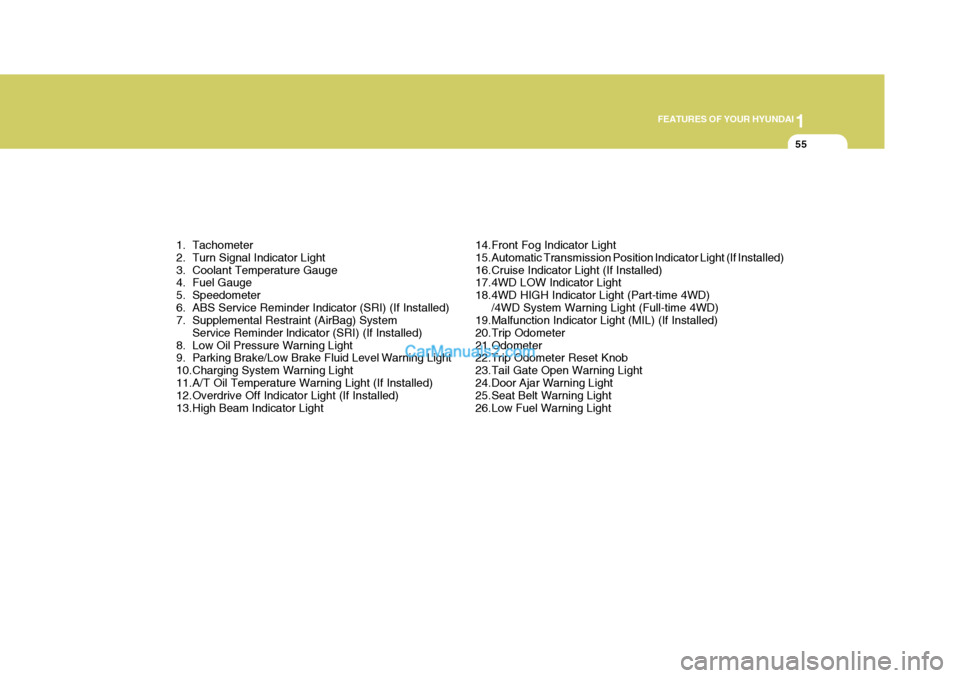
1. Tachometer
2. Turn Signal Indicator Light
3. Coolant Temperature Gauge
4. Fuel Gauge
5. Speedometer
6. ABS Service Reminder Indicator (SRI) (If Installed)
7. Supplemental Restraint (AirBag) System Service Reminder lndicator (SRI) (If Installed)
8. Low Oil Pressure Warning Light
9. Parking Brake/Low Brake Fluid Level Warning Light
10.Charging System Warning Light
11.A/T Oil Temperature Warning Light (If Installed)
12.Overdrive Off Indicator Light (If Installed)
13.High Beam Indicator Light 14.Front Fog Indicator Light
15.Automatic Transmission Position Indicator Light (If Installed)
16.Cruise Indicator Light (If Installed)
17.4WD LOW Indicator Light
18.4WD HIGH Indicator Light (Part-time 4WD)
/4WD System Warning Light (Full-time 4WD)
19.Malfunction Indicator Light (MIL) (If Installed)
20.Trip Odometer
21.Odometer 22.Trip Odometer Reset Knob
23.Tail Gate Open Warning Light
24.Door Ajar Warning Light
25.Seat Belt Warning Light
26.Low Fuel Warning Light
Page 71 of 539
1
FEATURES OF YOUR HYUNDAI
57
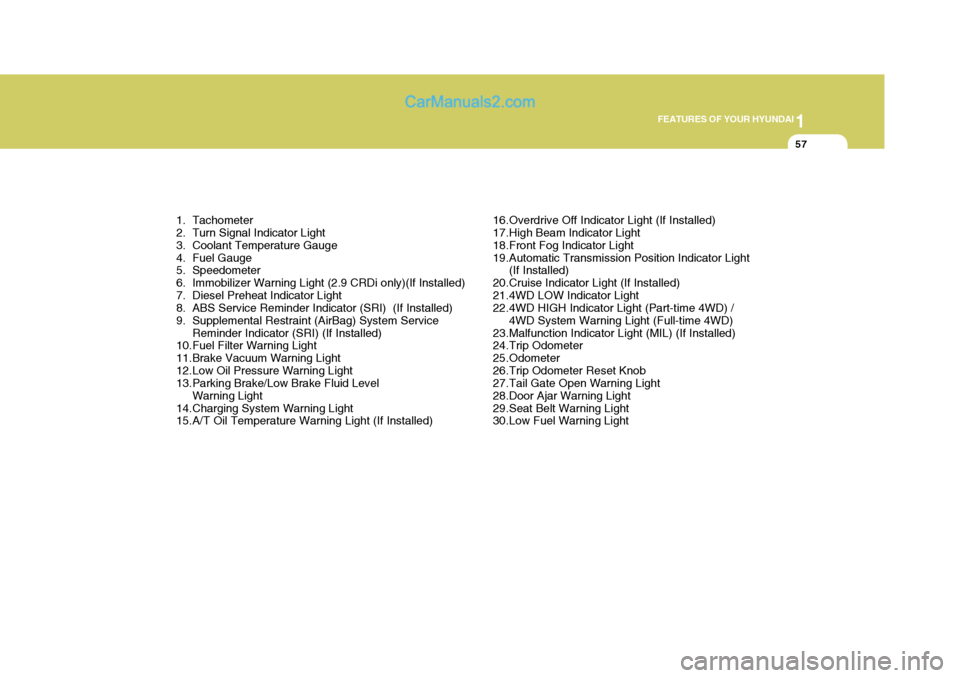
1. Tachometer
2. Turn Signal Indicator Light
3. Coolant Temperature Gauge
4. Fuel Gauge
5. Speedometer
6. Immobilizer Warning Light (2.9 CRDi only)(If Installed)
7. Diesel Preheat Indicator Light
8. ABS Service Reminder Indicator (SRI) (If Installed)
9. Supplemental Restraint (AirBag) System Service Reminder Indicator (SRI) (If Installed)
10.Fuel Filter Warning Light
11.Brake Vacuum Warning Light
12.Low Oil Pressure Warning Light
13.Parking Brake/Low Brake Fluid Level
Warning Light
14.Charging System Warning Light
15.A/T Oil Temperature Warning Light (If Installed) 16.Overdrive Off Indicator Light (If Installed)
17.High Beam Indicator Light
18.Front Fog Indicator Light
19.Automatic Transmission Position Indicator Light
(If Installed)
20.Cruise Indicator Light (If Installed)
21.4WD LOW Indicator Light
22.4WD HIGH Indicator Light (Part-time 4WD) / 4WD System Warning Light (Full-time 4WD)
23.Malfunction Indicator Light (MIL) (If Installed)
24.Trip Odometer
25.Odometer
26.Trip Odometer Reset Knob
27.Tail Gate Open Warning Light
28.Door Ajar Warning Light
29.Seat Belt Warning Light
30.Low Fuel Warning Light
Page 75 of 539
1
FEATURES OF YOUR HYUNDAI
61
B260B01B-GAT Tail Gate Open Warning Light
This light remains on unless the tail gate is completely closed and latched. B260B01HP-GAT SRS (Airbag) Service Reminder Indicator (SRI)(If Installed)
The SRS service reminder indicator (SRI) comes on and flashes for about 6 seconds after the ignition key is turned to the "ON" position or after the engine is started, after which it will goout. This light also comes on when the SRS is not working properly. If the SRI does not flash, or continuously remains on after flashing for about 6 seconds whenyou turned the ignition key to the "ON" position or started the engine, or if it comes on while driving, have the SRSinspected by an authorized Hyundai Dealer.
B260N02A-AAT Malfunction Indicator Light (If Installed)
This light illuminates when there is a malfunction of an exhaust gas relatedcomponent, and the system is not functioning properly so that the ex- haust gas regulation values are notsatisfied. This light will also illuminate when the ignition key is turned to the "ON" position, and then it will go out ina few seconds after the engine is started. If it illuminates while driving, or does not illuminate when the ignitionkey is turned to the "ON" position, take your car to your nearest authorized Hyundai dealer and have the systemchecked.
B260E01HP-GAT Seat Belt Warning Light
The seat belt warning light blinks for about 6 seconds when the ignition key is turned from the "OFF" position to"ON" or "START".
B260Q01HP-DAT Cruise Indicator Light (For Gasoline Engine)(If Installed)
The cruise indicator light in the instru- ment cluster is illuminated only when the vehicle cruising speed has beenset using the control switch on the steering wheel. The indicator light does not illuminatewhen the main cruise control switch is activated. Information about the use of cruise control may be found on page 1-100.
B265Q01HP-GAT Cruise Indicator Light (For Diesel Engine)(If Installed)
The cruise indicator light in the instru- ment cluster is illuminated when the cruise control main switch is activated.Information about the use of cruise control may be found on page 1-100.
Page 305 of 539
YOUR VEHICLE AT A GLANCE
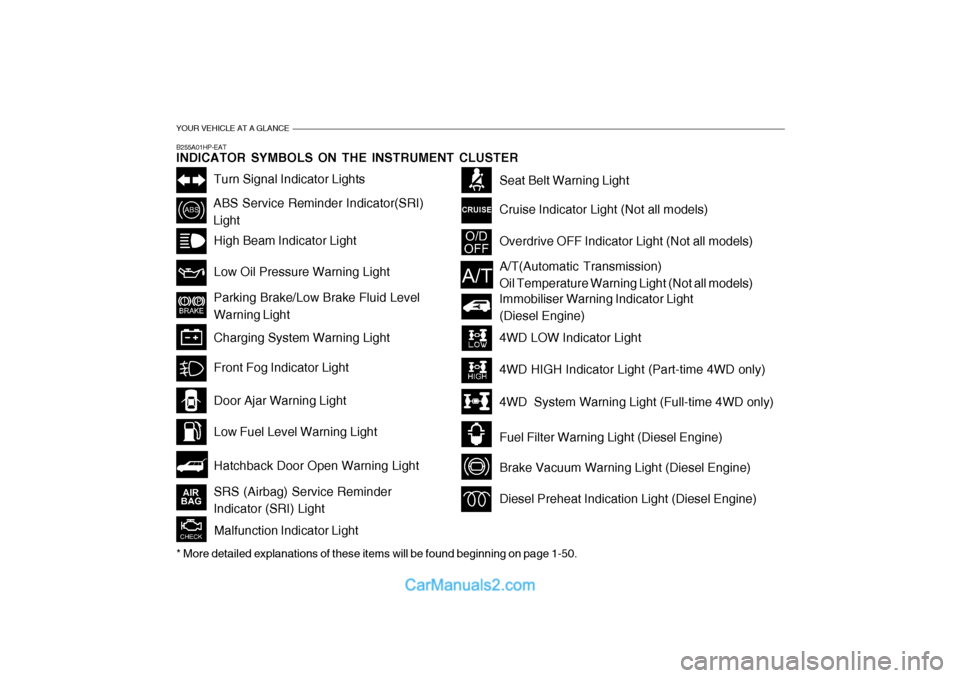
B255A01HP-EAT INDICATOR SYMBOLS ON THE INSTRUMENT CLUSTER
Turn Signal Indicator Lights
ABS Service Reminder Indicator(SRI) LightHigh Beam Indicator Light Low Oil Pressure Warning Light Parking Brake/Low Brake Fluid Level Warning Light Charging System Warning Light
Hatchback Door Open Warning Light
Door Ajar Warning Light Low Fuel Level Warning Light
Front Fog Indicator Light
Overdrive OFF Indicator Light (Not all models)
Immobiliser Warning Indicator Light (Diesel Engine)
Seat Belt Warning Light Cruise Indicator Light (Not all models)
Malfunction Indicator Light
A/T(Automatic Transmission) Oil Temperature Warning Light (Not all models)
4WD LOW Indicator Light 4WD HIGH Indicator Light (Part-time 4WD only)
4WD System Warning Light (Full-time 4WD only)
Fuel Filter Warning Light (Diesel Engine)
Brake Vacuum Warning Light (Diesel Engine)
Diesel Preheat Indication Light (Diesel Engine)
* More detailed explanations of these items will be found beginning on page 1-50.SRS (Airbag) Service Reminder Indicator (SRI) Light
Page 322 of 539
1
CONTROLS AND EQUIPMENT
17
!
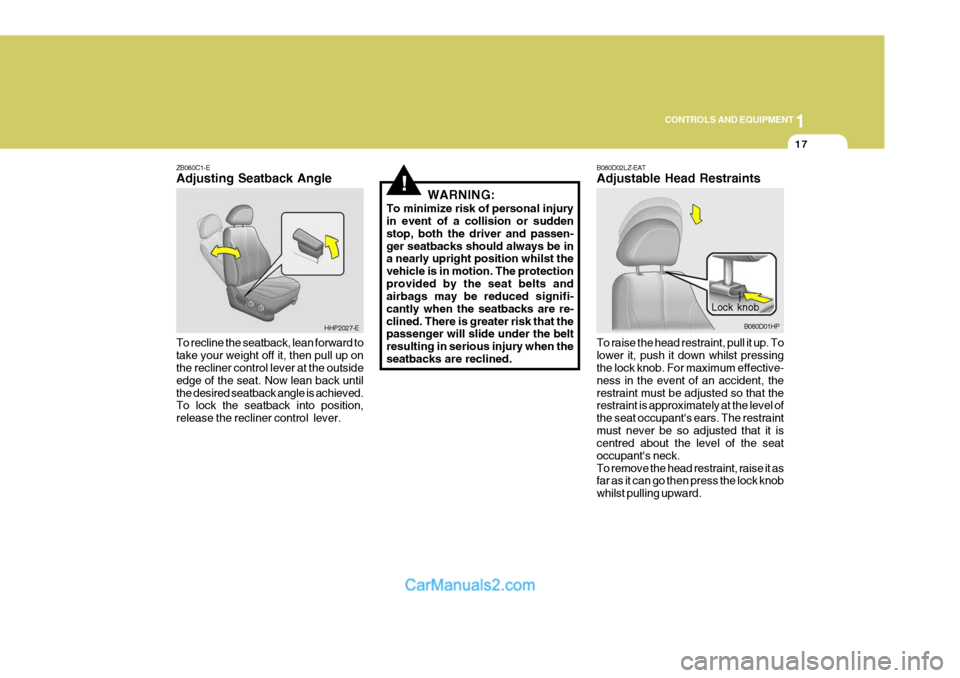
ZB060C1-E Adjusting Seatback Angle To recline the seatback, lean forward to take your weight off it, then pull up on the recliner control lever at the outside edge of the seat. Now lean back untilthe desired seatback angle is achieved. To lock the seatback into position, release the recliner control lever. WARNING:
To minimize risk of personal injury in event of a collision or sudden stop, both the driver and passen-ger seatbacks should always be in a nearly upright position whilst the vehicle is in motion. The protectionprovided by the seat belts and airbags may be reduced signifi- cantly when the seatbacks are re-clined. There is greater risk that the passenger will slide under the belt resulting in serious injury when the seatbacks are reclined.
HHP2027-E
Lock knob
B080D01HP
B080D02LZ-EAT Adjustable Head Restraints To raise the head restraint, pull it up. To lower it, push it down whilst pressing the lock knob. For maximum effective- ness in the event of an accident, therestraint must be adjusted so that the restraint is approximately at the level of the seat occupant's ears. The restraintmust never be so adjusted that it is centred about the level of the seat occupant's neck.To remove the head restraint, raise it as far as it can go then press the lock knob whilst pulling upward.