weight Hyundai Terracan 2005 Owner's Manual
[x] Cancel search | Manufacturer: HYUNDAI, Model Year: 2005, Model line: Terracan, Model: Hyundai Terracan 2005Pages: 539, PDF Size: 18.03 MB
Page 33 of 539
1
FEATURES OF YOUR HYUNDAI
19
!
!WARNING:
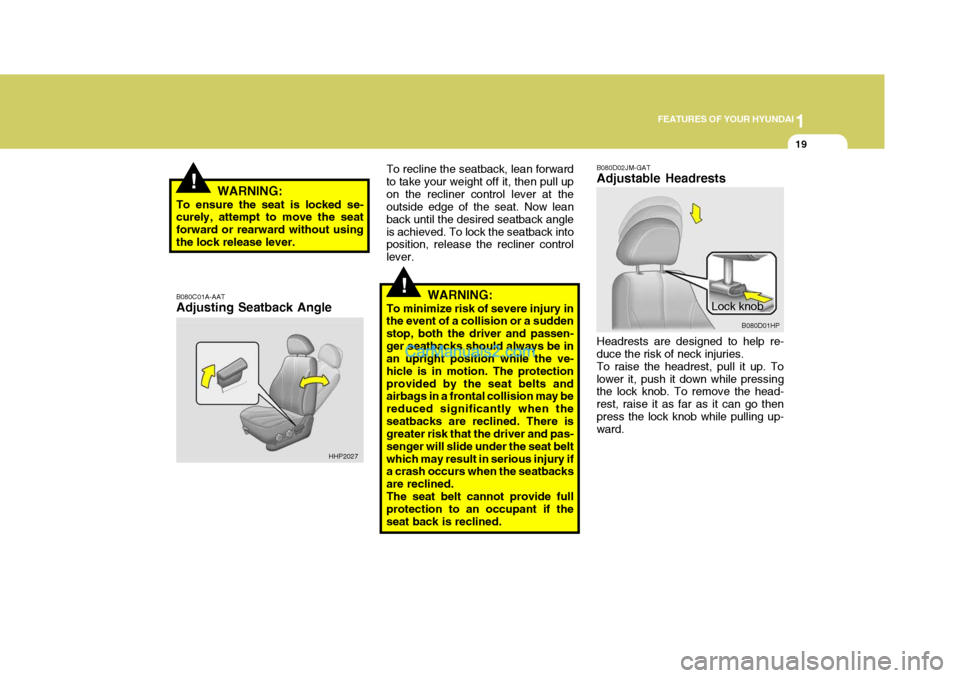
To ensure the seat is locked se- curely, attempt to move the seat forward or rearward without usingthe lock release lever. B080C01A-AAT Adjusting Seatback Angle To recline the seatback, lean forward to take your weight off it, then pull upon the recliner control lever at the outside edge of the seat. Now lean back until the desired seatback angleis achieved. To lock the seatback into position, release the recliner control lever.
WARNING:
To minimize risk of severe injury in the event of a collision or a sudden stop, both the driver and passen-ger seatbacks should always be in an upright position while the ve- hicle is in motion. The protectionprovided by the seat belts and airbags in a frontal collision may be reduced significantly when theseatbacks are reclined. There is greater risk that the driver and pas- senger will slide under the seat beltwhich may result in serious injury if a crash occurs when the seatbacks are reclined.The seat belt cannot provide full protection to an occupant if the seat back is reclined.
HHP2027 B080D02JM-GAT Adjustable Headrests
Lock knobB080D01HP
Headrests are designed to help re- duce the risk of neck injuries. To raise the headrest, pull it up. Tolower it, push it down while pressing the lock knob. To remove the head- rest, raise it as far as it can go thenpress the lock knob while pulling up- ward.
Page 108 of 539
1FEATURES OF YOUR HYUNDAI
94ROOF RACK
B650A01S-AAT Stowage Precautions
1. Do not place objects on the cargo security screen. Such objects may be thrown about inside the vehicle and possibly injure vehicle occu- pants during an accident or whenbraking.
2. For better fuel economy, do not
carry unnecessary weight.
3. Never allow anyone to ride in the luggage compartment. It is designedfor luggage only.
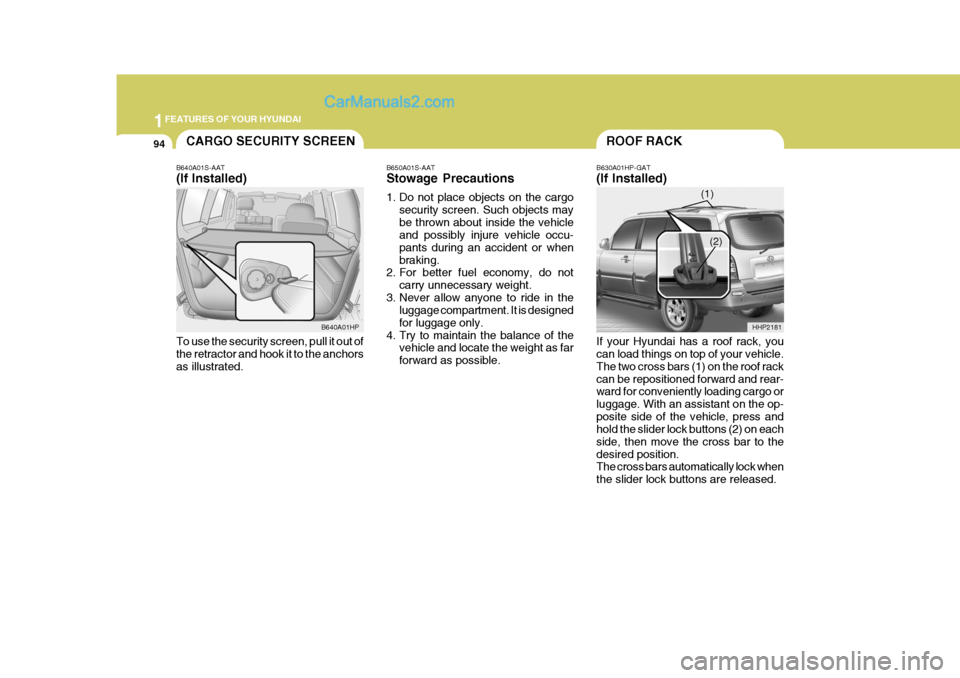
4. Try to maintain the balance of the vehicle and locate the weight as farforward as possible. B630A01HP-GAT (If Installed) If your Hyundai has a roof rack, you can load things on top of your vehicle. The two cross bars (1) on the roof rackcan be repositioned forward and rear- ward for conveniently loading cargo or luggage. With an assistant on the op-posite side of the vehicle, press and hold the slider lock buttons (2) on each side, then move the cross bar to thedesired position. The cross bars automatically lock when the slider lock buttons are released.
HHP2181CARGO SECURITY SCREEN
B640A01S-AAT (If Installed) To use the security screen, pull it out of the retractor and hook it to the anchors as illustrated. B640A01HP
(1)
(2)
Page 113 of 539
1
FEATURES OF YOUR HYUNDAI
99HEADLIGHT LEVELING DE- VICE SYSTEMSTEERING WHEEL TILT LEVERREAR SEAT ARMREST
!
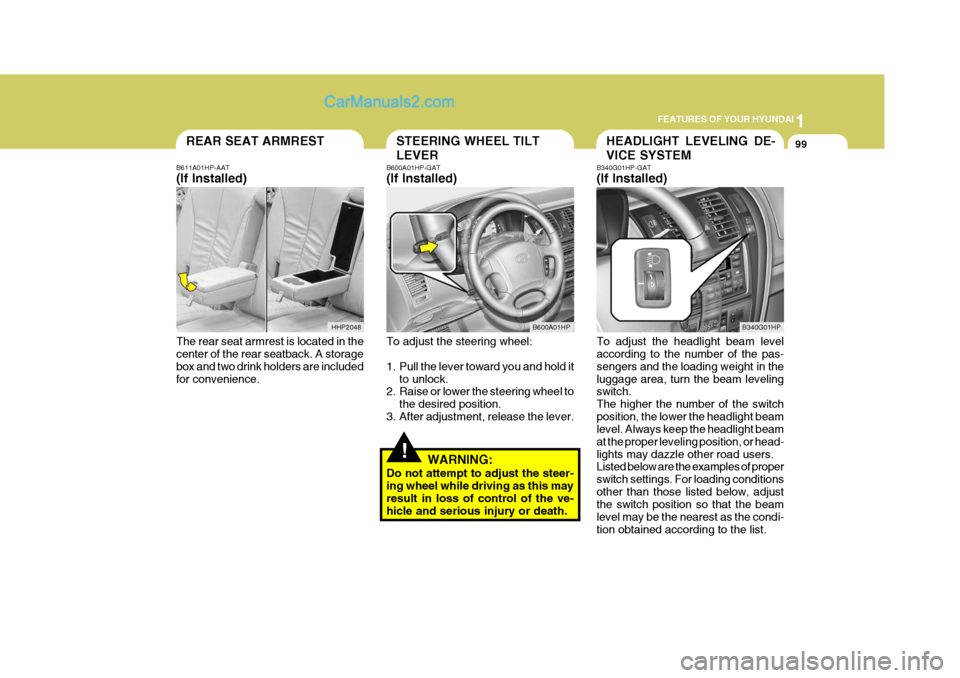
B611A01HP-AAT (If Installed) The rear seat armrest is located in the center of the rear seatback. A storage box and two drink holders are includedfor convenience. B600A01HP-GAT (If Installed) To adjust the steering wheel:
1. Pull the lever toward you and hold it
to unlock.
2. Raise or lower the steering wheel to
the desired position.
3. After adjustment, release the lever.
WARNING:
Do not attempt to adjust the steer- ing wheel while driving as this may result in loss of control of the ve- hicle and serious injury or death. B340G01HP-GAT (If Installed) To adjust the headlight beam level according to the number of the pas- sengers and the loading weight in theluggage area, turn the beam leveling switch. The higher the number of the switchposition, the lower the headlight beam level. Always keep the headlight beam at the proper leveling position, or head-lights may dazzle other road users. Listed below are the examples of proper switch settings. For loading conditionsother than those listed below, adjust the switch position so that the beam level may be the nearest as the condi-tion obtained according to the list.
B600A01HP
B340G01HP
HHP2048
Page 179 of 539
2 DRIVING YOUR HYUNDAI
24
o Remember, your Hyundai does notrequire extended warm-up. As soon as the engine is running smoothly, you can drive away. In very cold weather, however, give your enginea slightly longer warm-up period.
o Don't "lug" or "over-rev" the engine.
Lugging is driving too slowly in toohigh a gear resulting in the engine bucking. If this happens, shift to a lower gear. Over-revving is racingthe engine beyond its safe limit. This can be avoided by shifting at the recommended speeds.
o Use your air conditioning sparingly. The air conditioning system is oper-ated by engine power so your fueleconomy is reduced when you use it.
o Keep your car in good condition. For
better fuel economy and reduced maintenance costs, maintain your car in accordance with the mainte- nance schedule in Section 5. If youdrive your car in severe conditions, more frequent maintenance is re- quired (see Section 5 for details).
o Keep your car clean. For maximum service, your Hyundai should bekept clean and free of corrosivematerials. It is especially important that mud, dirt, ice, etc. not be al- lowed to accumulate on the under-side of the car. This extra weight can result in increased fuel con- sumption and also contribute to cor-rosion.
o Travel lightly. Don't carry unneces-
sary weight in your car. Weight re-duces fuel economy.
o Don't let the engine idle longer than
necessary. If you are waiting (andnot in traffic), turn off your engine and restart only when you're ready to go.
o Don't "ride" the brake or clutch pedal.
This can increase fuel consumptionand also increase wear on these components. In addition, driving with your foot resting on the brake pedalmay cause the brakes to overheat, which reduces their effectiveness and may lead to more serious con-sequences.
o Take care of your tires. Keep them
inflated to the recommended pres-sure. Incorrect inflation, either too much or too little, results in unnec- essary tire wear. Check the tire pres-sures at least once a month.
o Be sure that the wheels are aligned
correctly. Improper alignment canresult from hitting curbs or driving too fast over irregular surfaces. Poor alignment causes faster tire wearand may also result in other prob- lems as well as greater fuel con- sumption.
Page 181 of 539
2 DRIVING YOUR HYUNDAI
26
C160F01A-AAT Check Spark Plugs and Ignition System Inspect your spark plugs as described in Section 6 and replace them if neces-sary. Also check all ignition wiring and components to be sure they are not cracked, worn or damaged in any way. C160G02A-GAT To Keep Locks from Freezing To keep the locks from freezing, squirt an approved de-icer fluid or glycerine into the key opening. If a lock is cov-ered with ice, squirt it with an approved de-icing fluid to remove the ice. If the lock is frozen internally, you may beable to thaw it out by using a heated key. Handle the heated key with care to avoid injury. NOTE: The proper temperature for using the immobilizer key is from -40°C (-40°F) to 80°C (176°F). If you heatthe immobilizer key over 80°C (176°F) to open the frozen lock, it may cause damage to the transpon-der in its head.
C160D01A-AAT Check Battery and Cables Winter puts additional burdens on the battery system. Visually inspect thebattery and cables as described in Section 6. The level of charge in your battery can be checked by your Hyundaidealer or a service station. C160E01A-AAT Change to "Winter Weight" Oil if Necessary In some climates it is recommended that a lower viscosity "winter weight" oil be used during cold weather. See Section 9 for recommendations. If youaren't sure what weight oil you should use, consult your Hyundai dealer.
C160C01A-AAT Use High Quality Ethylene Gly- col Coolant Your Hyundai is delivered with high quality ethylene glycol coolant in thecooling system. It is the only type of coolant that should be used because it helps prevent corrosion in the coolingsystem, lubricates the water pump and prevents freezing. Be sure to replace or replenish your coolant in accor-dance with the maintenance schedule in Section 5. Before winter, have your coolant tested to assure that its freez-ing point is sufficient for the tempera- tures anticipated during the winter.
Page 184 of 539
2
DRIVING YOUR HYUNDAI
29
!
C190C03S-GAT Trailer Brakes If your trailer is equipped with a braking system, make sure it conforms to fed-eral and/or local regulations and that it is properly installed and operating cor- rectly. NOTE: If you tow a trailer or vehicle, your car will require more frequent main-tenance due to the additional load. See "Maintenance Under Severe Usage Conditions" on page 5-8.
CAUTION:
o Never connect a trailer brake sys- tem directly to the vehicle brakesystem.
o When towing a trailer on steep
grades (in excess of 12%) payclose attention to the engine cool- ant temperature gauge to ensure the engine does not overheat. Ifthe needle of the coolant tem- perature gauge moves across the dial towards "H" (HOT), pull over
and stop as soon as it is safe to do so, and allow the engine to idle until it cools down. You mayproceed once the engine has cooled sufficiently.
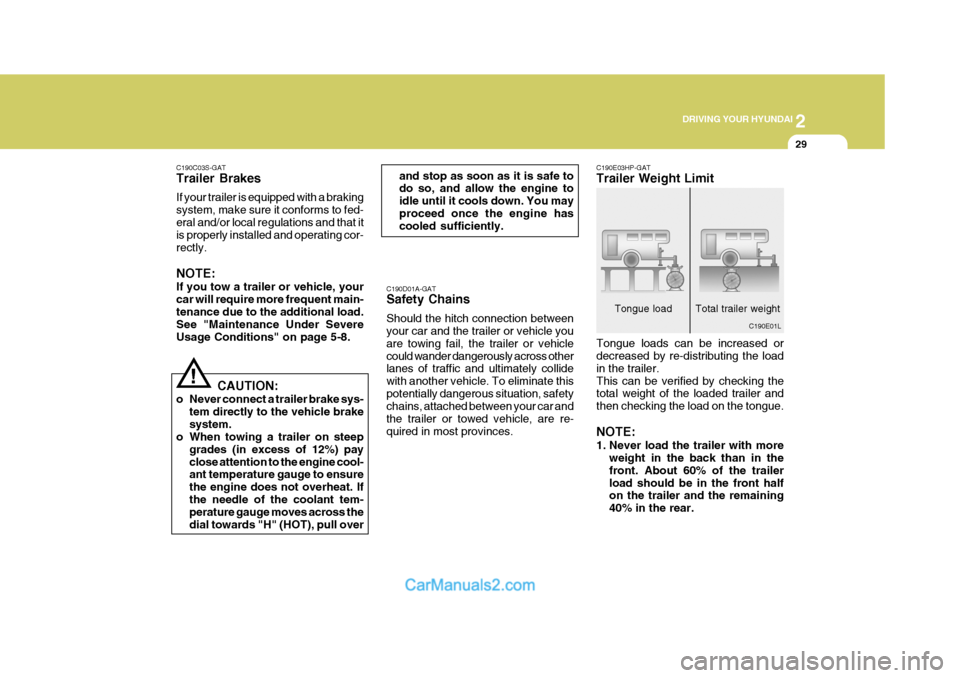
C190D01A-GAT Safety Chains Should the hitch connection between your car and the trailer or vehicle you are towing fail, the trailer or vehiclecould wander dangerously across other lanes of traffic and ultimately collide with another vehicle. To eliminate thispotentially dangerous situation, safety chains, attached between your car and the trailer or towed vehicle, are re-quired in most provinces. C190E03HP-GAT Trailer Weight Limit Tongue loads can be increased or decreased by re-distributing the load in the trailer.This can be verified by checking the total weight of the loaded trailer and then checking the load on the tongue. NOTE:
1. Never load the trailer with more
weight in the back than in the front. About 60% of the trailerload should be in the front half on the trailer and the remaining 40% in the rear. C190E01L
Tongue load Total trailer weight
Page 185 of 539
2 DRIVING YOUR HYUNDAI
30
!
CAUTION:
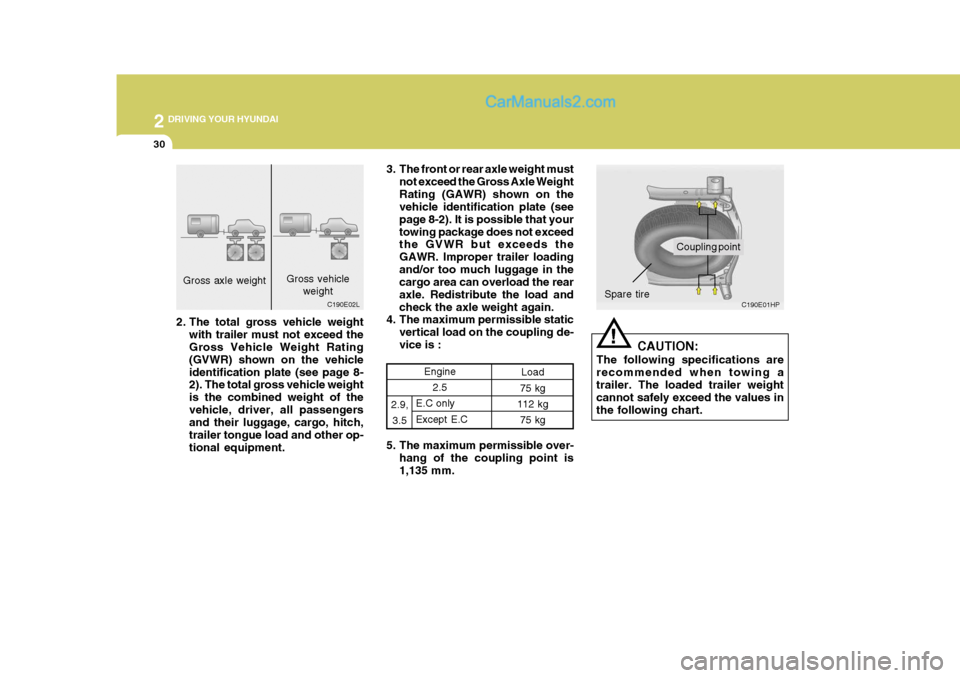
The following specifications are recommended when towing a trailer. The loaded trailer weight cannot safely exceed the values inthe following chart. C190E01HP
5. The maximum permissible over-
hang of the coupling point is 1,135 mm.
Gross axle weight
Engine2.5 Load
75 kg
112 kg
75 kg
2.9,3.5E.C only Except E.C
C190E02L
Gross vehicle
weight 3. The front or rear axle weight must
not exceed the Gross Axle Weight Rating (GAWR) shown on the vehicle identification plate (see page 8-2). It is possible that yourtowing package does not exceed the GVWR but exceeds the GAWR. Improper trailer loadingand/or too much luggage in the cargo area can overload the rear axle. Redistribute the load andcheck the axle weight again.
4. The maximum permissible static
vertical load on the coupling de-vice is :
Coupling point
Spare tire
2. The total gross vehicle weight with trailer must not exceed the Gross Vehicle Weight Rating (GVWR) shown on the vehicleidentification plate (see page 8- 2). The total gross vehicle weight is the combined weight of thevehicle, driver, all passengers and their luggage, cargo, hitch, trailer tongue load and other op-tional equipment.
Page 186 of 539
2
DRIVING YOUR HYUNDAI
31
C190F01HP-GAT Trailer or Vehicle Towing Tips
1. Before towing, check hitch and safety chain connections as well as proper operation of the trailer running lights, brake lights, and turn signals.
2. Always drive your vehicle at a mod- erate speed (Less than 100 km/h).
3. Trailer towing requires more fuel than normal conditions.
4. To maintain engine braking effi-
ciency, do not tow a trailer with thetransmission in fifth gear (manual transmission) or an overdrive gear (automatic transmission).
5. Always secure items in the trailer to prevent load shift while driving.
6. Check the condition and air pres- sure of all tires on the trailer and your car. Low tire pressure can seriously affect the handling. Alsocheck the spare tire.
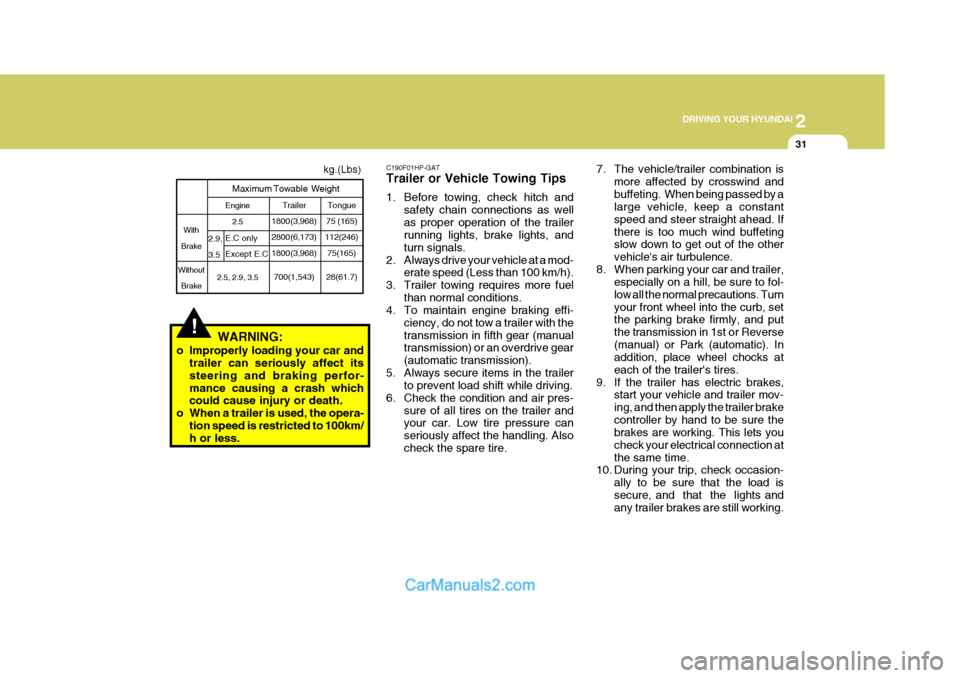
Tongue
75 (165)
112(246)
75(165)
28(61.7)
Engine
2.5
2.5, 2.9, 3.5
!WARNING:
o Improperly loading your car and trailer can seriously affect its steering and braking perfor-mance causing a crash which could cause injury or death.
o When a trailer is used, the opera- tion speed is restricted to 100km/h or less.
With
Brake
Without BrakeE.C only Except E.C
2.9,3.5
Maximum Towable Weight
Trailer
1800(3,968) 2800(6,173) 1800(3,968)
700(1,543)
7. The vehicle/trailer combination is more affected by crosswind and buffeting. When being passed by a large vehicle, keep a constant speed and steer straight ahead. Ifthere is too much wind buffeting slow down to get out of the other vehicle's air turbulence.
8. When parking your car and trailer, especially on a hill, be sure to fol-low all the normal precautions. Turnyour front wheel into the curb, set the parking brake firmly, and put the transmission in 1st or Reverse(manual) or Park (automatic). In addition, place wheel chocks at each of the trailer's tires.
9. If the trailer has electric brakes, start your vehicle and trailer mov-ing, and then apply the trailer brakecontroller by hand to be sure the brakes are working. This lets you check your electrical connection atthe same time.
10. During your trip, check occasion-
ally to be sure that the load issecure, and that the lights and any trailer brakes are still working.
kg.(Lbs)
Page 263 of 539
6
DO-IT-YOURSELF MAINTENANCE
41
1. Keep all tires inflated to the correct
pressure.
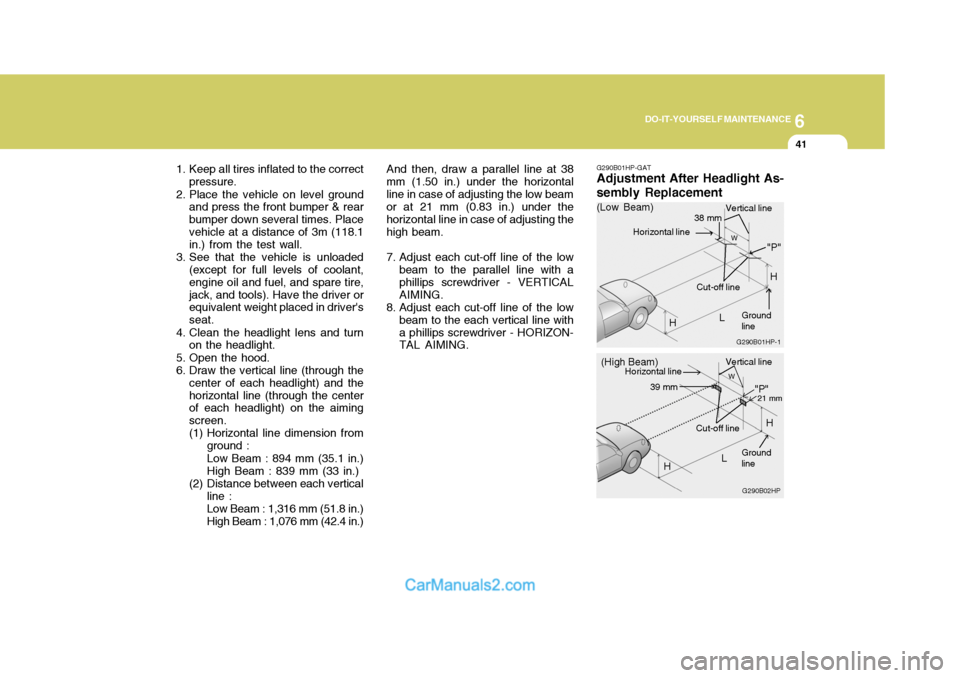
2. Place the vehicle on level ground and press the front bumper & rear bumper down several times. Placevehicle at a distance of 3m (118.1 in.) from the test wall.
3. See that the vehicle is unloaded (except for full levels of coolant, engine oil and fuel, and spare tire,jack, and tools). Have the driver or equivalent weight placed in driver's seat.
4. Clean the headlight lens and turn on the headlight.
5. Open the hood.
6. Draw the vertical line (through the center of each headlight) and thehorizontal line (through the center of each headlight) on the aiming screen.
(1) Horizontal line dimension from
ground : Low Beam : 894 mm (35.1 in.) High Beam : 839 mm (33 in.)
(2) Distance between each vertical line : Low Beam : 1,316 mm (51.8 in.) High Beam : 1,076 mm (42.4 in.) And then, draw a parallel line at 38
mm (1.50 in.) under the horizontalline in case of adjusting the low beam or at 21 mm (0.83 in.) under the horizontal line in case of adjusting thehigh beam.
7. Adjust each cut-off line of the low beam to the parallel line with a phillips screwdriver - VERTICALAIMING.
8. Adjust each cut-off line of the low beam to the each vertical line witha phillips screwdriver - HORIZON- TAL AIMING. G290B01HP-GAT Adjustment After Headlight As- sembly Replacement
G290B02HP
LW
H Cut-off line
"P"
Vertical line
Horizontal line
Ground line
21 mm39 mm
(High Beam)
H
G290B01HP-1
LW
"P"
38 mm
H
H
(Low Beam)
Vertical line
Ground line
Cut-off line
Horizontal line
Page 322 of 539
1
CONTROLS AND EQUIPMENT
17
!
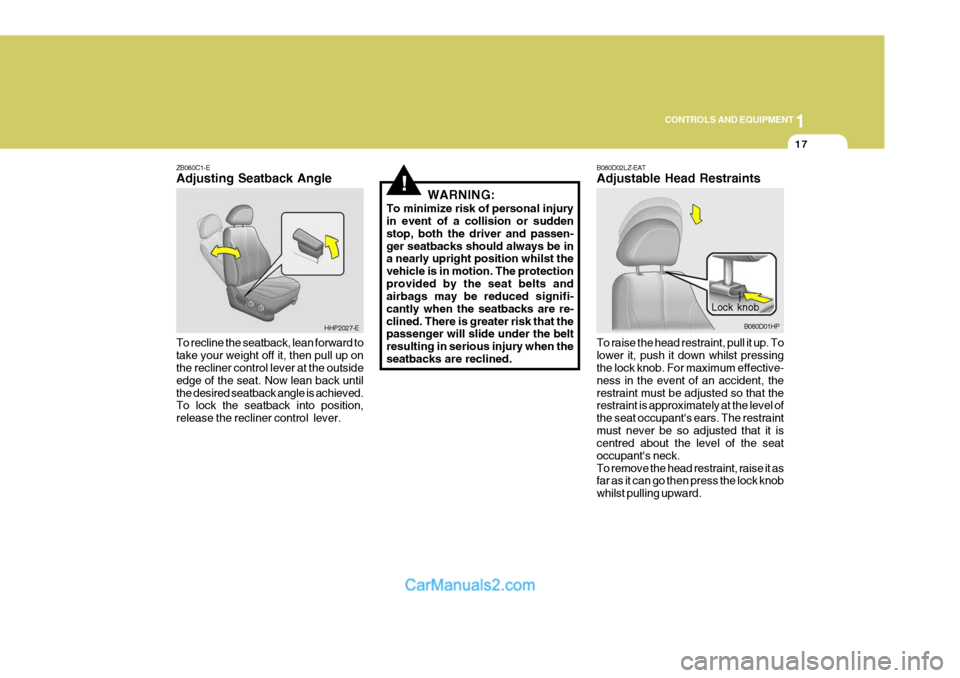
ZB060C1-E Adjusting Seatback Angle To recline the seatback, lean forward to take your weight off it, then pull up on the recliner control lever at the outside edge of the seat. Now lean back untilthe desired seatback angle is achieved. To lock the seatback into position, release the recliner control lever. WARNING:
To minimize risk of personal injury in event of a collision or sudden stop, both the driver and passen-ger seatbacks should always be in a nearly upright position whilst the vehicle is in motion. The protectionprovided by the seat belts and airbags may be reduced signifi- cantly when the seatbacks are re-clined. There is greater risk that the passenger will slide under the belt resulting in serious injury when the seatbacks are reclined.
HHP2027-E
Lock knob
B080D01HP
B080D02LZ-EAT Adjustable Head Restraints To raise the head restraint, pull it up. To lower it, push it down whilst pressing the lock knob. For maximum effective- ness in the event of an accident, therestraint must be adjusted so that the restraint is approximately at the level of the seat occupant's ears. The restraintmust never be so adjusted that it is centred about the level of the seat occupant's neck.To remove the head restraint, raise it as far as it can go then press the lock knob whilst pulling upward.