key Hyundai Tiburon 2003 Owner's Guide
[x] Cancel search | Manufacturer: HYUNDAI, Model Year: 2003, Model line: Tiburon, Model: Hyundai Tiburon 2003Pages: 169, PDF Size: 3.04 MB
Page 70 of 169
FEATURES OF YOUR HYUNDAI
1- 62
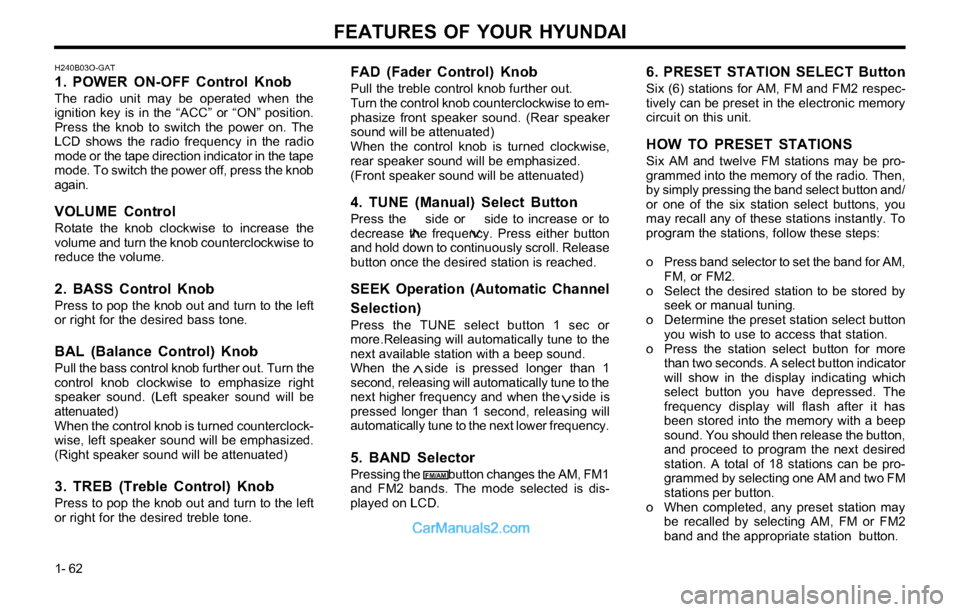
FAD (Fader Control) Knob
Pull the treble control knob further out.
Turn the control knob counterclockwise to em-
phasize front speaker sound. (Rear speaker
sound will be attenuated)
When the control knob is turned clockwise,
rear speaker sound will be emphasized.
(Front speaker sound will be attenuated)
4. TUNE (Manual) Select Button
Press the side or side to increase or to
decrease the frequency. Press either button
and hold down to continuously scroll. Release
button once the desired station is reached.
SEEK Operation (Automatic Channel
Selection)
Press the TUNE select button 1 sec or
more.Releasing will automatically tune to the
next available station with a beep sound.
When the side is pressed longer than 1
second, releasing will automatically tune to the
next higher frequency and when the side is
pressed longer than 1 second, releasing will
automatically tune to the next lower frequency.
5. BAND Selector
Pressing the button changes the AM, FM1
and FM2 bands. The mode selected is dis-
played on LCD.
6. PRESET STATION SELECT Button
Six (6) stations for AM, FM and FM2 respec-
tively can be preset in the electronic memory
circuit on this unit.
HOW TO PRESET STATIONS
Six AM and twelve FM stations may be pro-
grammed into the memory of the radio. Then,
by simply pressing the band select button and/
or one of the six station select buttons, you
may recall any of these stations instantly. To
program the stations, follow these steps:
o Press band selector to set the band for AM,
FM, or FM2.
o Select the desired station to be stored by
seek or manual tuning.
o Determine the preset station select button
you wish to use to access that station.
o Press the station select button for more
than two seconds. A select button indicator
will show in the display indicating which
select button you have depressed. The
frequency display will flash after it has
been stored into the memory with a beep
sound. You should then release the button,
and proceed to program the next desired
station. A total of 18 stations can be pro-
grammed by selecting one AM and two FM
stations per button.
o When completed, any preset station may
be recalled by selecting AM, FM or FM2
band and the appropriate station button.
H240B03O-GAT
1. POWER ON-OFF Control Knob
The radio unit may be operated when the
ignition key is in the “ACC” or “ON” position.
Press the knob to switch the power on. The
LCD shows the radio frequency in the radio
mode or the tape direction indicator in the tape
mode. To switch the power off, press the knob
again.
VOLUME Control
Rotate the knob clockwise to increase the
volume and turn the knob counterclockwise to
reduce the volume.
2. BASS Control Knob
Press to pop the knob out and turn to the left
or right for the desired bass tone.
BAL (Balance Control) Knob
Pull the bass control knob further out. Turn the
control knob clockwise to emphasize right
speaker sound. (Left speaker sound will be
attenuated)
When the control knob is turned counterclock-
wise, left speaker sound will be emphasized.
(Right speaker sound will be attenuated)
3. TREB (Treble Control) Knob
Press to pop the knob out and turn to the left
or right for the desired treble tone.
FM/AM
Page 77 of 169
FEATURES OF YOUR HYUNDAI
1- 69
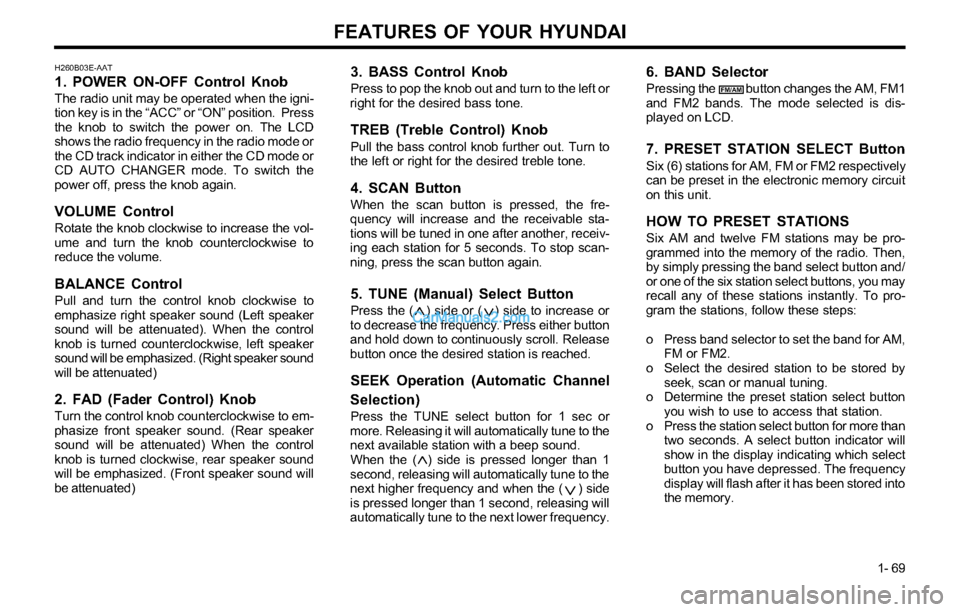
3. BASS Control Knob
Press to pop the knob out and turn to the left or
right for the desired bass tone.
TREB (Treble Control) Knob
Pull the bass control knob further out. Turn to
the left or right for the desired treble tone.
4. SCAN Button
When the scan button is pressed, the fre-
quency will increase and the receivable sta-
tions will be tuned in one after another, receiv-
ing each station for 5 seconds. To stop scan-
ning, press the scan button again.
5. TUNE (Manual) Select Button
Press the ( ) side or ( ) side to increase or
to decrease the frequency. Press either button
and hold down to continuously scroll. Release
button once the desired station is reached.
SEEK Operation (Automatic Channel
Selection)
Press the TUNE select button for 1 sec or
more. Releasing it will automatically tune to the
next available station with a beep sound.
When the ( ) side is pressed longer than 1
second, releasing will automatically tune to the
next higher frequency and when the ( ) side
is pressed longer than 1 second, releasing will
automatically tune to the next lower frequency.
6. BAND Selector
Pressing the button changes the AM, FM1
and FM2 bands. The mode selected is dis-
played on LCD.
7. PRESET STATION SELECT Button
Six (6) stations for AM, FM or FM2 respectively
can be preset in the electronic memory circuit
on this unit.
HOW TO PRESET STATIONS
Six AM and twelve FM stations may be pro-
grammed into the memory of the radio. Then,
by simply pressing the band select button and/
or one of the six station select buttons, you may
recall any of these stations instantly. To pro-
gram the stations, follow these steps:
o Press band selector to set the band for AM,
FM or FM2.
o Select the desired station to be stored by
seek, scan or manual tuning.
o Determine the preset station select button
you wish to use to access that station.
o Press the station select button for more than
two seconds. A select button indicator will
show in the display indicating which select
button you have depressed. The frequency
display will flash after it has been stored into
the memory.
H260B03E-AAT
1. POWER ON-OFF Control Knob
The radio unit may be operated when the igni-
tion key is in the “ACC” or “ON” position. Press
the knob to switch the power on. The LCD
shows the radio frequency in the radio mode or
the CD track indicator in either the CD mode or
CD AUTO CHANGER mode. To switch the
power off, press the knob again.
VOLUME Control
Rotate the knob clockwise to increase the vol-
ume and turn the knob counterclockwise to
reduce the volume.
BALANCE Control
Pull and turn the control knob clockwise to
emphasize right speaker sound (Left speaker
sound will be attenuated). When the control
knob is turned counterclockwise, left speaker
sound will be emphasized. (Right speaker sound
will be attenuated)
2. FAD (Fader Control) Knob
Turn the control knob counterclockwise to em-
phasize front speaker sound. (Rear speaker
sound will be attenuated) When the control
knob is turned clockwise, rear speaker sound
will be emphasized. (Front speaker sound will
be attenuated)
FM/AM
Page 84 of 169
FEATURES OF YOUR HYUNDAI
1- 76
H290B03E-GAT
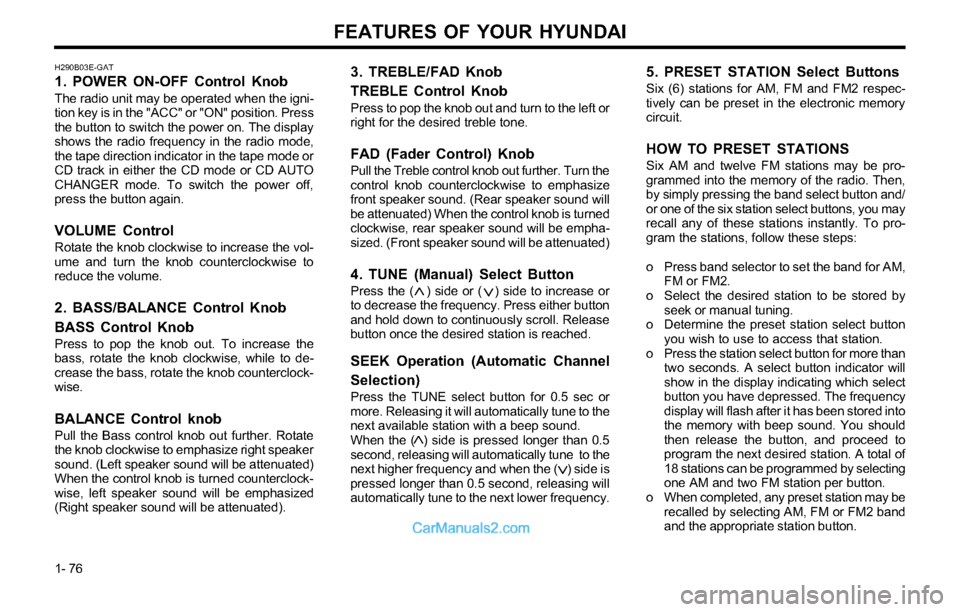
1. POWER ON-OFF Control Knob
The radio unit may be operated when the igni-
tion key is in the "ACC" or "ON" position. Press
the button to switch the power on. The display
shows the radio frequency in the radio mode,
the tape direction indicator in the tape mode or
CD track in either the CD mode or CD AUTO
CHANGER mode. To switch the power off,
press the button again.
VOLUME Control
Rotate the knob clockwise to increase the vol-
ume and turn the knob counterclockwise to
reduce the volume.
2. BASS/BALANCE Control Knob
BASS Control Knob
Press to pop the knob out. To increase the
bass, rotate the knob clockwise, while to de-
crease the bass, rotate the knob counterclock-
wise.
BALANCE Control knob
Pull the Bass control knob out further. Rotate
the knob clockwise to emphasize right speaker
sound. (Left speaker sound will be attenuated)
When the control knob is turned counterclock-
wise, left speaker sound will be emphasized
(Right speaker sound will be attenuated).
3. TREBLE/FAD Knob
TREBLE Control Knob
Press to pop the knob out and turn to the left or
right for the desired treble tone.
FAD (Fader Control) Knob
Pull the Treble control knob out further. Turn the
control knob counterclockwise to emphasize
front speaker sound. (Rear speaker sound will
be attenuated) When the control knob is turned
clockwise, rear speaker sound will be empha-
sized. (Front speaker sound will be attenuated)
4. TUNE (Manual) Select Button
Press the ( ) side or ( ) side to increase or
to decrease the frequency. Press either button
and hold down to continuously scroll. Release
button once the desired station is reached.
SEEK Operation (Automatic Channel
Selection)
Press the TUNE select button for 0.5 sec or
more. Releasing it will automatically tune to the
next available station with a beep sound.
When the ( ) side is pressed longer than 0.5
second, releasing will automatically tune to the
next higher frequency and when the ( ) side is
pressed longer than 0.5 second, releasing will
automatically tune to the next lower frequency.
5. PRESET STATION Select Buttons
Six (6) stations for AM, FM and FM2 respec-
tively can be preset in the electronic memory
circuit.
HOW TO PRESET STATIONS
Six AM and twelve FM stations may be pro-
grammed into the memory of the radio. Then,
by simply pressing the band select button and/
or one of the six station select buttons, you may
recall any of these stations instantly. To pro-
gram the stations, follow these steps:
o Press band selector to set the band for AM,
FM or FM2.
o Select the desired station to be stored by
seek or manual tuning.
o Determine the preset station select button
you wish to use to access that station.
o Press the station select button for more than
two seconds. A select button indicator will
show in the display indicating which select
button you have depressed. The frequency
display will flash after it has been stored into
the memory with beep sound. You should
then release the button, and proceed to
program the next desired station. A total of
18 stations can be programmed by selecting
one AM and two FM station per button.
o When completed, any preset station may be
recalled by selecting AM, FM or FM2 band
and the appropriate station button.
Page 85 of 169
FEATURES OF YOUR HYUNDAI
1- 77
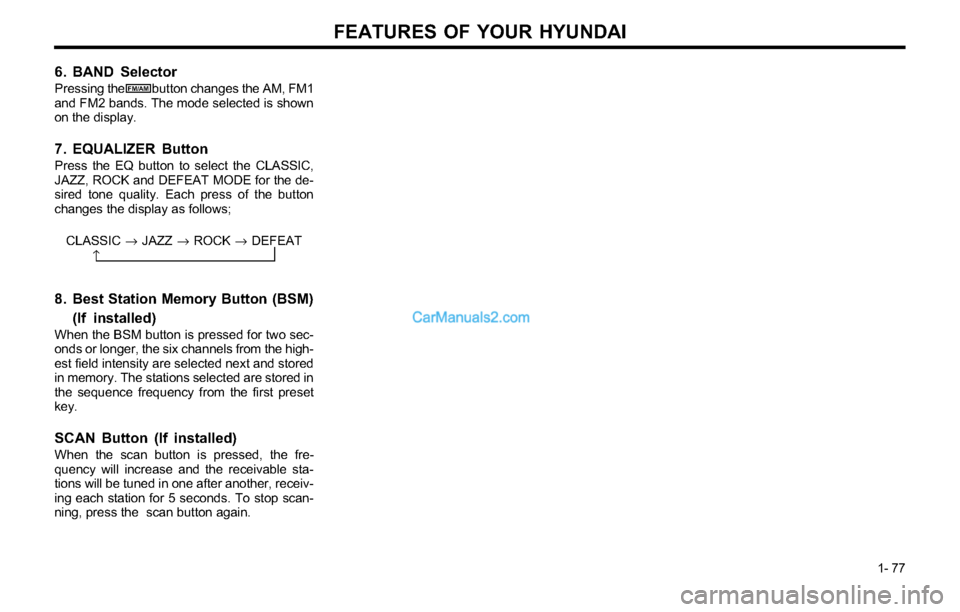
6. BAND Selector
Pressing the button changes the AM, FM1
and FM2 bands. The mode selected is shown
on the display.
7. EQUALIZER Button
Press the EQ button to select the CLASSIC,
JAZZ, ROCK and DEFEAT MODE for the de-
sired tone quality. Each press of the button
changes the display as follows;
8. Best Station Memory Button (BSM)
(If installed)
When the BSM button is pressed for two sec-
onds or longer, the six channels from the high-
est field intensity are selected next and stored
in memory. The stations selected are stored in
the sequence frequency from the first preset
key.
SCAN Button (If installed)
When the scan button is pressed, the fre-
quency will increase and the receivable sta-
tions will be tuned in one after another, receiv-
ing each station for 5 seconds. To stop scan-
ning, press the scan button again.CLASSIC ® JAZZ ® ROCK ® DEFEAT
FM/AM
Page 97 of 169
DRIVING YOUR HYUNDAI
2- 2
C020A01A-AATBEFORE STARTING THE ENGINE
Before you start the engine, you should always:
1. Look around the vehicle to be sure there are
no flat tires, puddles of oil, water or other
indications of possible trouble.
2. After entering the car, check to be sure the
parking brake is engaged.
3. Check that all windows, and lights are clean.
4. Check that the interior and exterior mirrors
are clean and in position.
5. Check your seat, seatback and headrest to
be sure they are in their proper positions.
6. Lock all the doors.
7. Fasten your seat belt and be sure that all
other occupants have fastened theirs.
8. Turn off all lights and accessories that are
not needed.
9. When you turn the ignition switch to “ON”,
check that all appropriate warning lights are
operating and that you have sufficient fuel.
10. Check the operation of warning lights and all
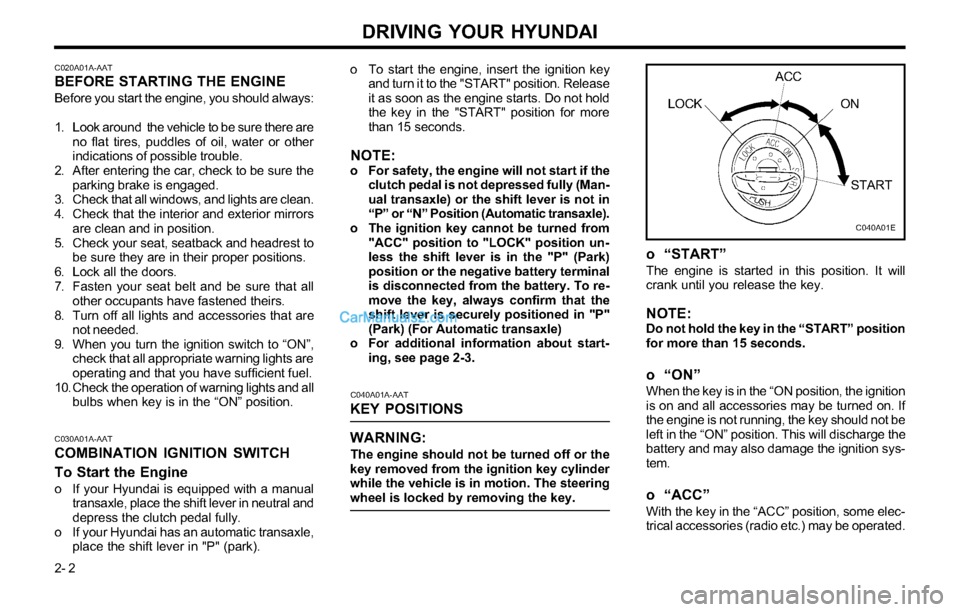
bulbs when key is in the “ON” position.o To start the engine, insert the ignition key
and turn it to the "START" position. Release
it as soon as the engine starts. Do not hold
the key in the "START" position for more
than 15 seconds.
NOTE:o For safety, the engine will not start if the
clutch pedal is not depressed fully (Man-
ual transaxle) or the shift lever is not in
“P” or “N” Position (Automatic transaxle).
o The ignition key cannot be turned from
"ACC" position to "LOCK" position un-
less the shift lever is in the "P" (Park)
position or the negative battery terminal
is disconnected from the battery. To re-
move the key, always confirm that the
shift lever is securely positioned in "P"
(Park) (For Automatic transaxle)
o For additional information about start-
ing, see page 2-3.
C040A01A-AAT
KEY POSITIONS
WARNING:
The engine should not be turned off or the
key removed from the ignition key cylinder
while the vehicle is in motion. The steering
wheel is locked by removing the key.
C030A01A-AATCOMBINATION IGNITION SWITCH
To Start the Engine
o If your Hyundai is equipped with a manual
transaxle, place the shift lever in neutral and
depress the clutch pedal fully.
o If your Hyundai has an automatic transaxle,
place the shift lever in "P" (park).
o “START”The engine is started in this position. It will
crank until you release the key.
NOTE:Do not hold the key in the “START” position
for more than 15 seconds.
o “ON”When the key is in the “ON position, the ignition
is on and all accessories may be turned on. If
the engine is not running, the key should not be
left in the “ON” position. This will discharge the
battery and may also damage the ignition sys-
tem.
o “ACC”
With the key in the “ACC” position, some elec-
trical accessories (radio etc.) may be operated.
C040A01E
LOCKACC
ON
START
Page 98 of 169
DRIVING YOUR HYUNDAI
2- 3
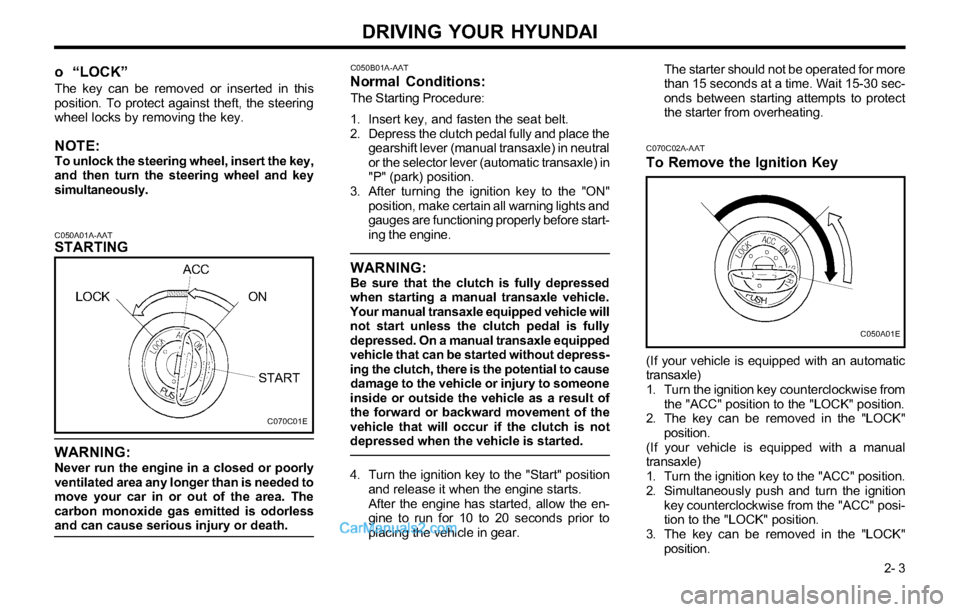
C050A01A-AATSTARTING
WARNING:
Never run the engine in a closed or poorly
ventilated area any longer than is needed to
move your car in or out of the area. The
carbon monoxide gas emitted is odorless
and can cause serious injury or death.
C050B01A-AATNormal Conditions:
The Starting Procedure:
1. Insert key, and fasten the seat belt.
2. Depress the clutch pedal fully and place the
gearshift lever (manual transaxle) in neutral
or the selector lever (automatic transaxle) in
"P" (park) position.
3. After turning the ignition key to the "ON"
position, make certain all warning lights and
gauges are functioning properly before start-
ing the engine.
WARNING:Be sure that the clutch is fully depressed
when starting a manual transaxle vehicle.
Your manual transaxle equipped vehicle will
not start unless the clutch pedal is fully
depressed. On a manual transaxle equipped
vehicle that can be started without depress-
ing the clutch, there is the potential to cause
damage to the vehicle or injury to someone
inside or outside the vehicle as a result of
the forward or backward movement of the
vehicle that will occur if the clutch is not
depressed when the vehicle is started.
4. Turn the ignition key to the "Start" position
and release it when the engine starts.
After the engine has started, allow the en-
gine to run for 10 to 20 seconds prior to
placing the vehicle in gear.The starter should not be operated for more
than 15 seconds at a time. Wait 15-30 sec-
onds between starting attempts to protect
the starter from overheating.
o “LOCK”
The key can be removed or inserted in this
position. To protect against theft, the steering
wheel locks by removing the key.
NOTE:To unlock the steering wheel, insert the key,
and then turn the steering wheel and key
simultaneously.C070C02A-AAT
To Remove the Ignition Key
(If your vehicle is equipped with an automatic
transaxle)
1. Turn the ignition key counterclockwise from
the "ACC" position to the "LOCK" position.
2. The key can be removed in the "LOCK"
position.
(If your vehicle is equipped with a manual
transaxle)
1. Turn the ignition key to the "ACC" position.
2. Simultaneously push and turn the ignition
key counterclockwise from the "ACC" posi-
tion to the "LOCK" position.
3. The key can be removed in the "LOCK"
position.
C070C01E
LOCKACC
ON
START
C050A01E
Page 102 of 169
DRIVING YOUR HYUNDAI
2- 7 SKIP : By rapidly moving the selector forward
or backward twice, it is possible to skip one
gear, i.e. 1st to 3rd or 3rd to 1st .
CAUTION:o In sports mode, the driver must execute
upward shifts in accordance with pre-
vailing road conditions, taking care to
keep the engine speed below the red
zone.
o For engine protection, upward shifts are
made automatically when the engine rpm
reaches the red zone.
o By rapidly moving the selector lever back-
wards (-) twice it is possible to skip one
gear by using the sports mode. Since
sudden engine braking and/or rapid ac-
celeration can cause a loss of traction,
however, downshifts must be made care-
fully in accordance with the vehicle's
speed.
NOTE:o In sports mode, only the four forward
gears can be selected. To reverse or park
the vehicle, move the selector lever to
the "R" or "P" position as required.
o In sports mode, downward shifts are
made automatically when the vehicle
slows down. When the vehicle stops, 1st
gear is automatically selected.
o To maintain the required levels of vehicle
performance and safety, the system may
not execute certain gearshifts when the
selector lever is operated.o Before driving away from a stop on a
slippery road, push the selector lever
forward into the +(UP) position. This
causes the transaxle to shift into 2nd
gear which is better for smooth driving
away on a slippery road. Push the selec-
tor lever to the -(DOWN) side to shift
back to 1st gear.
C090H01L-GAT
NOTE:o For smooth and safe operation, depress
the brake pedal when shifting from “Neu-
tral” position or “Park” position to a
forward or reverse gear.
o The ignition key must be in the “ON”
position and the brake pedal fully de-
pressed in order to move the shift lever
from the “P” (Park) position to any of the
other positions.
o It is always possible to shift from “R”,
“N”, “D” position to “P” position. The
vehicle must be fully stopped to avoid
transaxle damage.
C090I02L-GAT
CAUTION:
o Shift into “R” and “P” position only when
the vehicle has completely stopped.
o Do not accelerate the engine in reverse
or any of the forward positions with the
brakes applied.
o Always apply the footbrake when shift-
ing from “P” or “N”, to “R”, “D”position.
C090N01O-AATGood Driving Practices
o Never move the gear selector lever from “P”
or “N” to any other position with the acceler-
ator pedal depressed.
o Never move the gear selector lever into “P”
when the vehicle is in motion.
o Be sure the car is completely stopped be-
fore you attempt to shift into “R”.
o Never take the car out of gear and coast
down a hill. This may be extremely hazard-
ous. Always leave the car in gear when
moving.
o Do not “ride” the brakes. This can cause
them to overheat and malfunction. Instead,
when you are driving down a long hill, slow
down and shift to a lower gear. When you do
this, engine braking will help slow the car.
o Slow down before shifting to a lower gear.
Otherwise, the lower gear may not be en-
gaged. o Do not use the “P” (Park) position in
place of the parking brake. Always set
the parking brake, shift the transaxle into
“P” (Park) position and turn off the igni-
tion when you leave the vehicle, even
momentarily. Never leave the vehicle
unattended while the engine is running.
o Check the automatic transaxle fluid level
regularly, and add fluid as necessary.
o See the maintenance schedule for the
proper fluid recommendation.
Page 105 of 169
DRIVING YOUR HYUNDAI
2- 10
C140A01A-AAT
DRIVING FOR ECONOMY
You can save fuel and get more miles from your
car if you follow these suggestions:
o Drive smoothly. Accelerate at a moderate
rate. Don't make "jack-rabbit" starts or full-
throttle shifts and maintain a steady cruising
speed. Don't race between stoplights. Try to
adjust your speed to that of the other traffic
so you don't have to change speeds unnec-
essarily. Avoid heavy traffic whenever pos-
sible. Always maintain a safe distance from
other vehicles so you can avoid unneces-
sary braking. This also reduces brake wear.
o Drive at a moderate speed. The faster you
drive, the more fuel your car uses. Driving at
a moderate speed, especially on the high-
way, is one of the most effective ways to
reduce fuel consumption.
o Don't "ride" the brake or clutch pedal. This
can increase fuel consumption and also
increase wear on these components. In ad-
dition, driving with your foot resting on the
brake pedal may cause the brakes to over-
heat, which reduces their effectiveness and
may lead to more serious consequences.
C300B01GK-GATTCS ON/OFF Mode
In the TCS ON mode, the indicator in the
instrument cluster will not be illuminated.
To switch the TCS OFF mode, press the TCS
switch . To switch the TCS mode, press the
TCS switch again. In the TCS OFF mode, the
SLIP control will be deactivated and the TCS-
OFF indicator in the instrument cluster will be
illuminated.
NOTE:1) Turn off the engine. Then restart the
engine, and the TCS mode will automati-
cally turn ON.
2) When the traction control is operating
properly, you can feel a slight pulsation
CAUTION:When the TCS indicator blinks, SLIP control
has been activated. It also means that the
road is slippery or your car is accelerating
excessively. In this situation, release foot
pressure from the accelerator pedal and
maintain moderate speed.
WARNING:Traction control is only a driving aid; all
normal precautions for driving in inclement
weather and on slippery road surfaces
should be observed.
C300D01GK-GAT
Indicator and Warning
The indicator should illuminate when the igni-
tion key is turned to ON or START but should
go out after three seconds.
If the indicator does not illuminate, or the TCS
indicator does not go out after 3 seconds, have
it checked by an authorized dealer.
Should there be any unusual conditions in the
device, TCS-OFF either illuminates or blinks as
a warning.
If TCS-OFF illuminates or blinks, pull your car
to a safe place and stop the engine.
Then, start the engine again to check if the
TCS-OFF indicator goes out.
If the indicator remains lit even after the engine
has been started, have your car checked by an
authorized Hyundai dealer.in the vehicle. This is only the effect of
brake control and indicates nothing un-
usual.
3) When the engine starts, a click is heard
from the engine compartment; however,
this is only the sound of traction control
being checked.
4) When moving out of the mud or fresh
snow, pressing the accelerator pedal may
not cause the engine speed to increase.
NOTE:1) When TCS-OFF illuminates or blinks, trac-
tion control is automatically deactivated
for safety.
2) This warning function is not provided
when the driver selects the TCS-OFF
mode.
Page 107 of 169
DRIVING YOUR HYUNDAI
2- 12
C160K01A-AAT
Carry Emergency EquipmentDepending on the severity of the weather where
you drive your car, you should carry appropri-
ate emergency equipment. Some of the items
you may want to carry include tire chains, tow
straps or chains, flashlight, emergency flares,
sand, a shovel, jumper cables, a window
scraper, gloves, ground cloth, coveralls, a blan-
ket, etc.
C160J01A-AAT
Don’t Let Ice and Snow Accumulate
Underneath
Under some conditions, snow and ice can build
up under the fenders and interfere with the
steering. When driving in severe winter condi-
tions where this may happen, you should peri-
odically check underneath the car to be sure
the movement of the front wheels and the
steering components is not obstructed. transaxle) and block the rear wheels so the car
cannot roll. Then release the parking brake.
C160D01F-AATCheck Battery and Cables
Winter puts additional burdens on the battery
system. Visually inspect the battery and cables
as described in Section 6 (See page 6-16). The
level of charge in your battery can be checked
by your Hyundai dealer or a service station.
C160E01A-AATChange to "Winter Weight" Oil if
Necessary
In some climates it is recommended that a
lower viscosity "winter weight" oil be used dur-
ing cold weather. See Section 9 for recommen-
dations. If you aren’t sure what weight oil you
should use, consult your Hyundai dealer. tenance schedule in Section 5. Before winter,
have your coolant tested to assure that its
freezing point is sufficient for the temperatures
anticipated during the winter.
C160H01A-AATUse Approved Anti-Freeze in Window
Washer System
To keep the water in the window washer sys-
tem from freezing, add an approved anti-freeze
solution in accordance with instructions on the
container. Window washer anti-freeze is avail-
able from Hyundai dealers and most auto parts
outlets. Do not use engine coolant or other
types of anti-freeze as these may damage the
finish.
C160F01F-AATCheck Spark Plugs and Ignition
System
Inspect your spark plugs as described in Sec-
tion 6 (See page 6-6) and replace them if
necessary. Also check all ignition wiring and
components to be sure they are not cracked,
worn or damaged in any way.
C160G01A-AATTo Keep Locks from Freezing
To keep the locks from freezing, squirt an
approved de-icer fluid or glycerine into the key
opening. If a lock is covered with ice, squirt it
with an approved de-icing fluid to remove the
ice. If the lock is frozen internally, you may be
able to thaw it out by using a heated key.
Handle the heated key with care to avoid burn-
ing the fingers.
C160I01A-AAT
Don’t Let Your Parking Brake Freeze
Under some conditions your parking brake can
freeze in the engaged position. This is most
likely to happen when there is an accumulation
of snow or ice around or near the rear brakes or
if the brakes are wet. If there is a risk the
parking brake may freeze, apply it only tempo-
rarily while you put the gear selector lever in
"P" (automatic) or in first or reverse gear (manual
Page 118 of 169
WHAT TO DO IN AN EMERGENCY
3-8
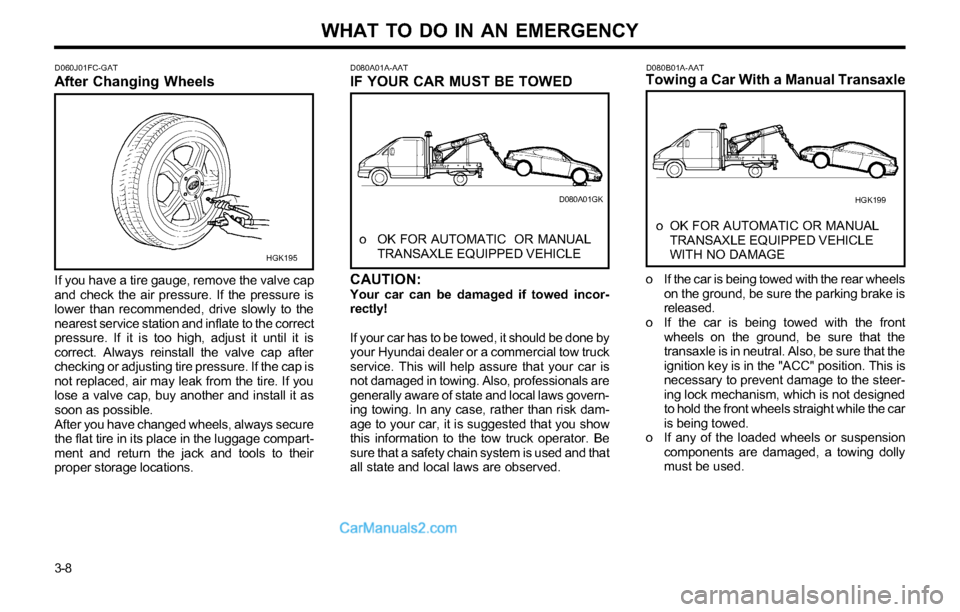
D080B01A-AATTowing a Car With a Manual Transaxle
o OK FOR AUTOMATIC OR MANUAL
TRANSAXLE EQUIPPED VEHICLE
WITH NO DAMAGE
o If the car is being towed with the rear wheels
on the ground, be sure the parking brake is
released.
o If the car is being towed with the front
wheels on the ground, be sure that the
transaxle is in neutral. Also, be sure that the
ignition key is in the "ACC" position. This is
necessary to prevent damage to the steer-
ing lock mechanism, which is not designed
to hold the front wheels straight while the car
is being towed.
o If any of the loaded wheels or suspension
components are damaged, a towing dolly
must be used.
D080A01A-AATIF YOUR CAR MUST BE TOWED
o OK FOR AUTOMATIC OR MANUAL
TRANSAXLE EQUIPPED VEHICLE
CAUTION:Your car can be damaged if towed incor-
rectly!
If your car has to be towed, it should be done by
your Hyundai dealer or a commercial tow truck
service. This will help assure that your car is
not damaged in towing. Also, professionals are
generally aware of state and local laws govern-
ing towing. In any case, rather than risk dam-
age to your car, it is suggested that you show
this information to the tow truck operator. Be
sure that a safety chain system is used and that
all state and local laws are observed.
D060J01FC-GATAfter Changing Wheels
If you have a tire gauge, remove the valve cap
and check the air pressure. If the pressure is
lower than recommended, drive slowly to the
nearest service station and inflate to the correct
pressure. If it is too high, adjust it until it is
correct. Always reinstall the valve cap after
checking or adjusting tire pressure. If the cap is
not replaced, air may leak from the tire. If you
lose a valve cap, buy another and install it as
soon as possible.
After you have changed wheels, always secure
the flat tire in its place in the luggage compart-
ment and return the jack and tools to their
proper storage locations.
HGK195
D080A01GK
HGK199