air suspension Hyundai Tiburon 2003 Owner's Manual
[x] Cancel search | Manufacturer: HYUNDAI, Model Year: 2003, Model line: Tiburon, Model: Hyundai Tiburon 2003Pages: 169, PDF Size: 3.04 MB
Page 118 of 169

WHAT TO DO IN AN EMERGENCY
3-8
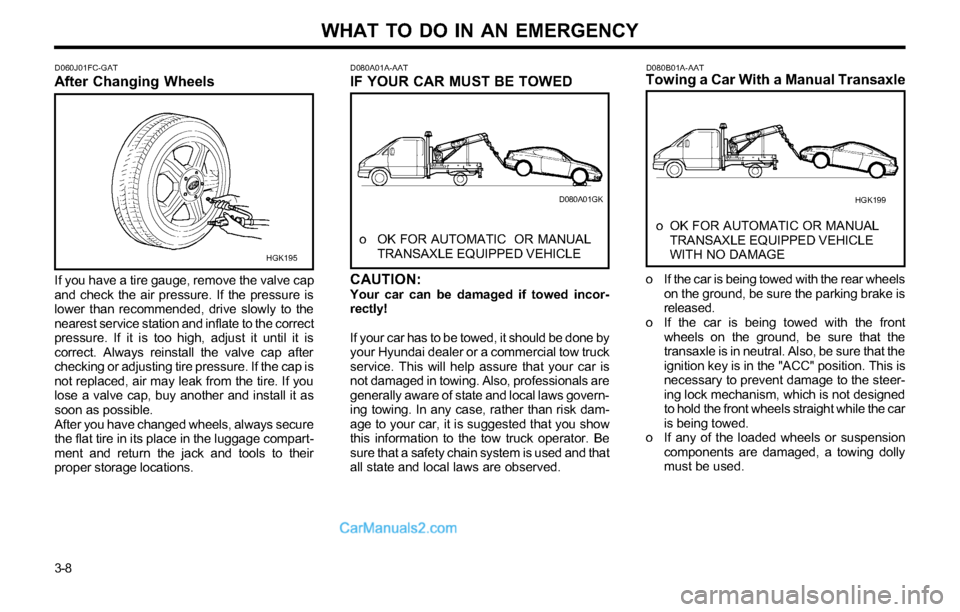
D080B01A-AATTowing a Car With a Manual Transaxle
o OK FOR AUTOMATIC OR MANUAL
TRANSAXLE EQUIPPED VEHICLE
WITH NO DAMAGE
o If the car is being towed with the rear wheels
on the ground, be sure the parking brake is
released.
o If the car is being towed with the front
wheels on the ground, be sure that the
transaxle is in neutral. Also, be sure that the
ignition key is in the "ACC" position. This is
necessary to prevent damage to the steer-
ing lock mechanism, which is not designed
to hold the front wheels straight while the car
is being towed.
o If any of the loaded wheels or suspension
components are damaged, a towing dolly
must be used.
D080A01A-AATIF YOUR CAR MUST BE TOWED
o OK FOR AUTOMATIC OR MANUAL
TRANSAXLE EQUIPPED VEHICLE
CAUTION:Your car can be damaged if towed incor-
rectly!
If your car has to be towed, it should be done by
your Hyundai dealer or a commercial tow truck
service. This will help assure that your car is
not damaged in towing. Also, professionals are
generally aware of state and local laws govern-
ing towing. In any case, rather than risk dam-
age to your car, it is suggested that you show
this information to the tow truck operator. Be
sure that a safety chain system is used and that
all state and local laws are observed.
D060J01FC-GATAfter Changing Wheels
If you have a tire gauge, remove the valve cap
and check the air pressure. If the pressure is
lower than recommended, drive slowly to the
nearest service station and inflate to the correct
pressure. If it is too high, adjust it until it is
correct. Always reinstall the valve cap after
checking or adjusting tire pressure. If the cap is
not replaced, air may leak from the tire. If you
lose a valve cap, buy another and install it as
soon as possible.
After you have changed wheels, always secure
the flat tire in its place in the luggage compart-
ment and return the jack and tools to their
proper storage locations.
HGK195
D080A01GK
HGK199
Page 128 of 169

VEHICLE MAINTENANCE REQUIREMENTS
5- 4
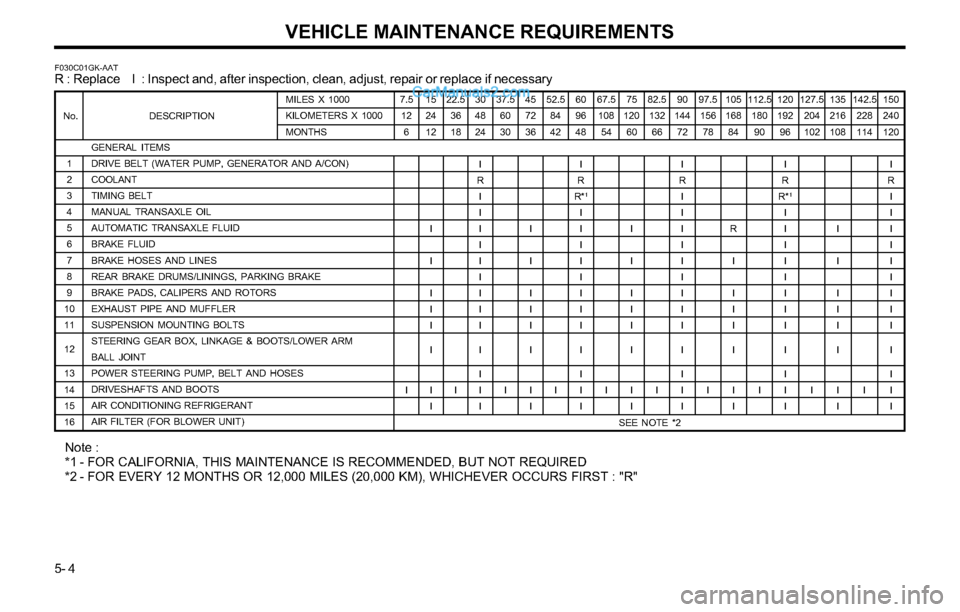
F030C01GK-AATR : Replace I : Inspect and, after inspection, clean, adjust, repair or replace if necessary
GENERAL ITEMS
DRIVE BELT (WATER PUMP, GENERATOR AND A/CON)
COOLANT
TIMING BELT
MANUAL TRANSAXLE OIL
AUTOMATIC TRANSAXLE FLUID
BRAKE FLUID
BRAKE HOSES AND LINES
REAR BRAKE DRUMS/LININGS, PARKING BRAKE
BRAKE PADS, CALIPERS AND ROTORS
EXHAUST PIPE AND MUFFLER
SUSPENSION MOUNTING BOLTS
STEERING GEAR BOX, LINKAGE & BOOTS/LOWER ARM
BALL JOINT
POWER STEERING PUMP, BELT AND HOSES
DRIVESHAFTS AND BOOTS
AIR CONDITIONING REFRIGERANT
AIR FILTER (FOR BLOWER UNIT) 1
2
3
4
5
6
7
8
9
10
11
12
13
14
15
16 No. DESCRIPTIONMILES X 1000
KILOMETERS X 1000
MONTHS7.5
12
6
I15
24
12
I
I
I
I
I
I
I
I22.5
36
18
I30
48
24
I
R
I
I
I
I
I
I
I
I
I
I
I
I
I37.5
60
30
I45
72
36
I
I
I
I
I
I
I
I52.5
84
42
I60
96
48
I
R
R*
1
I
I
I
I
I
I
I
I
I
I
I
I67.5
108
54
I75
120
60
I
I
I
I
I
I
I
I82.5
132
66
I90
144
72
I
R
I
I
I
I
I
I
I
I
I
I
I
I
I97.5
156
78
I105
168
84
R
I
I
I
I
I
I
I112.5
180
90
I120
192
96
I
R
R*
1
I
I
I
I
I
I
I
I
I
I
I
I127.5
204
102
I135
216
108
I
I
I
I
I
I
I
I142.5
228
114
I150
240
120
I
R
I
I
I
I
I
I
I
I
I
I
I
I
I
Note :
*1 - FOR CALIFORNIA, THIS MAINTENANCE IS RECOMMENDED, BUT NOT REQUIRED
*2 - FOR EVERY 12 MONTHS OR 12,000 MILES (20,000 KM), WHICHEVER OCCURS FIRST : "R"
SEE NOTE *2
Page 131 of 169

VEHICLE MAINTENANCE REQUIREMENTS
5-7
F070E04A-AATo Automatic Transaxle Fluid
The fluid level should be in the "HOT" range of
the dipstick, after the engine and transaxle are
at normal operating temperature. Check the
automatic transaxle fluid level with the engine
running and the transaxle in neutral, with the
parking brake properly applied. Use HYUNDAI
GENUINE ATF, DIAMOND ATF SP-III, SK
ATF SP-III when adding or changing fluid.
F070F01A-AAT
o Brake Hoses and LinesVisually check for proper installation, chafing,
cracks, deterioration and any leakage. Replace
any deteriorated or damaged parts immediately.
F070G02A-AAT
o Brake Fluid
Check brake fluid level in the brake fluid reser-
voir. The level should be between “MIN” and
“MAX” marks on the side of the reservoir. Use
only hydraulic brake fluid conforming to DOT 3
or DOT 4.
F070H01A-AATo Rear Brake Drums and Linings/
Parking Brake
Check the rear brake drums and linings for
scoring, burning, leaking fluid, broken parts,
and excessive wear. Inspect the parking brake
system including the parking brake lever and
cables. For detailed service procedures, refer
to the Shop Manual.
F070J01A-AATo Brake Pads, Calipers and Rotors
Check the pads for excessive wear, discs for
run out and wear, and calipers for fluid leakage.
F070K01A-AAT
o Exhaust Pipe and Muffler
Visually inspect the exhaust pipes, muffler and
hangers for cracks, deterioration, or damage.
Start the engine and listen carefully for any
exhaust gas leakage. Tighten connections or
replace parts as necessary.
F070L01A-AAT
o Suspension Mounting Bolts
Check the suspension connections for loose-
ness or damage. Retighten to the specified
torque.
F070N01A-AATo Power Steering Pump, Belt and
Hoses
Check the power steering pump and hoses for
leakage and damage. Replace any damaged or
leaking parts immediately. Inspect the power
steering belt for evidence of cuts, cracks, ex-
cessive wear, oiliness and proper tension. Re-
place or adjust it if necessary.
F070P01A-AAT
o Driveshafts and Boots
Check the drive shafts, boots and clamps for
cracks, deterioration, or damage. Replace any
damaged parts and, if necessary, repack the
grease.
F070Q01A-AAT
o Air Conditioning Refrigerant
Check the air conditioning lines and connec-
tions for leakage and damage. Check air condi-
tioning performance according to the relevant
shop manual if necessary.F070M01A-AATo Steering gear box, linkage & boots/
lower arm ball joint
With the vehicle stopped and engine off, check
for excessive free-play in the steering wheel.
Check the linkage for bends or damage. Check
the dust boots and ball joints for deterioration,
cracks, or damage. Replace any damaged parts.
F060N01E-AAT
o Valve ClearanceInspect excessive valve noise and/or engine
vibration and adjust if necessary. A qualified
technician should perform the operation.
Valve Clearance
Intake valves : 0.0067 ~ 0.0091 in. (0.17 ~ 0.23mm)
Exhaust valves : 0.0098 ~ 0.0122 in. (0.25 ~ 0.31mm)