CD changer Hyundai Tiburon 2004 Owner's Manual
[x] Cancel search | Manufacturer: HYUNDAI, Model Year: 2004, Model line: Tiburon, Model: Hyundai Tiburon 2004Pages: 224, PDF Size: 18.86 MB
Page 95 of 224
1FEATURES OF YOUR HYUNDAI
82
H260B03E-AAT
1. POWER ON-OFF Control Knob
The radio unit may be operated when the ignition
key is in the "ACC" or "ON" position. Press the
knob to switch the power on. The LCD shows
the radio frequency in the radio mode or the CD
track indicator in either the CD mode or CD
AUTO CHANGER mode. To switch the power
off, press the knob again.
VOLUME Control
Rotate the knob clockwise to increase the
volume and turn the knob counterclockwise to
reduce the volume.
BALANCE Control
Pull and turn the control knob clockwise to
emphasize right speaker sound (left speaker
sound will be attenuated). When the control
knob is turned counterclockwise, left speaker
sound will be emphasized (right speaker sound
will be attenuated).
2. FAD (Fader Control) Knob
Turn the control knob counterclockwise to
emphasize front speaker sound (rear speaker
sound will be attenuated). When the control
knob is turned clockwise, rear speaker sound
will be emphasized (front speaker sound will be
attenuated).
3. BASS Control Knob
Press to pop the knob out and turn to the left or
right for the desired bass tone.
TREB (Treble Control) Knob
Pull the bass control knob further out. Turn to the
left or right for the desired treble tone.
4. SCAN Button
When the scan button is pressed, the frequency
will increase and the receivable stations will be
tuned in one after another, receiving each sta-
tion for 5 seconds. To stop scanning, press the
scan button again.
5. TUNE (Manual) Select Button
Press the ( ) side or ( ) side to increase or to
decrease the frequency. Press either button
and hold down to continuously scroll. Release
button once the desired station is reached.
SEEK Operation (Automatic Channel
Selection)
Press the TUNE select button for 1 sec or more.
Releasing it will automatically tune to the next
available station with a beep sound.
When the ( ) side is pressed longer than 1
second, releasing will automatically tune to the
next higher frequency and when the ( ) side
is pressed longer than 1 second, releasing will
automatically tune to the next lower frequency.
Page 100 of 224
1FEATURES OF YOUR HYUNDAI
87
B260E01E-AAT
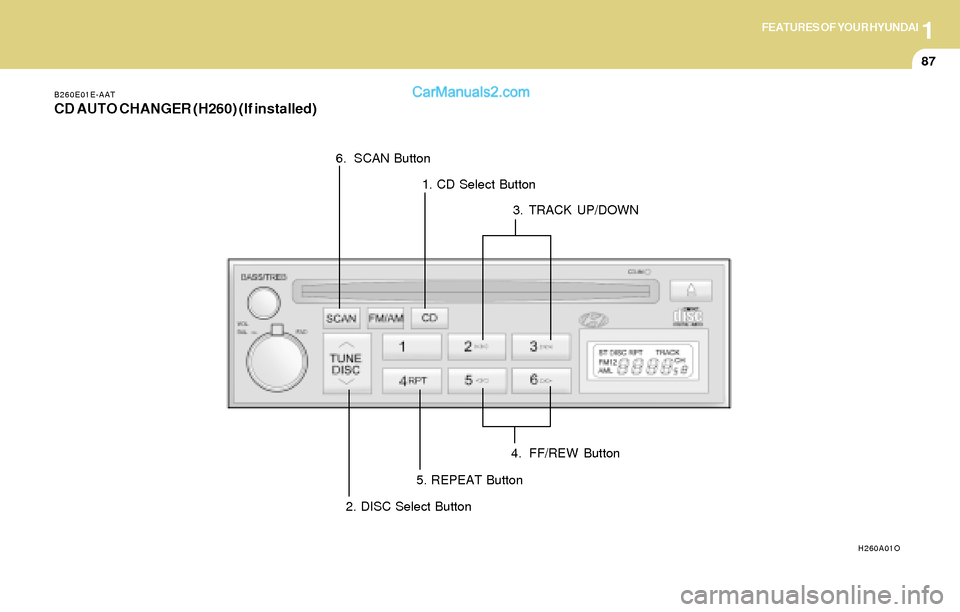
CD AUTO CHANGER (H260) (If installed)
H260A01O
1. CD Select Button
2. DISC Select Button3. TRACK UP/DOWN
4. FF/REW Button
5. REPEAT Button
6. SCAN Button
Page 101 of 224
1FEATURES OF YOUR HYUNDAI
88
B260F01GK-AAT
The CD auto changer is located in the right side
of the quater trim.
o To use the CD auto changer.
1. Open the sliding lid of the CD auto changer.
2. To eject the compact disc magazine, press
the EJECT button located inside the CD auto
changer.
3. Insert the discs into the magazine.
4. Push the magazine into the CD auto changer
and close the sliding lid.
o The CD auto changer can be used when the
ignition switch is in either the "ON" or "ACC"
position.
1. CD Select Button
When the CD changer magazine contains discs,
press the "CD" button and the CD changer can
be used even if the radio is being used. The
Hyundai CD changer can hold up to eight discs.
The disc number will be lit, and the track number,
and elapsed time will be displayed.
2. DISC Select Button
To select the CD you want, push " " to change
the disc number.
3. TRACK UP/DOWN
o The desired track on the disc currently being
played can be selected using the track
number.
o Press once to skip forward to the begin-
ning of the next track. Press once to skip
back to the beginning of the track.
4. FF/REW ( / )
If you want to fast forward or reverse through
the compact disc track, push and hold in the FF
( ) or REW ( ) button.
When you release the button, the compact disc
player will resume playing.
5. REPEAT
o To repeat the music you are listening to,
press the RPT button. To cancel, press
again.
o If you do not release RPT operation when the
track ends, it will automatically be replayed.
This process will be continued until you push
the button again.
6. SCAN Button
o Press the SCAN button to playback the first
10 seconds of each track.
o Press the SCAN button again within 10 sec.
for the desired track.
NOTE:o When replacing the fuse, replace it with
a fuse having the correct capacity.
o This equipment is designed to be used
only in a 12 volt DC battery system with
negative ground.
o This unit is made of precision parts. Do
not attempt to disassemble or adjust
any parts.
o When driving your vehicle, be sure to
keep the volume of the unit set low
enough to allow you to hear sounds
coming from the outside.
TUNE
DISC
Page 102 of 224
1FEATURES OF YOUR HYUNDAI
89
CAUTION:o Do not insert warped or poor quality
discs into the CD changer as damage to
the unit may occur.
o Do not insert anything like coins into the
changer slot as damage to the unit may
occur.
o Do not place beverages close to the
audio system. The playback mechanism
may be damaged if you spill them.
o Do not impact on the audio system, or
the playback mechanism could be dam-
aged.
o Driving on the off-roads or other vibra-
tions may skip your compact disc.
Do not use the audio system on off-
roads as the discs could be scratched
and damaged.
o Do not grip or pull out the disc with your
hand while the disc is being pulled into
the unit by the self loading mechanism.
These can cause poor disc scratching to
occur or trouble in the compact disc
changer.
o Avoid using CD-Recordable or CD-
Rewritable as the changer could not be
operated in recording way of the CD
maker. When using the compact disc
changer, genuine CDs are recommended.
!
Page 104 of 224
1FEATURES OF YOUR HYUNDAI
91
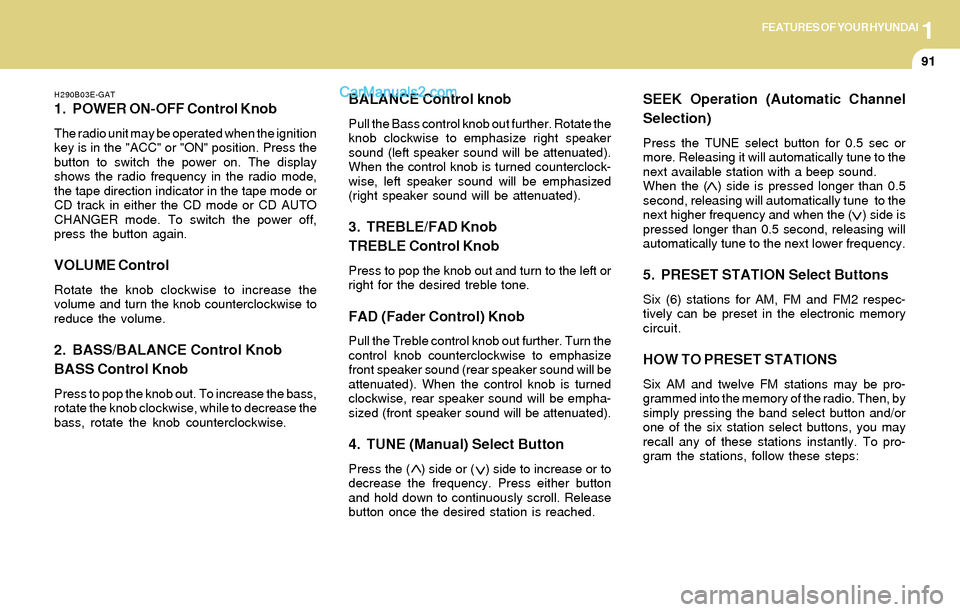
H290B03E-GAT
1. POWER ON-OFF Control Knob
The radio unit may be operated when the ignition
key is in the "ACC" or "ON" position. Press the
button to switch the power on. The display
shows the radio frequency in the radio mode,
the tape direction indicator in the tape mode or
CD track in either the CD mode or CD AUTO
CHANGER mode. To switch the power off,
press the button again.
VOLUME Control
Rotate the knob clockwise to increase the
volume and turn the knob counterclockwise to
reduce the volume.
2. BASS/BALANCE Control Knob
BASS Control Knob
Press to pop the knob out. To increase the bass,
rotate the knob clockwise, while to decrease the
bass, rotate the knob counterclockwise.
BALANCE Control knob
Pull the Bass control knob out further. Rotate the
knob clockwise to emphasize right speaker
sound (left speaker sound will be attenuated).
When the control knob is turned counterclock-
wise, left speaker sound will be emphasized
(right speaker sound will be attenuated).
3. TREBLE/FAD Knob
TREBLE Control Knob
Press to pop the knob out and turn to the left or
right for the desired treble tone.
FAD (Fader Control) Knob
Pull the Treble control knob out further. Turn the
control knob counterclockwise to emphasize
front speaker sound (rear speaker sound will be
attenuated). When the control knob is turned
clockwise, rear speaker sound will be empha-
sized (front speaker sound will be attenuated).
4. TUNE (Manual) Select Button
Press the ( ) side or ( ) side to increase or to
decrease the frequency. Press either button
and hold down to continuously scroll. Release
button once the desired station is reached.
SEEK Operation (Automatic Channel
Selection)
Press the TUNE select button for 0.5 sec or
more. Releasing it will automatically tune to the
next available station with a beep sound.
When the ( ) side is pressed longer than 0.5
second, releasing will automatically tune to the
next higher frequency and when the ( ) side is
pressed longer than 0.5 second, releasing will
automatically tune to the next lower frequency.
5. PRESET STATION Select Buttons
Six (6) stations for AM, FM and FM2 respec-
tively can be preset in the electronic memory
circuit.
HOW TO PRESET STATIONS
Six AM and twelve FM stations may be pro-
grammed into the memory of the radio. Then, by
simply pressing the band select button and/or
one of the six station select buttons, you may
recall any of these stations instantly. To pro-
gram the stations, follow these steps:
Page 111 of 224
1FEATURES OF YOUR HYUNDAI
98
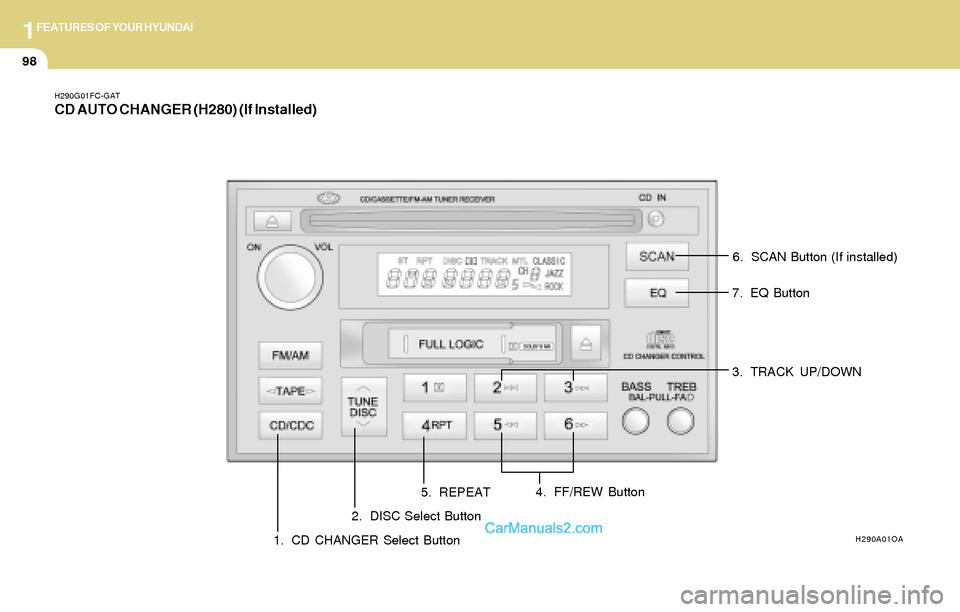
H290G01FC-GATCD AUTO CHANGER (H280) (If Installed)
H290A01OA1. CD CHANGER Select Button2. DISC Select Button6. SCAN Button (If installed)
3. TRACK UP/DOWN
4. FF/REW Button7. EQ Button
5. REPEAT
Page 112 of 224
1FEATURES OF YOUR HYUNDAI
99
B290H01GK-GAT
The CD auto changer is located in the right side
of the quater trim.
o To use the CD auto changer.
1. Open the sliding lid of the CD auto changer.
2. To eject the compact disc magazine, press
the EJECT button located inside the CD auto
changer.
3. Insert the discs into the magazine.
4. Push the magazine into the CD auto changer
and close the sliding lid.
o The CD auto changer can be used when the
ignition switch is in either "ON" or "ACC"
position.
1. CD CHANGER Select Button
When the CD changer magazine contains discs,
press the "CD/CDC" button and the CD changer
can be used even if the radio or cassette player
is being used. The Hyundai CD changer can
hold up to eight discs. The disc number will be
lit, and the track number, and elapsed time will
be displayed.
2. DISC Select Button
To select the CD you want, push " " to change
the disc number.
3. TRACK UP/DOWN
o The desired track on the disc currently being
played can be selected using the track
number.
o Press once to skip forward to the beginn-
ing of the next track. Press once to skip
back to the beginning of the track.
4. FF/REW ( / )
If you want to fast forward or reverse through
the compact disc track, push and hold in the FF
( ) or REW ( ) button.
When you release the button, the compact disc
player will resume playing.
5. REPEAT
o To repeat the music you are listening to,
press the RPT button. To cancel, press
again.
o If you do not release RPT operation when the
track ends, it will automatically be replayed.
This process will be continued until you push
the button again.
6. SCAN Button (If installed)
o Press the SCAN button to playback the first
10 seconds of each track.
o Press the SCAN button again within 10 sec.
for the desired track.
7. EQ Button
Press the EQ button to select the CLASSIC,
JAZZ, ROCK and DEFEAT MODE for the
desired tone quality. Each press of the button
changes the display as follows;
TUNE
DISC
CLASSIC → JAZZ → ROCK → DEFEAT
NOTE:o When replacing the fuse, replace it with
a fuse having the correct capacity.
o This equipment is designed to be used
only in a 12 volt DC battery system with
negative ground.
o This unit is made of precision parts. Do
not attempt to disassemble or adjust
any parts.
o When driving your vehicle, be sure to
keep the volume of the unit set low
enough to allow you to hear sounds
coming from the outside.
Page 113 of 224
1FEATURES OF YOUR HYUNDAI
100
CAUTION:o Do not insert warped or poor quality
discs into the changer as damage to the
unit may occur.
o Do not insert anything like coins into the
changer slot as damage to the unit may
occur.
o Do not place beverages close to the
audio system. The playback mechanism
may be damaged if you spill them.
o Do not impact on the audio system, or
the playback mechanism could be dam-
aged.
o Driving on the off-roads or other vibra-
tions may skip your compact disc.
Do not use the audio system on off-
roads as the discs could be scratched
and damaged.
o Do not grip or pull out the disc with your
hand while the disc is being pulled into
the unit by the self loading mechanism.
These can cause poor disc scratching to
occur or trouble in the compact disc
changer.
o Avoid using CD-Recordable or CD-
Rewritable as the changer could not be
operated in recording way of the CD
maker. When using the compact disc
changer, genuine CDs are recommended.
!
Page 114 of 224
1FEATURES OF YOUR HYUNDAI
101AUDIO FAULT CODE
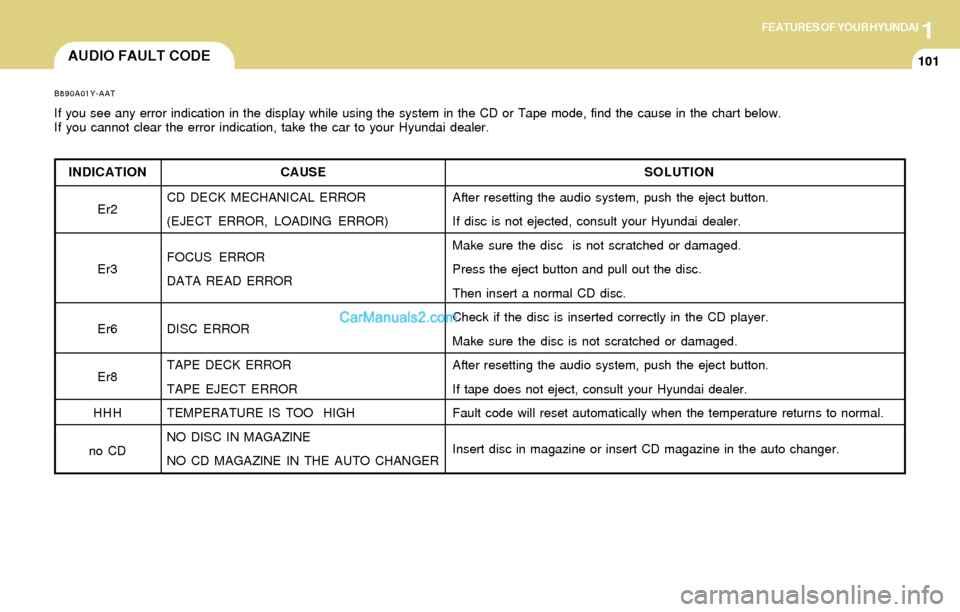
INDICATION
Er2
Er3
Er6
Er8
HHH
no CD
B890A01Y-AAT
If you see any error indication in the display while using the system in the CD or Tape mode, find the cause in the chart below.
If you cannot clear the error indication, take the car to your Hyundai dealer.
SOLUTION
After resetting the audio system, push the eject button.
If disc is not ejected, consult your Hyundai dealer.
Make sure the disc is not scratched or damaged.
Press the eject button and pull out the disc.
Then insert a normal CD disc.
Check if the disc is inserted correctly in the CD player.
Make sure the disc is not scratched or damaged.
After resetting the audio system, push the eject button.
If tape does not eject, consult your Hyundai dealer.
Fault code will reset automatically when the temperature returns to normal.
Insert disc in magazine or insert CD magazine in the auto changer. CAUSE
CD DECK MECHANICAL ERROR
(EJECT ERROR, LOADING ERROR)
FOCUS ERROR
DATA READ ERROR
DISC ERROR
TAPE DECK ERROR
TAPE EJECT ERROR
TEMPERATURE IS TOO HIGH
NO DISC IN MAGAZINE
NO CD MAGAZINE IN THE AUTO CHANGER
Page 220 of 224
10INDEX
2
A
Air Bag................................................................................... 1-25 ~ 1-31
Air Cleaner Filter ...............................................................................6-11
Air Conditioning
Care..............................................................................................6-17
Operation......................................................................................6-17
Switch...........................................................................................1-67
Air Conditioner Filter ..........................................................................1-77
Antenna..........................................................................................1-104
Anti-Lock Brake System ...................................................................2-12
Ashtray..............................................................................................1-46
Automatic Transaxle........................................................................... 2-8
B
Battery..................................................................................... 2-16, 6-23
Brake
Anti-lock system..........................................................................2-12
Checking the brakes ....................................................................6-15
Fluid ..............................................................................................6-15
Pedal clearance...........................................................................6-20
Pedal free play .............................................................................6-20
Practices......................................................................................2-11
Breaking-In your new Hyundai ........................................................... 1-3
Bulbs Wattage...................................................................................6-31C
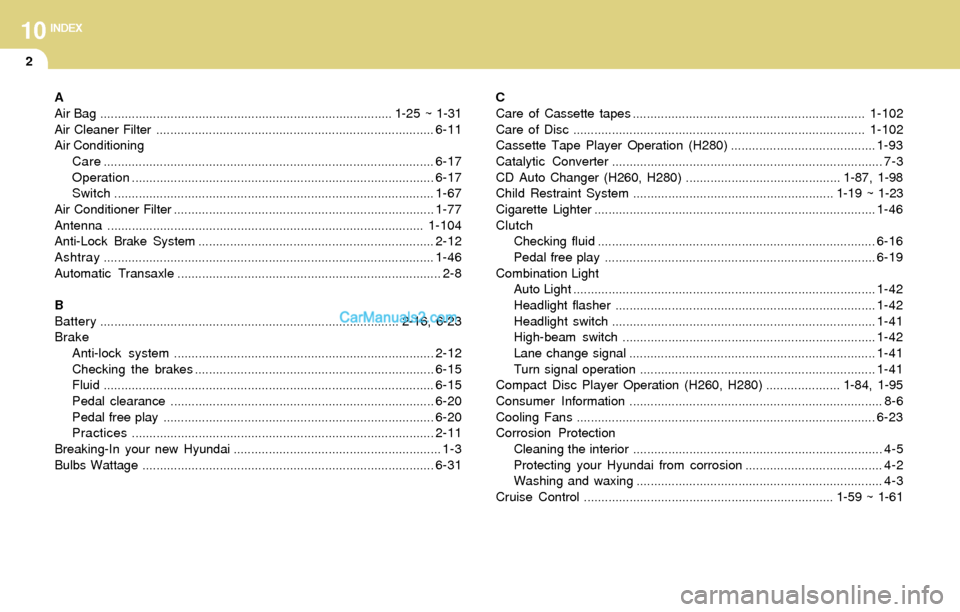
Care of Cassette tapes ..................................................................1-102
Care of Disc ...................................................................................1-102
Cassette Tape Player Operation (H280) .........................................1-93
Catalytic Converter............................................................................. 7-3
CD Auto Changer (H260, H280)............................................ 1-87, 1-98
Child Restraint System......................................................... 1-19 ~ 1-23
Cigarette Lighter................................................................................1-46
Clutch
Checking fluid...............................................................................6-16
Pedal free play .............................................................................6-19
Combination Light
Auto Light......................................................................................1-42
Headlight flasher..........................................................................1-42
Headlight switch...........................................................................1-41
High-beam switch........................................................................1-42
Lane change signal ......................................................................1-41
Turn signal operation...................................................................1-41
Compact Disc Player Operation (H260, H280) ..................... 1-84, 1-95
Consumer Information........................................................................ 8-6
Cooling Fans.....................................................................................6-23
Corrosion Protection
Cleaning the interior....................................................................... 4-5
Protecting your Hyundai from corrosion....................................... 4-2
Washing and waxing...................................................................... 4-3
Cruise Control....................................................................... 1-59 ~ 1-61