coolant level Hyundai Tiburon 2004 Owner's Manual
[x] Cancel search | Manufacturer: HYUNDAI, Model Year: 2004, Model line: Tiburon, Model: Hyundai Tiburon 2004Pages: 224, PDF Size: 18.86 MB
Page 46 of 224
1FEATURES OF YOUR HYUNDAI
33
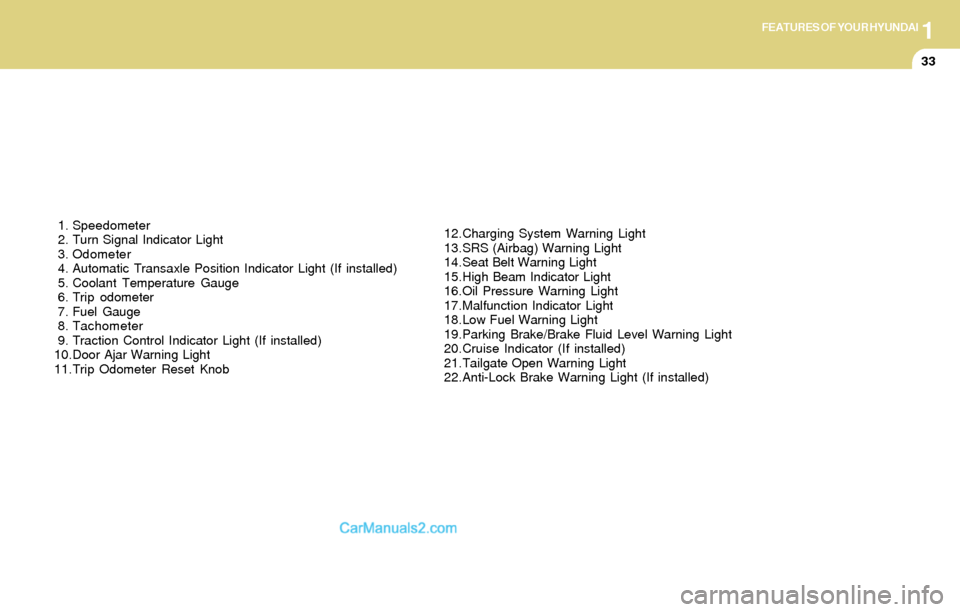
1. Speedometer
2. Turn Signal Indicator Light
3. Odometer
4. Automatic Transaxle Position Indicator Light (If installed)
5. Coolant Temperature Gauge
6. Trip odometer
7. Fuel Gauge
8. Tachometer
9. Traction Control Indicator Light (If installed)
10.Door Ajar Warning Light
11.Trip Odometer Reset Knob12.Charging System Warning Light
13.SRS (Airbag) Warning Light
14.Seat Belt Warning Light
15.High Beam Indicator Light
16.Oil Pressure Warning Light
17.Malfunction Indicator Light
18.Low Fuel Warning Light
19.Parking Brake/Brake Fluid Level Warning Light
20.Cruise Indicator (If installed)
21.Tailgate Open Warning Light
22.Anti-Lock Brake Warning Light (If installed)
Page 51 of 224
1FEATURES OF YOUR HYUNDAI
38
!
!
B290A02A-AAT
ENGINE COOLANT TEMPERATURE
GAUGE
WARNING:
Never remove the radiator cap when the
engine is hot. The engine coolant is under
pressure and could erupt and cause severe
burns. Wait until the engine is cool before
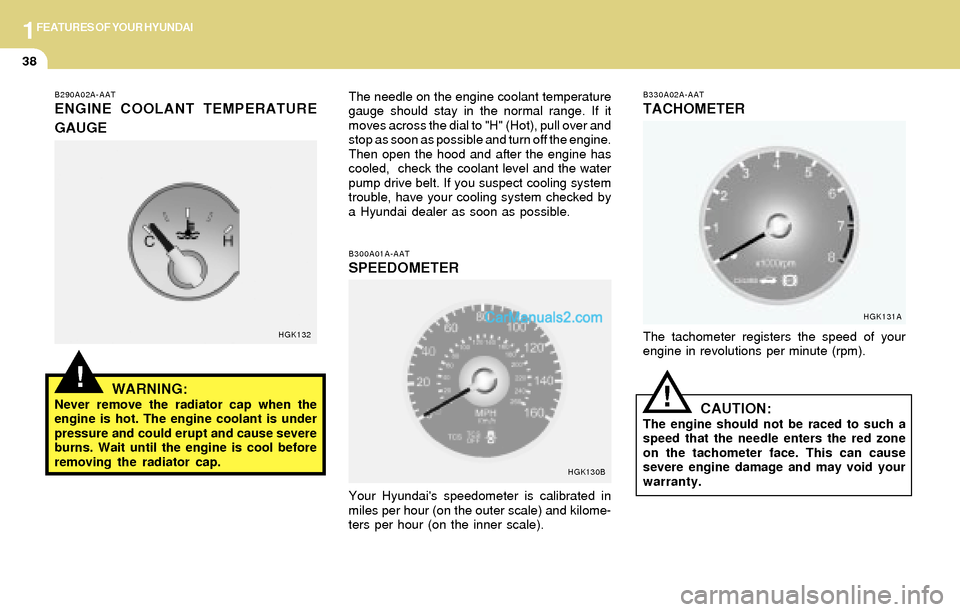
removing the radiator cap.The needle on the engine coolant temperature
gauge should stay in the normal range. If it
moves across the dial to "H" (Hot), pull over and
stop as soon as possible and turn off the engine.
Then open the hood and after the engine has
cooled, check the coolant level and the water
pump drive belt. If you suspect cooling system
trouble, have your cooling system checked by
a Hyundai dealer as soon as possible.
B300A01A-AATSPEEDOMETER
Your Hyundai's speedometer is calibrated in
miles per hour (on the outer scale) and kilome-
ters per hour (on the inner scale).
HGK132
HGK130BB330A02A-AAT
TACHOMETER
The tachometer registers the speed of your
engine in revolutions per minute (rpm).
HGK131A
CAUTION:The engine should not be raced to such a
speed that the needle enters the red zone
on the tachometer face. This can cause
severe engine damage and may void your
warranty.
Page 133 of 224
2DRIVING YOUR HYUNDAI
16WINTER DRIVING
C160A01A-AAT
The more severe weather conditions of winter
result in greater wear and other problems. To
minimize the problems of winter driving, you
should follow these suggestions:
C160B01A-AAT
Snowy or Icy Conditions
To drive your vehicle in deep snow, it may be
necessary to use snow tires or to install tire
chains on your tires. If snow tires are needed,
it is necessary to select tires equivalent in size
and type to the original equipment tires. Failure
to do so may adversely affect the safety and
handling of your car. Speeding, rapid accelera-
tion, sudden brake applications, and sharp
turns are potentially very hazardous practices.
During deceleration, use engine braking to the
fullest extent. Sudden brake applications on
snowy or icy roads may cause skids to occur.
You need to keep sufficient distance between
the vehicle in front and your vehicle. Also, apply
the brake gently. It should be noted that installing
tire chains on the tire will provide a greater
driving force, but will not prevent side skids.
NOTE:Tire chains are not legal in all states. Check
state laws before fitting tire chains.
C160C01A-AAT
Use High Quality Ethylene Glycol Cool-
ant
Your Hyundai is delivered with high quality
ethylene glycol coolant in the cooling system. It
is the only type of coolant that should be used
because it helps prevent corrosion in the cool-
ing system, lubricates the water pump and
prevents freezing. Be sure to replace or replen-
ish your coolant in accordance with the main-
tenance schedule in Section 5. Before winter,
have your coolant tested to assure that its
freezing point is sufficient for the temperatures
anticipated during the winter.
C160D01F-AATCheck Battery and Cables
Winter puts additional burdens on the battery
system. Visually inspect the battery and cables
as described in Section 6 (See page 6-23). The
level of charge in your battery can be checked
by your Hyundai dealer or a service station.
Page 143 of 224
3WHAT TO DO IN AN EMERGENCY
5
!
6. If you cannot find the cause of the overheat-
ing, wait until the engine temperature has
returned to normal. Then, if the engine cool-
ant has been lost, carefully add water to the
reservoir (Page 6-8) to bring the fluid level in
the reservoir up to the halfway mark.
7. Proceed with caution, keeping alert for fur-
ther signs of overheating. If overheating
happens again, call a Hyundai dealer for
assistance.
CAUTION:Serious loss of engine coolant indicates
there is a leak in the cooling system and this
should be checked as soon as possible by
a Hyundai dealer.
TEMPORARY SPARE TIRE
D040A01GK-AAT
The following instructions for the temporary
spare tire should be observed:
1. Check inflation pressure as soon as practi-
cal after installing the spare tire, and adjust
to the specified pressure. The tire pressure
should be periodically checked and main-
tained at the specified pressure while the tire
is stored.
Tire Size
Inflation Pressure
T125/70R 16
420 kPa(60 psi)6. The temporary spare tire pressure should
be checked once a month while the tire is
stored.
2. The spare tire should only be used tempo-
rarily and should be returned to the luggage
compartment as soon as the original tire can
be repaired or replaced.
3. Continuous use at speeds of over 80 km/h
(50 mph) is not recommended.
4. As the temporary spare tire is specifically
designed for your car, it should not be used
on any other vehicle.
5. The temporary spare tire should not be used
on any other wheels, nor should standard
tires, snow tires, wheel covers or trim rings
be used with the temporary spare wheel. If
such use is attempted, damage to these
items or other car components may occur. Spare Tire Pressure
CAUTION:o Do not use snow chains with your tem-
porary spare tire.
o Do not use more than one temporary
spare tire at a time.
!
Page 165 of 224
5VEHICLE MAINTENANCE REQUIREMENTS
8
F060B02A-AAT
o Drive Belts
Inspect all drive belts for evidence of cuts,
cracks, excessive wear or oil saturation and
replace if necessary. Drive belts should be
checked periodically for proper tension and
adjusted as necessary.
F070C01A-AATo Coolant
The coolant should be changed at the intervals
specified in the maintenance schedule.
F060E01A-AATo Timing belt
Inspect all parts related to the timing belt for
damage and deformation. Replace any dam-
aged parts immediately.
F070D01A-AAT
o Manual transaxle oil
Inspect the manual transaxle oil according to
the maintenance schedule.
NOTE:If the oil level is low, check for possible leaks
before adding oil. Do not overfill.
F070E04A-AATo Automatic Transaxle Fluid
The fluid level should be in the "HOT" range of
the dipstick, after the engine and transaxle are
at normal operating temperature. Check the
automatic transaxle fluid level with the engine
running and the transaxle in neutral, with the
parking brake properly applied. Use HYUNDAI
GENUINE ATF, DIAMOND ATF SP-III, SK ATF
SP-III when adding or changing fluid.
F070G02A-AAT
o Brake Fluid
Check brake fluid level in the brake fluid reser-
voir. The level should be between “MIN” and
“MAX” marks on the side of the reservoir. Use
only hydraulic brake fluid conforming to DOT 3
or DOT 4.
F070H01A-AATo Rear Brake Drums and Linings/
Parking Brake
Check the rear brake drums and linings for
scoring, burning, leaking fluid, broken parts,
and excessive wear. Inspect the parking brake
system including the parking brake lever and
cables. For detailed service procedures, refer
to the Shop Manual.
F070J01A-AATo Brake Pads, Calipers and Rotors
Check the pads for excessive wear, discs for
run out and wear, and calipers for fluid leakage.
F070F01A-AATo Brake Hoses and Lines
Visually check for proper installation, chafing,
cracks, deterioration and any leakage. Replace
any deteriorated or damaged parts immedi-
ately.
Page 167 of 224
Do-It-Yourself Maintenance
6
Engine Compartment .................................................... 6-2
General Checks ............................................................ 6-4
Checking the Engine Oil ............................................... 6-5
Changing the Oil and Filter ............................................ 6-6
Checking and Changing the Engine Coolant ................ 6-7
Spark Plugs .................................................................. 6-9
Changing the Air Cleaner Filter ...................................6-11
Checking the Transaxle Oil (manual) .........................6-12
Checking the Transaxle Fluid (Automatic) ..................6-13
Checking the Brakes..................................................6-15
Checking the Clutch Fluid ...........................................6-16
Air Conditioning Care..................................................6-17
Checking Drive Belts..................................................6-20
Checking and Replacing Fuses ..................................6-21
Checking the Battery..................................................6-22
Power Steering Fluid Level .........................................6-24
Replacement of Light Bulbs........................................ 6-26
Bulb Wattage...............................................................6-31
6
Page 168 of 224
6DO-IT-YOURSELF MAINTENANCE
2ENGINE COMPARTMENT
G010A01GK-AAT
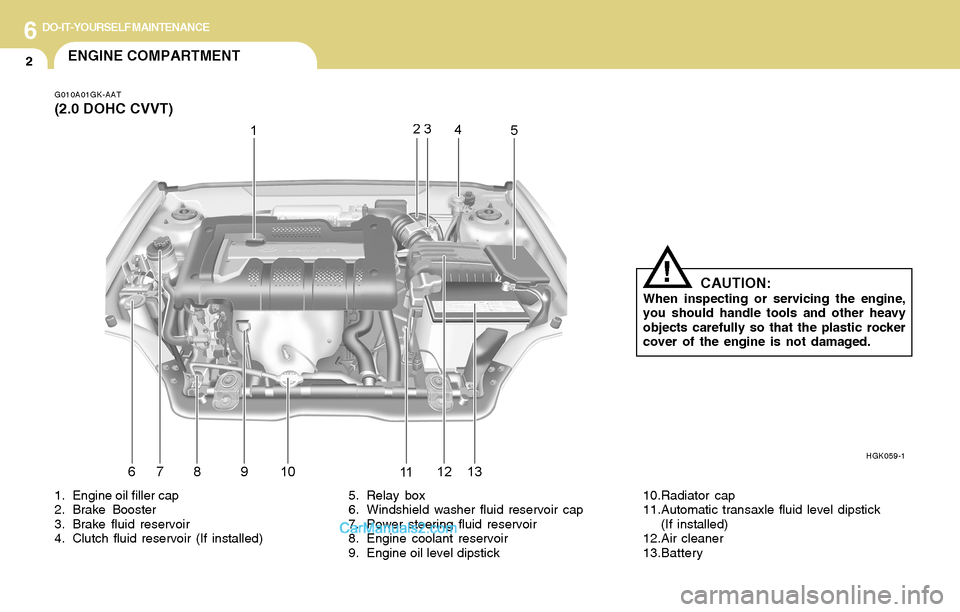
(2.0 DOHC CVVT)
HGK059-1
1. Engine oil filler cap
2. Brake Booster
3. Brake fluid reservoir
4. Clutch fluid reservoir (If installed)5. Relay box
6. Windshield washer fluid reservoir cap
7. Power steering fluid reservoir
8. Engine coolant reservoir
9. Engine oil level dipstick10.Radiator cap
11.Automatic transaxle fluid level dipstick
(If installed)
12.Air cleaner
13.Battery
CAUTION:When inspecting or servicing the engine,
you should handle tools and other heavy
objects carefully so that the plastic rocker
cover of the engine is not damaged.
!
Page 169 of 224
6DO-IT-YOURSELF MAINTENANCE
3
G010B01GK-GAT
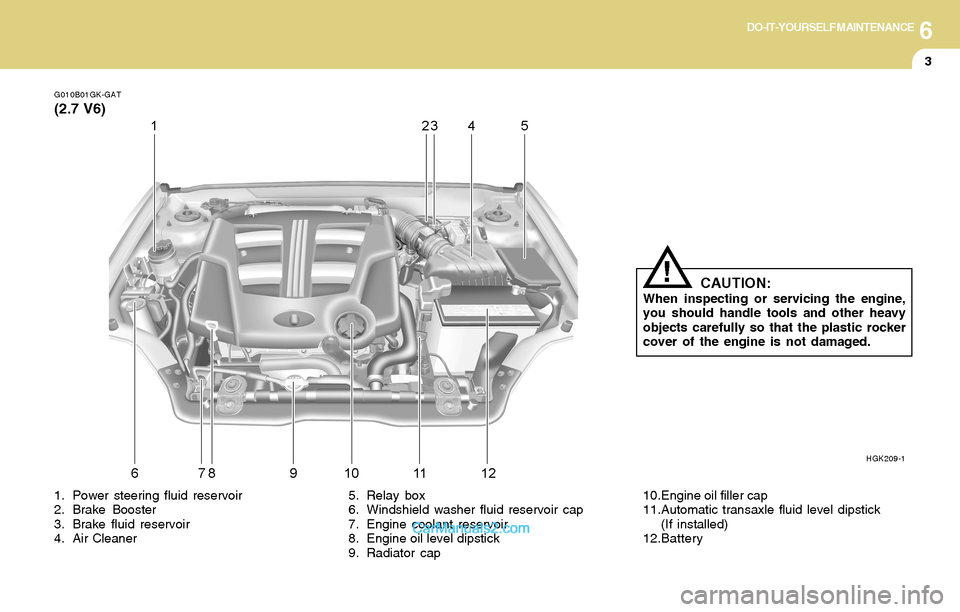
(2.7 V6)
HGK209-1
1. Power steering fluid reservoir
2. Brake Booster
3. Brake fluid reservoir
4. Air Cleaner5. Relay box
6. Windshield washer fluid reservoir cap
7. Engine coolant reservoir
8. Engine oil level dipstick
9. Radiator cap10.Engine oil filler cap
11.Automatic transaxle fluid level dipstick
(If installed)
12.Battery
CAUTION:When inspecting or servicing the engine,
you should handle tools and other heavy
objects carefully so that the plastic rocker
cover of the engine is not damaged.
!
Page 170 of 224
6DO-IT-YOURSELF MAINTENANCE
4GENERAL CHECKS
G020C01A-AAT
Vehicle Interior
The following should be checked each time
when the vehicle is driven:
o Lights operation
o Windshield wiper operation
o Horn operation
o Defroster, heating system operation (and air
conditioning, if installed)
o Steering operation and condition
o Mirror condition and operation
o Turn signal operation
o Accelerator pedal operation
o Brake operation, including parking brake
o Manual transaxle operation, including clutch
operation
o Automatic transaxle operation, including
"Park" mechanism operation
o Seat control condition and operation
o Seat belt condition and operation
o Sunvisor operation
If you notice anything that does not operate
correctly or appears to be functioning incor-
rectly, inspect it carefully and seek assistance
from your Hyundai dealer if service is needed.
G020B01A-AAT
Vehicle Exterior
The following should be checked monthly:
o Overall appearance and condition
o Wheel condition and wheel nut torque
o Exhaust system condition
o Light condition and operation
o Windshield glass condition
o Wiper blade condition
o Paint condition and body corrosion
o Fluid leaks
o Door and hood lock condition
o Tire pressure and condition (including spare
tire)
G020A01A-AAT
Engine Compartment
The following should be checked regularly:
o Engine oil level and condition
o Transaxle fluid level and condition
o Brake fluid level
o Clutch fluid level
o Engine coolant level
o Windshield washer fluid level
o Accessory drive belt condition
o Engine coolant hose condition
o Fluid leaks (on or below components)
o Power steering fluid level
o Battery condition
o Air filter condition
Page 172 of 224
6DO-IT-YOURSELF MAINTENANCE
6CHANGING THE OIL AND FILTER
!
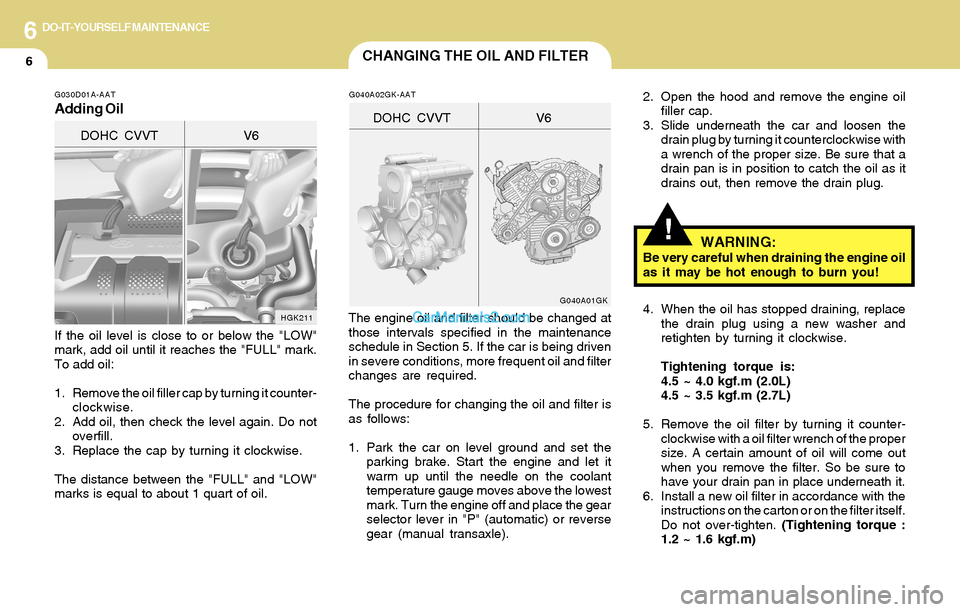
If the oil level is close to or below the "LOW"
mark, add oil until it reaches the "FULL" mark.
To add oil:
1. Remove the oil filler cap by turning it counter-
clockwise.
2. Add oil, then check the level again. Do not
overfill.
3. Replace the cap by turning it clockwise.
The distance between the "FULL" and "LOW"
marks is equal to about 1 quart of oil.
G040A02GK-AAT2. Open the hood and remove the engine oil
filler cap.
3. Slide underneath the car and loosen the
drain plug by turning it counterclockwise with
a wrench of the proper size. Be sure that a
drain pan is in position to catch the oil as it
drains out, then remove the drain plug.
G040A01GK
WARNING:Be very careful when draining the engine oil
as it may be hot enough to burn you!
G030D01A-AAT
Adding Oil
HGK211
DOHC CVVT V6
The engine oil and filter should be changed at
those intervals specified in the maintenance
schedule in Section 5. If the car is being driven
in severe conditions, more frequent oil and filter
changes are required.
The procedure for changing the oil and filter is
as follows:
1. Park the car on level ground and set the
parking brake. Start the engine and let it
warm up until the needle on the coolant
temperature gauge moves above the lowest
mark. Turn the engine off and place the gear
selector lever in "P" (automatic) or reverse
gear (manual transaxle).4. When the oil has stopped draining, replace
the drain plug using a new washer and
retighten by turning it clockwise.
Tightening torque is:
4.5 ~ 4.0 kgf.m (2.0L)
4.5 ~ 3.5 kgf.m (2.7L)
5. Remove the oil filter by turning it counter-
clockwise with a oil filter wrench of the proper
size. A certain amount of oil will come out
when you remove the filter. So be sure to
have your drain pan in place underneath it.
6. Install a new oil filter in accordance with the
instructions on the carton or on the filter itself.
Do not over-tighten. (Tightening torque :
1.2 ~ 1.6 kgf.m) DOHC CVVT V6