fuel pressure Hyundai Tiburon 2004 Owner's Manual
[x] Cancel search | Manufacturer: HYUNDAI, Model Year: 2004, Model line: Tiburon, Model: Hyundai Tiburon 2004Pages: 224, PDF Size: 18.86 MB
Page 13 of 224
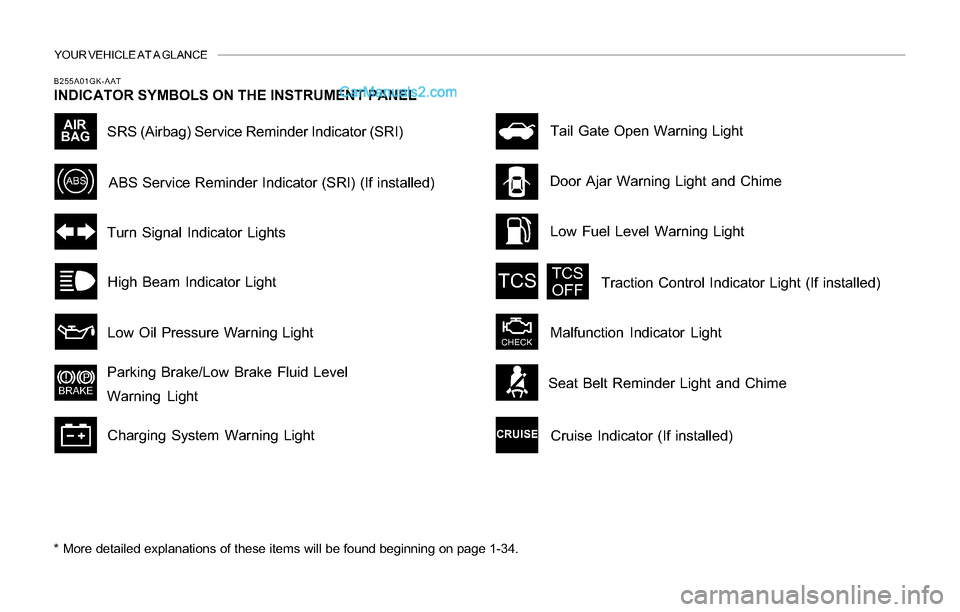
YOUR VEHICLE AT A GLANCE
B255A01GK-AAT
INDICATOR SYMBOLS ON THE INSTRUMENT PANEL
* More detailed explanations of these items will be found beginning on page 1-34.
SRS (Airbag) Service Reminder Indicator (SRI)
Door Ajar Warning Light and Chime
Turn Signal Indicator Lights
High Beam Indicator Light
Low Oil Pressure Warning Light
Parking Brake/Low Brake Fluid Level
Warning Light
Charging System Warning LightTail Gate Open Warning Light
ABS Service Reminder Indicator (SRI) (If installed)
Low Fuel Level Warning Light
Malfunction Indicator LightTraction Control Indicator Light (If installed)
Cruise Indicator (If installed)
Seat Belt Reminder Light and Chime
Page 46 of 224
1FEATURES OF YOUR HYUNDAI
33
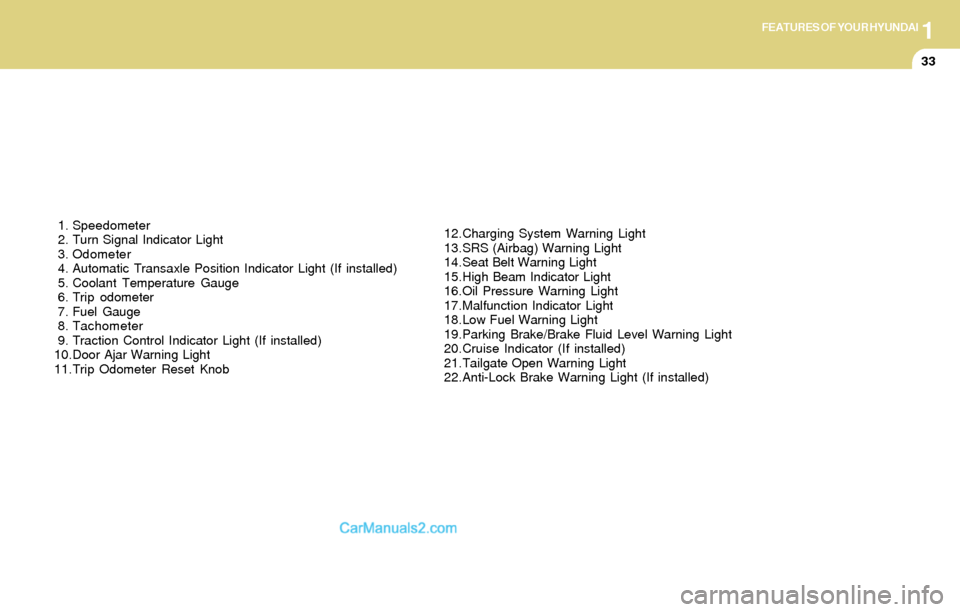
1. Speedometer
2. Turn Signal Indicator Light
3. Odometer
4. Automatic Transaxle Position Indicator Light (If installed)
5. Coolant Temperature Gauge
6. Trip odometer
7. Fuel Gauge
8. Tachometer
9. Traction Control Indicator Light (If installed)
10.Door Ajar Warning Light
11.Trip Odometer Reset Knob12.Charging System Warning Light
13.SRS (Airbag) Warning Light
14.Seat Belt Warning Light
15.High Beam Indicator Light
16.Oil Pressure Warning Light
17.Malfunction Indicator Light
18.Low Fuel Warning Light
19.Parking Brake/Brake Fluid Level Warning Light
20.Cruise Indicator (If installed)
21.Tailgate Open Warning Light
22.Anti-Lock Brake Warning Light (If installed)
Page 131 of 224
2DRIVING YOUR HYUNDAI
14DRIVING FOR ECONOMY
C310B01O-AAT
TCS ON/OFF Mode
When the TCS is running, the TCS indicator light
in the instrument cluster will blink.
If you turn the system off by pressing the TCS
switch, the TCS-OFF indicator light will come on
and stay on. In the TCS-OFF mode, the SLIP
control will be deactivated. Adjust you driving
accordingly. To turn the system back on, press
the switch again. The TCS-OFF indicator light
should go off.
NOTE:1) The TCS mode will automatically be
turned ON after the engine is turned off
and restarted.
2) When the traction control system is
operating properly, you can feel a slight
pulsation in the vehicle. This is only the
effect of brake control and indicates
nothing unusual.
3) When the engine starts, a click is heard
from the engine compartment; however,
this is only the sound of traction control
being checked.
4) When moving out of the mud or fresh
snow, pressing the accelerator pedal
may not cause the engine speed to in-
crease due to TCS operation.
C310D01O-AAT
Indicators and Warning
The TCS indicators should illuminate when the
ignition key is turned to ON or START but should
go out after three seconds.
If the indicator does not illuminate, or the TCS or
TCS-OFF indicator does not go out after 3
seconds, have it checked by an authorized
dealer.
Should there be any unusual conditions in the
device while driving, TCS-OFF indicator illumi-
nates as a warning.
If TCS-OFF indicator illuminates, pull your car
to a safe place and stop the engine.
Then, start the engine again to check if the TCS-
OFF indicator goes out.
If the indicator remains lit even after the engine
has been started, have your car checked by an
authorized Hyundai dealer.
NOTE:1) When the TCS-OFF indicator illuminates,
traction control is automatically deacti-
vated for safety.
2) This warning function is not provided
when the driver selects the TCS-OFF
mode.
C140A01A-AAT
You can save fuel and get more miles from your
car if you follow these suggestions:
o Drive smoothly. Accelerate at a moderate
rate. Don't make "jack-rabbit" starts or full-
throttle shifts and maintain a steady cruising
speed. Don't race between stoplights. Try to
adjust your speed to that of the other traffic
so you don't have to change speeds unnec-
essarily. Avoid heavy traffic whenever pos-
sible. Always maintain a safe distance from
other vehicles so you can avoid unneces-
sary braking. This also reduces brake wear.
o Drive at a moderate speed. The faster you
drive, the more fuel your car uses. Driving at
a moderate speed, especially on the high-
way, is one of the most effective ways to
reduce fuel consumption.
o Don't "ride" the brake or clutch pedal. This
can increase fuel consumption and also
increase wear on these components. In
addition, driving with your foot resting on the
brake pedal may cause the brakes to over-
heat, which reduces their effectiveness and
may lead to more serious consequences.
o Take care of your tires. Keep them inflated
to the recommended pressure. Incorrect
inflation, either too much or too little, results
in unnecessary tire wear. Check the tire
pressures at least once a month.
Page 135 of 224
2DRIVING YOUR HYUNDAI
18TRAILER OR VEHICLE TOWING
C170A01A-AAT
HIGHER SPEED MOTORING
Pre-Trip Inspections
1. Tires:
Adjust the tire inflation pressures to specifica-
tion. Low tire inflation pressures will result in
overheating and possible failure of the tires.
Avoid using worn or damaged tires which may
result in reduced traction or tire failure.
NOTE:Never exceed the maximum tire inflation
pressure shown on the tires.
2. Fuel, engine coolant and engine oil: High
speed travel consumes more fuel than urban
motoring. Do not forget to check both engine
coolant and engine oil.
3. Drive belt:
A loose or damaged drive belt may result in
overheating of the engine.
C180A01A-AATUSE OF LIGHTS
Check your lights regularly for correct opera-
tion and always keep them clean. When driving
during the day in conditions of poor visibility, it
is helpful to drive with headlights on low beam.
This enables you to be seen as well as to see.
C190A02S-AAT
If you are considering towing with your car, you
should first check with your State's Department
of Motor Vehicles to determine their legal re-
quirements.
Since laws vary from State to State, the require-
ments for towing trailers, cars, other types of
vehicles, or apparatus may differ. Ask your
Hyundai dealer for further details before towing.
CAUTION:Do not do any towing with your car during
its first 1,200 miles (2,000 km) in order to
allow the engine to properly break in. Fail-
ure to heed this caution may result in seri-
ous engine or transaxle damage.
!
C190B01S-AAT
Trailer Hitches
Select the proper hitch and ball combination,
making sure that its location is compatible with
that of the trailer or vehicle being towed. Use a
quality non-equalizing hitch which distributes
the tongue load uniformly throughout the chas-
sis.
The hitch should be bolted securely to the car
and installed by a qualified technician. DO NOT
USE A HITCH DESIGNED FOR TEMPORARY
INSTALLATION AND NEVER USE ONE THAT
ATTACHES ONLY TO THE BUMPER.
Page 137 of 224
2DRIVING YOUR HYUNDAI
20
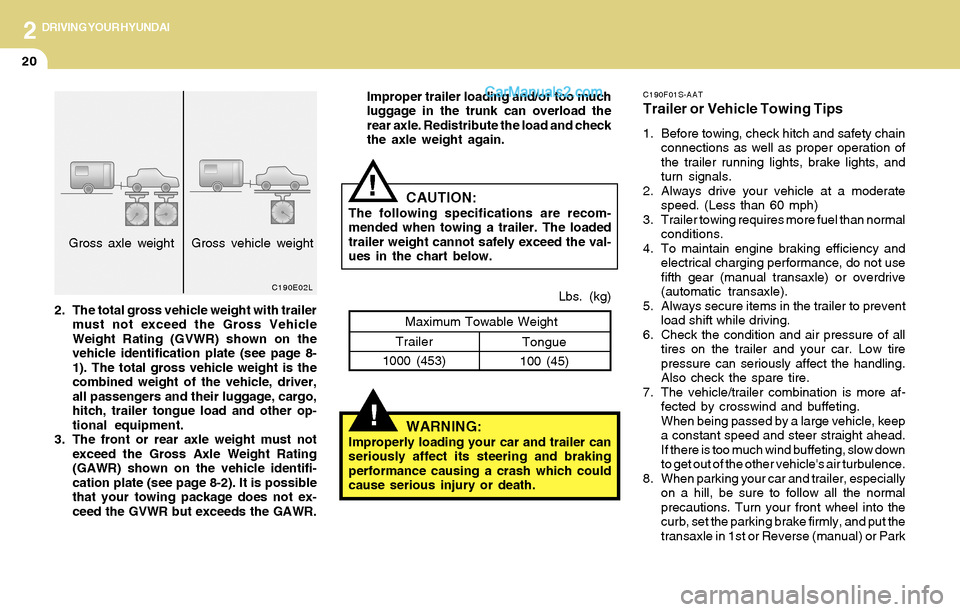
2. The total gross vehicle weight with trailer
must not exceed the Gross Vehicle
Weight Rating (GVWR) shown on the
vehicle identification plate (see page 8-
1). The total gross vehicle weight is the
combined weight of the vehicle, driver,
all passengers and their luggage, cargo,
hitch, trailer tongue load and other op-
tional equipment.
3. The front or rear axle weight must not
exceed the Gross Axle Weight Rating
(GAWR) shown on the vehicle identifi-
cation plate (see page 8-2). It is possible
that your towing package does not ex-
ceed the GVWR but exceeds the GAWR.
C190E02L
CAUTION:The following specifications are recom-
mended when towing a trailer. The loaded
trailer weight cannot safely exceed the val-
ues in the chart below.
!
!WARNING:Improperly loading your car and trailer can
seriously affect its steering and braking
performance causing a crash which could
cause serious injury or death.Lbs. (kg)
Maximum Towable Weight
Trailer
1000 (453)Tongue
100 (45)
C190F01S-AAT
Trailer or Vehicle Towing Tips
1. Before towing, check hitch and safety chain
connections as well as proper operation of
the trailer running lights, brake lights, and
turn signals.
2. Always drive your vehicle at a moderate
speed. (Less than 60 mph)
3. Trailer towing requires more fuel than normal
conditions.
4. To maintain engine braking efficiency and
electrical charging performance, do not use
fifth gear (manual transaxle) or overdrive
(automatic transaxle).
5. Always secure items in the trailer to prevent
load shift while driving.
6. Check the condition and air pressure of all
tires on the trailer and your car. Low tire
pressure can seriously affect the handling.
Also check the spare tire.
7. The vehicle/trailer combination is more af-
fected by crosswind and buffeting.
When being passed by a large vehicle, keep
a constant speed and steer straight ahead.
If there is too much wind buffeting, slow down
to get out of the other vehicle's air turbulence.
8. When parking your car and trailer, especially
on a hill, be sure to follow all the normal
precautions. Turn your front wheel into the
curb, set the parking brake firmly, and put the
transaxle in 1st or Reverse (manual) or Park Gross axle weight Gross vehicle weightImproper trailer loading and/or too much
luggage in the trunk can overload the
rear axle. Redistribute the load and check
the axle weight again.
Page 191 of 224
6DO-IT-YOURSELF MAINTENANCE
25HEADLIGHT AIMING ADJUSTMENT
G290A03GK G290A02GK-AAT
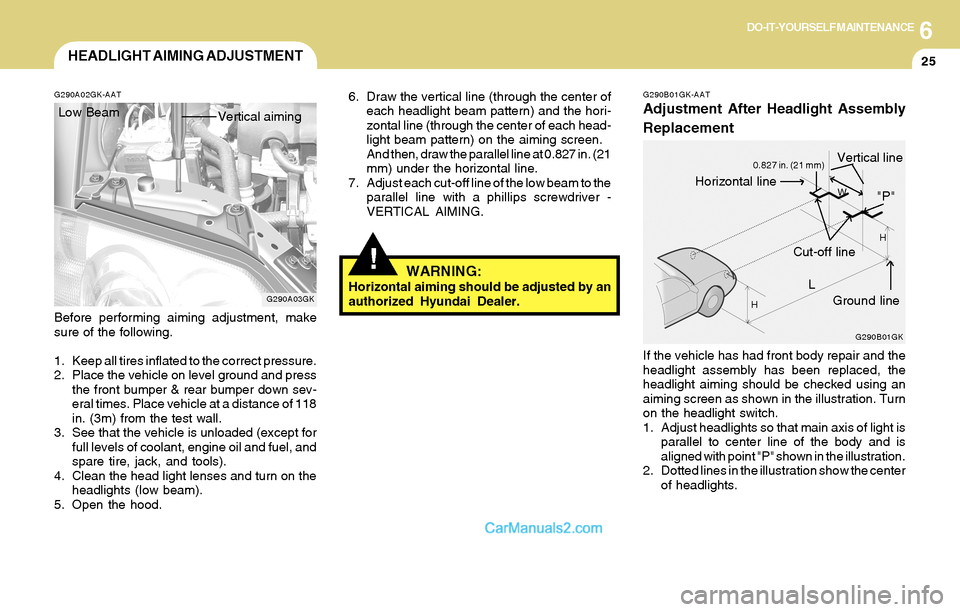
Before performing aiming adjustment, make
sure of the following.
1. Keep all tires inflated to the correct pressure.
2. Place the vehicle on level ground and press
the front bumper & rear bumper down sev-
eral times. Place vehicle at a distance of 118
in. (3m) from the test wall.
3. See that the vehicle is unloaded (except for
full levels of coolant, engine oil and fuel, and
spare tire, jack, and tools).
4. Clean the head light lenses and turn on the
headlights (low beam).
5. Open the hood.
!
6. Draw the vertical line (through the center of
each headlight beam pattern) and the hori-
zontal line (through the center of each head-
light beam pattern) on the aiming screen.
And then, draw the parallel line at 0.827 in. (21
mm) under the horizontal line.
7. Adjust each cut-off line of the low beam to the
parallel line with a phillips screwdriver -
VERTICAL AIMING.
WARNING:Horizontal aiming should be adjusted by an
authorized Hyundai Dealer. Low Beam
Vertical aiming
G290B01GK-AAT
Adjustment After Headlight Assembly
Replacement
If the vehicle has had front body repair and the
headlight assembly has been replaced, the
headlight aiming should be checked using an
aiming screen as shown in the illustration. Turn
on the headlight switch.
1. Adjust headlights so that main axis of light is
parallel to center line of the body and is
aligned with point "P" shown in the illustration.
2. Dotted lines in the illustration show the center
of headlights.
G290B01GK
L
W
H
H
Cut-off line
Ground line
"P"Horizontal line
Vertical line0.827 in. (21 mm)
Page 224 of 224
Seoul Korea
Printing: MAR. 31, 2004
Publication No.: A2CO-EU43L
Printed in Korea
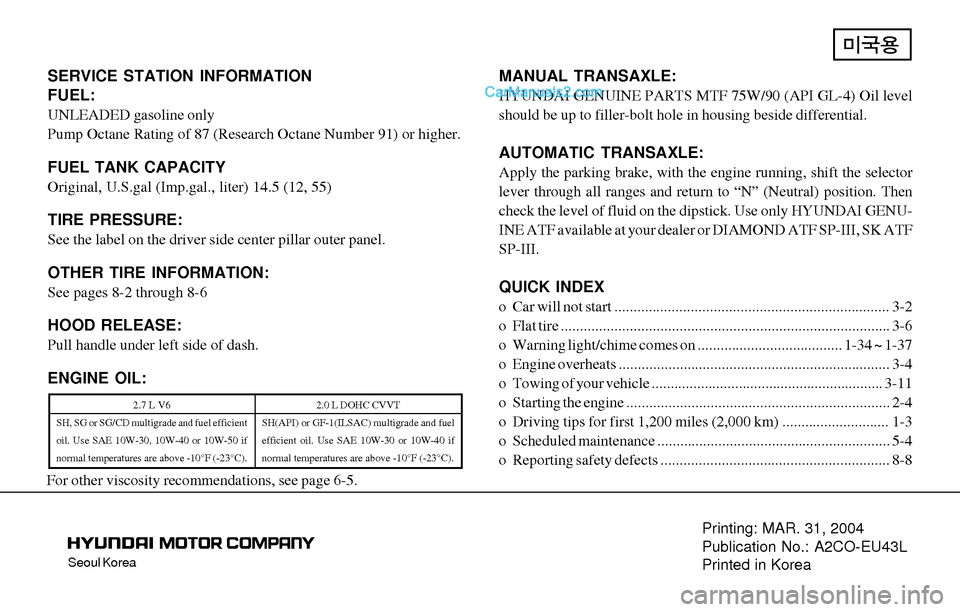
SERVICE STATION INFORMATION
FUEL:
UNLEADED gasoline only
Pump Octane Rating of 87 (Research Octane Number 91) or higher.
FUEL TANK CAPACITY
Original, U.S.gal (Imp.gal., liter) 14.5 (12, 55)
TIRE PRESSURE:
See the label on the driver side center pillar outer panel.
OTHER TIRE INFORMATION:
See pages 8-2 through 8-6
HOOD RELEASE:
Pull handle under left side of dash.
ENGINE OIL:MANUAL TRANSAXLE:
HYUNDAI GENUINE PARTS MTF 75W/90 (API GL-4) Oil level
should be up to filler-bolt hole in housing beside differential.
AUTOMATIC TRANSAXLE:
Apply the parking brake, with the engine running, shift the selector
lever through all ranges and return to “N” (Neutral) position. Then
check the level of fluid on the dipstick. Use only HYUNDAI GENU-
INE ATF available at your dealer or DIAMOND ATF SP-III, SK ATF
SP-III.
QUICK INDEX
o Car will not start ........................................................................ 3-2
o Flat tire ...................................................................................... 3-6
o Warning light/chime comes on ...................................... 1-34 ~ 1-37
o Engine overheats ....................................................................... 3-4
o Towing of your vehicle ............................................................. 3-11
o Starting the engine ..................................................................... 2-4
o Driving tips for first 1,200 miles (2,000 km) ............................ 1-3
o Scheduled maintenance ............................................................. 5-4
o Reporting safety defects ............................................................ 8-8
2.7 L V6
SH, SG or SG/CD multigrade and fuel efficient
oil. Use SAE 10W-30, 10W-40 or 10W-50 if
normal temperatures are above -10°F (-23°C).2.0 L DOHC CVVT
SH(API) or GF-1(ILSAC) multigrade and fuel
efficient oil. Use SAE 10W-30 or 10W-40 if
normal temperatures are above -10°F (-23°C).
For other viscosity recommendations, see page 6-5.