turn signal HYUNDAI TUCSON 2006 Owners Manual
[x] Cancel search | Manufacturer: HYUNDAI, Model Year: 2006, Model line: TUCSON, Model: HYUNDAI TUCSON 2006Pages: 289, PDF Size: 11.55 MB
Page 12 of 289
YOUR VEHICLE AT A GLANCE
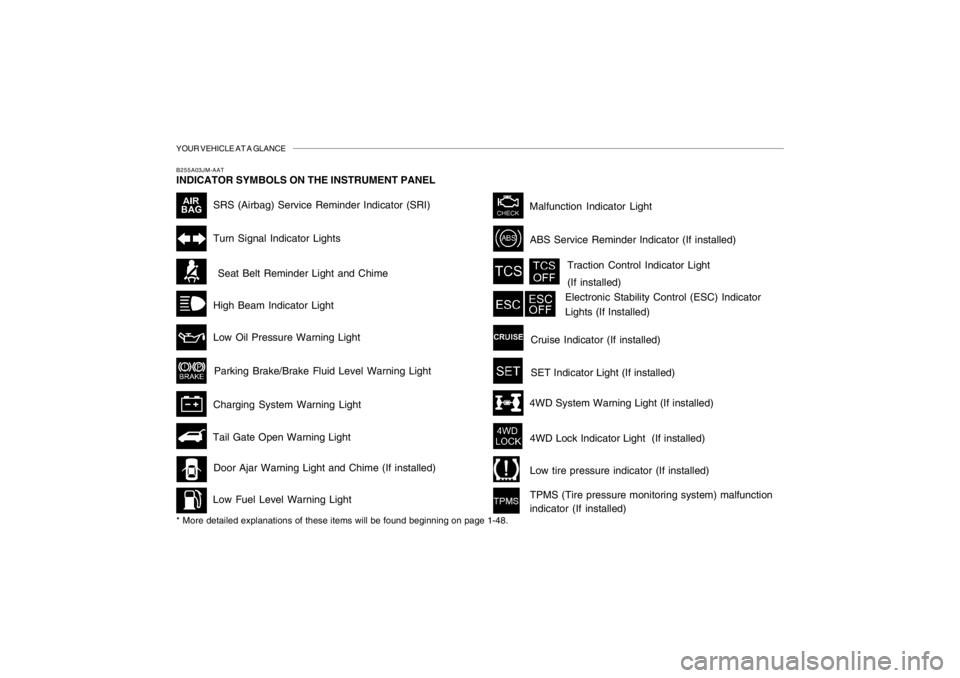
SRS (Airbag) Service Reminder Indicator (SRI)
B255A03JM-AATINDICATOR SYMBOLS ON THE INSTRUMENT PANEL
Turn Signal Indicator LightsHigh Beam Indicator Light
Low Oil Pressure Warning Light
Charging System Warning LightSeat Belt Reminder Light and Chime
* More detailed explanations of these items will be found beginning on page 1-48.
Parking Brake/Brake Fluid Level Warning Light
Malfunction Indicator Light
Tail Gate Open Warning Light
Low Fuel Level Warning LightDoor Ajar Warning Light and Chime (If installed)Traction Control Indicator Light
(If installed)
ABS Service Reminder Indicator (If installed)Cruise Indicator (If installed)
4WD Lock Indicator Light (If installed)4WD System Warning Light (If installed)SET Indicator Light (If installed)
Electronic Stability Control (ESC) Indicator
Lights (If Installed)
Low tire pressure indicator (If installed)
TPMS (Tire pressure monitoring system) malfunction
indicator (If installed)
Page 20 of 289
1FEATURES OF YOUR HYUNDAI8
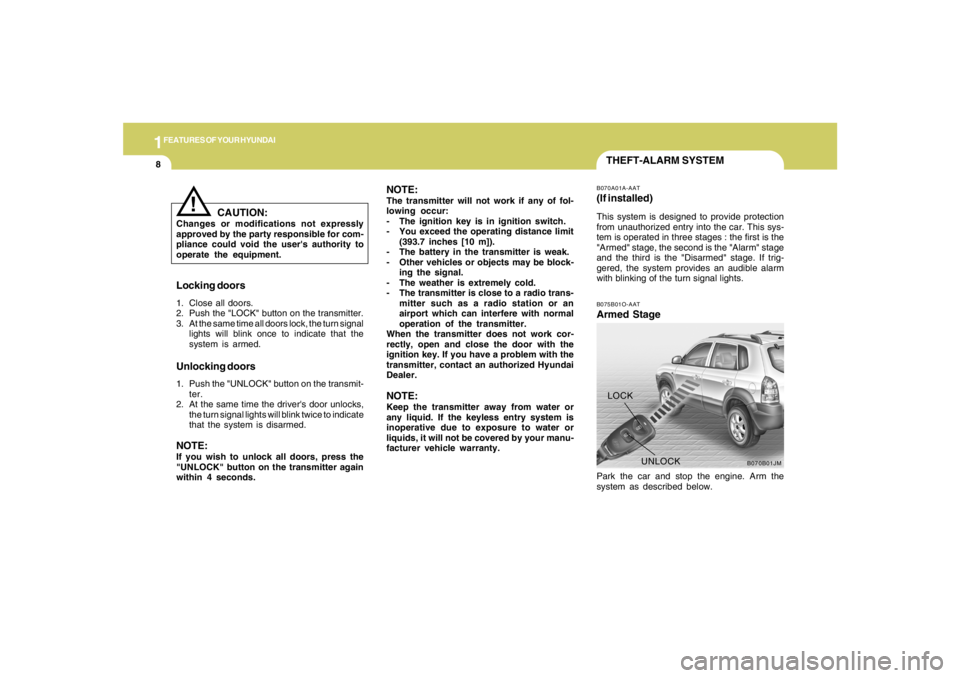
B070B01JM
UNLOCK LOCK
THEFT-ALARM SYSTEMB075B01O-AATArmed StagePark the car and stop the engine. Arm the
system as described below.B070A01A-AAT(If installed)This system is designed to provide protection
from unauthorized entry into the car. This sys-
tem is operated in three stages : the first is the
"Armed" stage, the second is the "Alarm" stage
and the third is the "Disarmed" stage. If trig-
gered, the system provides an audible alarm
with blinking of the turn signal lights.
Locking doors1. Close all doors.
2. Push the "LOCK" button on the transmitter.
3. At the same time all doors lock, the turn signal
lights will blink once to indicate that the
system is armed.Unlocking doors1. Push the "UNLOCK" button on the transmit-
ter.
2. At the same time the driver's door unlocks,
the turn signal lights will blink twice to indicate
that the system is disarmed.NOTE:If you wish to unlock all doors, press the
"UNLOCK" button on the transmitter again
within 4 seconds.
CAUTION:
Changes or modifications not expressly
approved by the party responsible for com-
pliance could void the user's authority to
operate the equipment.
!
NOTE:The transmitter will not work if any of fol-
lowing occur:
- The ignition key is in ignition switch.
- You exceed the operating distance limit
(393.7 inches [10 m]).
- The battery in the transmitter is weak.
- Other vehicles or objects may be block-
ing the signal.
- The weather is extremely cold.
- The transmitter is close to a radio trans-
mitter such as a radio station or an
airport which can interfere with normal
operation of the transmitter.
When the transmitter does not work cor-
rectly, open and close the door with the
ignition key. If you have a problem with the
transmitter, contact an authorized Hyundai
Dealer.NOTE:Keep the transmitter away from water or
any liquid. If the keyless entry system is
inoperative due to exposure to water or
liquids, it will not be covered by your manu-
facturer vehicle warranty.
Page 21 of 289
1
FEATURES OF YOUR HYUNDAI
9
1) Remove the ignition key from the ignition
switch.
2) Make sure that the hood and tail gate are
closed and latched.
3) Lock the doors using the transmitter of the
keyless entry system.
After completion of the steps above, the turn
signal lights will blink once to indicate that the
system is armed.
NOTE:o If any door, the tail gate or engine hood
remains open, the system will not be
armed. If this happens, rearm the system
as described above.
o If the "LOCK" button is pressed once
more within 4 seconds after pushing the
"LOCK" button on the transmitter, the
siren will sound once to indicate that the
system is armed.
CAUTION:
Do not arm the system until all passengers
have left the car. If the system is armed while
a passenger(s) remains in the car, the alarm
may be activated when the remaining
passenger(s) leaves the car.
!
B075C01JM-AATAlarm StageThe alarm will be activated if any of the following
occurs while the car is parked and the system
is armed.
1) A front or rear door is opened without using
the transmitter or the ignition key.
2) The tail gate is opened without using the
transmitter or the ignition key.
3) The hood is opened.
The siren will sound and the turn signal lights will
blink continuously for about 30 seconds (This
will repeat 3 times). To turn off the system,
unlock the door or tail gate using the transmitter
or the ignition key.
CAUTION:
Avoid trying to start the engine while the
system is armed.
!
B075D01JM-AATDisarmed StageThe system will be disarmed by using the
transmitter or the ignition key.
The driver's door is unlocked by depressing
once the "UNLOCK" button on the transmitter.
If you wish to unlock all doors, press the "UN-
LOCK" button on the transmitter again within 4
seconds.
Whenever the step above is completed, the turn
signal lights will blink twice to indicate that the
system is disarmed.NOTE :The system will rearm if a door, tailgate, or
hood is not opened within 30 seconds.
Page 22 of 289
1FEATURES OF YOUR HYUNDAI10
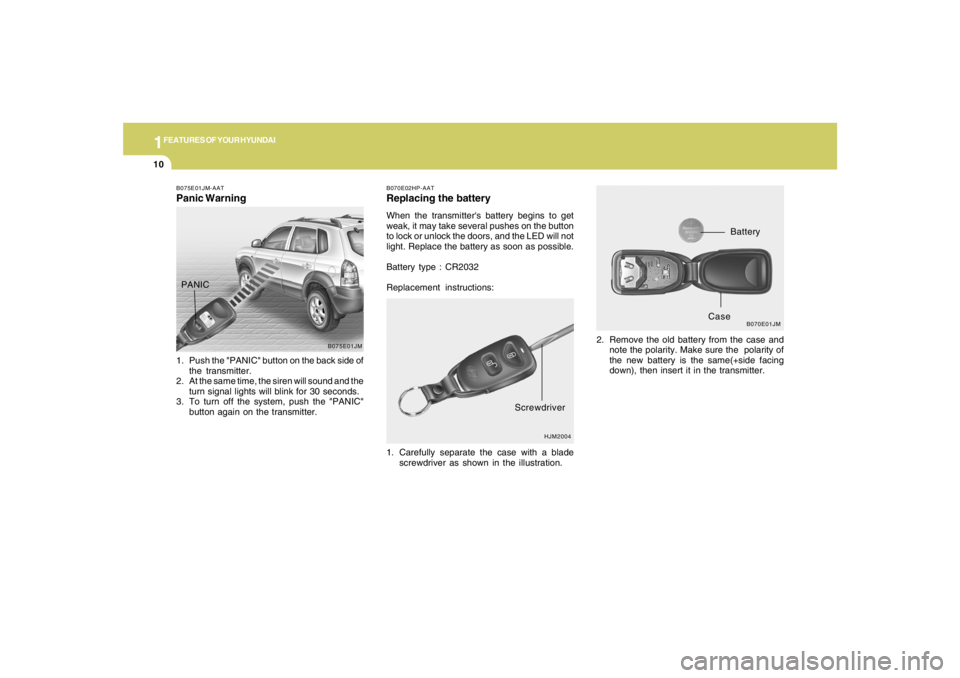
B070E02HP-AATReplacing the batteryWhen the transmitter's battery begins to get
weak, it may take several pushes on the button
to lock or unlock the doors, and the LED will not
light. Replace the battery as soon as possible.
Battery type : CR2032
Replacement instructions:
1. Carefully separate the case with a blade
screwdriver as shown in the illustration.2. Remove the old battery from the case and
note the polarity. Make sure the polarity of
the new battery is the same(+side facing
down), then insert it in the transmitter.
HJM2004
Screwdriver
B070E01JM
Battery
Case
B075E01JM-AATPanic Warning1. Push the "PANIC" button on the back side of
the transmitter.
2. At the same time, the siren will sound and the
turn signal lights will blink for 30 seconds.
3. To turn off the system, push the "PANIC"
button again on the transmitter.
B075E01JM
PANIC
Page 59 of 289
1
FEATURES OF YOUR HYUNDAI
47
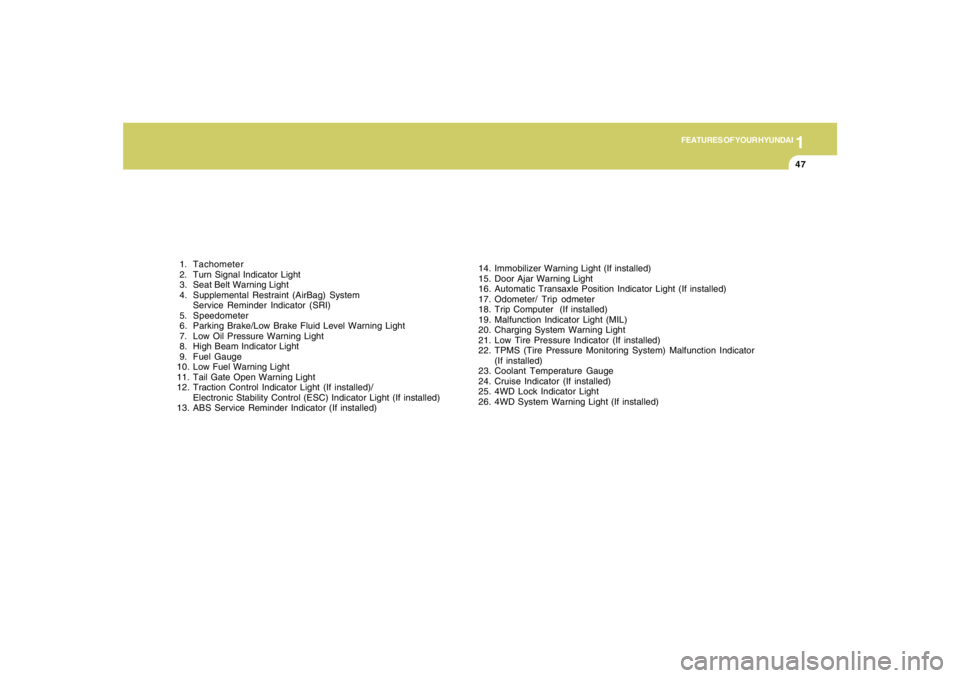
1. Tachometer
2. Turn Signal Indicator Light
3. Seat Belt Warning Light
4. Supplemental Restraint (AirBag) System
Service Reminder Indicator (SRI)
5. Speedometer
6. Parking Brake/Low Brake Fluid Level Warning Light
7. Low Oil Pressure Warning Light
8. High Beam Indicator Light
9. Fuel Gauge
10. Low Fuel Warning Light
11. Tail Gate Open Warning Light
12. Traction Control Indicator Light (If installed)/
Electronic Stability Control (ESC) Indicator Light (If installed)
13. ABS Service Reminder Indicator (If installed)14. Immobilizer Warning Light (If installed)
15. Door Ajar Warning Light
16. Automatic Transaxle Position Indicator Light (If installed)
17. Odometer/ Trip odmeter
18. Trip Computer (If installed)
19. Malfunction Indicator Light (MIL)
20. Charging System Warning Light
21. Low Tire Pressure Indicator (If installed)
22. TPMS (Tire Pressure Monitoring System) Malfunction Indicator
(If installed)
23. Coolant Temperature Gauge
24. Cruise Indicator (If installed)
25. 4WD Lock Indicator Light
26. 4WD System Warning Light (If installed)
Page 60 of 289
1FEATURES OF YOUR HYUNDAI48
WARNING AND INDICATOR LIGHTSB260B01JM-AAT
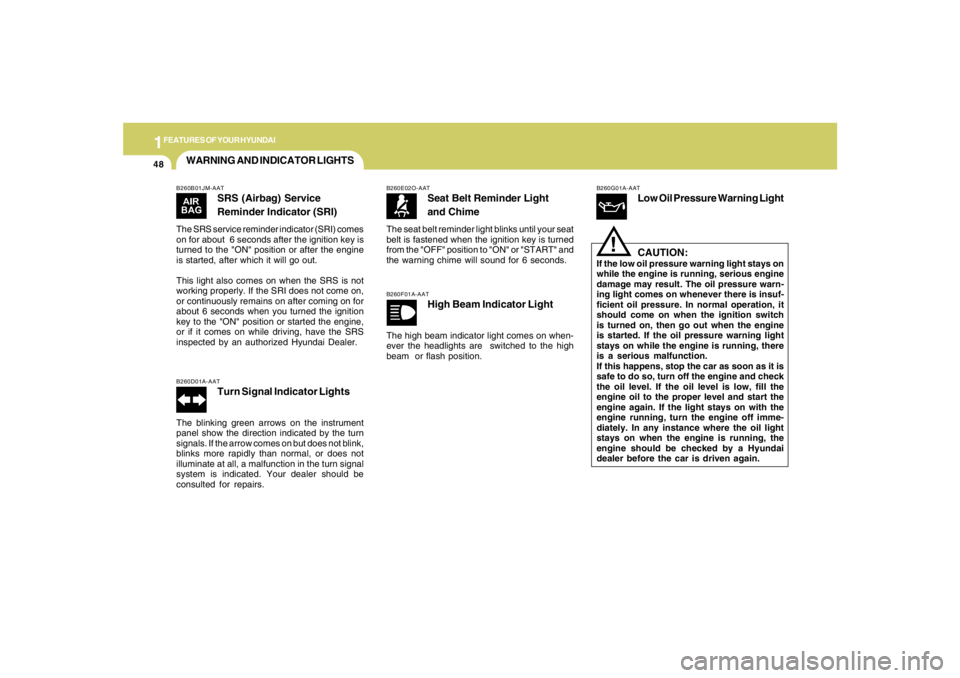
SRS (Airbag) Service
Reminder Indicator (SRI)
The SRS service reminder indicator (SRI) comes
on for about 6 seconds after the ignition key is
turned to the "ON" position or after the engine
is started, after which it will go out.
This light also comes on when the SRS is not
working properly. If the SRI does not come on,
or continuously remains on after coming on for
about 6 seconds when you turned the ignition
key to the "ON" position or started the engine,
or if it comes on while driving, have the SRS
inspected by an authorized Hyundai Dealer.B260D01A-AAT
Turn Signal Indicator Lights
The blinking green arrows on the instrument
panel show the direction indicated by the turn
signals. If the arrow comes on but does not blink,
blinks more rapidly than normal, or does not
illuminate at all, a malfunction in the turn signal
system is indicated. Your dealer should be
consulted for repairs.
B260E02O-AAT
Seat Belt Reminder Light
and Chime
The seat belt reminder light blinks until your seat
belt is fastened when the ignition key is turned
from the "OFF" position to "ON" or "START" and
the warning chime will sound for 6 seconds.B260F01A-AAT
High Beam Indicator Light
The high beam indicator light comes on when-
ever the headlights are switched to the high
beam or flash position.
B260G01A-AAT
Low Oil Pressure Warning Light
CAUTION:
If the low oil pressure warning light stays on
while the engine is running, serious engine
damage may result. The oil pressure warn-
ing light comes on whenever there is insuf-
ficient oil pressure. In normal operation, it
should come on when the ignition switch
is turned on, then go out when the engine
is started. If the oil pressure warning light
stays on while the engine is running, there
is a serious malfunction.
If this happens, stop the car as soon as it is
safe to do so, turn off the engine and check
the oil level. If the oil level is low, fill the
engine oil to the proper level and start the
engine again. If the light stays on with the
engine running, turn the engine off imme-
diately. In any instance where the oil light
stays on when the engine is running, the
engine should be checked by a Hyundai
dealer before the car is driven again.
!
Page 69 of 289
1
FEATURES OF YOUR HYUNDAI
57
MULTI-FUNCTION LIGHT SWITCHB340A01A-AATCOMBINATION TURN SIGNAL,
HEADLIGHT AND HIGH-BEAM
SWITCH
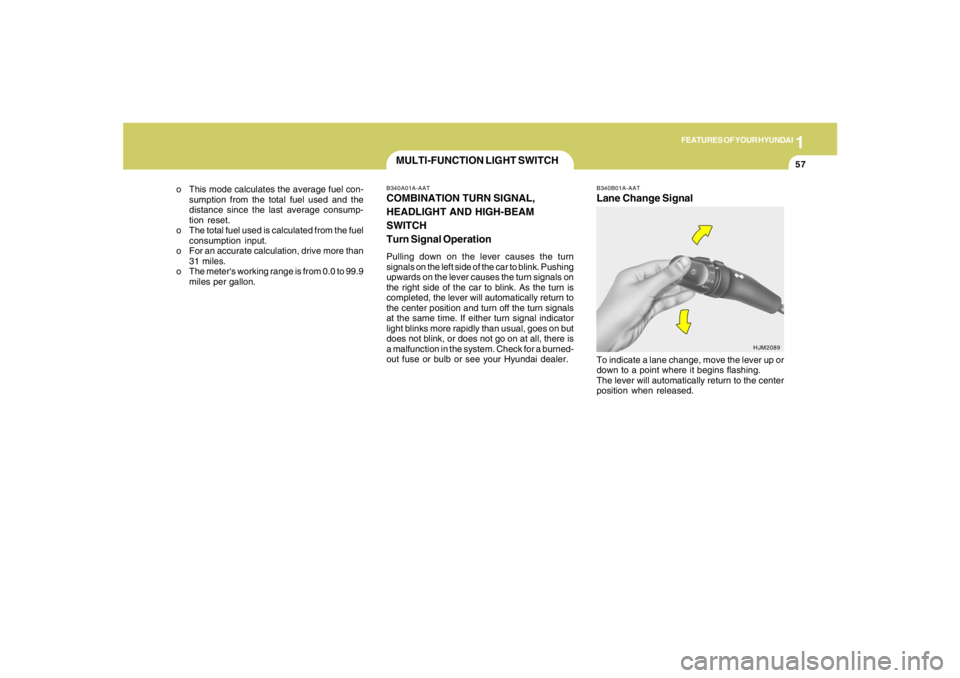
Turn Signal OperationPulling down on the lever causes the turn
signals on the left side of the car to blink. Pushing
upwards on the lever causes the turn signals on
the right side of the car to blink. As the turn is
completed, the lever will automatically return to
the center position and turn off the turn signals
at the same time. If either turn signal indicator
light blinks more rapidly than usual, goes on but
does not blink, or does not go on at all, there is
a malfunction in the system. Check for a burned-
out fuse or bulb or see your Hyundai dealer. o This mode calculates the average fuel con-
sumption from the total fuel used and the
distance since the last average consump-
tion reset.
o The total fuel used is calculated from the fuel
consumption input.
o For an accurate calculation, drive more than
31 miles.
o The meter's working range is from 0.0 to 99.9
miles per gallon.
B340B01A-AATLane Change SignalTo indicate a lane change, move the lever up or
down to a point where it begins flashing.
The lever will automatically return to the center
position when released.
HJM2089
Page 74 of 289
1FEATURES OF YOUR HYUNDAI62
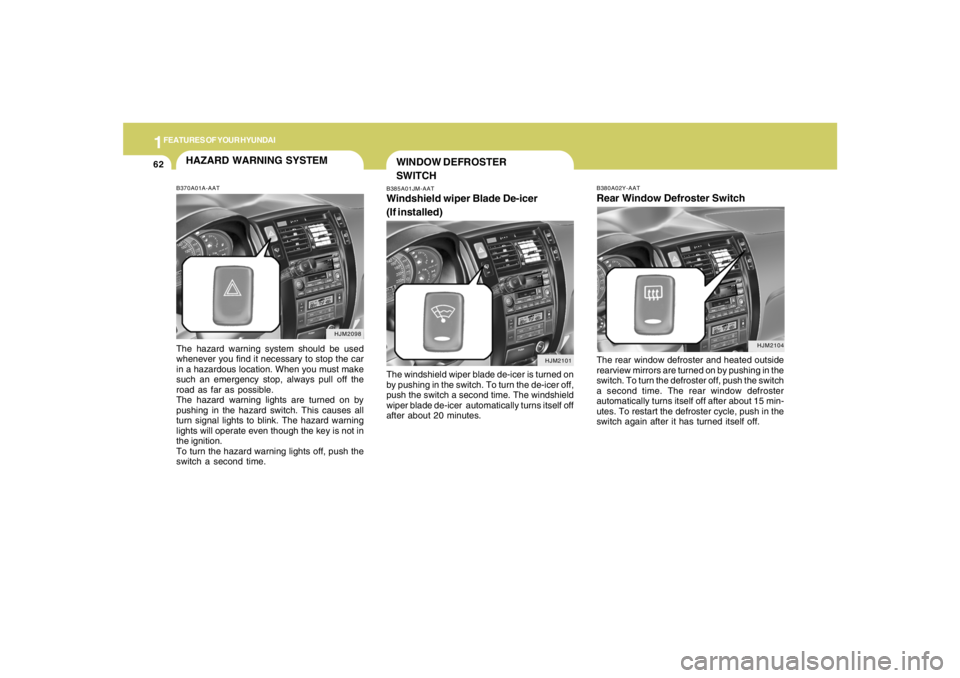
B380A02Y-AATRear Window Defroster SwitchThe rear window defroster and heated outside
rearview mirrors are turned on by pushing in the
switch. To turn the defroster off, push the switch
a second time. The rear window defroster
automatically turns itself off after about 15 min-
utes. To restart the defroster cycle, push in the
switch again after it has turned itself off.
HJM2104
HJM2098
HAZARD WARNING SYSTEMB370A01A-AATThe hazard warning system should be used
whenever you find it necessary to stop the car
in a hazardous location. When you must make
such an emergency stop, always pull off the
road as far as possible.
The hazard warning lights are turned on by
pushing in the hazard switch. This causes all
turn signal lights to blink. The hazard warning
lights will operate even though the key is not in
the ignition.
To turn the hazard warning lights off, push the
switch a second time.
B385A01JM-AATWindshield wiper Blade De-icer
(If installed)The windshield wiper blade de-icer is turned on
by pushing in the switch. To turn the de-icer off,
push the switch a second time. The windshield
wiper blade de-icer automatically turns itself off
after about 20 minutes.
HJM2101
WINDOW DEFROSTER
SWITCH
Page 151 of 289
1
FEATURES OF YOUR HYUNDAI
139139139139139
CAUTION:
o Be sure to remove the antenna before
washing the car in an automatic car
wash or it may be damaged.
o Before entering a place with a low height
clearance, be sure to adjust the roof
antenna low.
o In some vehicles, the antenna can be
folded into only front position.
o When reinstalling your antenna, it is
important that it is fully tightened to
ensure proper reception.
!
ANTENNA
B870D02JM-U B870D02JM-AAT
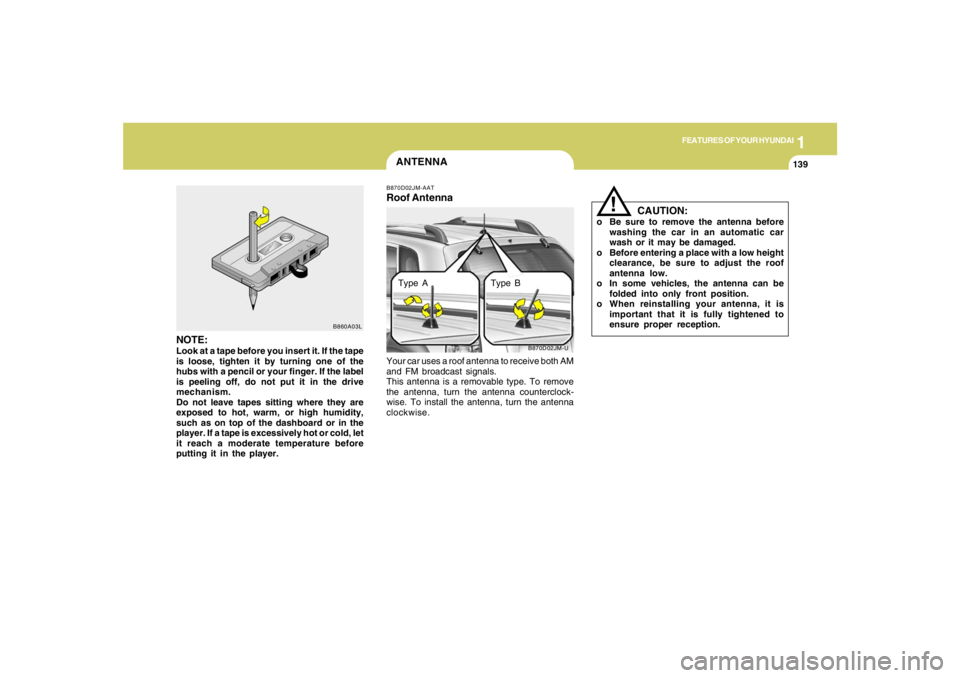
Roof AntennaYour car uses a roof antenna to receive both AM
and FM broadcast signals.
This antenna is a removable type. To remove
the antenna, turn the antenna counterclock-
wise. To install the antenna, turn the antenna
clockwise.
NOTE:Look at a tape before you insert it. If the tape
is loose, tighten it by turning one of the
hubs with a pencil or your finger. If the label
is peeling off, do not put it in the drive
mechanism.
Do not leave tapes sitting where they are
exposed to hot, warm, or high humidity,
such as on top of the dashboard or in the
player. If a tape is excessively hot or cold, let
it reach a moderate temperature before
putting it in the player.
B860A03L
Type A Type B
Page 179 of 289
2
DRIVING YOUR HYUNDAI
28
C190F01O-AATTrailer or Vehicle Towing Tips1. Before towing, check hitch and safety chain
connections as well as proper operation of
the trailer running lights, brake lights, and
turn signals.
2. Trailer towing requires more fuel than normal
conditions.
3. To maintain engine braking efficiency, do not
tow a trailer with the transaxle in fifth gear
(manual transaxle) or overdrive (automatic
transaxle).
4. Always secure items in the trailer to prevent
load shift while driving.
5. Check the condition and air pressure of all
tires on the trailer and your car. Low tire
pressure can seriously affect the handling.
Also check the spare tire.
6. The vehicle/trailer combination is more af-
fected by crosswind and buffeting.
When being passed by a large vehicle, keep
a constant speed and steer straight ahead.
If there is too much wind buffeting, slow down
to get out of the other vehicle's air turbulence.
7. When parking your car and trailer, especially
on a hill, be sure to follow all the normal
precautions. Turn your front wheel into the
curb, set the parking brake firmly, and put the
transaxle in 1st or Reverse (manual) or Park
(automatic). In addition, place wheel chocks
at each of the trailer's tires.8. If the trailer has electric brakes, start your
vehicle and trailer moving, and then apply the
trailer brake controller by hand to be sure the
brakes are working. This lets you check
your electrical connection at the same time.
9. During your trip, check occasionally to be
sure that the load is secure, and that the
lights and any trailer brakes are still working.
10.Avoid jerky starts, sudden acceleration or
sudden stops.
11.Avoid sharp turns and rapid lane changes.
12.Avoid holding the brake pedal down too long
or too frequently. This could cause the brakes
to overheat, resulting in reduced braking
efficiency.
13.When going down a hill, shift into a lower gear
and use the engine braking effect.
When ascending a long grade, downshift the
transaxle to a lower gear and reduce speed
to reduce chances of engine overloading
and/or overheating.
14.If you have to stop while going uphill, do not
hold the vehicle in place by pressing on the
accelerator. This can cause the automatic
transaxle to overheat. Use the parking brake
or footbrake.
15.If the transaxle shifts frequently while going
up a hill, shift down one gear.
NOTE:When towing check transaxle fluid more
frequently.
!
WARNING:
o Improperly loading your vehicle and
trailer can seriously affect its steering
and braking performance causing a
crash which could cause serious injury
or death.
o Towing a trailer affected vehicle han-
dling and braking.
o Drive more slowly when towing a trailer
and allow more distance when braking.
o Be careful when driving in slippery and
windy conditions.
o Be careful when turning and while driv-
ing up and down hills.
o Do not exceed 45 mph or the posted
towing speed limit, whichever is lower.