open hood HYUNDAI TUCSON 2006 Owners Manual
[x] Cancel search | Manufacturer: HYUNDAI, Model Year: 2006, Model line: TUCSON, Model: HYUNDAI TUCSON 2006Pages: 289, PDF Size: 11.55 MB
Page 21 of 289
1
FEATURES OF YOUR HYUNDAI
9
1) Remove the ignition key from the ignition
switch.
2) Make sure that the hood and tail gate are
closed and latched.
3) Lock the doors using the transmitter of the
keyless entry system.
After completion of the steps above, the turn
signal lights will blink once to indicate that the
system is armed.
NOTE:o If any door, the tail gate or engine hood
remains open, the system will not be
armed. If this happens, rearm the system
as described above.
o If the "LOCK" button is pressed once
more within 4 seconds after pushing the
"LOCK" button on the transmitter, the
siren will sound once to indicate that the
system is armed.
CAUTION:
Do not arm the system until all passengers
have left the car. If the system is armed while
a passenger(s) remains in the car, the alarm
may be activated when the remaining
passenger(s) leaves the car.
!
B075C01JM-AATAlarm StageThe alarm will be activated if any of the following
occurs while the car is parked and the system
is armed.
1) A front or rear door is opened without using
the transmitter or the ignition key.
2) The tail gate is opened without using the
transmitter or the ignition key.
3) The hood is opened.
The siren will sound and the turn signal lights will
blink continuously for about 30 seconds (This
will repeat 3 times). To turn off the system,
unlock the door or tail gate using the transmitter
or the ignition key.
CAUTION:
Avoid trying to start the engine while the
system is armed.
!
B075D01JM-AATDisarmed StageThe system will be disarmed by using the
transmitter or the ignition key.
The driver's door is unlocked by depressing
once the "UNLOCK" button on the transmitter.
If you wish to unlock all doors, press the "UN-
LOCK" button on the transmitter again within 4
seconds.
Whenever the step above is completed, the turn
signal lights will blink twice to indicate that the
system is disarmed.NOTE :The system will rearm if a door, tailgate, or
hood is not opened within 30 seconds.
Page 61 of 289
1
FEATURES OF YOUR HYUNDAI
49
!
B260H02A-AAT
Parking Brake/Low Brake Fluid
Level Warning Light
The brake fluid level warning light indicates that
the brake fluid level in the brake master cylinder
is low and hydraulic brake fluid conforming to
DOT 3 or DOT 4 specifications should be
added. After adding fluid, if no other trouble is
found, the car should be immediately and care-
fully driven to a Hyundai dealer for inspection.
If further trouble is experienced, the vehicle
should not be driven at all but taken to a dealer
by a professional towing service.
Your Hyundai is equipped with dual-diagonal
braking systems. This means you still have
braking on two wheels even if one of the dual
systems should fail. With only one of the dual
systems working, more than normal pedal travel
and greater pedal pressure are required to stop
the car. Also, the car will not stop in as short a
distance with only half of the brake system
working. If the brakes fail while you are driving,
shift to a lower gear for additional engine braking
and stop the car as soon as it is safe to do so.
WARNING:
If you suspect brake trouble, have your
brakes checked by a Hyundai dealer as
soon as possible. Driving your car with a
problem in either the brake electrical sys-
tem or brake hydraulic system is danger-
ous, and could result in a serious injury or
death.Warning Light OperationThe parking brake/brake fluid level warning light
should come on when the parking brake is
applied and the ignition switch is turned to "ON"
or "START". After the engine is started, the light
should go out when the parking brake is re-
leased.
If the parking brake is not applied, the warning
light should come on when the ignition switch is
turned to "ON" or "START", then go out when
the engine starts. If the light comes on at any
other time, you should slow the vehicle and bring
it to a complete stop in a safe location off the
roadway.
B260J02A-AAT
Charging System Warning Light
The charging system warning light should come
on when the ignition is turned on, then go out
when the engine is running. If the light stays on
while the engine is running, there is a malfunc-
tion in the electrical charging system. If the light
comes on while you are driving, stop, turn off the
engine and check under the hood. First, make
certain the generator drive belt is in place. If it is,
check the tension of the belt. Do this as shown
on page 6-21 by pushing down on the center of
the belt. Have the system checked by your
Hyundai dealer as soon as possible.B260B01JM-AAT
Tail Gate Open Warning Light
This light remains on unless the tail gate and/or
tail gate window is completely closed and latched.
Page 65 of 289
1
FEATURES OF YOUR HYUNDAI
53
!
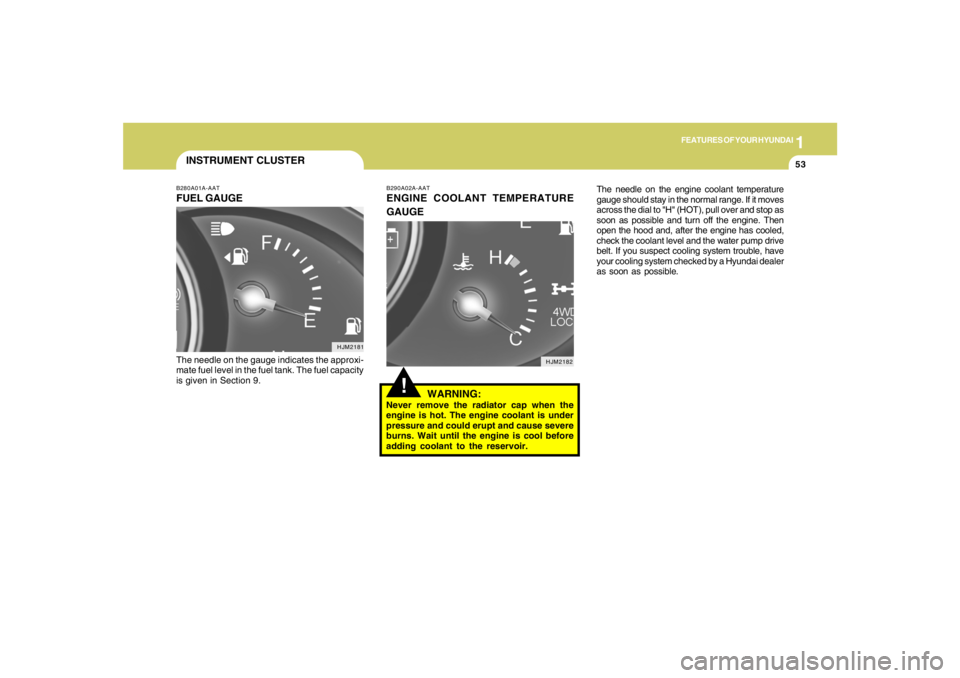
B290A02A-AATENGINE COOLANT TEMPERATURE
GAUGE
WARNING:Never remove the radiator cap when the
engine is hot. The engine coolant is under
pressure and could erupt and cause severe
burns. Wait until the engine is cool before
adding coolant to the reservoir.
B280A01A-AATFUEL GAUGEThe needle on the gauge indicates the approxi-
mate fuel level in the fuel tank. The fuel capacity
is given in Section 9.INSTRUMENT CLUSTER
HJM2182 HJM2181
The needle on the engine coolant temperature
gauge should stay in the normal range. If it moves
across the dial to "H" (HOT), pull over and stop as
soon as possible and turn off the engine. Then
open the hood and, after the engine has cooled,
check the coolant level and the water pump drive
belt. If you suspect cooling system trouble, have
your cooling system checked by a Hyundai dealer
as soon as possible.
Page 94 of 289
1FEATURES OF YOUR HYUNDAI82
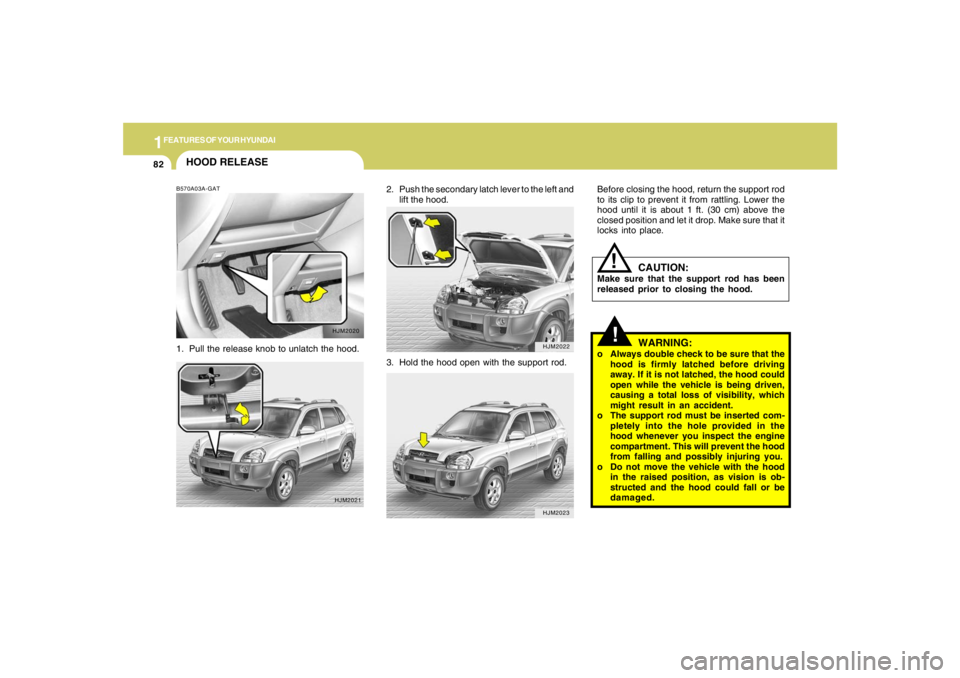
2. Push the secondary latch lever to the left and
lift the hood.
HJM2022HJM2023
HOOD RELEASEB570A03A-GAT1. Pull the release knob to unlatch the hood.
HJM2020
HJM2021
3. Hold the hood open with the support rod.
!
Before closing the hood, return the support rod
to its clip to prevent it from rattling. Lower the
hood until it is about 1 ft. (30 cm) above the
closed position and let it drop. Make sure that it
locks into place.
WARNING:
o Always double check to be sure that the
hood is firmly latched before driving
away. If it is not latched, the hood could
open while the vehicle is being driven,
causing a total loss of visibility, which
might result in an accident.
o The support rod must be inserted com-
pletely into the hole provided in the
hood whenever you inspect the engine
compartment. This will prevent the hood
from falling and possibly injuring you.
o Do not move the vehicle with the hood
in the raised position, as vision is ob-
structed and the hood could fall or be
damaged.
CAUTION:
Make sure that the support rod has been
released prior to closing the hood.
!
Page 189 of 289
34WHAT TO DO IN AN EMERGENCY
IF THE ENGINE OVERHEATS
!!
!
WARNING:
While the engine is running, keep hair,
hands and clothing away from moving parts
such as the fan and drive belts to prevent
injury.
5. If the water pump drive belt is broken or
engine coolant is leaking out, stop the engine
immediately and call the nearest Hyundai
dealer for assistance.
WARNING:
Do not remove the radiator cap when the
engine is hot. This can allow coolant to be
blown out of the opening and cause seri-
ous burns.6. If you cannot find the cause of the overheat-
ing, wait until the engine temperature has
returned to normal. Then, if coolant has been
lost, carefully add coolant to the reservoir
(page 6-9) to bring the fluid level in the
reservoir up to the halfway mark.
7. Proceed with caution, keeping alert for fur-
ther signs of overheating. If overheating
happens again, call a Hyundai dealer for
assistance.
CAUTION:
Serious loss of coolant indicates there is a
leak in the cooling system and this should
be checked as soon as possible by a Hyundai
dealer.
D030A02A-AATIf your temperature gauge indicates overheat-
ing, you experience a loss of power, or hear loud
pinging or knocking, the engine is probably too
hot. If this happens, you should:
1. Pull off the road and stop as soon as it is safe
to do so.
2. Place the gear selector lever in "P" (auto-
matic), or neutral (manual transaxle) and set
the parking brake. If the air conditioning is on,
turn it off.
3. If engine coolant is running out under the car
or steam is coming out from the hood, stop
the engine. Do not open the hood until the
coolant has stopped running or the steaming
has stopped. If there is no visible loss of
engine coolant and no steam, leave the
engine running and check to be sure the
engine cooling fan is operating. If the fan is
not running, turn the engine off.
4. Check to see if the water pump drive belt is
missing. If it is not missing, check to see that
it is tight. If the drive belt seems to be
satisfactory, check for coolant leaking from
the radiator, hoses or under the car. (If the
air conditioning had been in use, it is normal
for cold water to be draining from it when you
stop).
Page 226 of 289
6
DO-IT-YOURSELF MAINTENANCE
7
6. Install a new oil filter in accordance with the
instructions on the carton or on the filter itself.
Do not over-tighten. (Tightening torque :
1.2 ~ 1.6 kgf.m) Be sure that the mounting
surface on the engine is clean and that the
old gasket is removed completely. Lubricate
the new gasket on the filter with clean engine
oil before installation.
7. Remove the engine oil level dipstick.
8. Refill the crankcase with the recommended
engine oil. Refer to the specification in chap-
ter 9 for engine oil capacity.
!
PROPOSITION 65 WARNING:
This product contains a chemical known to
the State of California to cause cancer.
Used engine oil may cause irritation or
cancer of the skin if left in contact with the
skin for prolonged periods of time. Used
engine oil contains chemicals that have
caused cancer in laboratory animals. Al-
ways protect your skin by washing your
hands thoroughly with soap and warm
water as soon as possible after handling
used oil.
!
WARNING:
Be very careful when draining the engine oil
as it may be hot enough to burn you! 2. Open the hood and remove the engine oil
filler cap.
3. Slide underneath the car and loosen the
drain plug by turning it counterclockwise with
a wrench of the proper size. Be sure that a
drain pan is in position to catch the oil as it
drains out, then remove the drain plug.
4. When the oil has stopped draining, replace
the drain plug using a new washer and
retighten by turning it clockwise.
Oil pan drain plug tightening torque:
3.5 ~ 4.5 kgf.m (2.7L)
4.0 ~ 4.5 kgf.m (2.0L)
5. Remove the oil filter by turning it counter-
clockwise with a oil filter wrench of the proper
size. A certain amount of oil will come out
when you remove the filter. So be sure to
have your drain pan in place underneath it.
CAUTION:
Slowly pour the recommended oil using by
a funnel. Do not overfill! Engine damage
may occur if overfilled.
!
9. Start the engine and check to be sure no oil
is leaking from the drain plug or oil filter.
10.Shut off the engine and recheck the oil level.NOTE:Always dispose of used engine oil in an
environmentally acceptable manner. It is
suggested that it be placed in a sealed
container and taken to a service station for
reclamation. Do not pour the oil on the
ground or put it in with the household
trash.
Page 232 of 289
6
DO-IT-YOURSELF MAINTENANCE
13
!
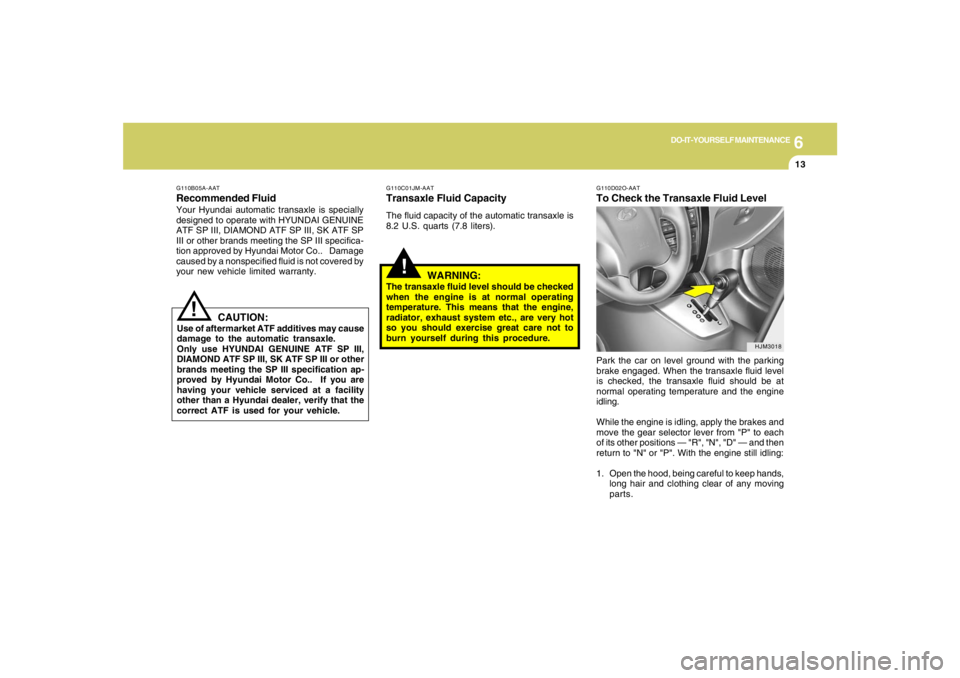
G110D02O-AATTo Check the Transaxle Fluid LevelPark the car on level ground with the parking
brake engaged. When the transaxle fluid level
is checked, the transaxle fluid should be at
normal operating temperature and the engine
idling.
While the engine is idling, apply the brakes and
move the gear selector lever from "P" to each
of its other positions — "R", "N", "D" — and then
return to "N" or "P". With the engine still idling:
1. Open the hood, being careful to keep hands,
long hair and clothing clear of any moving
parts.
G110C01JM-AATTransaxle Fluid CapacityThe fluid capacity of the automatic transaxle is
8.2 U.S. quarts (7.8 liters).
WARNING:
The transaxle fluid level should be checked
when the engine is at normal operating
temperature. This means that the engine,
radiator, exhaust system etc., are very hot
so you should exercise great care not to
burn yourself during this procedure.
HJM3018
!
G110B05A-AATRecommended FluidYour Hyundai automatic transaxle is specially
designed to operate with HYUNDAI GENUINE
ATF SP III, DIAMOND ATF SP III, SK ATF SP
III or other brands meeting the SP III specifica-
tion approved by Hyundai Motor Co.. Damage
caused by a nonspecified fluid is not covered by
your new vehicle limited warranty.
CAUTION:
Use of aftermarket ATF additives may cause
damage to the automatic transaxle.
Only use HYUNDAI GENUINE ATF SP III,
DIAMOND ATF SP III, SK ATF SP III or other
brands meeting the SP III specification ap-
proved by Hyundai Motor Co.. If you are
having your vehicle serviced at a facility
other than a Hyundai dealer, verify that the
correct ATF is used for your vehicle.
Page 244 of 289
6
DO-IT-YOURSELF MAINTENANCE
25
HEADLIGHT AIMING ADJUSTMENT
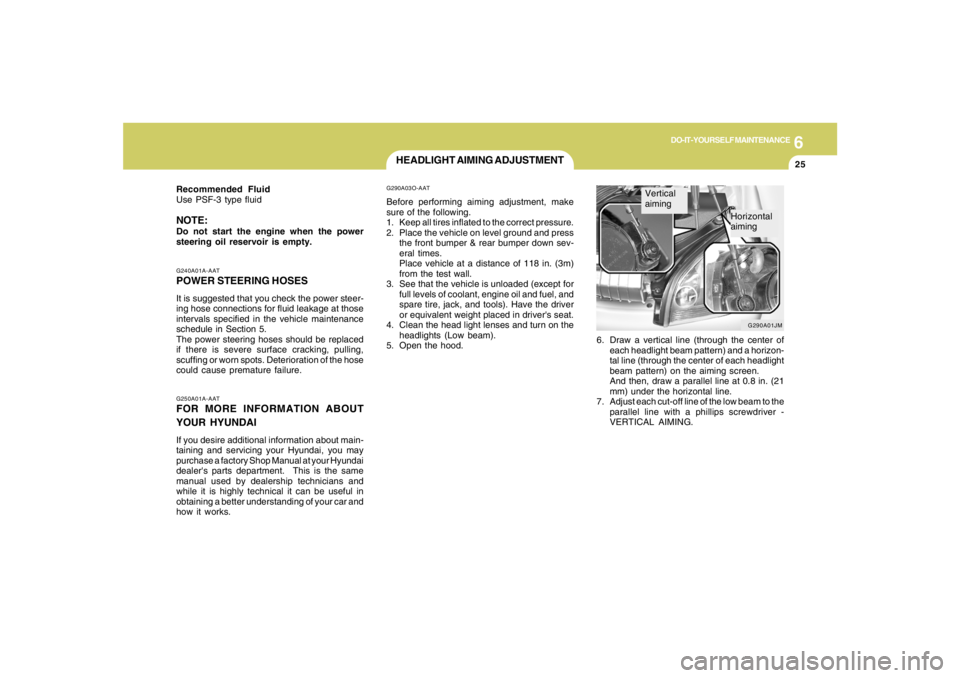
6. Draw a vertical line (through the center of
each headlight beam pattern) and a horizon-
tal line (through the center of each headlight
beam pattern) on the aiming screen.
And then, draw a parallel line at 0.8 in. (21
mm) under the horizontal line.
7. Adjust each cut-off line of the low beam to the
parallel line with a phillips screwdriver -
VERTICAL AIMING.
G290A03O-AATBefore performing aiming adjustment, make
sure of the following.
1. Keep all tires inflated to the correct pressure.
2. Place the vehicle on level ground and press
the front bumper & rear bumper down sev-
eral times.
Place vehicle at a distance of 118 in. (3m)
from the test wall.
3. See that the vehicle is unloaded (except for
full levels of coolant, engine oil and fuel, and
spare tire, jack, and tools). Have the driver
or equivalent weight placed in driver's seat.
4. Clean the head light lenses and turn on the
headlights (Low beam).
5. Open the hood.
G250A01A-AATFOR MORE INFORMATION ABOUT
YOUR HYUNDAIIf you desire additional information about main-
taining and servicing your Hyundai, you may
purchase a factory Shop Manual at your Hyundai
dealer's parts department. This is the same
manual used by dealership technicians and
while it is highly technical it can be useful in
obtaining a better understanding of your car and
how it works.G240A01A-AATPOWER STEERING HOSESIt is suggested that you check the power steer-
ing hose connections for fluid leakage at those
intervals specified in the vehicle maintenance
schedule in Section 5.
The power steering hoses should be replaced
if there is severe surface cracking, pulling,
scuffing or worn spots. Deterioration of the hose
could cause premature failure. Recommended Fluid
Use PSF-3 type fluidNOTE:Do not start the engine when the power
steering oil reservoir is empty.
G290A01JM
Vertical
aiming
Horizontal
aiming
Page 246 of 289
6
DO-IT-YOURSELF MAINTENANCE
27
REPLACEMENT OF LIGHT BULBS!
G260A02A-AATBefore attempting to replace a light bulb, be sure
the switch is turned to the "OFF" position.
The next paragraph shows how to reach the
light bulbs so they may be changed. Be sure to
replace the burned-out bulb with one of the
same number and wattage rating.
See page 6-34 for the wattage description.
CAUTION:
o Keep the lamps out of contact with pe-
troleum products, such as oil, gasoline,
etc.
o After heavy, driving rain or washing,
headlight and taillight lenses could ap-
pear frosty. This condition is caused by
the temperature difference between the
lamp inside and outside. This is similar
to the condensation on your windows
inside your vehicle during the rain and
doesn’t indicate a problem with your
vehicle. If the water leaks into the lamp
bulb circuitry, have the vehicle checked
by an Authorized Hyundai Dealer.
HJM5013 G270A02O-AAT
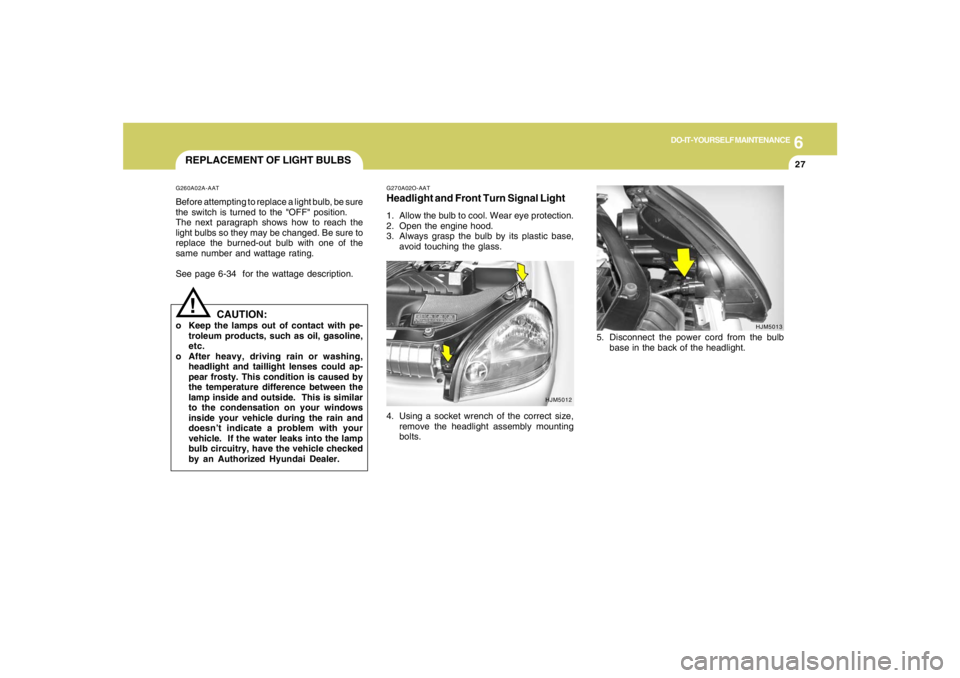
Headlight and Front Turn Signal Light1. Allow the bulb to cool. Wear eye protection.
2. Open the engine hood.
3. Always grasp the bulb by its plastic base,
avoid touching the glass.
4. Using a socket wrench of the correct size,
remove the headlight assembly mounting
bolts.
HJM5012
5. Disconnect the power cord from the bulb
base in the back of the headlight.