lock HYUNDAI TUCSON 2013 Owners Manual
[x] Cancel search | Manufacturer: HYUNDAI, Model Year: 2013, Model line: TUCSON, Model: HYUNDAI TUCSON 2013Pages: 397, PDF Size: 5.55 MB
Page 297 of 397
621
What to do in an emergency
When towing your vehicle in an emer- gency without wheel dollies :
1. Set the ignition switch in the ACC posi-tion.
2. Place the transaxle shift lever in N (Neutral).
3. Release the parking brake.
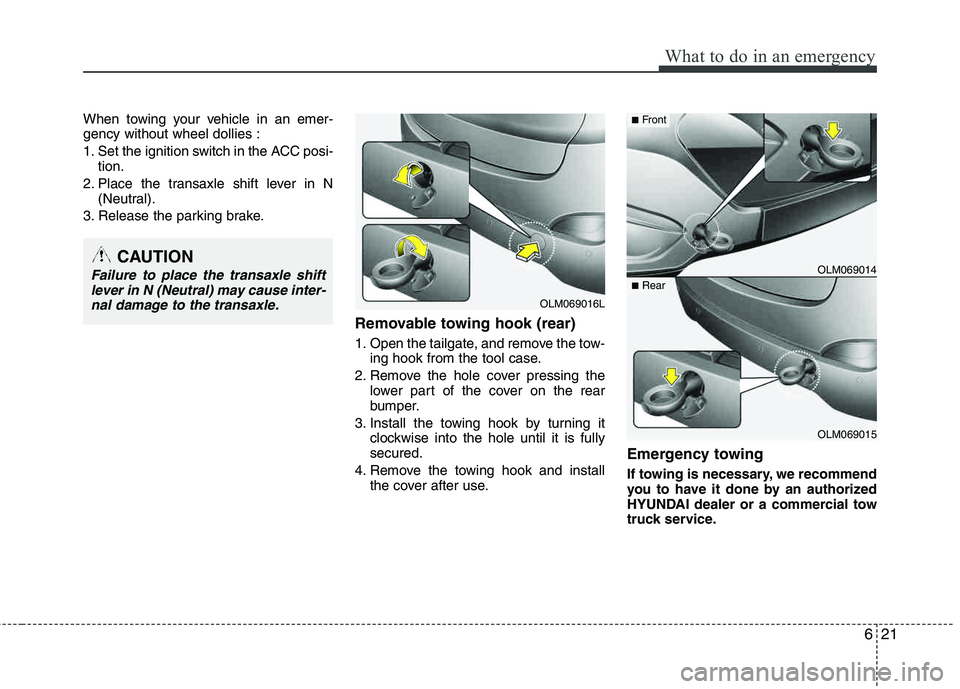
Removable towing hook (rear)
1. Open the tailgate, and remove the tow- ing hook from the tool case.
2. Remove the hole cover pressing the lower part of the cover on the rear
bumper.
3. Install the towing hook by turning it clockwise into the hole until it is fullysecured.
4. Remove the towing hook and install the cover after use.
Emergency towing
If towing is necessary, we recommend
you to have it done by an authorized
HYUNDAI dealer or a commercial tow
truck service.
CAUTION
Failure to place the transaxle shift
lever in N (Neutral) may cause inter-
nal damage to the transaxle.
OLM069016L
OLM069014
OLM069015
■ Front
■Rear
Page 299 of 397
623
What to do in an emergency
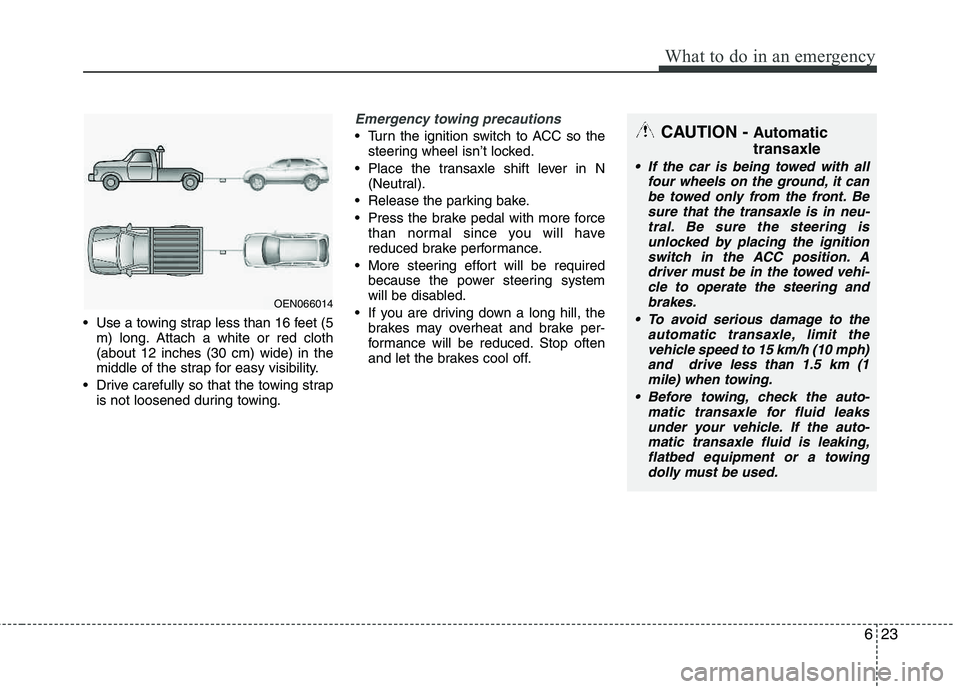
Use a towing strap less than 16 feet (5m) long. Attach a white or red cloth (about 12 inches (30 cm) wide) in the
middle of the strap for easy visibility.
Drive carefully so that the towing strap is not loosened during towing.
Emergency towing precautions
Turn the ignition switch to ACC so the
steering wheel isn’t locked.
Place the transaxle shift lever in N (Neutral).
Release the parking bake.
Press the brake pedal with more force than normal since you will have
reduced brake performance.
More steering effort will be required because the power steering system
will be disabled.
If you are driving down a long hill, the brakes may overheat and brake per-
formance will be reduced. Stop often
and let the brakes cool off.
OEN066014
CAUTION - Automatic transaxle
If the car is being towed with all
four wheels on the ground, it canbe towed only from the front. Be
sure that the transaxle is in neu-tral. Be sure the steering isunlocked by placing the ignition switch in the ACC position. A
driver must be in the towed vehi- cle to operate the steering andbrakes.
To avoid serious damage to the automatic transaxle, limit thevehicle speed to 15 km/h (10 mph)and drive less than 1.5 km (1
mile) when towing.
Before towing, check the auto- matic transaxle for fluid leaks
under your vehicle. If the auto-matic transaxle fluid is leaking,flatbed equipment or a towingdolly must be used.
Page 305 of 397
75
Maintenance
While operating your vehicle:
Note any changes in the sound of theexhaust or any smell of exhaust fumes
in the vehicle.
Check for vibrations in the steering wheel. Notice any increased steering
effort or looseness in the steering
wheel, or change in its straight-ahead position.
Notice if your vehicle constantly turns slightly or “pulls” to one side when trav-
eling on smooth, level road.
When stopping, listen and check for unusual sounds, pulling to one side,
increased brake pedal travel or “hard-
to-push” brake pedal.
If any slipping or changes in the oper- ation of your transaxle occurs, check
the transaxle fluid level.
Check the automatic transaxle P (Park) function.
Check the parking brake.
Check for fluid leaks under your vehicle (water dripping from the air condition-
ing system during or after use is nor-mal).
At least monthly:
Check the coolant level in the enginecoolant reservoir.
Check the operation of all exterior lights, including the stoplights, turn sig-
nals and hazard warning flashers.
Check the inflation pressures of all tires including the spare.
At least twice a year
(i.e., every Spring and Fall):
Check the radiator, heater and air con- ditioning hoses for leaks or damage.
Check the windshield washer spray and wiper operation. Clean the wiper
blades with clean cloth dampened with
washer fluid.
Check the headlight alignment.
Check the muffler, exhaust pipes, shields and clamps.
Check the lap/shoulder belts for wear and function.
Check for worn tires and loose wheel lug nuts.
At least once a year:
Clean the body and door drain holes.
Lubricate the door hinges and checks,and hood hinges.
Lubricate the door and hood locks and latches.
Lubricate the door rubber weather- strips.
Check the air conditioning system.
Inspect and lubricate the automatic transaxle linkage and controls.
Clean the battery and terminals.
Check the brake/clutch* fluid level.
* : if equipped
Page 323 of 397
723
Maintenance
Check the condition and connections of all cooling system hoses and heater
hoses. Replace any swollen or deterio-
rated hoses.
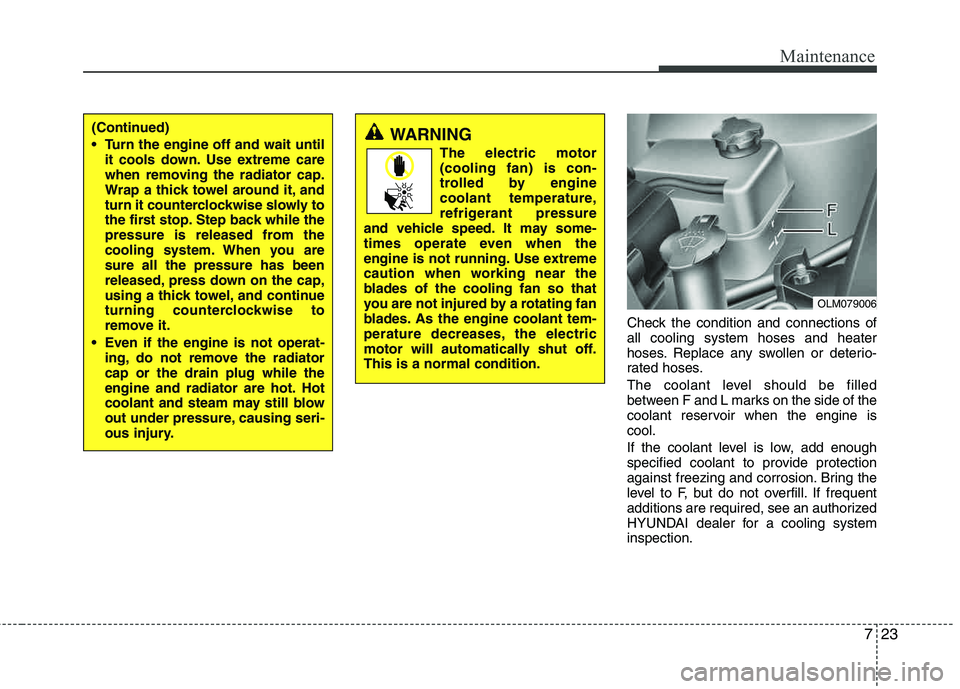
The coolant level should be filled
between F and L marks on the side of the
coolant reservoir when the engine iscool.
If the coolant level is low, add enough
specified coolant to provide protection
against freezing and corrosion. Bring the
level to F, but do not overfill. If frequent
additions are required, see an authorized
HYUNDAI dealer for a cooling systeminspection.
OLM079006
(Continued)
Turn the engine off and wait untilit cools down. Use extreme care
when removing the radiator cap.
Wrap a thick towel around it, and
turn it counterclockwise slowly to
the first stop. Step back while the
pressure is released from the
cooling system. When you are sure all the pressure has been
released, press down on the cap,
using a thick towel, and continue
turning counterclockwise to
remove it.
Even if the engine is not operat- ing, do not remove the radiator cap or the drain plug while the
engine and radiator are hot. Hot
coolant and steam may still blow
out under pressure, causing seri-
ous injury.WARNING
The electric motor (cooling fan) is con-
trolled by engine
coolant temperature,
refrigerant pressure
and vehicle speed. It may some-
times operate even when the
engine is not running. Use extreme
caution when working near the
blades of the cooling fan so that
you are not injured by a rotating fan
blades. As the engine coolant tem-
perature decreases, the electric
motor will automatically shut off. This is a normal condition.
Page 328 of 397
Maintenance
28
7
AIR CLEANER
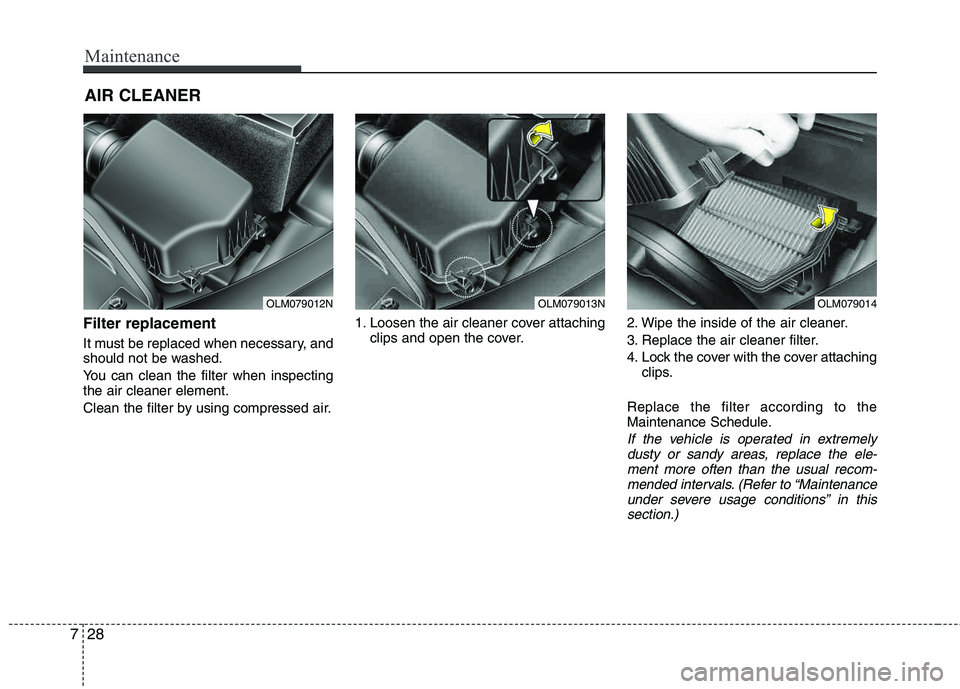
Filter replacement
It must be replaced when necessary, and
should not be washed.
You can clean the filter when inspecting the air cleaner element.
Clean the filter by using compressed air. 1. Loosen the air cleaner cover attaching
clips and open the cover. 2. Wipe the inside of the air cleaner.
3. Replace the air cleaner filter.
4. Lock the cover with the cover attaching
clips.
Replace the filter according to the
Maintenance Schedule.
If the vehicle is operated in extremely dusty or sandy areas, replace the ele- ment more often than the usual recom-
mended intervals. (Refer to “Maintenance under severe usage conditions” in thissection.)
OLM079012NOLM079013NOLM079014
Page 332 of 397
Maintenance
32
7
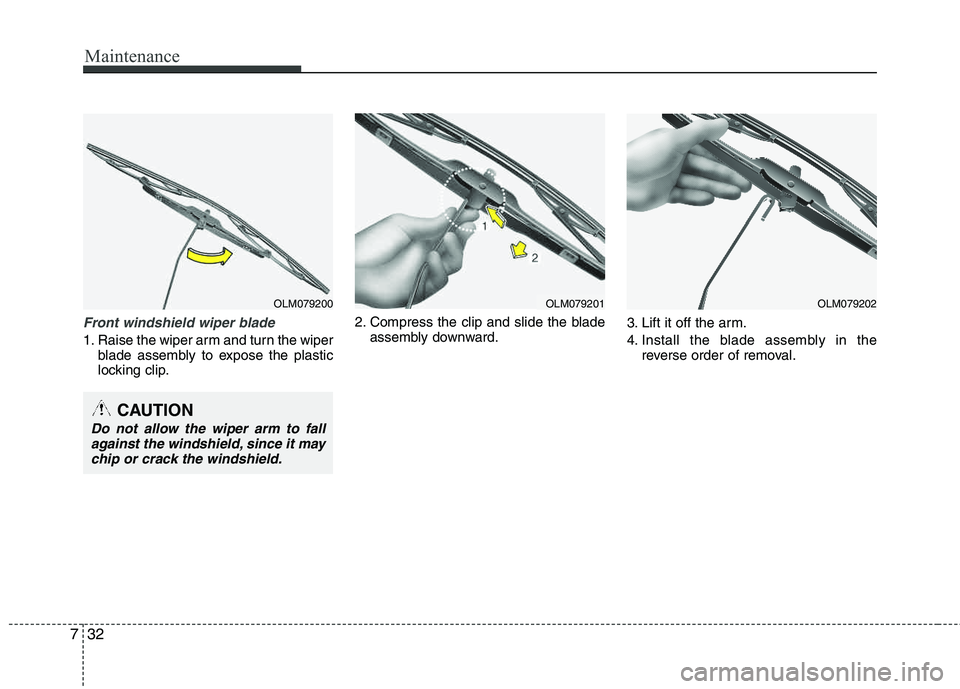
Front windshield wiper blade
1. Raise the wiper arm and turn the wiper
blade assembly to expose the plastic
locking clip. 2. Compress the clip and slide the blade
assembly downward. 3. Lift it off the arm.
4. Install the blade assembly in the
reverse order of removal.
CAUTION
Do not allow the wiper arm to fall
against the windshield, since it may
chip or crack the windshield.
OLM079200OLM079201OLM079202
Page 336 of 397
Maintenance
36
7
Reset items
Items should be reset after the battery
has been discharged or the battery has been disconnected.
Auto up/down window (See section 4)
Sunroof (See section 4)
Trip computer (See section 4)
Climate control system
(See section 4)
Clock (See section 4)
Audio (See section 4)(Continued)
Wear eye protection when check- ing the battery during charging.
Disconnect the battery charger in the following order.
1. Turn off the battery charger main switch.
2. Unhook the negative clamp from the negative battery terminal.
3. Unhook the positive clamp from the positive battery terminal.
WARNING
Before performing maintenance or recharging the battery, turn off all accessories and stop the
engine.
The negative battery cable must be removed first and installed
last when the battery is discon-nected.
Page 341 of 397
741
Maintenance
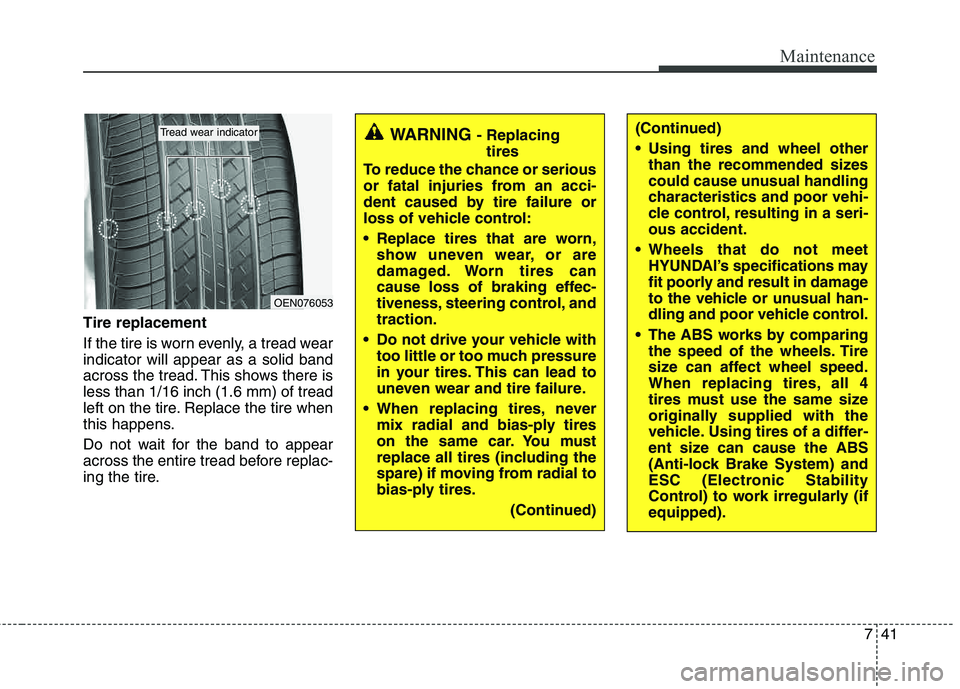
Tire replacement
If the tire is worn evenly, a tread wear indicator will appear as a solid band
across the tread. This shows there isless than 1/16 inch (1.6 mm) of tread
left on the tire. Replace the tire when
this happens.
Do not wait for the band to appear
across the entire tread before replac-
ing the tire.
OEN076053
Tread wear indicatorWARNING - Replacingtires
To reduce the chance or serious
or fatal injuries from an acci-
dent caused by tire failure or
loss of vehicle control:
Replace tires that are worn, show uneven wear, or are
damaged. Worn tires can
cause loss of braking effec-
tiveness, steering control, andtraction.
Do not drive your vehicle with too little or too much pressure
in your tires. This can lead to
uneven wear and tire failure.
When replacing tires, never mix radial and bias-ply tires
on the same car. You must
replace all tires (including the
spare) if moving from radial to
bias-ply tires.
(Continued)(Continued)
Using tires and wheel otherthan the recommended sizes
could cause unusual handling
characteristics and poor vehi-
cle control, resulting in a seri-ous accident.
Wheels that do not meet HYUNDAI’s specifications may
fit poorly and result in damage
to the vehicle or unusual han-
dling and poor vehicle control.
The ABS works by comparing the speed of the wheels. Tire
size can affect wheel speed.
When replacing tires, all 4
tires must use the same size
originally supplied with the
vehicle. Using tires of a differ-
ent size can cause the ABS
(Anti-lock Brake System) and
ESC (Electronic Stability
Control) to work irregularly (ifequipped).
Page 352 of 397
Maintenance
52
7
If the headlights or other electrical com-
ponents do not work and the fuses are
OK, check the fuse panel in the engine
compartment. If a fuse is blown, it mustbe replaced.
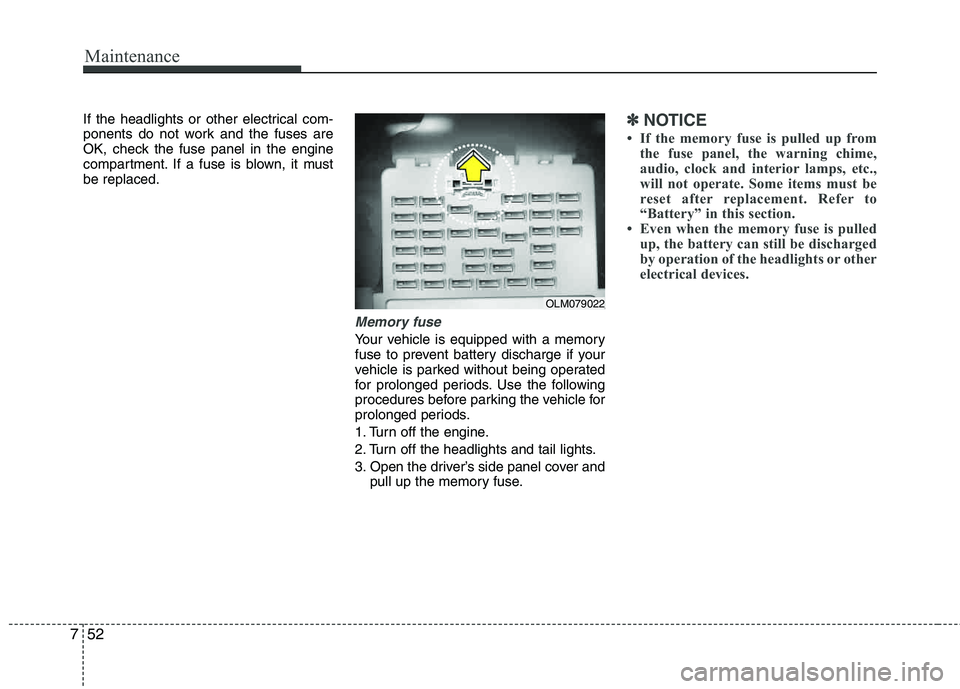
Memory fuse
Your vehicle is equipped with a memory
fuse to prevent battery discharge if your
vehicle is parked without being operated
for prolonged periods. Use the following
procedures before parking the vehicle for
prolonged periods.
1. Turn off the engine.
2. Turn off the headlights and tail lights.
3. Open the driver’s side panel cover and
pull up the memory fuse.
✽✽ NOTICE
If the memory fuse is pulled up from the fuse panel, the warning chime,
audio, clock and interior lamps, etc.,
will not operate. Some items must be
reset after replacement. Refer to
“Battery” in this section.
Even when the memory fuse is pulled
up, the battery can still be discharged
by operation of the headlights or other
electrical devices.
OLM079022
Page 356 of 397
Maintenance
56
7
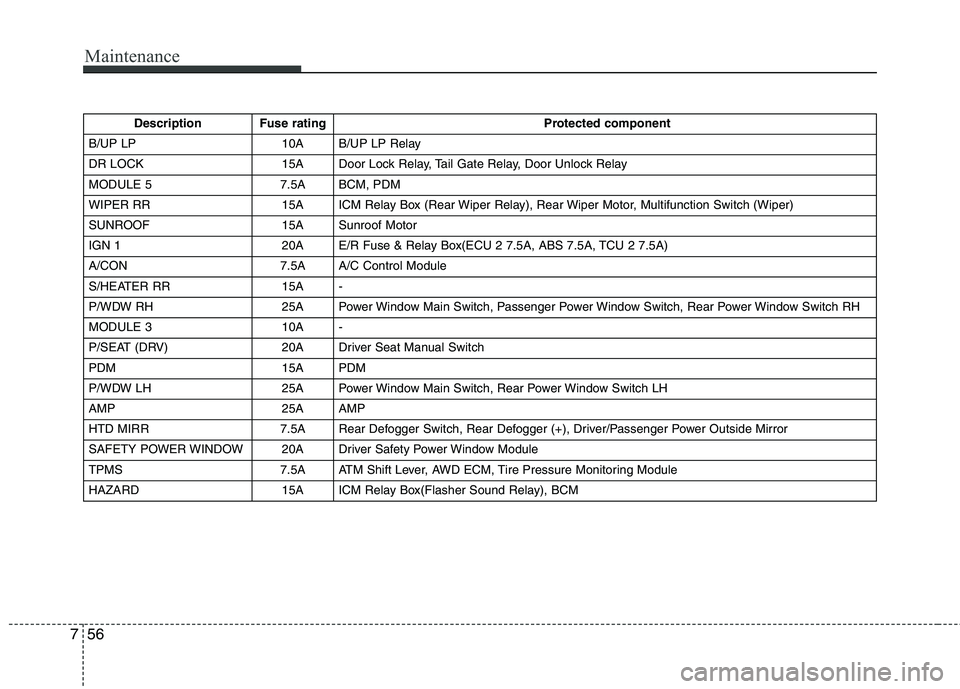
Description Fuse rating Protected component
B/UP LP 10A B/UP LP Relay
DR LOCK 15A Door Lock Relay, Tail Gate Relay, Door Unlock Relay
MODULE 5 7.5A BCM, PDM
WIPER RR 15A ICM Relay Box (Rear Wiper Relay), Rear Wiper Motor, Multifunction Switch (Wiper)
SUNROOF 15A Sunroof Motor
IGN 1 20A E/R Fuse & Relay Box(ECU 2 7.5A, ABS 7.5A, TCU 2 7.5A)
A/CON 7.5A A/C Control Module
S/HEATER RR 15A -
P/WDW RH 25A Power Window Main Switch, Passenger Power Window Switch, Rear Power Window Switch RH
MODULE 3 10A -
P/SEAT (DRV) 20A Driver Seat Manual Switch
PDM 15A PDM
P/WDW LH 25A Power Window Main Switch, Rear Power Window Switch LH
AMP 25A AMP
HTD MIRR 7.5A Rear Defogger Switch, Rear Defogger (+), Driver/Passenger Power Outside Mirror
SAFETY POWER WINDOW 20A Driver Safety Power Window Module
TPMS 7.5A ATM Shift Lever, AWD ECM, Tire Pressure Monitoring Module
HAZARD 15A ICM Relay Box(Flasher Sound Relay), BCM