fuse HYUNDAI TUCSON 2014 Owners Manual
[x] Cancel search | Manufacturer: HYUNDAI, Model Year: 2014, Model line: TUCSON, Model: HYUNDAI TUCSON 2014Pages: 542, PDF Size: 7.59 MB
Page 15 of 542
1-4
Your vehicle at a glance
IINN TTEERR IIOO RR OO VVEERR VV IIEE WW
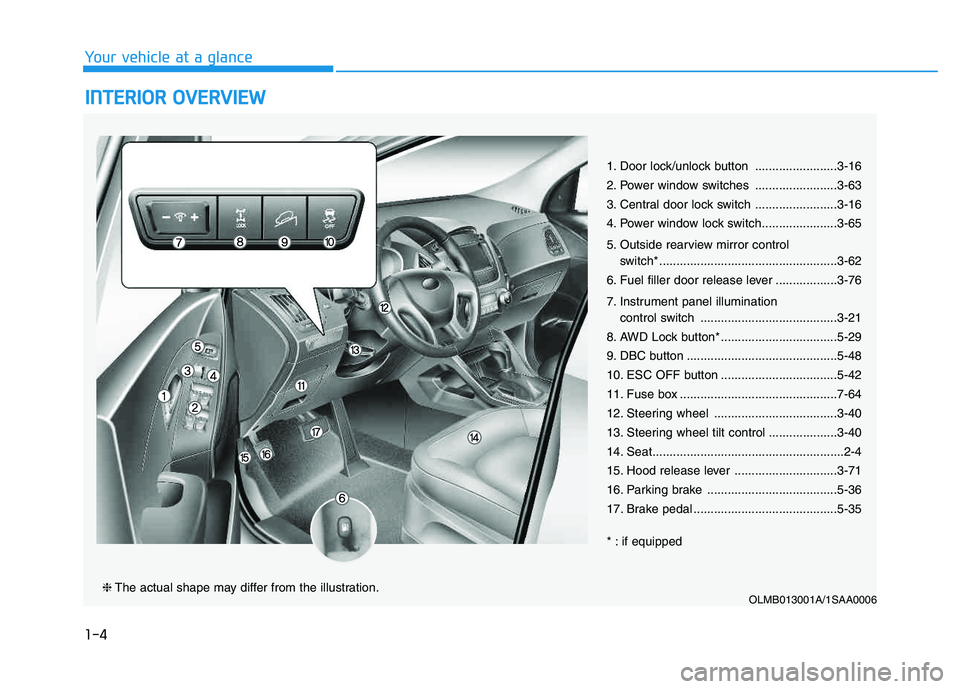
1. Door lock/unlock button ........................3-16
2. Power window switches ........................3-63
3. Central door lock switch ........................3-16
4. Power window lock switch......................3-65
5. Outside rearview mirror control
switch* ....................................................3-62
6. Fuel filler door release lever ..................3-76
7. Instrument panel illumination control switch ........................................3-21
8. AWD Lock button* ..................................5-29
9. DBC button ............................................5-48
10. ESC OFF button ..................................5-42
11. Fuse box ..............................................7-64
12. Steering wheel ....................................3-40
13. Steering wheel tilt control ....................3-40
14. Seat........................................................2-4
15. Hood release lever ..............................3-71
16. Parking brake ......................................5-36
17. Brake pedal ..........................................5-35
* : if equipped
OLMB013001A/1SAA0006❈ The actual shape may differ from the illustration.
Page 17 of 542
1-6
Your vehicle at a glance
EENN GGIINN EE CC OO MM PPAA RRTTMM EENN TT
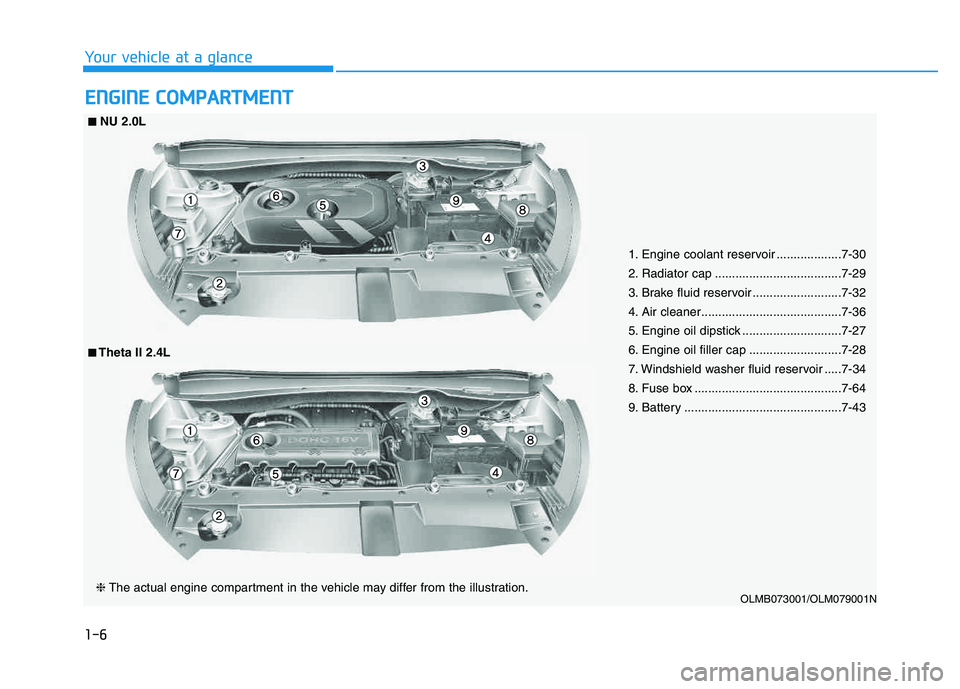
1. Engine coolant reservoir ...................7-30
2. Radiator cap .....................................7-29
3. Brake fluid reservoir ..........................7-32
4. Air cleaner.........................................7-36
5. Engine oil dipstick .............................7-27
6. Engine oil filler cap ...........................7-28
7. Windshield washer fluid reservoir .....7-34
8. Fuse box ...........................................7-64
9. Battery ..............................................7-43
OLMB073001/OLM079001N
■■NU 2.0L
❈ The actual engine compartment in the vehicle may differ from the illustration.
■■Theta II 2.4L
Page 152 of 542
3-66
Convenient features of your vehicle
Do not allow children to play
with the power windows. Keep
the driver’s door power window
lock switch in the LOCK position
(indicator illuminating). Serious
injury or death can result from
unintentional window operation
by a child.
WARNING
To prevent possible damage
to the power window system,
do not open or close two win-
dows or more at the same
time. This will also ensure the
longevity of the fuse.
Never try to operate the main
switch on the driver's door and
the individual door window
switch in opposing directions
at the same time. If this is
done, the window will stop and
cannot be opened or closed.
CAUTION
Page 155 of 542
3-69
Convenient features of your vehicle
3
✽✽NOTICE
After washing the vehicle or after a
rain, be sure to wipe off the water on
the sunroof before operating the
sunroof.
To reset the sunroof
If the battery has been discharged or disconnected, or if the related fusehas been replaced or disconnected,
reset the Sunroof as follows:
1. The ignition switch must be in the ON position.
2. Open the roller blind.
3. Close the sunroof completely.
4. Release the control lever.
5. Push the control lever forward until the sunroof tilts and slightly moves
up and down. Then, release the
lever.
6. Push the control lever forward until the sunroof is operated as follows:
TILT OPEN �SLIDE OPEN �
SLIDE CLOSE
Then, release the control lever.
If the sunroof does not operate prop-
erly after resetting, have the system
checked by an authorized HYUNDAI
dealer.
Periodically remove any dirt
that may accumulate on the
sunroof guide rail or between
the sunroof and roof panel,
which can make a noise.
Do not try to open the sunroof when the temperature is
below freezing or when the
sunroof is covered with snow
or ice, the motor could be
damaged. In cold and wet cli-
mates, the sunroof may not
work properly.
To prevent damage to the sun-
roof and the motor, do not
continue to press the sunroof
control lever after the sunroof
is in the fully open, closed ortilt position(s).
CAUTION
Make sure heads, other body
parts or other objects are
safely out of the way before
closing the sunroof to avoid
injuries or vehicle damage.
Never adjust the sunroof or
roller blind while driving. This
may cause loss of vehicle con-
trol resulting in an accident.
To avoid serious injury or
death, do not extend your
head, arms or body outside
the sunroof while driving.
WARNING
Page 207 of 542
3-121
Convenient features of your vehicle
3
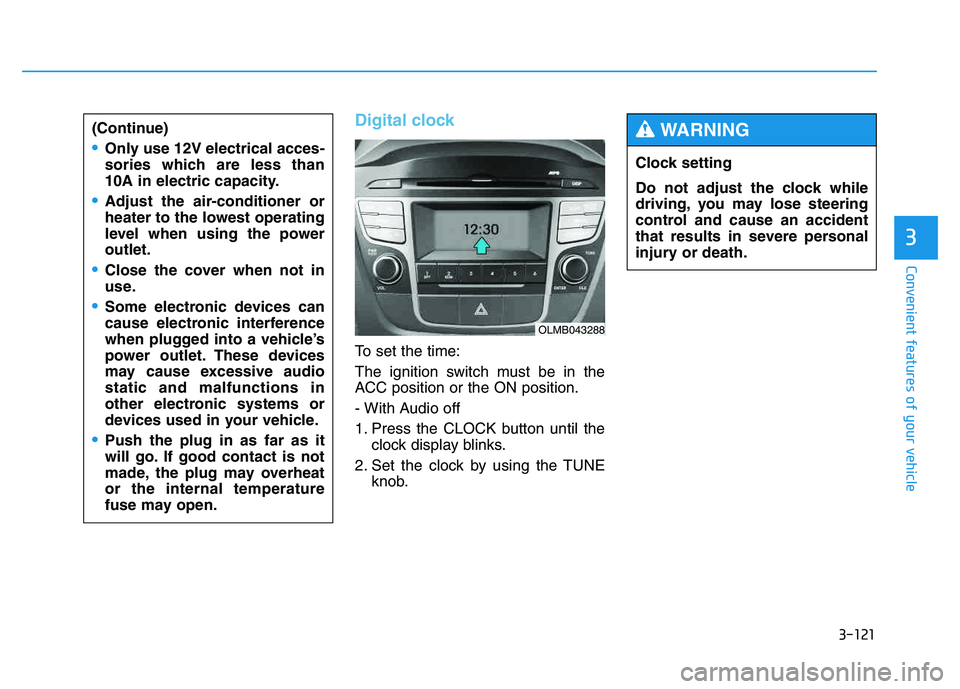
Digital clock
To set the time:
The ignition switch must be in the
ACC position or the ON position.
- With Audio off
1. Press the CLOCK button until theclock display blinks.
2. Set the clock by using the TUNE knob.
(Continue)
Only use 12V electrical acces-
sories which are less than
10A in electric capacity.
Adjust the air-conditioner or
heater to the lowest operating
level when using the poweroutlet.
Close the cover when not in
use.
Some electronic devices can
cause electronic interference
when plugged into a vehicle’s
power outlet. These devices
may cause excessive audiostatic and malfunctions in
other electronic systems or
devices used in your vehicle.
Push the plug in as far as it
will go. If good contact is not
made, the plug may overheator the internal temperature
fuse may open.
OLMB043288
Clock setting
Do not adjust the clock while
driving, you may lose steering
control and cause an accident
that results in severe personal
injury or death.
WARNING
Page 348 of 542
5-12
Driving your vehicle
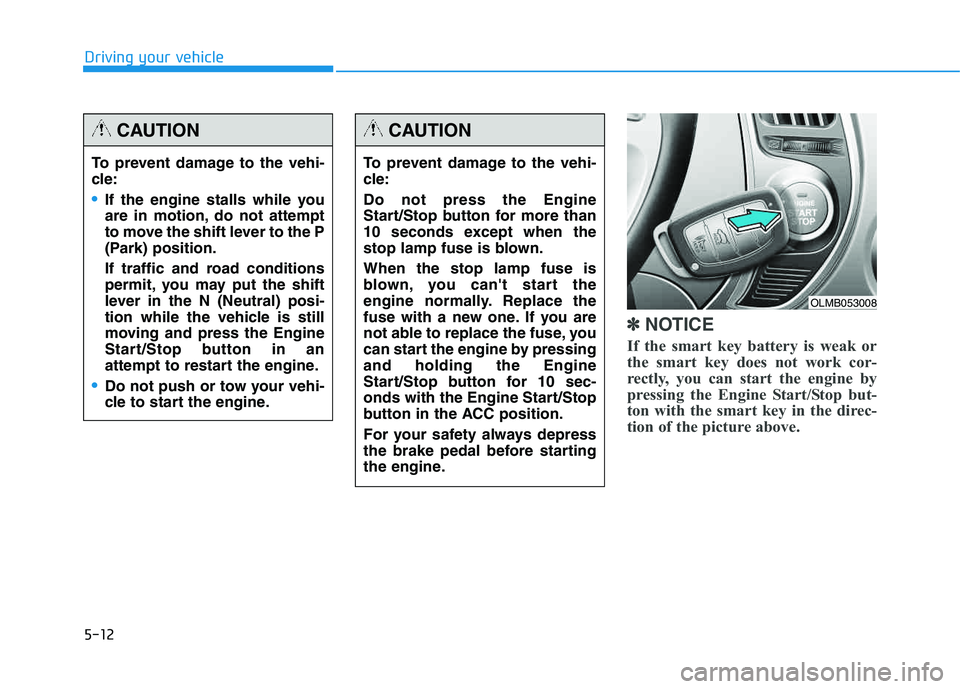
✽✽NOTICE
If the smart key battery is weak or
the smart key does not work cor-
rectly, you can start the engine by
pressing the Engine Start/Stop but-
ton with the smart key in the direc-
tion of the picture above.
To prevent damage to the vehi-
cle:
If the engine stalls while you
are in motion, do not attempt
to move the shift lever to the P
(Park) position.
If traffic and road conditions
permit, you may put the shift
lever in the N (Neutral) posi-
tion while the vehicle is still
moving and press the Engine
Start/Stop button in an
attempt to restart the engine.
Do not push or tow your vehi-
cle to start the engine.
CAUTION
To prevent damage to the vehi-
cle: Do not press the Engine
Start/Stop button for more than
10 seconds except when the
stop lamp fuse is blown. When the stop lamp fuse is
blown, you can't start the
engine normally. Replace the
fuse with a new one. If you are
not able to replace the fuse, you
can start the engine by pressingand holding the Engine
Start/Stop button for 10 sec-
onds with the Engine Start/Stop
button in the ACC position.
For your safety always depress
the brake pedal before starting
the engine.
CAUTION
OLMB053008
Page 432 of 542
7
Snow tires .........................................................................7-60
Radial-ply tires ................................................................7-61
Low aspect ratio tires ....................................................7-61
FUSES ....................................................................7-63
Instrument panel fuse replacement ...........................7-64
Memory fuse (SHUNT connector) ..............................7-65
Engine compartment panel fuse replacement.........7-66
Fuse/Relay panel description ......................................7-68
LIGHT BULBS ........................................................7-74
Headlight, parking light, turn signal light,
side marker and front fog light bulb replacement ..7-74Side repeater light replacement ..................................7-77
Rear combination light bulb replacement .................7-78
High mounted stop light ................................................7-80
License plate light bulb replacement .........................7-81
Interior light bulb replacement ....................................7-82
APPEARANCE CARE.............................................7-83
Exterior care ....................................................................7-83
Interior care......................................................................7-88
EMISSION CONTROL SYSTEM............................7-90
CALIFORNIA PERCHLORATE NOTICE ................7-94
Page 433 of 542
7-3
7
Maintenance
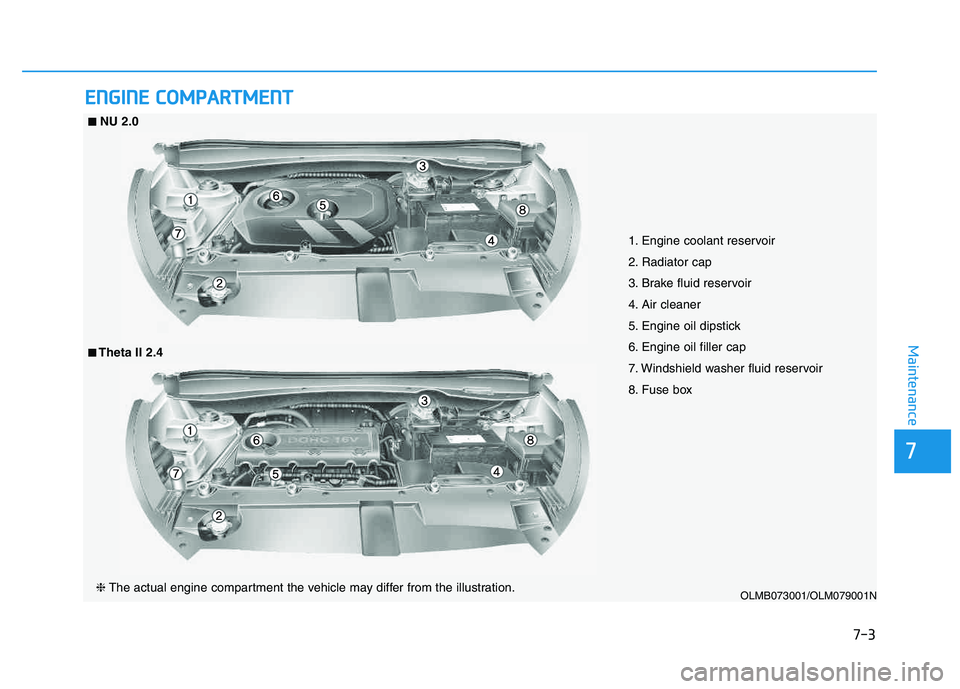
EENN GGIINN EE CC OO MM PPAA RRTTMM EENN TT
1. Engine coolant reservoir
2. Radiator cap
3. Brake fluid reservoir
4. Air cleaner
5. Engine oil dipstick
6. Engine oil filler cap
7. Windshield washer fluid reservoir
8. Fuse box
OLMB073001/OLM079001N
■■NU 2.0
❈ The actual engine compartment the vehicle may differ from the illustration.
■■Theta II 2.4
Page 493 of 542
7-63
7
Maintenance
FFUU SSEE SS
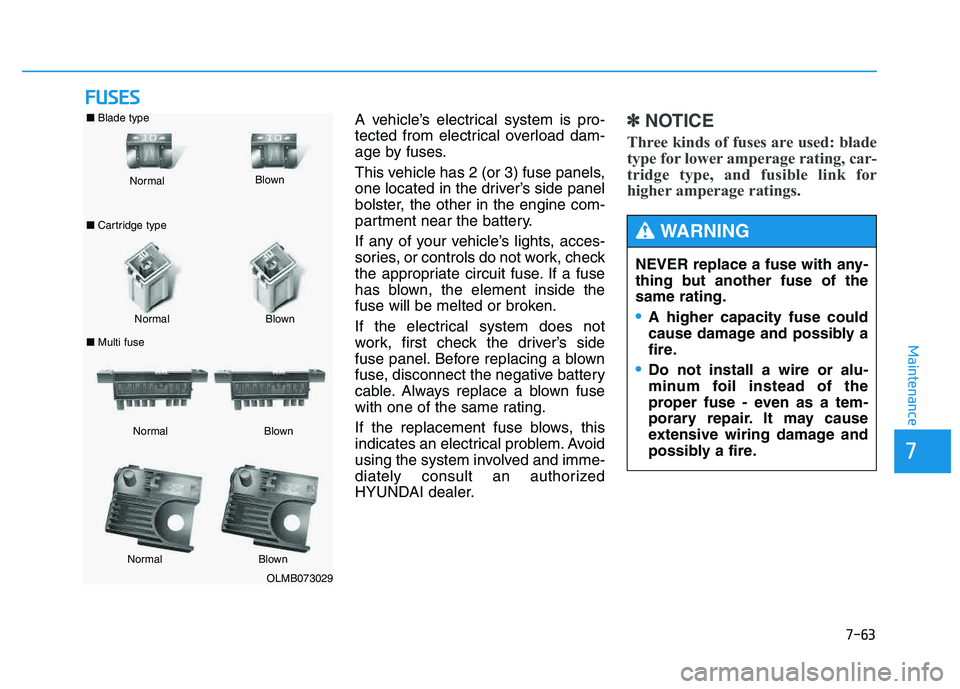
A vehicle’s electrical system is pro-
tected from electrical overload dam-
age by fuses.
This vehicle has 2 (or 3) fuse panels,
one located in the driver’s side panel
bolster, the other in the engine com-
partment near the battery.
If any of your vehicle’s lights, acces-
sories, or controls do not work, check
the appropriate circuit fuse. If a fuse
has blown, the element inside the
fuse will be melted or broken.
If the electrical system does not
work, first check the driver’s side
fuse panel. Before replacing a blown
fuse, disconnect the negative battery
cable. Always replace a blown fuse
with one of the same rating.
If the replacement fuse blows, this
indicates an electrical problem. Avoid
using the system involved and imme-
diately consult an authorized
HYUNDAI dealer.✽✽
NOTICE
Three kinds of fuses are used: blade
type for lower amperage rating, car-
tridge type, and fusible link for
higher amperage ratings.
NEVER replace a fuse with any-
thing but another fuse of thesame rating.
A higher capacity fuse could
cause damage and possibly a
fire.
Do not install a wire or alu-
minum foil instead of the
proper fuse - even as a tem-
porary repair. It may cause
extensive wiring damage and
possibly a fire.
WARNING
OLMB073029
Normal
Normal
■
Blade type
■ Cartridge type
■ Multi fuse Blown
Blown
Normal Blown
Normal Blown
Page 494 of 542
7-64
Maintenance
Instrument panel fuse replace- ment
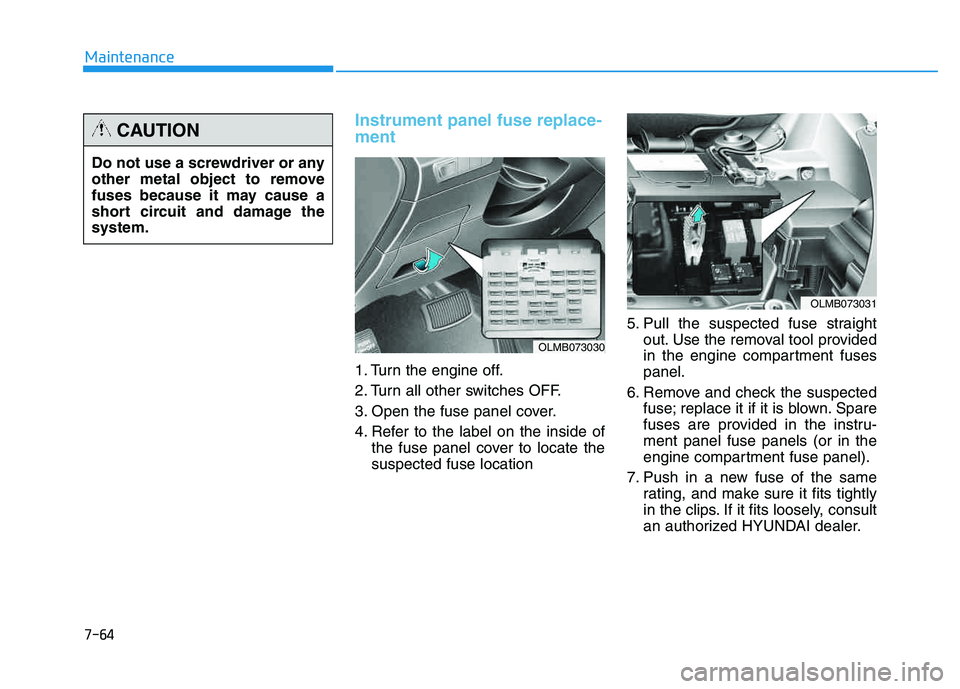
1. Turn the engine off.
2. Turn all other switches OFF.
3. Open the fuse panel cover.
4. Refer to the label on the inside ofthe fuse panel cover to locate the suspected fuse location 5. Pull the suspected fuse straight
out. Use the removal tool provided
in the engine compartment fusespanel.
6. Remove and check the suspected fuse; replace it if it is blown. Spare
fuses are provided in the instru-ment panel fuse panels (or in the
engine compartment fuse panel).
7. Push in a new fuse of the same rating, and make sure it fits tightly
in the clips. If it fits loosely, consult
an authorized HYUNDAI dealer.
Do not use a screwdriver or any
other metal object to remove
fuses because it may cause a
short circuit and damage thesystem.
CAUTION
OLMB073031
OLMB073030