screw Hyundai Tucson 2019 Owner's Manual
[x] Cancel search | Manufacturer: HYUNDAI, Model Year: 2019, Model line: Tucson, Model: Hyundai Tucson 2019Pages: 546, PDF Size: 61.38 MB
Page 110 of 546
3-19
Convenient features of your vehicle
3
Auto UNLOCK - Enable on Shift
When this feature is set in the LCD
cluster display, all the doors will be
unlocked automatically when the
vehicle is shifted back into P (Park).
For more information on these
features, refer to the LCD Display
section later in this chapter.
Child-Protector Rear Door locks
The child safety lock is provided to
help prevent children seated in the
rear from accidentally opening the
rear doors. The rear door safety locks
should be used whenever children
are in the vehicle.
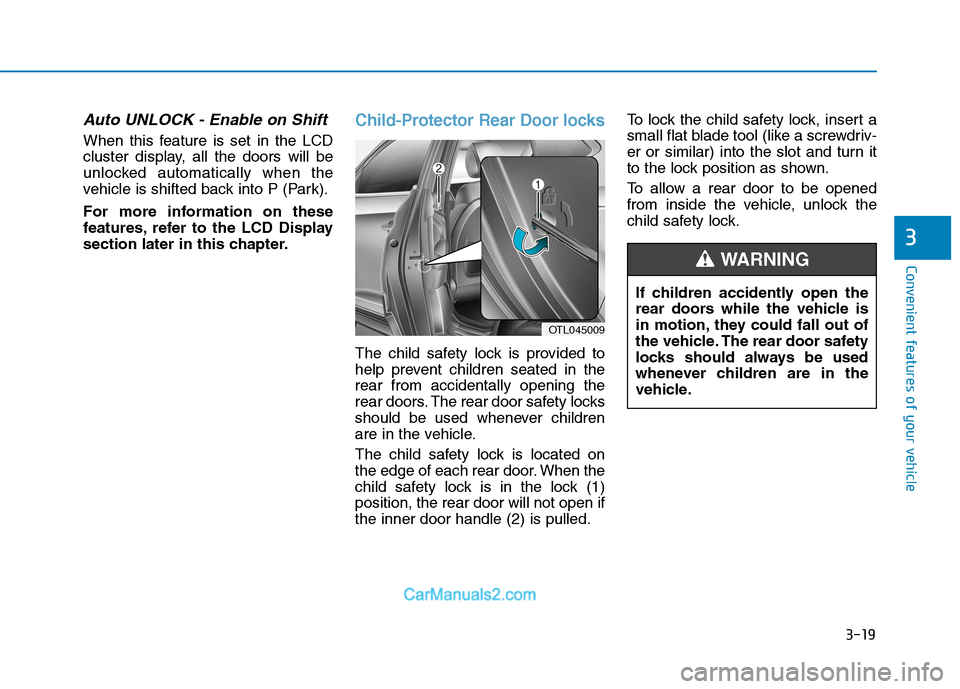
The child safety lock is located on
the edge of each rear door. When the
child safety lock is in the lock (1)
position, the rear door will not open if
the inner door handle (2) is pulled.To lock the child safety lock, insert a
small flat blade tool (like a screwdriv-
er or similar) into the slot and turn it
to the lock position as shown.
To allow a rear door to be opened
from inside the vehicle, unlock the
child safety lock.
If children accidently open the
rear doors while the vehicle is
in motion, they could fall out of
the vehicle. The rear door safety
locks should always be used
whenever children are in the
vehicle.
WARNING
OTL045009
Page 284 of 546
5-18
Shift-Lock System
For your safety, the automatic trans-
mission has a shift-lock system
which prevents shifting the transmis-
sion from P (Park) into R (Reverse)
unless the brake pedal is depressed.
To shift the transmission from P
(Park) into R (Reverse):
1. Depress and hold the brake pedal.
2. Start the engine or place the igni-
tion switch in the ON position.
3. Move the shift lever.
Shift-Lock Release
If the shift lever cannot be moved from
the P (Park) position into R (Reverse)
position with the brake pedal
depressed, continue depressing the
brake, and then do the following:
1. Place the ignition switch in the
LOCK/OFF position.
2. Apply the parking brake.
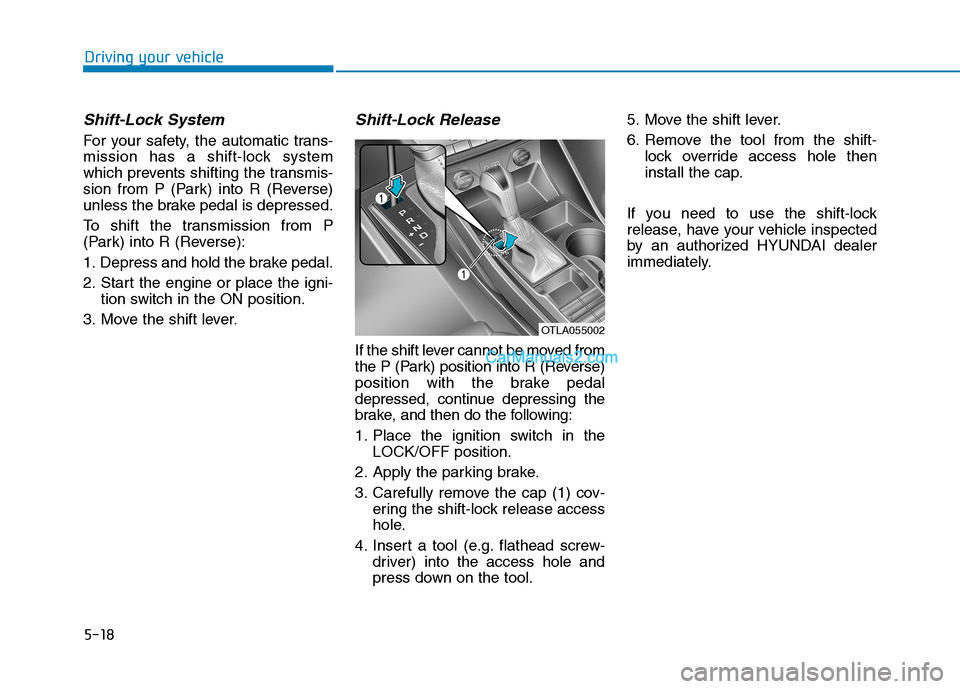
3. Carefully remove the cap (1) cov-
ering the shift-lock release access
hole.
4. Insert a tool (e.g. flathead screw-
driver) into the access hole and
press down on the tool.5. Move the shift lever.
6. Remove the tool from the shift-
lock override access hole then
install the cap.
If you need to use the shift-lock
release, have your vehicle inspected
by an authorized HYUNDAI dealer
immediately.
Driving your vehicle
OTLA055002
Page 485 of 546
7-51
7
Maintenance
F FU
US
SE
ES
S
A vehicle’s electrical system is pro-
tected from electrical overload dam-
age by fuses.
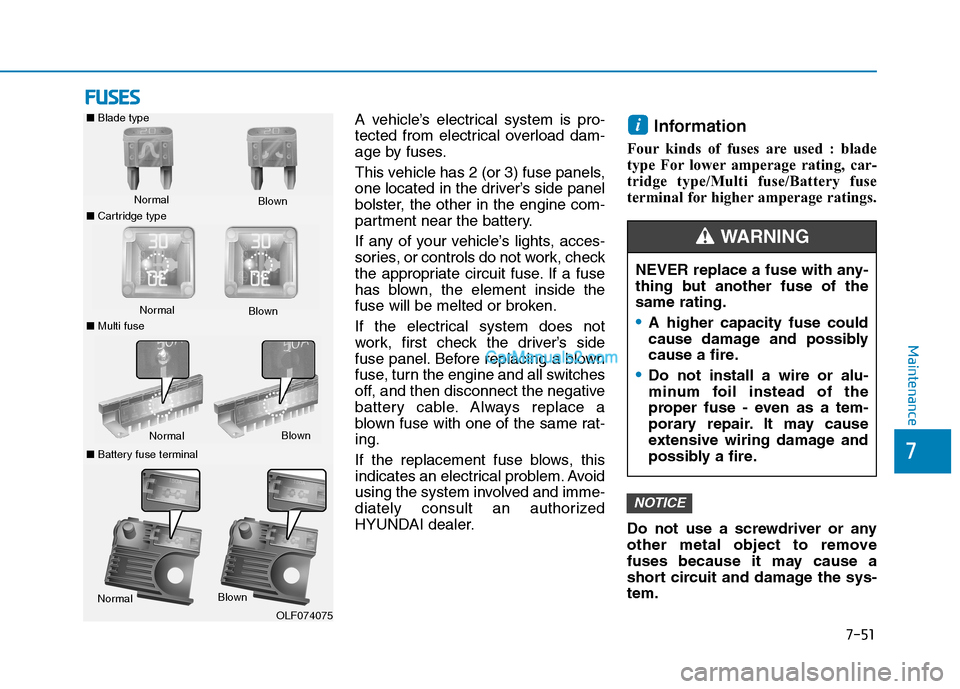
This vehicle has 2 (or 3) fuse panels,
one located in the driver’s side panel
bolster, the other in the engine com-
partment near the battery.
If any of your vehicle’s lights, acces-
sories, or controls do not work, check
the appropriate circuit fuse. If a fuse
has blown, the element inside the
fuse will be melted or broken.
If the electrical system does not
work, first check the driver’s side
fuse panel. Before replacing a blown
fuse, turn the engine and all switches
off, and then disconnect the negative
battery cable. Always replace a
blown fuse with one of the same rat-
ing.
If the replacement fuse blows, this
indicates an electrical problem. Avoid
using the system involved and imme-
diately consult an authorized
HYUNDAI dealer.Information
Four kinds of fuses are used : blade
type For lower amperage rating, car-
tridge type/Multi fuse/Battery fuse
terminal for higher amperage ratings.
Do not use a screwdriver or any
other metal object to remove
fuses because it may cause a
short circuit and damage the sys-
tem.
NOTICE
i
NEVER replace a fuse with any-
thing but another fuse of the
same rating.
A higher capacity fuse could
cause damage and possibly
cause a fire.
Do not install a wire or alu-
minum foil instead of the
proper fuse - even as a tem-
porary repair. It may cause
extensive wiring damage and
possibly a fire.
WARNING
■Blade type
Normal
■Cartridge typeBlown
Normal
Blown
■Multi fuse
NormalBlown
■Battery fuse terminal
NormalBlown
OLF074075
Page 504 of 546
7-70
Maintenance
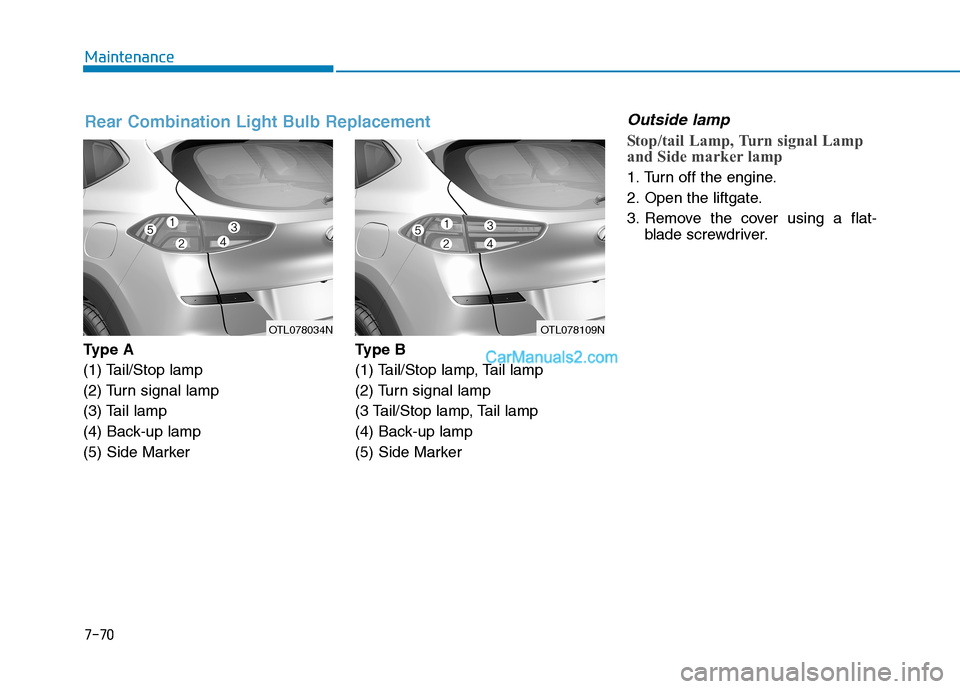
Ty p e A
(1) Tail/Stop lamp
(2) Turn signal lamp
(3) Tail lamp
(4) Back-up lamp
(5) Side MarkerType B
(1) Tail/Stop lamp, Tail lamp
(2) Turn signal lamp
(3 Tail/Stop lamp, Tail lamp
(4) Back-up lamp
(5) Side Marker
Outside lamp
Stop/tail Lamp, Turn signal Lamp
and Side marker lamp
1. Turn off the engine.
2. Open the liftgate.
3. Remove the cover using a flat-
blade screwdriver.
OTL078034N OTL078109N
Rear Combination Light Bulb Replacement
Page 505 of 546
![Hyundai Tucson 2019 Owners Manual 7-71
7
Maintenance
4. Loosen the lamp assembly retain-
ing screws with a cross-tip screw-
driver.
5. Remove the rear combination
lamp assembly from the body of
the vehicle.
[A] : Tail/Stop lamp, [B] : Hyundai Tucson 2019 Owners Manual 7-71
7
Maintenance
4. Loosen the lamp assembly retain-
ing screws with a cross-tip screw-
driver.
5. Remove the rear combination
lamp assembly from the body of
the vehicle.
[A] : Tail/Stop lamp, [B] :](/img/35/19694/w960_19694-504.png)
7-71
7
Maintenance
4. Loosen the lamp assembly retain-
ing screws with a cross-tip screw-
driver.
5. Remove the rear combination
lamp assembly from the body of
the vehicle.
[A] : Tail/Stop lamp, [B] : Turn signal lamp,
[C] : Side marker
6. Remove the socket from the
assembly by turning the socket
counterclockwise until the tabs on
the socket align with the slots on
the assembly.
7. Remove the bulb from the socket
by pressing it in and rotating it
counterclockwise until the tabs on
the bulb align with the slots in the
socket. Pull the bulb out of the
socket.
8. Insert a new bulb by inserting it
into the socket and rotating it until
it locks into place.9. Install the socket in the assembly
by aligning the tabs on the socket
with the slots in the assembly.
Push the socket into the assembly
and turn the socket clockwise.
10. Reinstall the lamp assembly to
the body of the vehicle.
Tail lamp, Tail/Stop lamp and Side
marker
If the LED lamp does not operate,
have the system checked by an
authorized HYUNDAI dealer.
The LED lamps cannot replaced as a
single unit because it is an integrated
unit. The LED lamps has to be
replaced with the unit.
A skilled technician should check or
repair the LED lamp, for it may dam-
age related parts of the vehicle.OTL078037NOTL075035
OTL075036
Page 506 of 546
7-72
Maintenance
Inside lamp
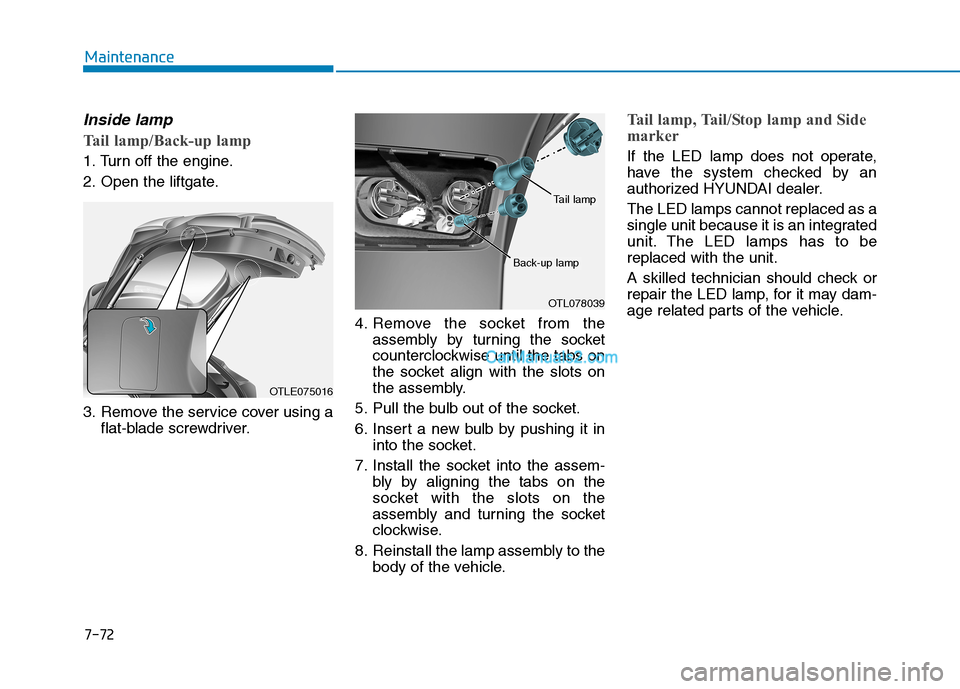
Tail lamp/Back-up lamp
1. Turn off the engine.
2. Open the liftgate.
3. Remove the service cover using a
flat-blade screwdriver.4. Remove the socket from the
assembly by turning the socket
counterclockwise until the tabs on
the socket align with the slots on
the assembly.
5. Pull the bulb out of the socket.
6. Insert a new bulb by pushing it in
into the socket.
7. Install the socket into the assem-
bly by aligning the tabs on the
socket with the slots on the
assembly and turning the socket
clockwise.
8. Reinstall the lamp assembly to the
body of the vehicle.
Tail lamp, Tail/Stop lamp and Side
marker
If the LED lamp does not operate,
have the system checked by an
authorized HYUNDAI dealer.
The LED lamps cannot replaced as a
single unit because it is an integrated
unit. The LED lamps has to be
replaced with the unit.
A skilled technician should check or
repair the LED lamp, for it may dam-
age related parts of the vehicle.
OTLE075016
OTL078039
Tail lamp
Back-up lamp
Page 507 of 546
7-73
7
Maintenance
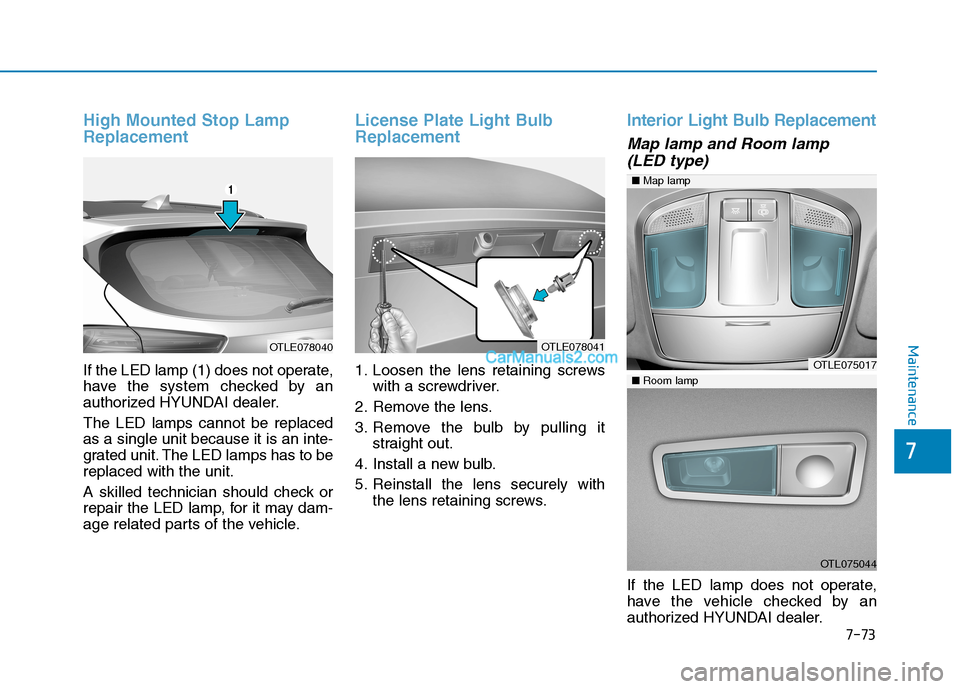
High Mounted Stop Lamp
Replacement
If the LED lamp (1) does not operate,
have the system checked by an
authorized HYUNDAI dealer.
The LED lamps cannot be replaced
as a single unit because it is an inte-
grated unit. The LED lamps has to be
replaced with the unit.
A skilled technician should check or
repair the LED lamp, for it may dam-
age related parts of the vehicle.
License Plate Light Bulb
Replacement
1. Loosen the lens retaining screws
with a screwdriver.
2. Remove the lens.
3. Remove the bulb by pulling it
straight out.
4. Install a new bulb.
5. Reinstall the lens securely with
the lens retaining screws.
Interior Light Bulb Replacement
Map lamp and Room lamp
(LED type)
If the LED lamp does not operate,
have the vehicle checked by an
authorized HYUNDAI dealer.
OTLE078040OTLE078041
OTLE075017
OTL075044
■Room lamp
■Map lamp
Page 508 of 546
7-74
Maintenance
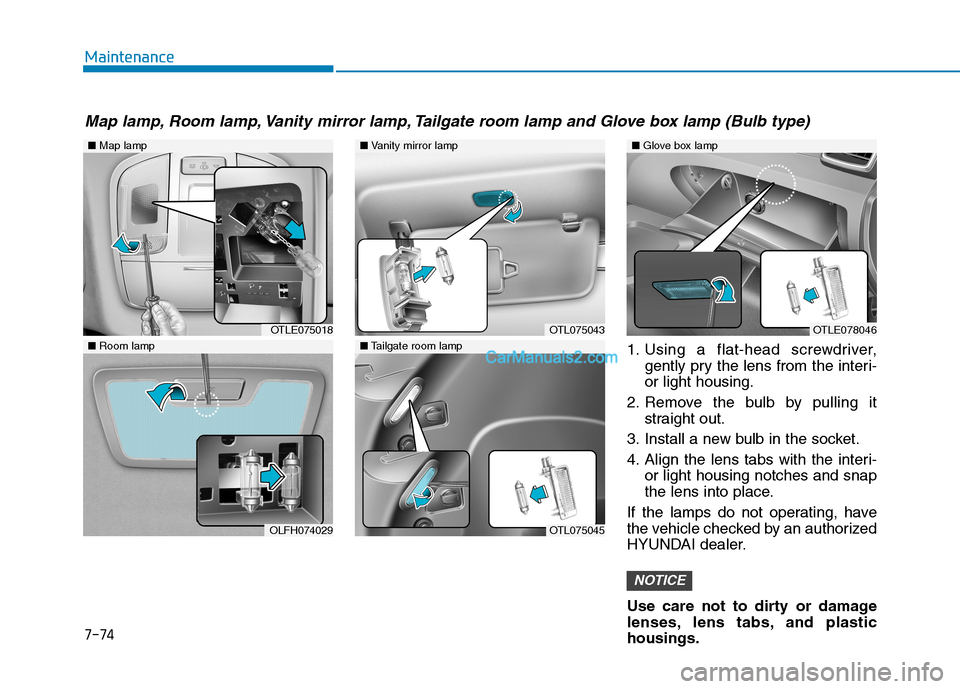
1. Using a flat-head screwdriver,
gently pry the lens from the interi-
or light housing.
2. Remove the bulb by pulling it
straight out.
3. Install a new bulb in the socket.
4. Align the lens tabs with the interi-
or light housing notches and snap
the lens into place.
If the lamps do not operating, have
the vehicle checked by an authorized
HYUNDAI dealer.
Use care not to dirty or damage
lenses, lens tabs, and plastic
housings.
NOTICE
Map lamp, Room lamp, Vanity mirror lamp, Tailgate room lamp and Glove box lamp (Bulb type)
■Map lamp
OTLE075018
OLFH074029
■Vanity mirror lamp
■Tailgate room lamp
OTL075043
OTL075045
■Room lamp
OTLE078046
■Glove box lamp