mirror Hyundai Tucson 2020 Owner's Manual - RHD (UK, Australia)
[x] Cancel search | Manufacturer: HYUNDAI, Model Year: 2020, Model line: Tucson, Model: Hyundai Tucson 2020Pages: 637, PDF Size: 64.45 MB
Page 15 of 637
1-2
E EX
XT
TE
ER
RI
IO
OR
R
O
OV
VE
ER
RV
VI
IE
EW
W
(
(I
I)
)
Your vehicle at a glance
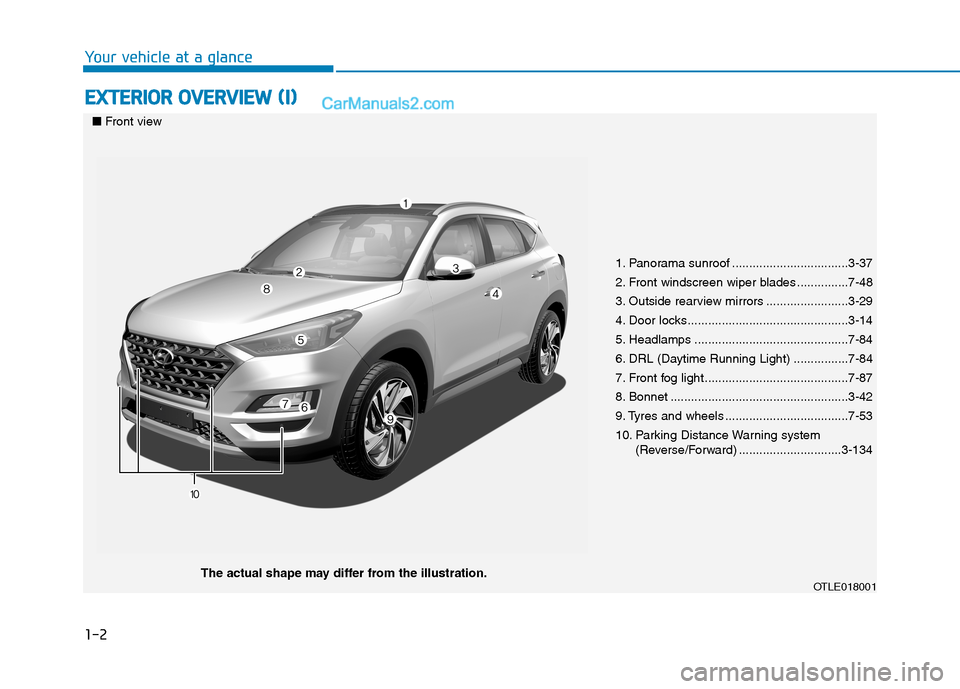
1. Panorama sunroof ..................................3-37
2. Front windscreen wiper blades ...............7-48
3. Outside rearview mirrors ........................3-29
4. Door locks...............................................3-14
5. Headlamps .............................................7-84
6. DRL (Daytime Running Light) ................7-84
7. Front fog light ..........................................7-87
8. Bonnet ....................................................3-42
9. Tyres and wheels ....................................7-53
10. Parking Distance Warning system
(Reverse/Forward) ..............................3-134
OTLE018001
■Front view
The actual shape may differ from the illustration.
Page 17 of 637
1-4
Your vehicle at a glance
I IN
NT
TE
ER
RI
IO
OR
R
O
OV
VE
ER
RV
VI
IE
EW
W
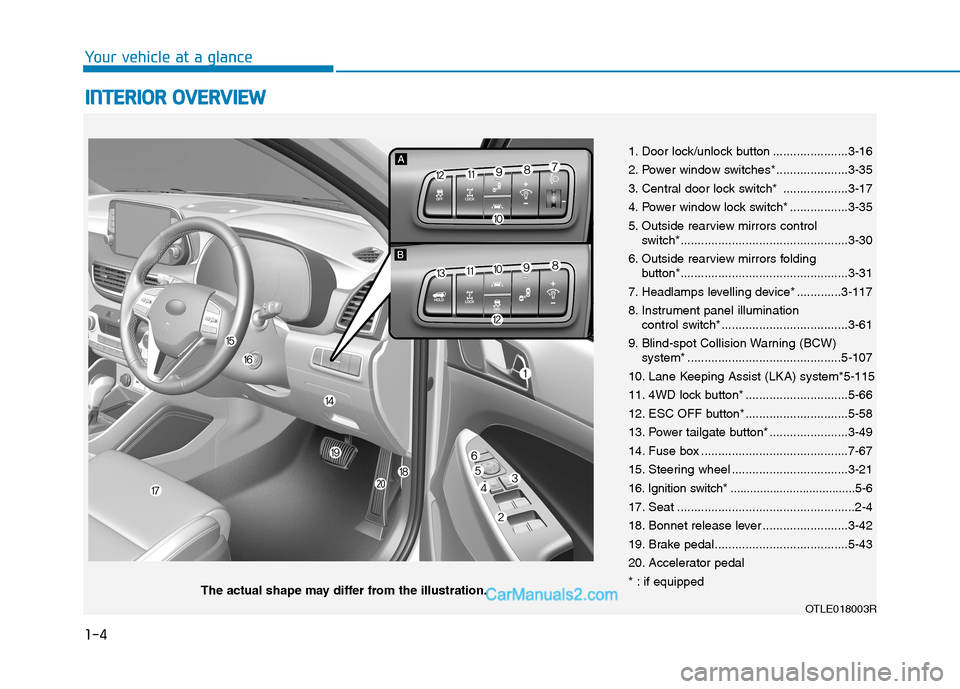
1. Door lock/unlock button ......................3-16
2. Power window switches*.....................3-35
3. Central door lock switch* ...................3-17
4. Power window lock switch* .................3-35
5. Outside rearview mirrors control
switch*.................................................3-30
6. Outside rearview mirrors folding
button*.................................................3-31
7. Headlamps levelling device* .............3-117
8. Instrument panel illumination
control switch*.....................................3-61
9. Blind-spot Collision Warning (BCW)
system* .............................................5-107
10. Lane Keeping Assist (LKA) system*5-115
11. 4WD lock button* ..............................5-66
12. ESC OFF button* ..............................5-58
13. Power tailgate button* .......................3-49
14. Fuse box ...........................................7-67
15. Steering wheel ..................................3-21
16. Ignition switch* ......................................5-6
17. Seat ....................................................2-4
18. Bonnet release lever .........................3-42
19. Brake pedal.......................................5-43
20. Accelerator pedal
* : if equipped
OTLE018003R
The actual shape may differ from the illustration.
Page 70 of 637
2-49
Safety system of your vehicle
2
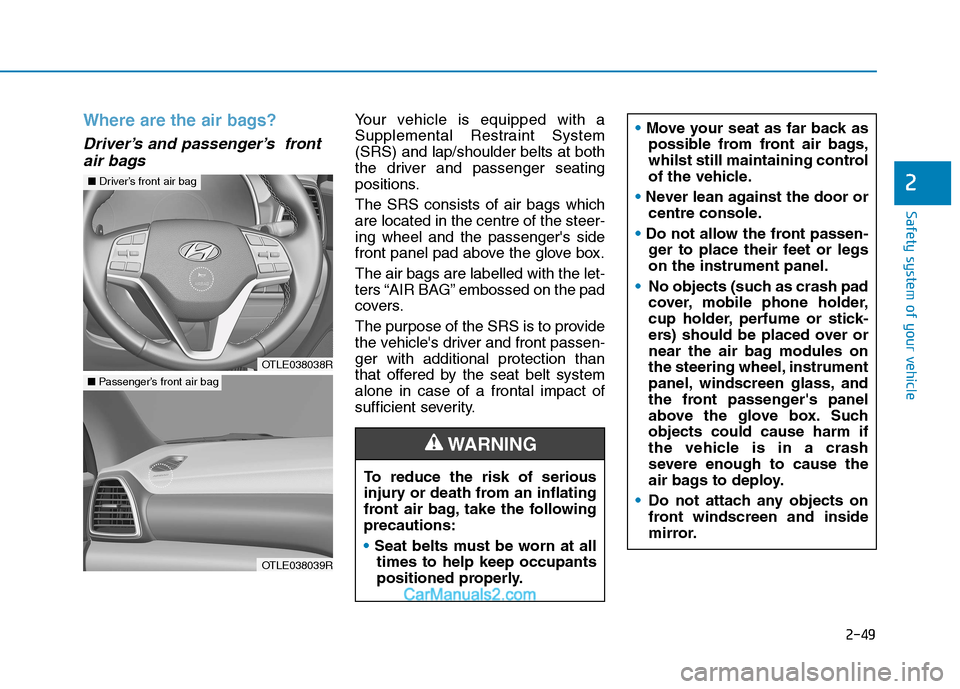
Where are the air bags?
Driver’s and passenger’s front
air bags
Your vehicle is equipped with a
Supplemental Restraint System
(SRS) and lap/shoulder belts at both
the driver and passenger seating
positions.
The SRS consists of air bags which
are located in the centre of the steer-
ing wheel and the passenger's side
front panel pad above the glove box.
The air bags are labelled with the let-
ters “AIR BAG” embossed on the pad
covers.
The purpose of the SRS is to provide
the vehicle's driver and front passen-
ger with additional protection than
that offered by the seat belt system
alone in case of a frontal impact of
sufficient severity.
To reduce the risk of serious
injury or death from an inflating
front air bag, take the following
precautions:
Seat belts must be worn at all
times to help keep occupants
positioned properly.
WARNING
Move your seat as far back as
possible from front air bags,
whilst still maintaining control
of the vehicle.
Never lean against the door or
centre console.
Do not allow the front passen-
ger to place their feet or legs
on the instrument panel.
No objects (such as crash pad
cover, mobile phone holder,
cup holder, perfume or stick-
ers) should be placed over or
near the air bag modules on
the steering wheel, instrument
panel, windscreen glass, and
the front passenger's panel
above the glove box. Such
objects could cause harm if
the vehicle is in a crash
severe enough to cause the
air bags to deploy.
Do not attach any objects on
front windscreen and inside
mirror.
OTLE038038R
■Driver’s front air bag
OTLE038039R
■Passenger’s front air bag
Page 87 of 637
Convenient features of your vehicle
3
Accessing your vehicle .........................................3-4
Remote key .........................................................................3-4
Smart key ............................................................................3-8
Immobiliser system .........................................................3-13
Door locks .............................................................3-14
Operating door locks from outside the vehicle ......3-14
Operating door locks from inside the vehicle .........3-16
Auto door lock/unlock features..................................3-18
Child-protector rear door locks ..................................3-19
Theft-alarm system.............................................3-20
Steering wheel......................................................3-21
Electric power steering (EPS) ......................................3-21
Tilt steering / Telescope steering...............................3-22
Heated steering wheel ...................................................3-23
Horn ....................................................................................3-23
Mirrors ...................................................................3-24
Inside rearview mirror....................................................3-24
Outside rearview mirrors ..............................................3-29
Windows ................................................................3-32
Power windows ................................................................3-32
Panorama sunroof ...............................................3-37
Sunshade ...........................................................................3-38
Sliding the sunroof .........................................................3-38
Tilting the sunroof ..........................................................3-39
Closing the sunroof ........................................................3-40
Resetting the sunroof ....................................................3-41
Sunroof open warning ...................................................3-41
Exterior features .................................................3-42
Bonnet................................................................................3-42
Fuel filler door .................................................................3-44
Tailgate ..................................................................3-47
Non-power tailgate ........................................................3-47
Power tailgate ..................................................................3-49
Smart tailgate ...................................................................3-55
Instrument cluster................................................3-59
Instrument cluster control ............................................3-61
Gauges ...............................................................................3-61
Distance to empty ...........................................................3-65
Icy Road Warning Light .................................................3-65
Transmission Shift Indicator .........................................3-66
LCD display ...........................................................3-69
LCD display control.........................................................3-69
LCD display modes ..........................................................3-70
Warning messages ..........................................................3-80
Page 90 of 637
3-4
Convenient features of your vehicle
Remote key (if equipped)
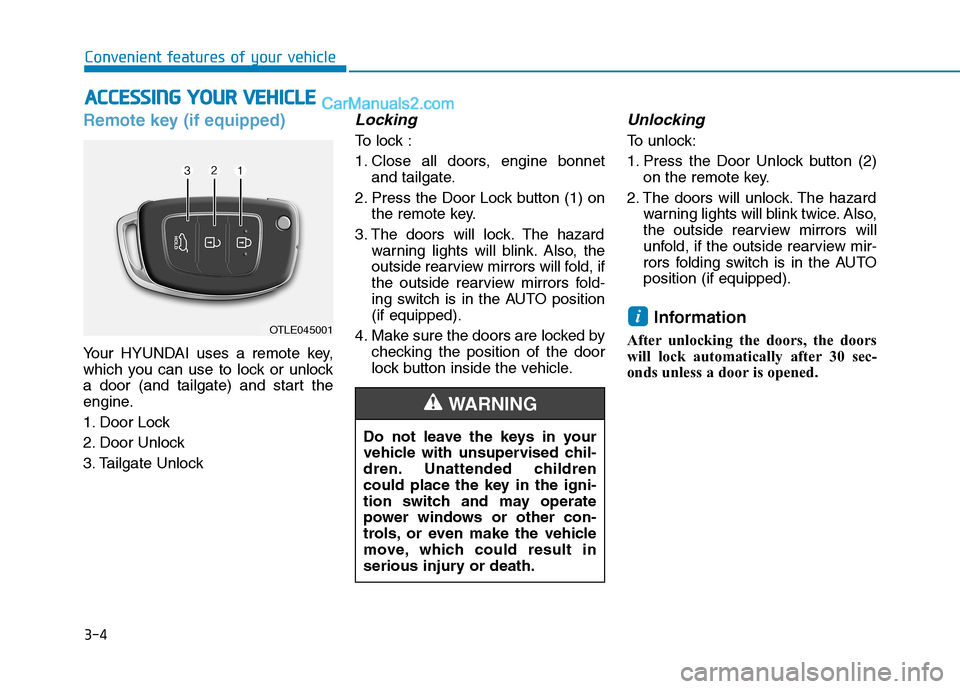
Your HYUNDAI uses a remote key,
which you can use to lock or unlock
a door (and tailgate) and start the
engine.
1. Door Lock
2. Door Unlock
3. Tailgate Unlock
Locking
To lock :
1. Close all doors, engine bonnet
and tailgate.
2. Press the Door Lock button (1) on
the remote key.
3. The doors will lock. The hazard
warning lights will blink. Also, the
outside rearview mirrors will fold, if
the outside rearview mirrors fold-
ing switch is in the AUTO position
(if equipped).
4. Make sure the doors are locked by
checking the position of the door
lock button inside the vehicle.
Unlocking
To unlock:
1. Press the Door Unlock button (2)
on the remote key.
2. The doors will unlock. The hazard
warning lights will blink twice. Also,
the outside rearview mirrors will
unfold, if the outside rearview mir-
rors folding switch is in the AUTO
position (if equipped).
Information
After unlocking the doors, the doors
will lock automatically after 30 sec-
onds unless a door is opened.
i
A AC
CC
CE
ES
SS
SI
IN
NG
G
Y
YO
OU
UR
R
V
VE
EH
HI
IC
CL
LE
E
Do not leave the keys in your
vehicle with unsupervised chil-
dren. Unattended children
could place the key in the igni-
tion switch and may operate
power windows or other con-
trols, or even make the vehicle
move, which could result in
serious injury or death.
WARNING
OTLE045001
Page 94 of 637
3-8
Smart key (if equipped)
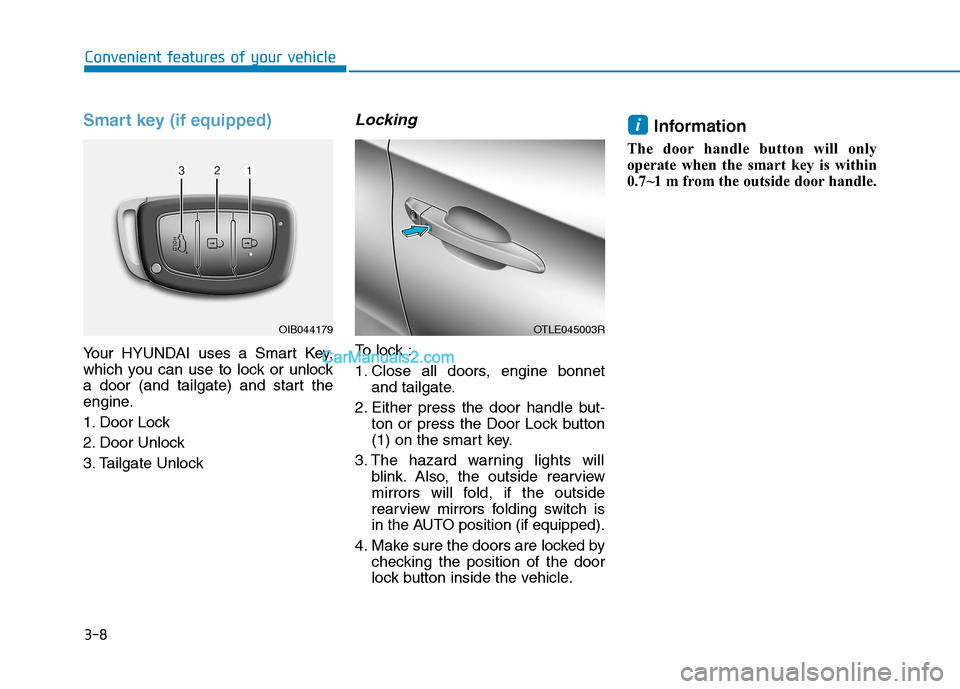
Your HYUNDAI uses a Smart Key,
which you can use to lock or unlock
a door (and tailgate) and start the
engine.
1. Door Lock
2. Door Unlock
3. Tailgate Unlock
Locking
To lock :
1. Close all doors, engine bonnet
and tailgate.
2. Either press the door handle but-
ton or press the Door Lock button
(1) on the smart key.
3. The hazard warning lights will
blink. Also, the outside rearview
mirrors will fold, if the outside
rearview mirrors folding switch is
in the AUTO position (if equipped).
4. Make sure the doors are locked by
checking the position of the door
lock button inside the vehicle.
Information
The door handle button will only
operate when the smart key is within
0.7~1 m from the outside door handle.
i
Convenient features of your vehicle
OIB044179OTLE045003R
Page 95 of 637
3-9
Convenient features of your vehicle
Even though you press the outside
door handle button, the doors will not
lock and the chime will sound for
three seconds if any of the following
occur:
The Smart Key is in the vehicle.
The Engine Start/Stop button is in
the ACC or ON position.
Any door except the tailgate is
open.Unlocking
To unlock:
1. Carry the Smart Key.
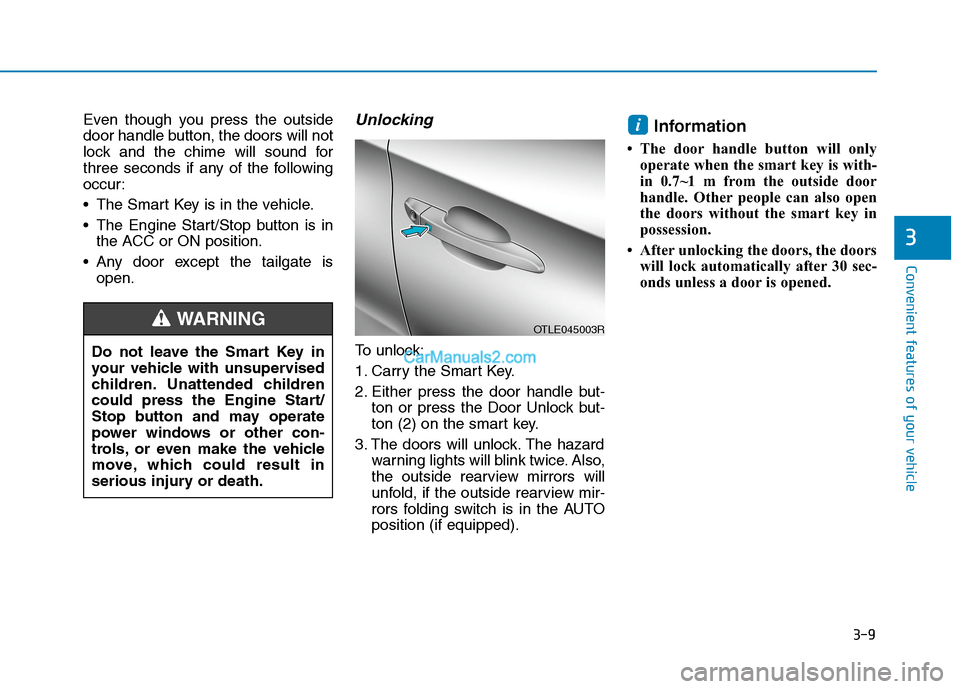
2. Either press the door handle but-
ton or press the Door Unlock but-
ton (2) on the smart key.
3. The doors will unlock. The hazard
warning lights will blink twice. Also,
the outside rearview mirrors will
unfold, if the outside rearview mir-
rors folding switch is in the AUTO
position (if equipped).
Information
• The door handle button will only
operate when the smart key is with-
in 0.7~1 m from the outside door
handle. Other people can also open
the doors without the smart key in
possession.
• After unlocking the doors, the doors
will lock automatically after 30 sec-
onds unless a door is opened.
i
3
Do not leave the Smart Key in
your vehicle with unsupervised
children. Unattended children
could press the Engine Start/
Stop button and may operate
power windows or other con-
trols, or even make the vehicle
move, which could result in
serious injury or death.
WARNINGOTLE045003R
Page 110 of 637
3-24
Convenient features of your vehicle
M MI
IR
RR
RO
OR
RS
S
Inside rearview mirror
Before you start driving, adjust the
rearview mirror to the centre on the
view through the rear window.When cleaning the mirror, use a
paper towel or similar material
dampened with glass cleaner. Do
not spray glass cleaner directly on
the mirror as that may cause the
liquid cleaner to enter the mirror
housing.
NOTICE
Make sure your line of sight is
not obstructed. Do not place
objects on the rear seat, lug-
gage compartment, or behind
the rear headrests which could
interfere with your vision
through the rear window.
WARNING
To prevent serious injury during
an accident or deployment of
the air bag, do not modify the
rearview mirror and do not
install a wide mirror.
WARNING
NEVER adjust the mirror whilst
driving. This may cause loss of
vehicle control resulting in an
accident.
WARNING
Page 111 of 637
3-25
Convenient features of your vehicle
3
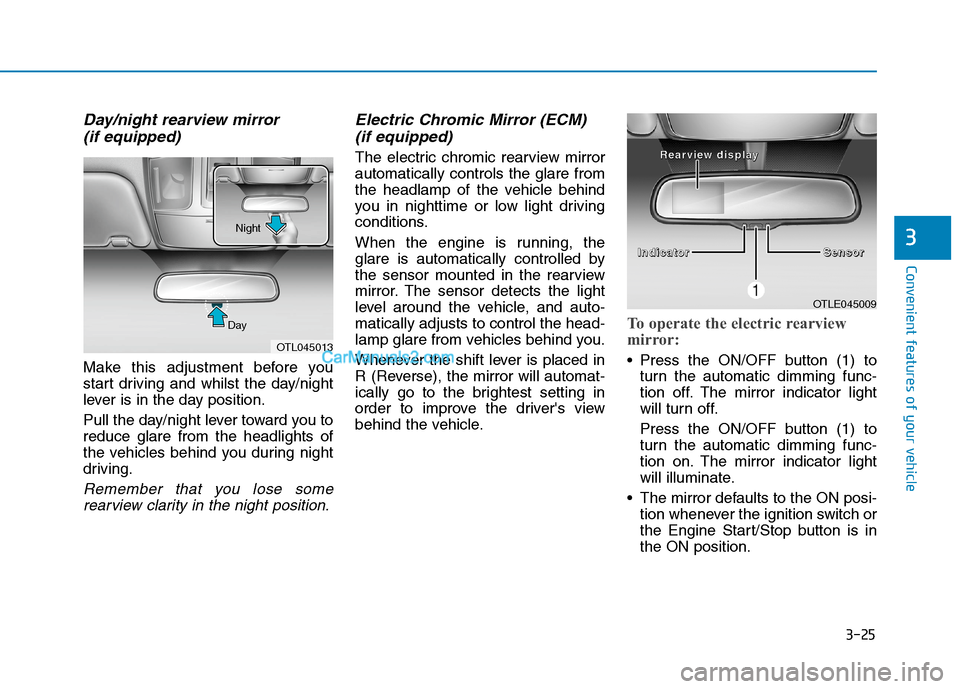
Day/night rearview mirror
(if equipped)
Make this adjustment before you
start driving and whilst the day/night
lever is in the day position.
Pull the day/night lever toward you to
reduce glare from the headlights of
the vehicles behind you during night
driving.
Remember that you lose some
rearview clarity in the night position.
Electric Chromic Mirror (ECM)
(if equipped)
The electric chromic rearview mirror
automatically controls the glare from
the headlamp of the vehicle behind
you in nighttime or low light driving
conditions.
When the engine is running, the
glare is automatically controlled by
the sensor mounted in the rearview
mirror. The sensor detects the light
level around the vehicle, and auto-
matically adjusts to control the head-
lamp glare from vehicles behind you.
Whenever the shift lever is placed in
R (Reverse), the mirror will automat-
ically go to the brightest setting in
order to improve the driver's view
behind the vehicle.
To operate the electric rearview
mirror:
Press the ON/OFF button (1) to
turn the automatic dimming func-
tion off. The mirror indicator light
will turn off.
Press the ON/OFF button (1) to
turn the automatic dimming func-
tion on. The mirror indicator light
will illuminate.
The mirror defaults to the ON posi-
tion whenever the ignition switch or
the Engine Start/Stop button is in
the ON position.
OTLE045009
I I I I
n n n n
d d d d
i i i i
c c c c
a a a a
t t t t
o o o o
r r r r
S S S S
e e e e
n n n n
s s s s
o o o o
r r r r R R R R
e e e e
a a a a
r r r r
v v v v
i i i i
e e e e
w w w w
d d d d
i
i i i
s s s s
p p p p
l l l l
a a a a
y y y y
OTL045013 DayNight
Page 112 of 637
3-26
Convenient features of your vehicle
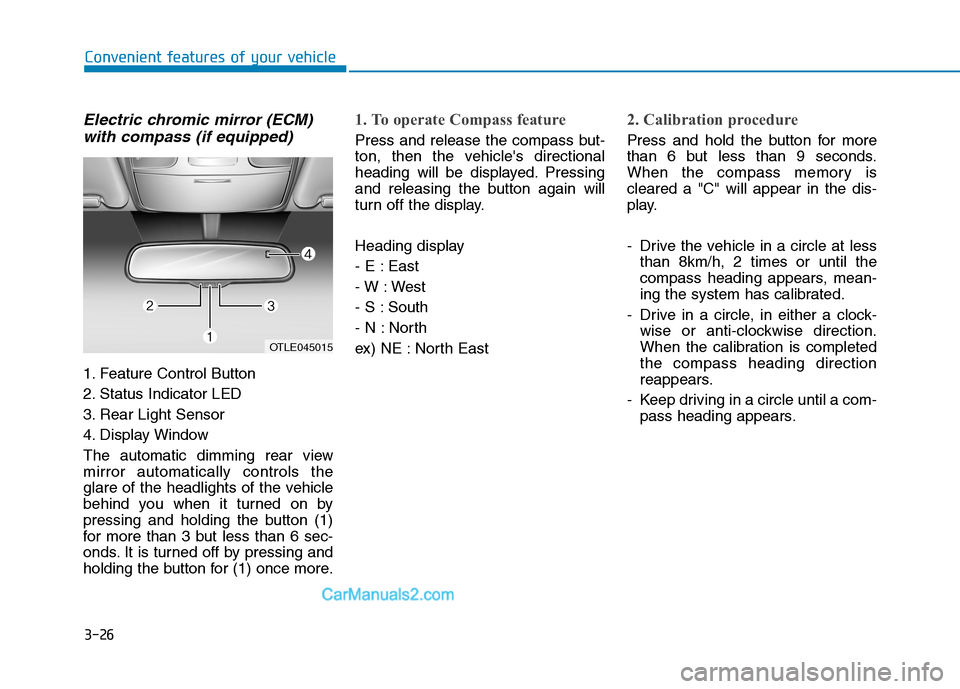
Electric chromic mirror (ECM)
with compass (if equipped)
1. Feature Control Button
2. Status Indicator LED
3. Rear Light Sensor
4. Display Window
The automatic dimming rear view
mirror automatically controls the
glare of the headlights of the vehicle
behind you when it turned on by
pressing and holding the button (1)
for more than 3 but less than 6 sec-
onds. It is turned off by pressing and
holding the button for (1) once more.
1. To operate Compass feature
Press and release the compass but-
ton, then the vehicle's directional
heading will be displayed. Pressing
and releasing the button again will
turn off the display.
Heading display
- E : East
- W : West
- S : South
- N : North
ex) NE : North East
2. Calibration procedure
Press and hold the button for more
than 6 but less than 9 seconds.
When the compass memory is
cleared a "C" will appear in the dis-
play.
- Drive the vehicle in a circle at less
than 8km/h, 2 times or until the
compass heading appears, mean-
ing the system has calibrated.
- Drive in a circle, in either a clock-
wise or anti-clockwise direction.
When the calibration is completed
the compass heading direction
reappears.
- Keep driving in a circle until a com-
pass heading appears.
OTLE045015