wheel nut Hyundai Tucson 2020 Owner's Manual - RHD (UK, Australia)
[x] Cancel search | Manufacturer: HYUNDAI, Model Year: 2020, Model line: Tucson, Model: Hyundai Tucson 2020Pages: 637, PDF Size: 64.45 MB
Page 376 of 637
5-59
Driving your vehicle
5
ESC operation
ESC ON condition
When the ignition switch is in the ON
position, the ESC and the ESC OFF
indicator lights illuminate for approxi-
mately three seconds and go off,
then the ESC is turned on.
When operating
When the ESC is in opera-
tion, the ESC indicator light
blinks:
conditions which may lock the
wheels, you may hear sounds from
the brakes, or feel a corresponding
sensation in the brake pedal. This is
normal and it means your ESC is
active.
engine may not respond to the
accelerator as it does under routine
conditions.
when the ESC activates, the Cruise
Control automatically disengages.
The Cruise Control can be reen-
gaged when the road conditions
allow.See "Cruise Control System"
later in this chapter(if equipped).
driving on a slippery road, the
engine rpm (revolutions per minute)
may not increase even if you press
the accelerator pedal deeply. This is
to maintain the stability and traction
of the vehicle and does not indicate
a problem. Never drive too fast for the road
conditions or too quickly when
cornering. The ESC system will
not prevent accidents.
Excessive speed in turns, abrupt
manoeuvres, and hydroplaning
on wet surfaces can result in
severe accidents.WARNING
Page 486 of 637
5-169
Driving your vehicle
5
When the clutch is overheated,
the safe protection mode
engages. If the safe protection
mode engages, the gear posi-
tion indicator on the cluster
blinks with a chime sound.
At this time, a warning message
will appear on the LCD display
and driving may not be smooth.
If you ignore this warning, the
driving condition may become
worse.
To return to normal driving con-
dition, stop the vehicle on a flat
road and apply the foot brake for
a few minutes before driving off.Parking on hills
Generally, if you have a trailer
attached to your vehicle, you should
not park your vehicle on a hill.
However, if you ever have to park
your trailer on a hill, here's how to do
it:
1. Pull the vehicle into the parking
space.
Turn the steering wheel in the
direction of the kerb (left if headed
down hill, right if headed up hill).
2. Shift the vehicle to P (Park, for
automatic transmission/dual
clutch transmission vehicle) or
neutral (for manual transmission
vehicle).
3. Set the parking brake and shut off
the vehicle.
4. Place wheel chocks under the
trailer wheels on the down hill side
of the wheels.
5. Start the vehicle, hold the brakes,
shift to neutral, release the park-
ing brake and slowly release the
brakes until the trailer chocks
absorb the load.6. Reapply the brakes and parking
brakes.
7. Move the shift lever to P (Park, for
automatic transmission/dual clutch
transmission vehicle) or 1
stgear
when the vehicle is parked on a
uphill grade and in R (Reverse) on
a downhill (for manual transmis-
sion vehicle).
8. Shut off the vehicle and release
the vehicle brakes but leave the
parking brake set.
To prevent serious or fatal
injury:
Do not get out of the vehicle
without the parking brake
firmly set. If you have left the
engine running, the vehicle
can move suddenly. You and
others could be seriously or
fatally injured.
Do not apply the accelerator
pedal to hold the vehicle on
an uphill.
WARNING
Page 499 of 637
6-11
What to do in an emergency
Tyre pressure monitoring sys-
tem
Each tyre, including the spare (if pro-
vided), should be checked monthly
when cold and inflated to the inflation
pressure recommended by the vehi-
cle manufacturer on the vehicle plac-
ard or tyre inflation pressure label. If
your vehicle has tyres of a different
size than the size indicated on the
vehicle placard or tyre inflation pres-
sure label, you should determine the
proper tyre inflation pressure for
those tyres.As an added safety feature, your
vehicle has been equipped with a
tyre pressure monitoring system
(TPMS) that illuminates a low tyre
pressure telltale when one or more
of your tyres is significantly under-
inflated. Accordingly, when the low
tyre pressure telltale illuminates, you
should stop and check your tyres as
soon as possible, and inflate them to
the proper pressure. Driving on a sig-
nificantly under-inflated tyre causes
the tyre to overheat and can lead to
tyre failure. Under-inflation also
reduces fuel efficiency and tyre tread
life, and may affect the vehicle’s han-
dling and stopping ability.
Please note that the TPMS is not a
substitute for proper tyre mainte-
nance, and it is the driver’s responsi-
bility to maintain correct tyre pres-
sures, even if under-inflation has not
reached the level to trigger illumina-
tion of the TPMS low tyre pressure
telltale.Your vehicle has also been equipped
with a TPMS malfunction indicator to
indicate when the system is not
operating properly. The TPMS mal-
function indicator is combined with
the low tyre pressure telltale. When
the system detects a malfunction,
the telltale will flash for approximate-
ly one minute and then remain con-
tinuously illuminated. This sequence
will continue upon subsequent vehi-
cle start-ups as long as the malfunc-
tion exists. When the malfunction
indicator is illuminated, the system
may not be able to detect or signal
low tyre pressure as intended.
TPMS malfunctions may occur for a
variety of reasons, including the
installation of replacement or alter-
native tyres or wheels on the vehicle
that prevent the TPMS from function-
ing properly. Always check the TPMS
malfunction telltale after replacing
one or more tyres or wheels on your
vehicle to ensure that the replace-
ment or alternative tyres and wheels
allow the TPMS to continue to func-
tion properly.
6
Over-inflation or under-inflation
can reduce tyre life, adversely
affect vehicle handling, and
lead to sudden tyre failure that
may cause loss of vehicle con-
trol resulting in an accident.
WARNING
Page 500 of 637
6-12
If any of the below happens, we
recommend that the system be
checked by an authorised
HYUNDAI dealer:
1. The low tyre pressure telltale/
TPMS malfunction indicator
does not illuminate for 3 sec-
onds when the Engine
Start/Stop button is turned to
the ON or the engine is running.
2. The TPMS malfunction indicator
remains illuminated after blink-
ing for approximately 1 minute.
3. The low tyre pressure position
telltale remains illuminated.
Low tyre pressure
telltale
Low tyre pressure position
telltale and tyre pressure tell-
tale
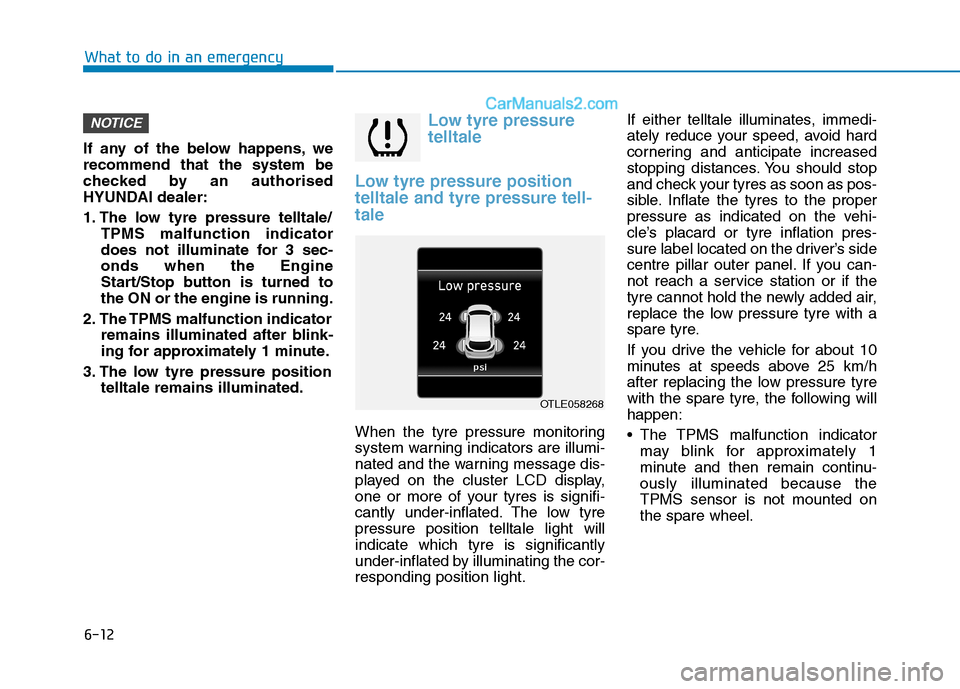
When the tyre pressure monitoring
system warning indicators are illumi-
nated and the warning message dis-
played on the cluster LCD display,
one or more of your tyres is signifi-
cantly under-inflated. The low tyre
pressure position telltale light will
indicate which tyre is significantly
under-inflated by illuminating the cor-
responding position light.If either telltale illuminates, immedi-
ately reduce your speed, avoid hard
cornering and anticipate increased
stopping distances. You should stop
and check your tyres as soon as pos-
sible. Inflate the tyres to the proper
pressure as indicated on the vehi-
cle’s placard or tyre inflation pres-
sure label located on the driver’s side
centre pillar outer panel. If you can-
not reach a service station or if the
tyre cannot hold the newly added air,
replace the low pressure tyre with a
spare tyre.
If you drive the vehicle for about 10
minutes at speeds above 25 km/h
after replacing the low pressure tyre
with the spare tyre, the following will
happen:
The TPMS malfunction indicator
may blink for approximately 1
minute and then remain continu-
ously illuminated because the
TPMS sensor is not mounted on
the spare wheel.
NOTICE
What to do in an emergency
OTLE058268
Page 502 of 637
6-14
Changing a tyre with TPMS
If you have a flat tyre, the low Tyre
pressure and position telltales will
come on. We recommend that the
system be checked by an authorised
HYUNDAI dealer.
Each wheel is equipped with a tyre
pressure sensor mounted inside the
tyre behind the valve stem. You must
use TPMS specific wheels. It is rec-
ommended that you have your tyres
serviced by an authorised HYUNDAI
dealer.If you drive the vehicle for about 10
minutes at speeds above 25 km/h
after replacing the low pressure tyre
with the spare tyre, the following will
happen:
The TPMS malfunction indicator
may blink for approximately 1
minute and then remain continu-
ously illuminated because the
TPMS sensor is not mounted on
the spare wheel.
What to do in an emergency
The TPMS malfunction indica-
tor may blink for approximate-
ly 1 minute and then remain
continuously illuminated if
the vehicle is moving around
electric power supply cables
or radios transmitters such as
at police stations, government
and public offices, broadcast-
ing stations, military installa-
tions, airports, or transmitting
towers, etc. This can interfere
with normal operation of the
Tyre Pressure Monitoring
System (TPMS).
The TPMS malfunction indica-
tor may blink for approximate-
ly 1 minute and then remain
continuously illuminated if
snow chains are used or
some separate electronic
devices such as a notebook
computer, mobile chargers,
remote starter or navigation
etc., are used in the vehicle.
This can interfere with normal
operation of the Tyre Pressure
Monitoring System (TPMS).
CAUTION
NEVER use a puncture-repair-
ing agent to repair and/or inflate
a low pressure tyre. The tyre
sealant can damage the tyre
pressure sensor. If used, you
will have to replace the tyre
pressure sensor.
CAUTION
Page 504 of 637
6-16
What to do in an emergency
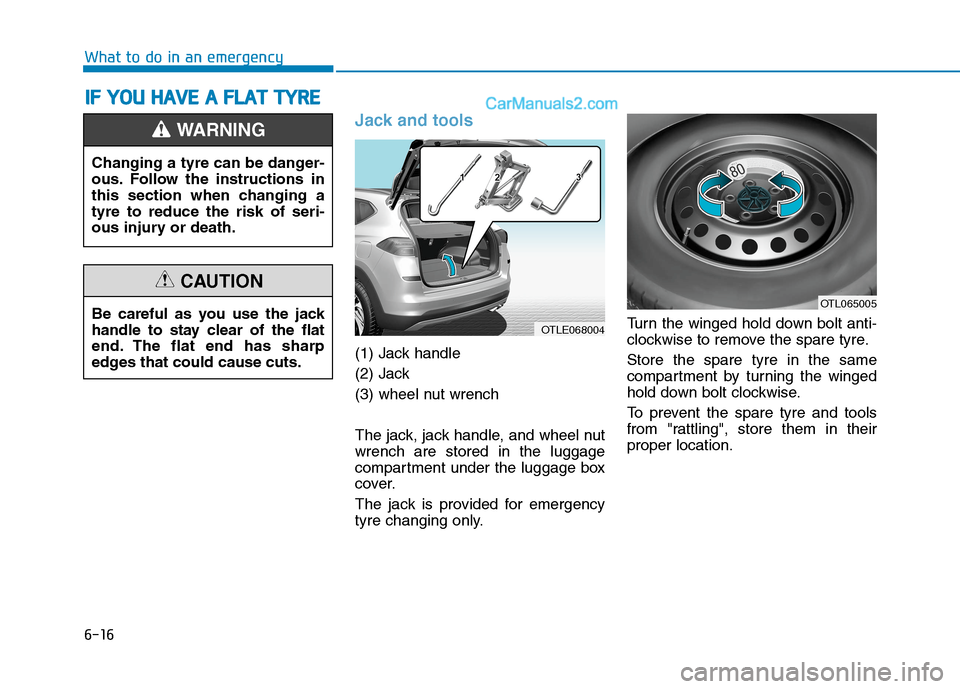
Jack and tools
(1) Jack handle
(2) Jack
(3) wheel nut wrench
The jack, jack handle, and wheel nut
wrench are stored in the luggage
compartment under the luggage box
cover.
The jack is provided for emergency
tyre changing only.Turn the winged hold down bolt anti-
clockwise to remove the spare tyre.
Store the spare tyre in the same
compartment by turning the winged
hold down bolt clockwise.
To prevent the spare tyre and tools
from "rattling", store them in their
proper location.
I IF
F
Y
YO
OU
U
H
HA
AV
VE
E
A
A
F
FL
LA
AT
T
T
TY
YR
RE
E
OTLE068004
OTL065005
Changing a tyre can be danger-
ous. Follow the instructions in
this section when changing a
tyre to reduce the risk of seri-
ous injury or death.
WARNING
Be careful as you use the jack
handle to stay clear of the flat
end. The flat end has sharp
edges that could cause cuts.
CAUTION
Page 506 of 637
6-18
What to do in an emergency
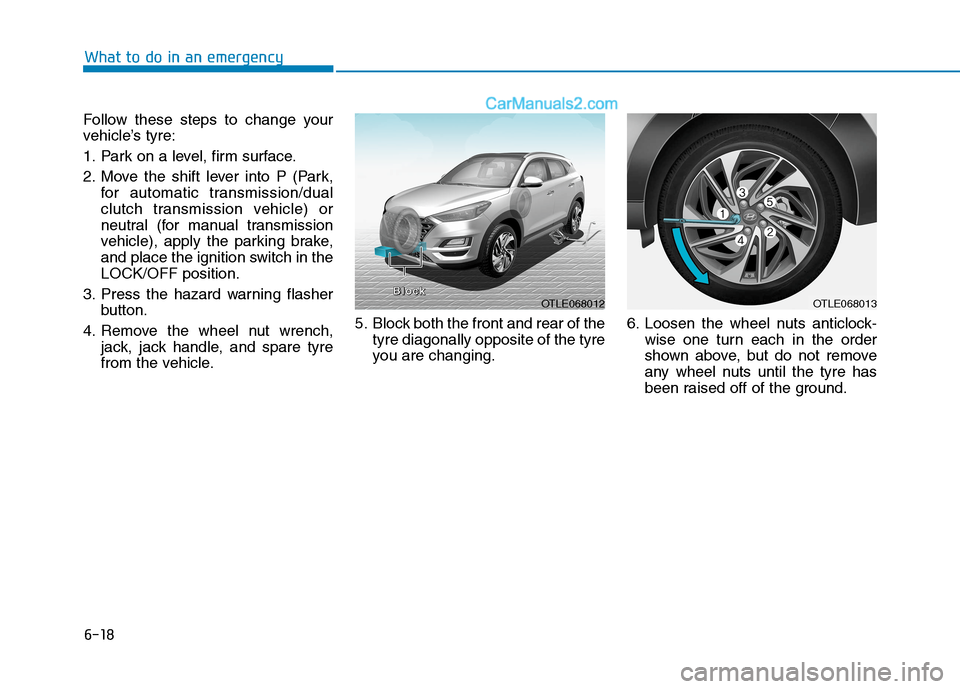
Follow these steps to change your
vehicle’s tyre:
1. Park on a level, firm surface.
2. Move the shift lever into P (Park,
for automatic transmission/dual
clutch transmission vehicle) or
neutral (for manual transmission
vehicle), apply the parking brake,
and place the ignition switch in the
LOCK/OFF position.
3. Press the hazard warning flasher
button.
4. Remove the wheel nut wrench,
jack, jack handle, and spare tyre
from the vehicle.5. Block both the front and rear of the
tyre diagonally opposite of the tyre
you are changing.6. Loosen the wheel nuts anticlock-
wise one turn each in the order
shown above, but do not remove
any wheel nuts until the tyre has
been raised off of the ground.
OTLE068012B B B B
l l l l
o o o o
c c c c
k k k kOTLE068013
Page 507 of 637
6-19
What to do in an emergency
6
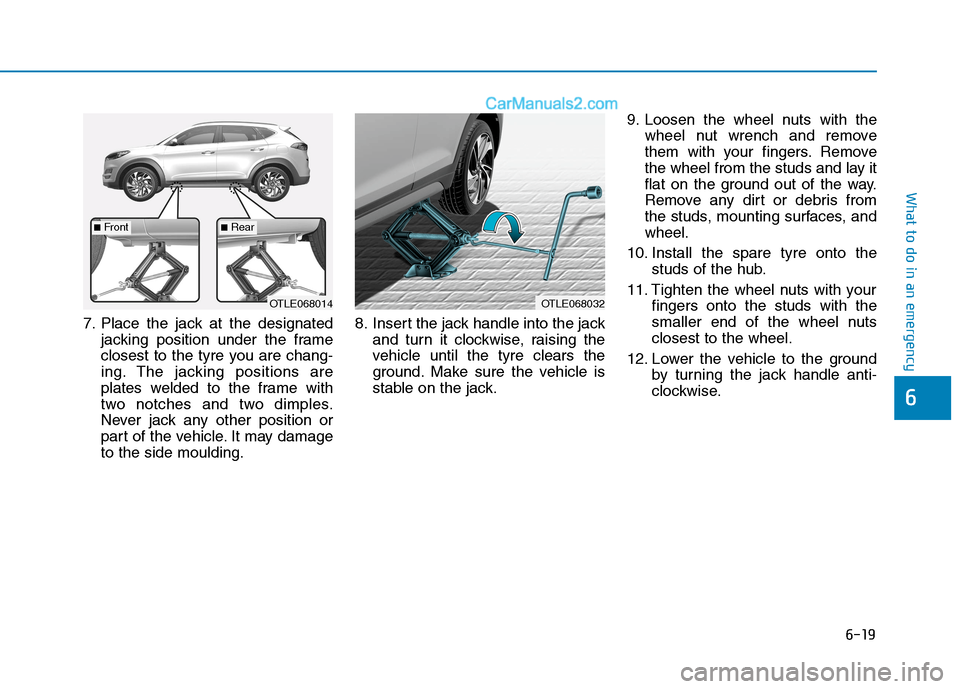
7. Place the jack at the designated
jacking position under the frame
closest to the tyre you are chang-
ing. The jacking positions are
plates welded to the frame with
two notches and two dimples.
Never jack any other position or
part of the vehicle. It may damage
to the side moulding.8. Insert the jack handle into the jack
and turn it clockwise, raising the
vehicle until the tyre clears the
ground. Make sure the vehicle is
stable on the jack.9. Loosen the wheel nuts with the
wheel nut wrench and remove
them with your fingers. Remove
the wheel from the studs and lay it
flat on the ground out of the way.
Remove any dirt or debris from
the studs, mounting surfaces, and
wheel.
10. Install the spare tyre onto the
studs of the hub.
11. Tighten the wheel nuts with your
fingers onto the studs with the
smaller end of the wheel nuts
closest to the wheel.
12. Lower the vehicle to the ground
by turning the jack handle anti-
clockwise.
OTLE068032OTLE068014
■Front■Rear
Page 508 of 637
6-20
What to do in an emergency
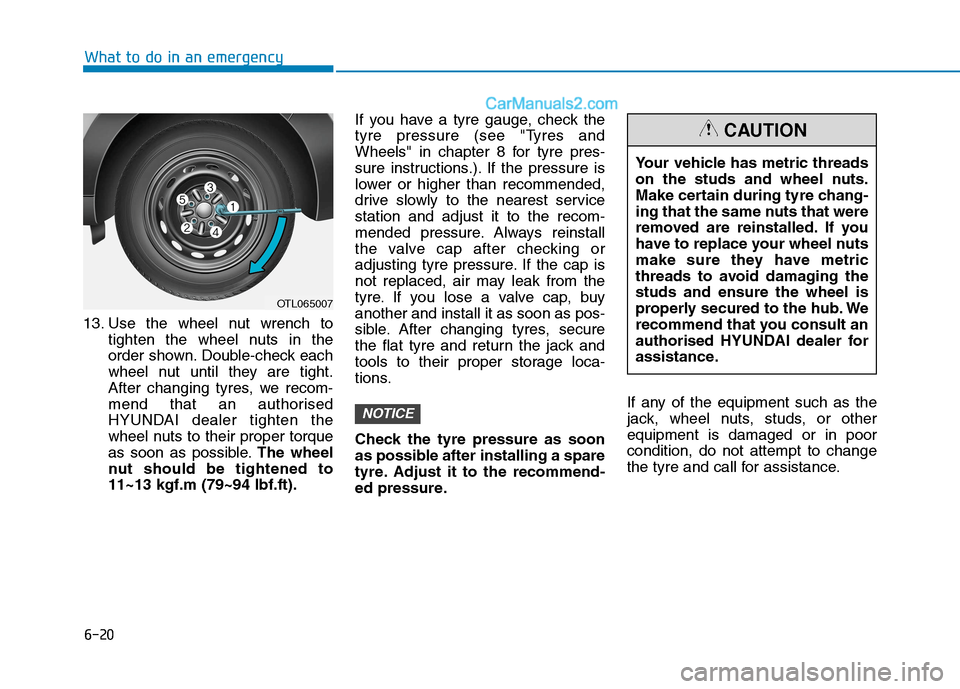
13. Use the wheel nut wrench to
tighten the wheel nuts in the
order shown. Double-check each
wheel nut until they are tight.
After changing tyres, we recom-
mend that an authorised
HYUNDAI dealer tighten the
wheel nuts to their proper torque
as soon as possible.The wheel
nut should be tightened to
11~13 kgf.m (79~94 lbf.ft).If you have a tyre gauge, check the
tyre pressure (see "Tyres and
Wheels" in chapter 8 for tyre pres-
sure instructions.). If the pressure is
lower or higher than recommended,
drive slowly to the nearest service
station and adjust it to the recom-
mended pressure. Always reinstall
the valve cap after checking or
adjusting tyre pressure. If the cap is
not replaced, air may leak from the
tyre. If you lose a valve cap, buy
another and install it as soon as pos-
sible. After changing tyres, secure
the flat tyre and return the jack and
tools to their proper storage loca-
tions.
Check the tyre pressure as soon
as possible after installing a spare
tyre. Adjust it to the recommend-
ed pressure.If any of the equipment such as the
jack, wheel nuts, studs, or other
equipment is damaged or in poor
condition, do not attempt to change
the tyre and call for assistance.
NOTICE
OTL065007
Your vehicle has metric threads
on the studs and wheel nuts.
Make certain during tyre chang-
ing that the same nuts that were
removed are reinstalled. If you
have to replace your wheel nuts
make sure they have metric
threads to avoid damaging the
studs and ensure the wheel is
properly secured to the hub. We
recommend that you consult an
authorised HYUNDAI dealer for
assistance.
CAUTION
Page 510 of 637
6-22
What to do in an emergency
When the original tyre and wheel
are repaired and reinstalled on the
vehicle, the wheel nut torque must
be set correctly. The correct wheel
nut tightening torque is 11-13
kgf.m (79-94 lbf.ft).
NOTICE
To prevent damaging the com-
pact spare tyre and your vehi-
cle:
Drive slowly enough for the
road conditions to avoid all
hazards, such as a potholes
or debris.
Avoid driving over obstacles.
The compact spare tyre diam-
eter is smaller than the diame-
ter of a conventional tyre and
reduces the ground clearance
approximately 25 mm.
Do not use tyre chains on the
compact spare tyre. Because
of the smaller size, a tyre
chain will not fit properly.
Do not use the compact spare
tyre on any other wheels, nor
should standard tyres, snow
tyres, wheel covers or trim
rings be used with the com-
pact spare tyre.
CAUTION