door lock HYUNDAI TUCSON 2021 Owners Manual
[x] Cancel search | Manufacturer: HYUNDAI, Model Year: 2021, Model line: TUCSON, Model: HYUNDAI TUCSON 2021Pages: 546, PDF Size: 44.38 MB
Page 15 of 546
1-4
Your vehicle at a glance
I IN
NT
TE
ER
RI
IO
OR
R
O
OV
VE
ER
RV
VI
IE
EW
W
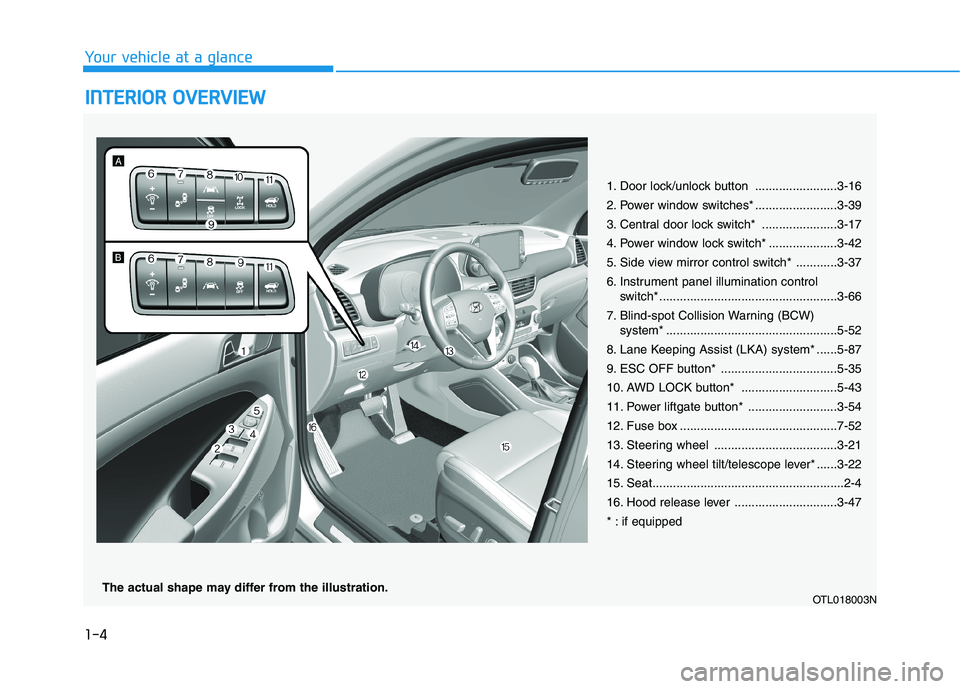
1. Door lock/unlock button ........................3-16
2. Power window switches* ........................3-39
3. Central door lock switch* ......................3-17
4. Power window lock switch* ....................3-42
5. Side view mirror control switch* ............3-37
6. Instrument panel illumination control
switch* ....................................................3-66
7. Blind-spot Collision Warning (BCW)
system* ..................................................5-52
8. Lane Keeping Assist (LKA) system* ......5-87
9. ESC OFF button* ..................................5-35
10. AWD LOCK button* ............................5-43
11. Power liftgate button* ..........................3-54
12. Fuse box ..............................................7-52
13. Steering wheel ....................................3-21
14. Steering wheel tilt/telescope lever* ......3-22
15. Seat........................................................2-4
16. Hood release lever ..............................3-47
* : if equipped
OTL018003NThe actual shape may differ from the illustration.
Page 46 of 546
2-28
Safety system of your vehicle
Height adjustment
You can adjust the height of the
shoulder belt anchor to one of the
four different positions for maximum
comfort and safety.
The shoulder portion should be
adjusted so it lies across your chest
and midway over your shoulder near-
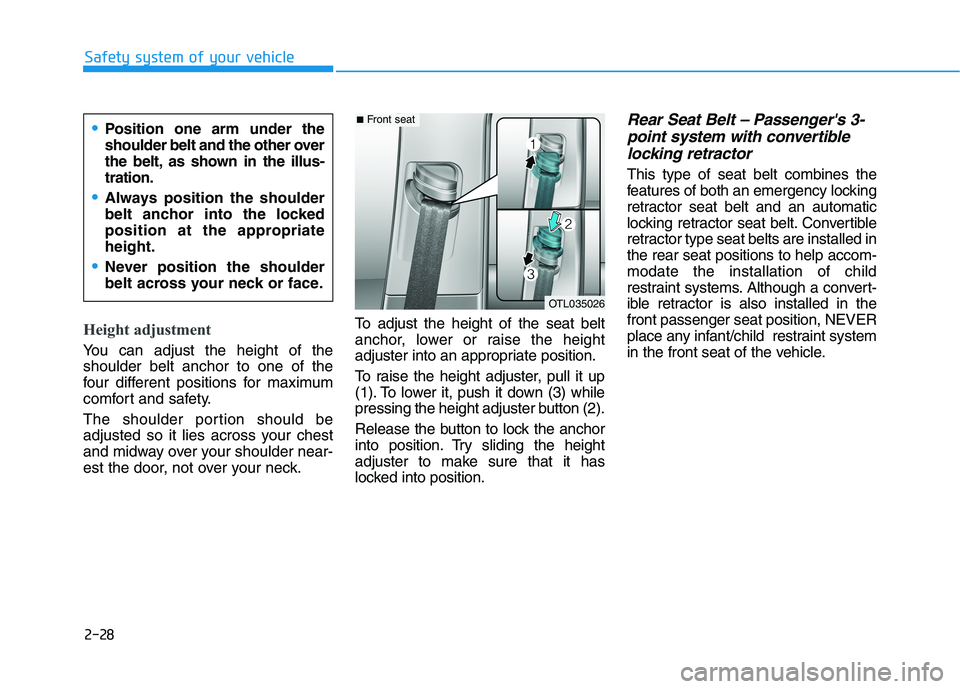
est the door, not over your neck.To adjust the height of the seat belt
anchor, lower or raise the height
adjuster into an appropriate position.
To raise the height adjuster, pull it up
(1). To lower it, push it down (3) while
pressing the height adjuster button (2).
Release the button to lock the anchor
into position. Try sliding the height
adjuster to make sure that it has
locked into position.
Rear Seat Belt – Passenger's 3-
point system with convertible
locking retractor
This type of seat belt combines the
features of both an emergency locking
retractor seat belt and an automatic
locking retractor seat belt. Convertible
retractor type seat belts are installed in
the rear seat positions to help accom-
modate the installation of child
restraint systems. Although a convert-
ible retractor is also installed in the
front passenger seat position, NEVER
place any infant/child restraint system
in the front seat of the vehicle.
Position one arm under the
shoulder belt and the other over
the belt, as shown in the illus-
tration.
Always position the shoulder
belt anchor into the locked
position at the appropriate
height.
Never position the shoulder
belt across your neck or face.
OTL035026
■Front seat
Page 70 of 546
2-52
Safety system of your vehicle
The purpose of the air bag is to pro-
vide the vehicle's driver and the front
passenger with additional protection
than that offered by the seat belt
alone.
The side air bags are designed to
deploy during certain side impact
collisions, depending on the crash
severity, angle, speed and point of
impact.
The side and curtain air bags on
both sides of the vehicle may deploy
if a rollover or possible rollover is
detected.
The side air bags are not designed to
deploy in all side impact or rollover
situations.To reduce the risk of serious
injury or death from an inflating
side air bag, take the following
precautions:
Seat belts must be worn at all
times to help keep occupants
positioned properly.
Do not allow passengers to
lean their heads or bodies onto
doors, put their arms on the
doors, stretch their arms out of
the window, or place objects
between the doors and seats.
Hold the steering wheel at the 9
o'clock and 3 o'clock positions,
to minimize the risk of injuries
to your hands and arms.
Do not use any accessory
seat covers. This could reduce
or prevent the effectiveness
of the system.
Do not place any objects over
the air bag or between the air
bag and yourself.
WARNING Also, do not attach any
objects around the area the
air bag inflates such as the
door, side door glass, front
and rear pillar.
Do not place any objects
between the door and the
seat. They may become dan-
gerous projectiles if the side
air bag inflates.
Do not install any accessories
on the side or near the side air
bags.
Do not put any objects
between the side airbag label
and seat cushion. It could
cause harm if the vehicle is in
a crash severe enough to
cause the air bags to deploy.
Do not cause impact to the
doors when the ignition
switch is in the ON position as
this may cause the side air
bags to inflate.
If the seat or seat cover is
damaged, have the vehicle
checked and repaired by an
authorized HYUNDAI dealer.
Page 92 of 546
Convenient features of your vehicle
Accessing Your Vehicle .........................................3-4
Remote Key.........................................................................3-4
Smart Key ............................................................................3-8
Immobilizer System .........................................................3-13
Door Locks ............................................................3-15
Operating Door Locks from Outside the Vehicle ....3-15
Operating Door Locks from Inside the Vehicle .......3-16
Automatic Door Lock and Unlock Features .............3-18
Child-Protector Rear Door locks ................................3-19
Theft-Alarm System ............................................3-20
Steering Wheel .....................................................3-21
Electric Power Steering (EPS) .....................................3-21
Tilt Steering/Telescope Steering.................................3-22
Heated Steering Wheel ..................................................3-23
Horn ....................................................................................3-23
Mirrors ...................................................................3-24
Inside Rearview Mirror ..................................................3-24
Side View Mirrors ...........................................................3-36
Windows ................................................................3-39
Power Windows ...............................................................3-40
Panoramic Sunroof ..............................................3-43
Sunshade ...........................................................................3-44
Sliding the Sunroof .........................................................3-44
Tilting the Sunroof .........................................................3-45
Closing the Sunroof........................................................3-45
To Reset the Sunroof.....................................................3-46
Exterior Features .................................................3-47
Hood ...................................................................................3-47
Fuel Filler Door ................................................................3-48
Liftgate ..................................................................3-52
Non-Powered liftgate ....................................................3-52
Power Liftgate .................................................................3-54
Smart Liftgate ..................................................................3-61
Instrument Cluster ...............................................3-65
Instrument Cluster Control............................................3-66
Gauges and Meters ........................................................3-67
Icy Road Warning Light .................................................3-70
Warning and Indicator Lights .......................................3-72
LCD Display Messages ...................................................3-84
LCD Display ...........................................................3-91
LCD Display Control ........................................................3-91
LCD Display Modes .........................................................3-92
Trip Computer .....................................................3-103
3
Page 95 of 546
3-4
Convenient features of your vehicle
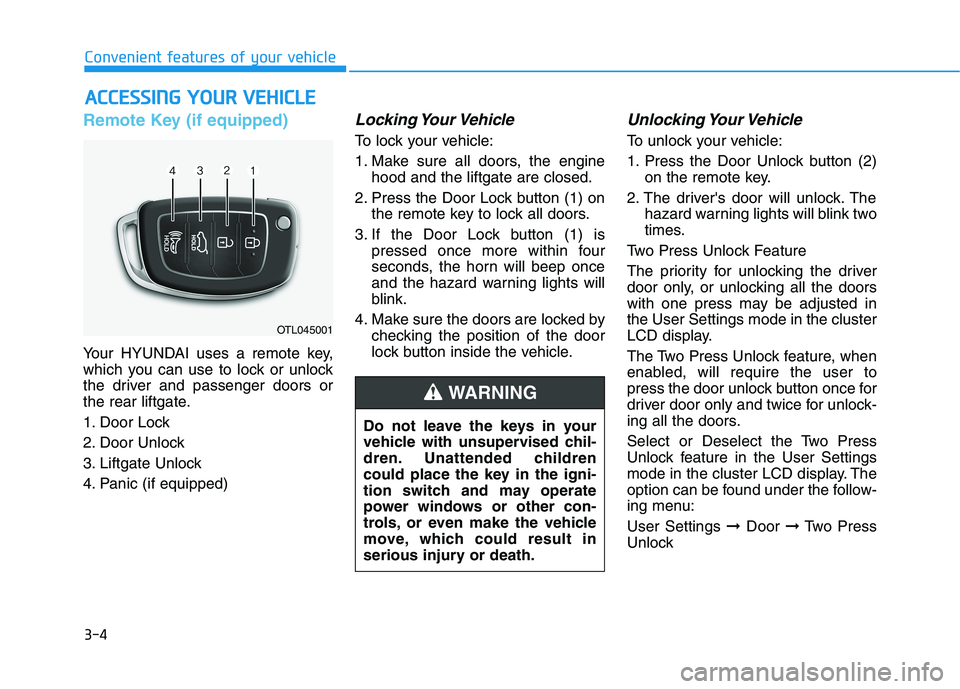
Remote Key (if equipped)
Your HYUNDAI uses a remote key,
which you can use to lock or unlock
the driver and passenger doors or
the rear liftgate.
1. Door Lock
2. Door Unlock
3. Liftgate Unlock
4. Panic (if equipped)
Locking Your Vehicle
To lock your vehicle:
1. Make sure all doors, the engine
hood and the liftgate are closed.
2. Press the Door Lock button (1) on
the remote key to lock all doors.
3. If the Door Lock button (1) is
pressed once more within four
seconds, the horn will beep once
and the hazard warning lights will
blink.
4. Make sure the doors are locked by
checking the position of the door
lock button inside the vehicle.
Unlocking Your Vehicle
To unlock your vehicle:
1. Press the Door Unlock button (2)
on the remote key.
2. The driver's door will unlock. The
hazard warning lights will blink two
times.
Two Press Unlock Feature
The priority for unlocking the driver
door only, or unlocking all the doors
with one press may be adjusted in
the User Settings mode in the cluster
LCD display.
The Two Press Unlock feature, when
enabled, will require the user to
press the door unlock button once for
driver door only and twice for unlock-
ing all the doors.
Select or Deselect the Two Press
Unlock feature in the User Settings
mode in the cluster LCD display. The
option can be found under the follow-
ing menu:
User Settings ➞Door ➞Two Press
Unlock
A AC
CC
CE
ES
SS
SI
IN
NG
G
Y
YO
OU
UR
R
V
VE
EH
HI
IC
CL
LE
E
OTL045001
Do not leave the keys in your
vehicle with unsupervised chil-
dren. Unattended children
could place the key in the igni-
tion switch and may operate
power windows or other con-
trols, or even make the vehicle
move, which could result in
serious injury or death.
WARNING
Page 96 of 546
3-5
Convenient features of your vehicle
The Two Press Unlock feature can
also be enabled or disabled by
pressing the door lock and unlock
buttons simultaneously on the Key
FOB:
Press and hold both the Door Lock
button and the Door Unlock button
simultaneously until the hazard
warning lights blink.
This will enable or disable the Two
Press Unlock feature. Repeat this
procedure to enable/disable the
mode again.
Information
After unlocking the doors, the doors
will automatically relock after 30 sec-
onds unless a door is opened.
Liftgate unlocking
To unlock the liftgate:
1. Press and hold the Liftgate Unlock
button (3) on the remote key for
more than one second.
2. The hazard warning lights will
blink two times.
3. Once the liftgate is opened and
then closed, the liftgate will auto-
matically re-lock after 30 seconds.
Information
The word "HOLD" is written on the
button to inform you that you must
press and hold the button for more
than one second.
Panic button (if equipped)
Press and hold the Panic button (4)
for more than one second. The horn
sounds and hazard warning lights
flash for about 30 seconds.
To cancel the panic mode, press any
button on the remote key.
Start-up
For more details, refer to the "Key
Ignition Switch" section in chapter
5.
To prevent damaging the remote
key:
• Keep the remote key away from
water or any liquid and fire.
Internal circuits may malfunc-
tion if the inside of the remote
key gets damp (from liquids or
moisture) or if it is heated. This
can exclude the remote key from
being covered under warranty.
Avoid dropping or throwing the
remote key.
Protect the remote key from
extreme temperatures.
NOTICE
i
i
3
Page 97 of 546
3-6
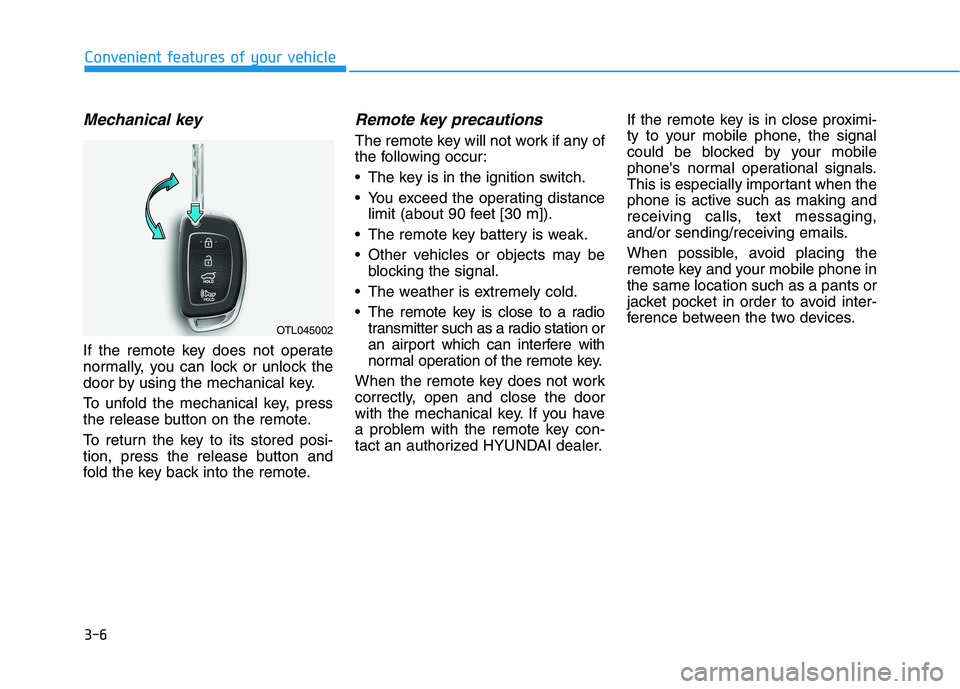
Mechanical key
If the remote key does not operate
normally, you can lock or unlock the
door by using the mechanical key.
To unfold the mechanical key, press
the release button on the remote.
To return the key to its stored posi-
tion, press the release button and
fold the key back into the remote.
Remote key precautions
The remote key will not work if any of
the following occur:
• The key is in the ignition switch.
You exceed the operating distance
limit (about 90 feet [30 m]).
The remote key battery is weak.
Other vehicles or objects may be
blocking the signal.
The weather is extremely cold.
The remote key is close to a radio
transmitter such as a radio station or
an airport which can interfere with
normal operation of the remote key.
When the remote key does not work
correctly, open and close the door
with the mechanical key. If you have
a problem with the remote key con-
tact an authorized HYUNDAI dealer.If the remote key is in close proximi-
ty to your mobile phone, the signal
could be blocked by your mobile
phone's normal operational signals.
This is especially important when the
phone is active such as making and
receiving calls, text messaging,
and/or sending/receiving emails.
When possible, avoid placing the
remote key and your mobile phone in
the same location such as a pants or
jacket pocket in order to avoid inter-
ference between the two devices.
Convenient features of your vehicle
OTL045002
Page 99 of 546
3-8
Convenient features of your vehicle
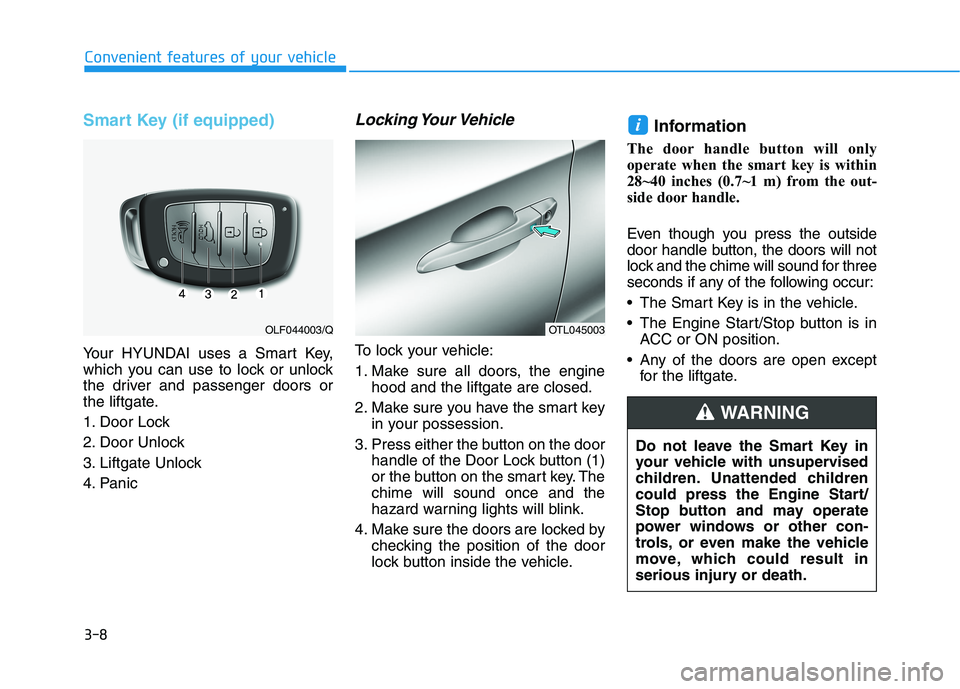
Smart Key (if equipped)
Your HYUNDAI uses a Smart Key,
which you can use to lock or unlock
the driver and passenger doors or
the liftgate.
1. Door Lock
2. Door Unlock
3. Liftgate Unlock
4. Panic
Locking Your Vehicle
To lock your vehicle:
1. Make sure all doors, the engine
hood and the liftgate are closed.
2. Make sure you have the smart key
in your possession.
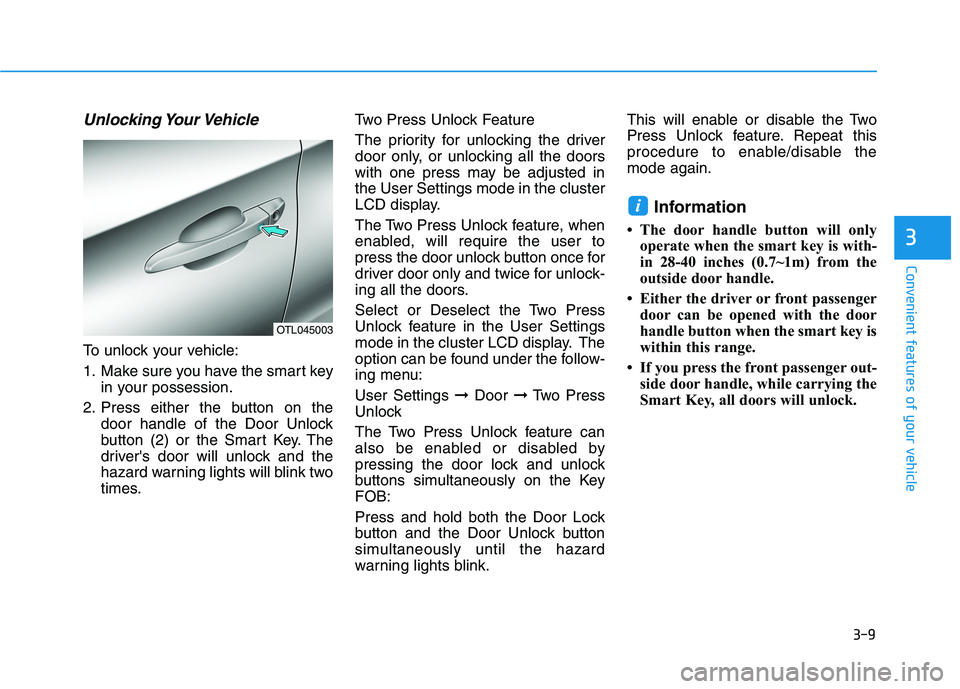
3. Press either the button on the door
handle of the Door Lock button (1)
or the button on the smart key. The
chime will sound once and the
hazard warning lights will blink.
4. Make sure the doors are locked by
checking the position of the door
lock button inside the vehicle.
Information
The door handle button will only
operate when the smart key is within
28~40 inches (0.7~1 m) from the out-
side door handle.
Even though you press the outside
door handle button, the doors will not
lock and the chime will sound for three
seconds if any of the following occur:
The Smart Key is in the vehicle.
The Engine Start/Stop button is in
ACC or ON position.
Any of the doors are open except
for the liftgate.
i
OTL045003OLF044003/Q
Do not leave the Smart Key in
your vehicle with unsupervised
children. Unattended children
could press the Engine Start/
Stop button and may operate
power windows or other con-
trols, or even make the vehicle
move, which could result in
serious injury or death.
WARNING
Page 100 of 546
3-9
Convenient features of your vehicle
3
Unlocking Your Vehicle
To unlock your vehicle:
1. Make sure you have the smart key
in your possession.
2. Press either the button on the
door handle of the Door Unlock
button (2) or the Smart Key. The
driver's door will unlock and the
hazard warning lights will blink two
times.Two Press Unlock Feature
The priority for unlocking the driver
door only, or unlocking all the doors
with one press may be adjusted in
the User Settings mode in the cluster
LCD display.
The Two Press Unlock feature, when
enabled, will require the user to
press the door unlock button once for
driver door only and twice for unlock-
ing all the doors.
Select or Deselect the Two Press
Unlock feature in the User Settings
mode in the cluster LCD display. The
option can be found under the follow-
ing menu:
User Settings ➞Door ➞Two Press
Unlock
The Two Press Unlock feature can
also be enabled or disabled by
pressing the door lock and unlock
buttons simultaneously on the Key
FOB:
Press and hold both the Door Lock
button and the Door Unlock button
simultaneously until the hazard
warning lights blink.This will enable or disable the Two
Press Unlock feature. Repeat this
procedure to enable/disable the
mode again.
Information
• The door handle button will only
operate when the smart key is with-
in 28-40 inches (0.7~1m) from the
outside door handle.
• Either the driver or front passenger
door can be opened with the door
handle button when the smart key is
within this range.
• If you press the front passenger out-
side door handle, while carrying the
Smart Key, all doors will unlock.
i
OTL045003
Page 102 of 546
3-11
Convenient features of your vehicle
3
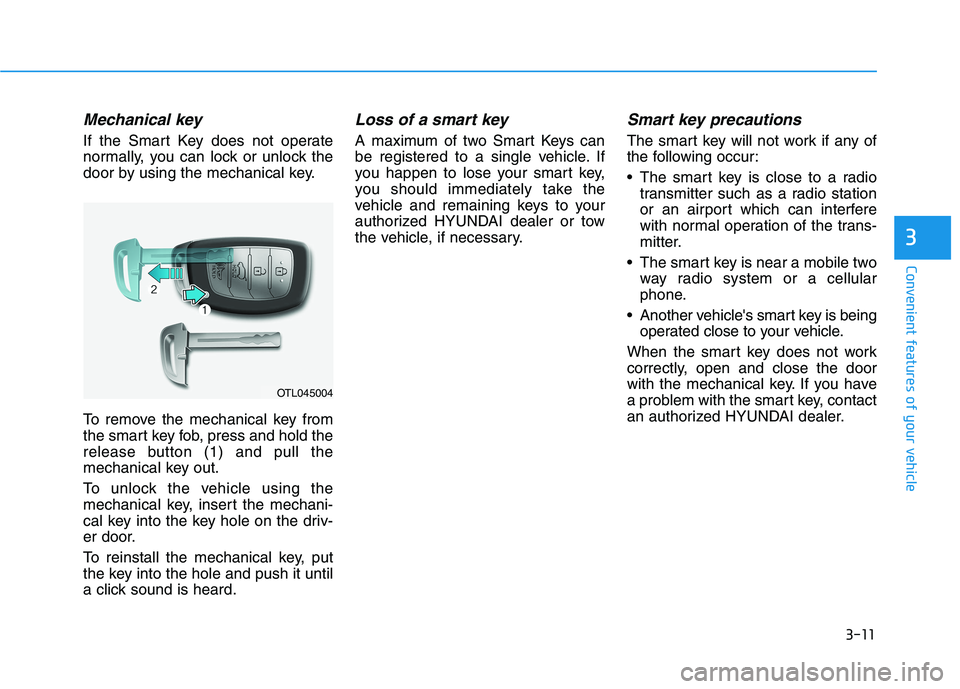
Mechanical key
If the Smart Key does not operate
normally, you can lock or unlock the
door by using the mechanical key.
To remove the mechanical key from
the smart key fob, press and hold the
release button (1) and pull the
mechanical key out.
To unlock the vehicle using the
mechanical key, insert the mechani-
cal key into the key hole on the driv-
er door.
To reinstall the mechanical key, put
the key into the hole and push it until
a click sound is heard.
Loss of a smart key
A maximum of two Smart Keys can
be registered to a single vehicle. If
you happen to lose your smart key,
you should immediately take the
vehicle and remaining keys to your
authorized HYUNDAI dealer or tow
the vehicle, if necessary.
Smart key precautions
The smart key will not work if any of
the following occur:
The smart key is close to a radio
transmitter such as a radio station
or an airport which can interfere
with normal operation of the trans-
mitter.
The smart key is near a mobile two
way radio system or a cellular
phone.
Another vehicle's smart key is being
operated close to your vehicle.
When the smart key does not work
correctly, open and close the door
with the mechanical key. If you have
a problem with the smart key, contact
an authorized HYUNDAI dealer.
OTL045004