turn signal HYUNDAI TUCSON HYBRID 2022 Owners Manual
[x] Cancel search | Manufacturer: HYUNDAI, Model Year: 2022, Model line: TUCSON HYBRID, Model: HYUNDAI TUCSON HYBRID 2022Pages: 630, PDF Size: 77.98 MB
Page 38 of 630
02
2-9
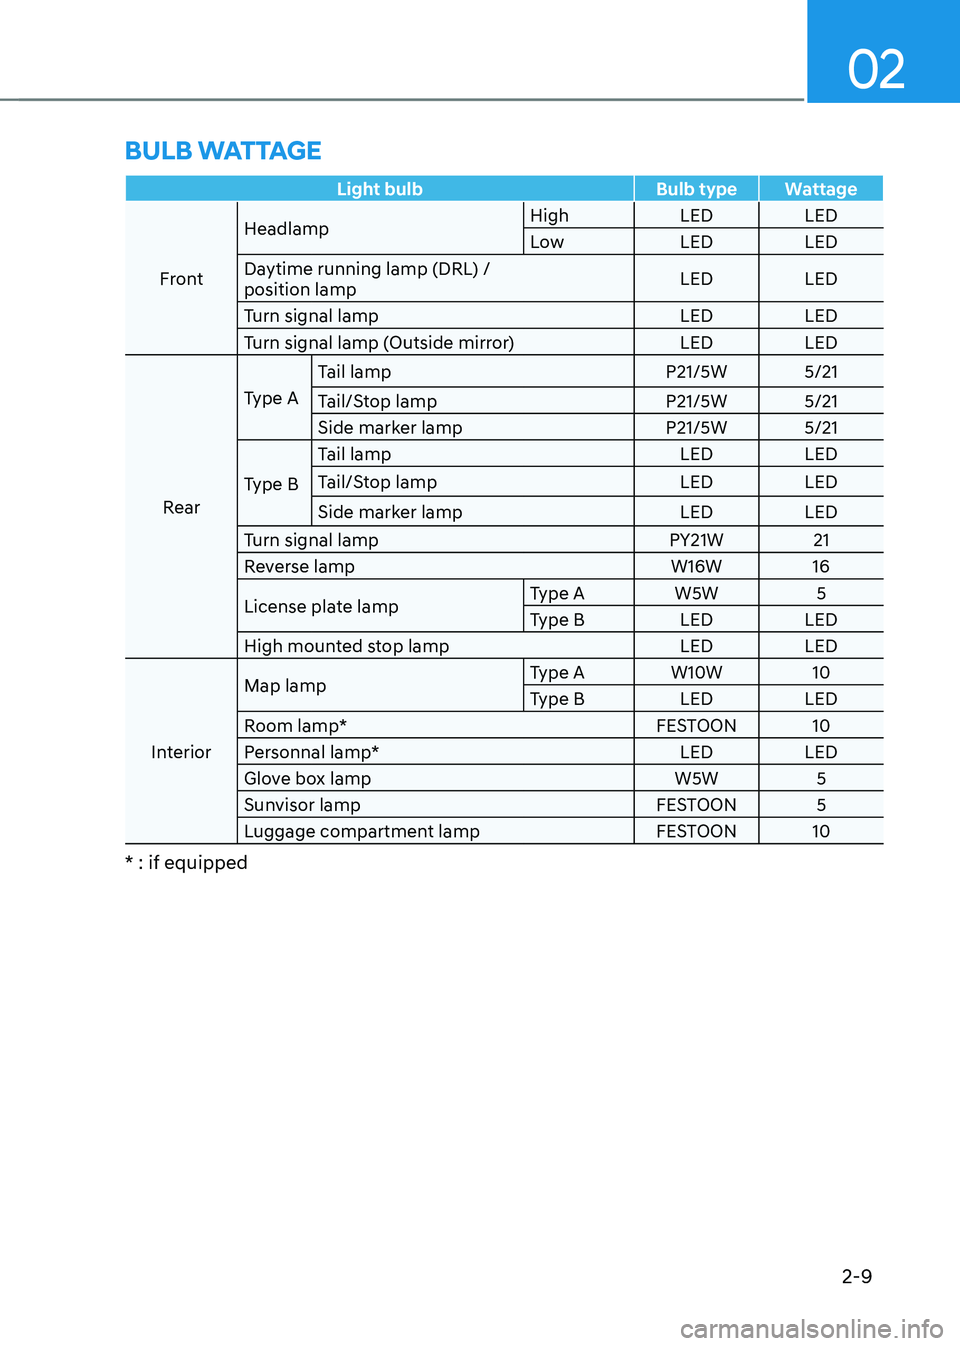
Light bulbBulb typeWattage
Front Headlamp
High
LEDLED
Low LEDLED
Daytime running lamp (DRL) /
position lamp LED
LED
Turn signal lamp LEDLED
Turn signal lamp (Outside mirror) LEDLED
Rear Type A
Tail lamp
P21/5W5/21
Tail/Stop lamp P21/5W5/21
Side marker lamp P21/5W5/21
Type B Tail lamp
LEDLED
Tail/Stop lamp LEDLED
Side marker lamp LEDLED
Turn signal lamp PY21W21
Reverse lamp W16W16
License plate lamp Type A
W5W5
Type B LEDLED
High mounted stop lamp LEDLED
Interior Map lamp
Type A
W10W 10
Type B LEDLED
Room lamp* FESTOON10
Personnal lamp* LEDLED
Glove box lamp W5W5
Sunvisor lamp FESTOON5
Luggage compartment lamp FESTOON10
* : if equipped
BULB WATTAGE
Page 97 of 630
03
3-51
During a moderate to severe frontal
collision, sensors will detect the
vehicle’s rapid deceleration. If the rate of
deceleration is high enough, the control
unit will inflate the front air bags, at the
time and with the force needed.
The front air bags help protect the driver
and front passenger by responding to
frontal impacts in which seat belts alone
cannot provide adequate restraint. When
needed, the side air bags help provide
protection in the event of a side impact
or rollover by supporting the side upper
body area.
• Air bags are activated (able to
inflate if necessary) only when the
Engine Start/Stop button is in the
ON or START position, and it can be
activated within about 3 minutes after
the engine is turned off.
• Air bags inflate in the event of certain
frontal or side collisions to help
protect the occupants from serious
physical injury.
• There is no single speed at which the
air bags will inflate. Generally, air bags
are designed to inflate based upon the
severity of a collision and its direction.
These two factors determine whether
the sensors produce an electronic
deployment/inflation signal.
• The front air bags will completely
inflate and deflate in an instant. It is
virtually impossible for you to see the
air bags inflate during an accident. It is
much more likely that you will simply
see the deflated air bags hanging out
of their storage compartments after
the collision. •
In addition to inflating in serious side
collisions, vehicles equipped with a
rollover sensor, side and/or curtain air
bags will inflate if the sensing system
detects a rollover.
When a rollover is detected, curtain
air bags will remain inflated longer to
help provide protection from ejection,
especially when used in conjunction
with the seat belts. (if equipped with a
rollover sensor)
• To help provide protection, the air
bags must inflate rapidly. The speed
of air bag inflation is a consequence
of extremely short time in which
to inflate the air bag between the
occupant and the vehicle structures
before the occupant impacts those
structures. This speed of inflation
reduces the risk of serious or
lifethreatening injuries and is thus a
necessary part of air bag design.
However, the rapid air bag inflation
can also cause injuries which can
include facial abrasions, bruises and
broken bones because the inflation
speed also causes the air bags to
expand with a great deal of force.
• There are even circumstances under
which contact with the air bag can
cause fatal injuries, especially if the
occupant is positioned excessively
close to the air bag.
You can take steps to reduce the risk
of being injured by an inflating air bag.
The greatest risk is sitting too close to
the air bag. An air bag needs about 10
in. (25 cm) of space to inflate. NHTSA
recommends that drivers allow at least
10 in. (25 cm) between the center of the
steering wheel and the chest.
Page 114 of 630
Immobilizer indicator light (with smart key) ..........................................................4-20
Downhill Brake Control (DBC) indicator light ........................................................4-20
Turn signal indicator light ........................................................................\
.................4-21
High beam indicator light ........................................................................\
................4-21
Low beam indicator light ........................................................................\
.................4-21
Light ON indicator light ........................................................................\
....................4-21
High Beam Assist indicator light ........................................................................\
......4-21
Cruise indicator light ........................................................................\
.......................4-21
SPORT Mode indicator light ........................................................................\
............4-22
ECO Mode indicator light ........................................................................\
................4-22
SMART Mode indicator light ........................................................................\
...........4-22
LCD display messages ........................................................................\
.......................4-22
Shift to P ........................................................................\
...........................................4-22
Low key battery ........................................................................\
................................4-22
Press START button while turning wheel ...............................................................4-22
Check steering wheel lock system ........................................................................\
.4-22
Press brake pedal to start engine ........................................................................\
...4-23
Key not in vehicle ........................................................................\
.............................4-23
Key not detected ........................................................................\
..............................4-23
Press START button again ........................................................................\
...............4-23
Press START button with key ........................................................................\
...........4-23
Check BRAKE SWITCH fuse
........................................................................\
............4-23
12V battery discharging due to additional electrical devices ...............................4-23
Door, Hood, Liftgate open indicator .......................................................................4-24
Sunroof open indicator ........................................................................\
....................4-24
Low pressure ........................................................................\
....................................4-24
Wiper/Lights display ........................................................................\
........................4-25
Low washer fluid ........................................................................\
..............................4-25
Low fuel ........................................................................\
............................................4-25
Engine has overheated ........................................................................\
....................4-25
Check exhaust system ........................................................................\
.....................4-25
Check headlight ........................................................................\
...............................4-25
Check turn signal ........................................................................\
.............................4-25
Check brake light ........................................................................\
.............................4-25
Check headlamp LED ........................................................................\
......................4-26
Check Active Air Flap system ........................................................................\
..........4-26
Ready to start driving ........................................................................\
......................4-26
Check regenerative brakes ........................................................................\
.............. 4-26
Stop vehicle and check brakes
........................................................................\
.......4-26
Check Hybrid system ........................................................................\
.......................4-26
Stop safely and check Hybrid system ....................................................................4-26
Check Hybrid system. Do not start engine ............................................................4-26
4
Page 133 of 630
04
4-21
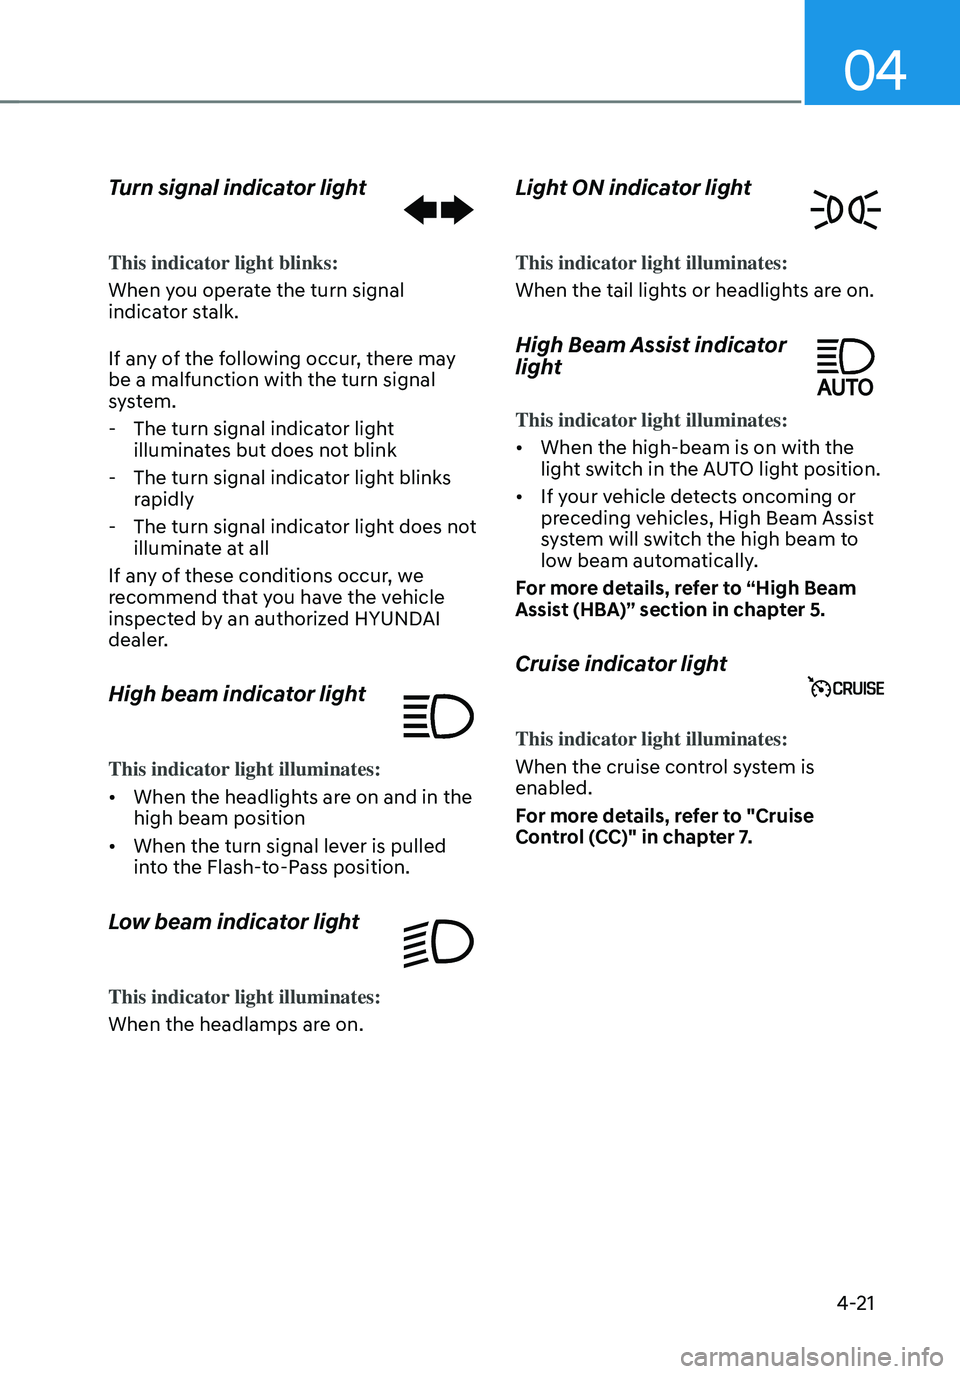
Turn signal indicator light
This indicator light blinks:
When you operate the turn signal
indicator stalk.
If any of the following occur, there may
be a malfunction with the turn signal
system.
-The turn signal indicator light
illuminates but does not blink
-The turn signal indicator light blinks
rapidly
-The turn signal indicator light does not
illuminate at all
If any of these conditions occur, we
recommend that you have the vehicle
inspected by an authorized HYUNDAI
dealer.
High beam indicator light
This indicator light illuminates:
• When the headlights are on and in the
high beam position
• When the turn signal lever is pulled
into the Flash-to-Pass position.
Low beam indicator light
This indicator light illuminates:
When the headlamps are on.
Light ON indicator light
This indicator light illuminates:
When the tail lights or headlights are on.
High Beam Assist indicator
light
This indicator light illuminates:
• When the high-beam is on with the
light switch in the AUTO light position.
• If your vehicle detects oncoming or
preceding vehicles, High Beam Assist
system will switch the high beam to
low beam automatically.
For more details, refer to “High Beam
Assist (HBA)” section in chapter 5.
Cruise indicator light
This indicator light illuminates:
When the cruise control system is
enabled.
For more details, refer to "Cruise
Control (CC)" in chapter 7.
Page 137 of 630

04
4-25
Wiper/Lights display
„„Wiper„„Lights
OJX1049008LOJX1049007L
• This indicator displays which wiper
speed is selected using the wiper
control.
• This indicator displays which exterior
light is selected using the lighting
control.
You can activate or deactivate Wiper/
Lights display function from the User
Settings menu in the cluster LCD display.
- Setup → User settings → Cluster →
Wiper/Lights display
Low washer fluid (if equipped)
This message is displayed if the washer
fluid level in the reservoir is nearly empty.
Have the washer fluid reservoir refilled.
Low fuel
This message is displayed if the fuel tank
is almost out of fuel.
When this message is displayed, the low
fuel level warning light in the cluster will
come on.
It is recommended to look for the nearest
fueling station and refuel as soon as
possible.
NOTICE
Do not drive the vehicle with low fuel.
Hybrid battery damage may occur
when the fuel tank is completely empty.
Engine has overheated
This message is displayed when the
engine coolant temperature is above
248°F (120°C). This means that the
engine is overheated and may be
damaged.
If your vehicle is overheated, refer to
“Overheating” section in chapter 8.
Check exhaust system (if equipped)
This message is displayed if there is a
problem with the GPF system. At this
time, the GPF warning light will also
blink. If this occurs, we recommend that
you have the GPF system checked by an
authorized HYUNDAI dealer.
GPF : Gasoline Particulate Filter
Check headlight (if equipped)
This message is displayed if the
headlights are not operating properly. A
headlight bulb may need to be replaced.
Make sure to replace the burned out
bulb with a new one of the same wattage
rating.
Check turn signal (if equipped)
This message is displayed if the turn
signal lamps are not operating properly.
A lamp may need to be replaced.
Make sure to replace the burned out
bulb with a new one of the same wattage
rating.
Check brake light (if equipped)
This message is displayed if the stop
lamps are not operating properly. A lamp
may need to be replaced.
Make sure to replace the burned out
bulb with a new one of the same wattage
rating.
Page 148 of 630
Instrument cluster
4-36
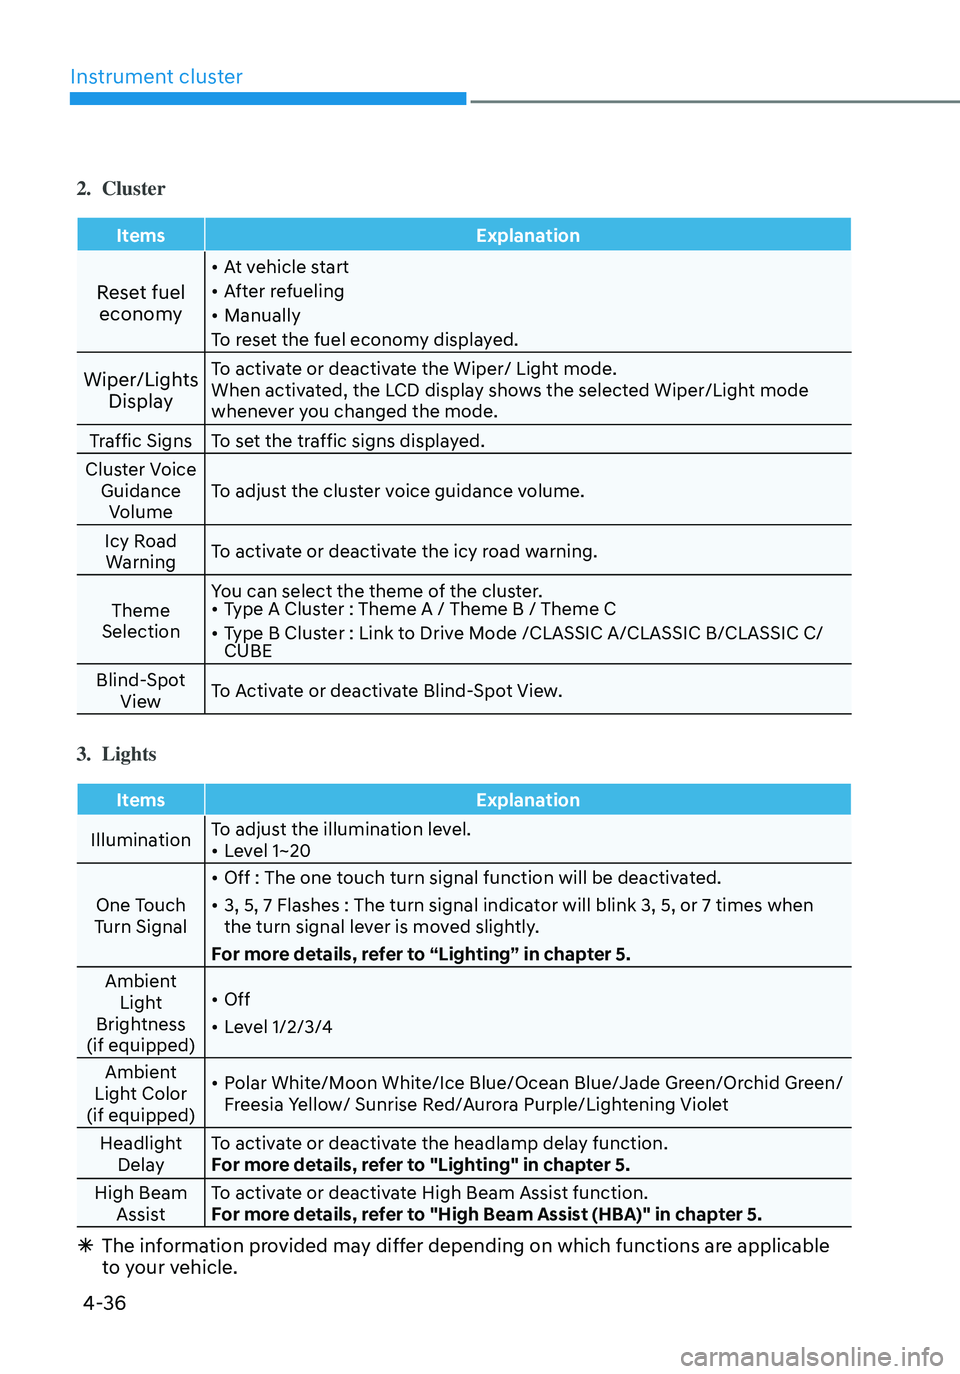
2. Cluster
ItemsExplanation
Reset fuel
economy
• At vehicle start
• After refueling
• Manually
To reset the fuel economy displayed.
Wiper/Lights DisplayTo activate or deactivate the Wiper/ Light mode.
When activated, the LCD display shows the selected Wiper/Light mode
whenever you changed the mode.
Traffic Signs To set the traffic signs displayed.
Cluster Voice Guidance Volume To adjust the cluster voice guidance volume.
Icy Road Warning To activate or deactivate the icy road warning.
Theme
Selection You can select the theme of the cluster.
• Type A Cluster : Theme A / Theme B / Theme C
• Type B Cluster : Link to Drive Mode /CLASSIC A/CLASSIC B/CLASSIC C/
CUBE
Blind-Spot View To Activate or deactivate Blind-Spot View.
3. Lights
Items
Explanation
Illumination To adjust the illumination level.
• Level 1~20
One Touch
Turn Signal
• Off : The one touch turn signal function will be deactivated.
• 3, 5, 7 Flashes : The turn signal indicator will blink 3, 5, or 7 times when
the turn signal lever is moved slightly.
For more details, refer to “Lighting” in chapter 5.
Ambient Light
Brightness
(if equipped)
• Off
• Level 1/2/3/4
Ambient
Light Color
(if equipped)
• Polar White/Moon White/Ice Blue/Ocean Blue/Jade Green/Orchid Green/
Freesia Yellow/ Sunrise Red/Aurora Purple/Lightening Violet
Headlight Delay To activate or deactivate the headlamp delay function.
For more details, refer to "Lighting" in chapter 5.
High Beam Assist To activate or deactivate High Beam Assist function.
For more details, refer to "High Beam Assist (HBA)" in chapter 5.
Ã
The information provided may differ depending on which functions are applicable
to your vehicle.
Page 240 of 630
05
5-83
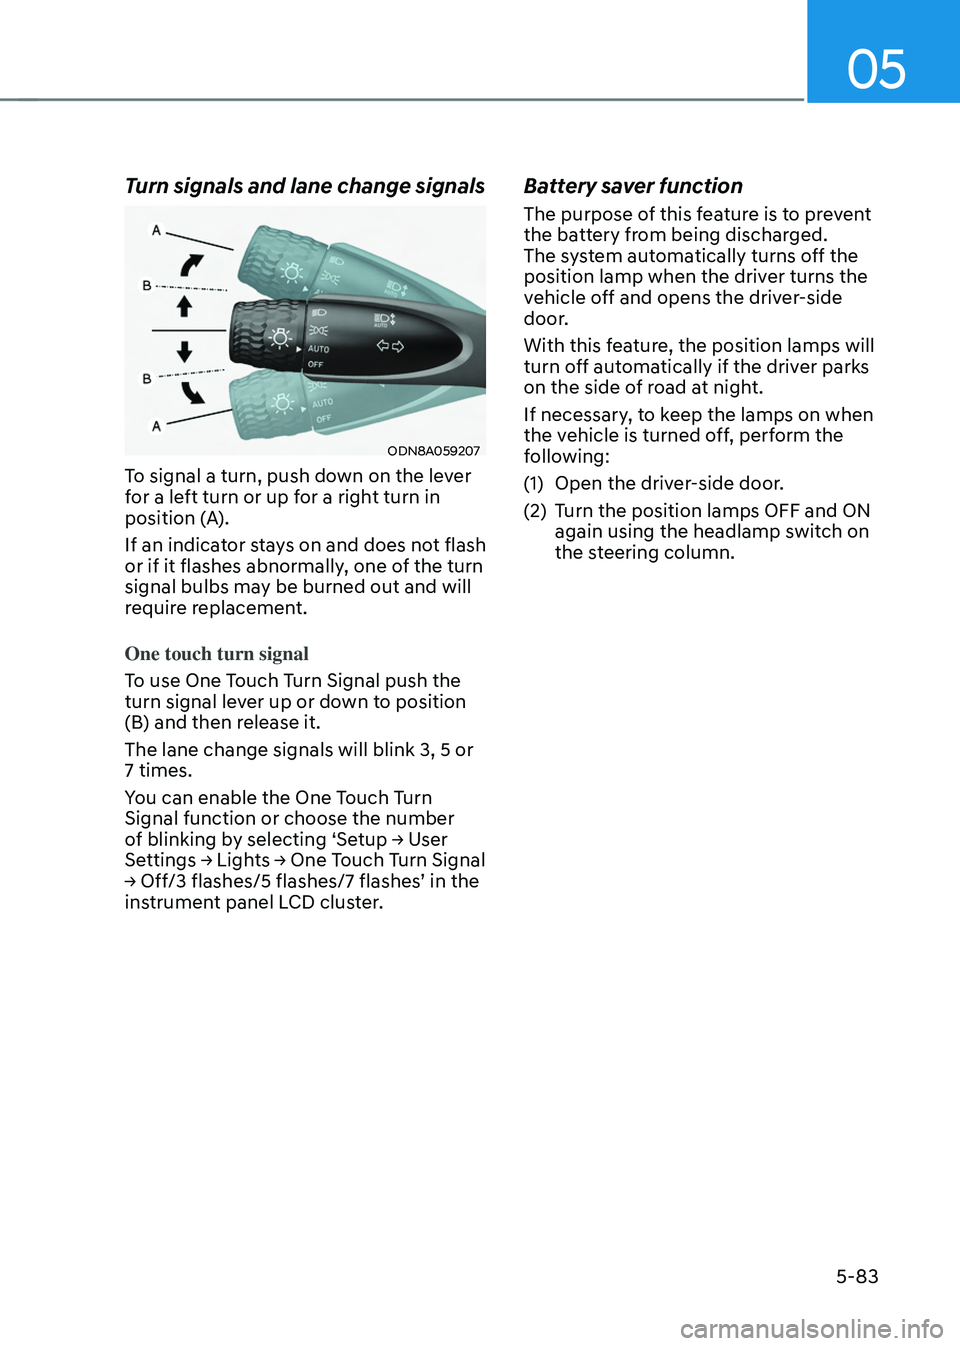
Turn signals and lane change signals
ODN8A059207
To signal a turn, push down on the lever
for a left turn or up for a right turn in
position (A).
If an indicator stays on and does not flash
or if it flashes abnormally, one of the turn
signal bulbs may be burned out and will
require replacement.
One touch turn signal
To use One Touch Turn Signal push the
turn signal lever up or down to position
(B) and then release it.
The lane change signals will blink 3, 5 or
7 times.
You can enable the One Touch Turn
Signal function or choose the number
of
blinking b
y
selecting ‘Se
tup
→ U
ser
Settings → Ligh
ts
→ One T
ouch
T
urn
Signal → Off/3 flashes/5 flashes/7 flashes
’
in the instrumen
t panel LCD cluster.
Battery saver function
The purpose of this feature is to prevent
the battery from being discharged.
The system automatically turns off the
position lamp when the driver turns the
vehicle off and opens the driver-side
door.
With this feature, the position lamps will
turn off automatically if the driver parks
on the side of road at night.
If necessary, to keep the lamps on when
the vehicle is turned off, perform the
following:
(1)
Open the driver
-side door.
(2)
Turn the position lamps OFF and ON
again using the headlamp s
witch on
the steering column.
Page 270 of 630
05
5-113
ClImaTe ConTrol addITIonal feaTUres
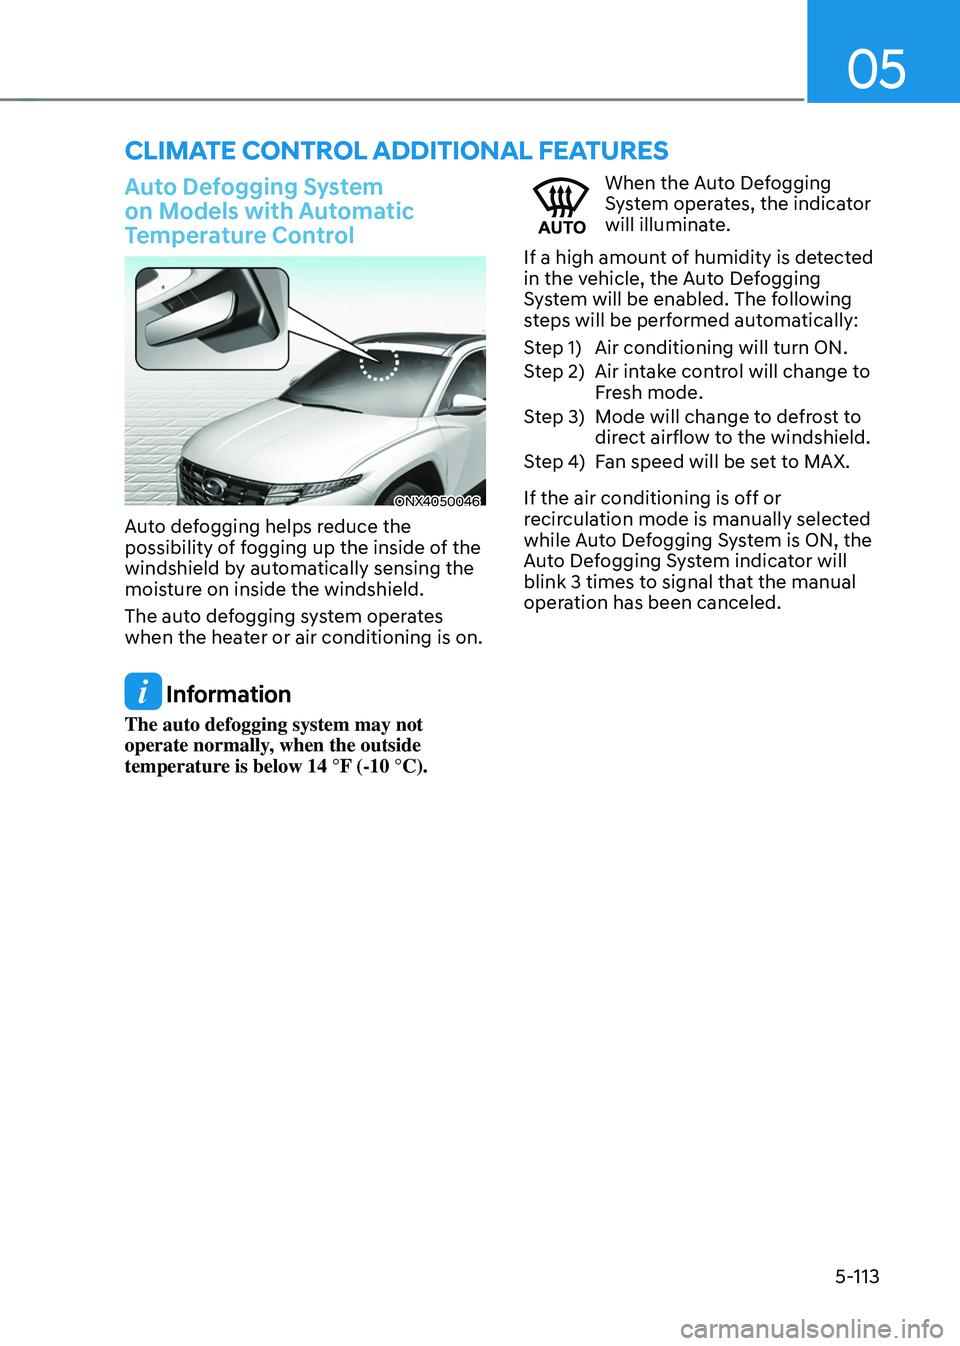
Auto Defogging System
on Models with Automatic
Temperature Control
ONX4050046
Auto defogging helps reduce the
possibility of fogging up the inside of the
windshield by automatically sensing the
moisture on inside the windshield.
The auto defogging system operates
when the heater or air conditioning is on.
Information
The auto defogging system may not
operate normally, when the outside
temperature is below 14 °F (-10 °C).
When the Auto Defogging
System operates, the indicator
will illuminate.
If a high amount of humidity is detected
in the vehicle, the Auto Defogging
System will be enabled. The following
steps will be performed automatically:
Step 1) Air conditioning will turn ON.
Step 2) Air intake control will change to Fresh mode.
Step 3) Mode will change to defrost to direct airflow to the windshield.
Step 4) Fan speed will be set to MAX.
If the air conditioning is off or
recirculation mode is manually selected
while Auto Defogging System is ON, the
Auto Defogging System indicator will
blink 3 times to signal that the manual
operation has been canceled.
Page 271 of 630
Convenient features
5-114
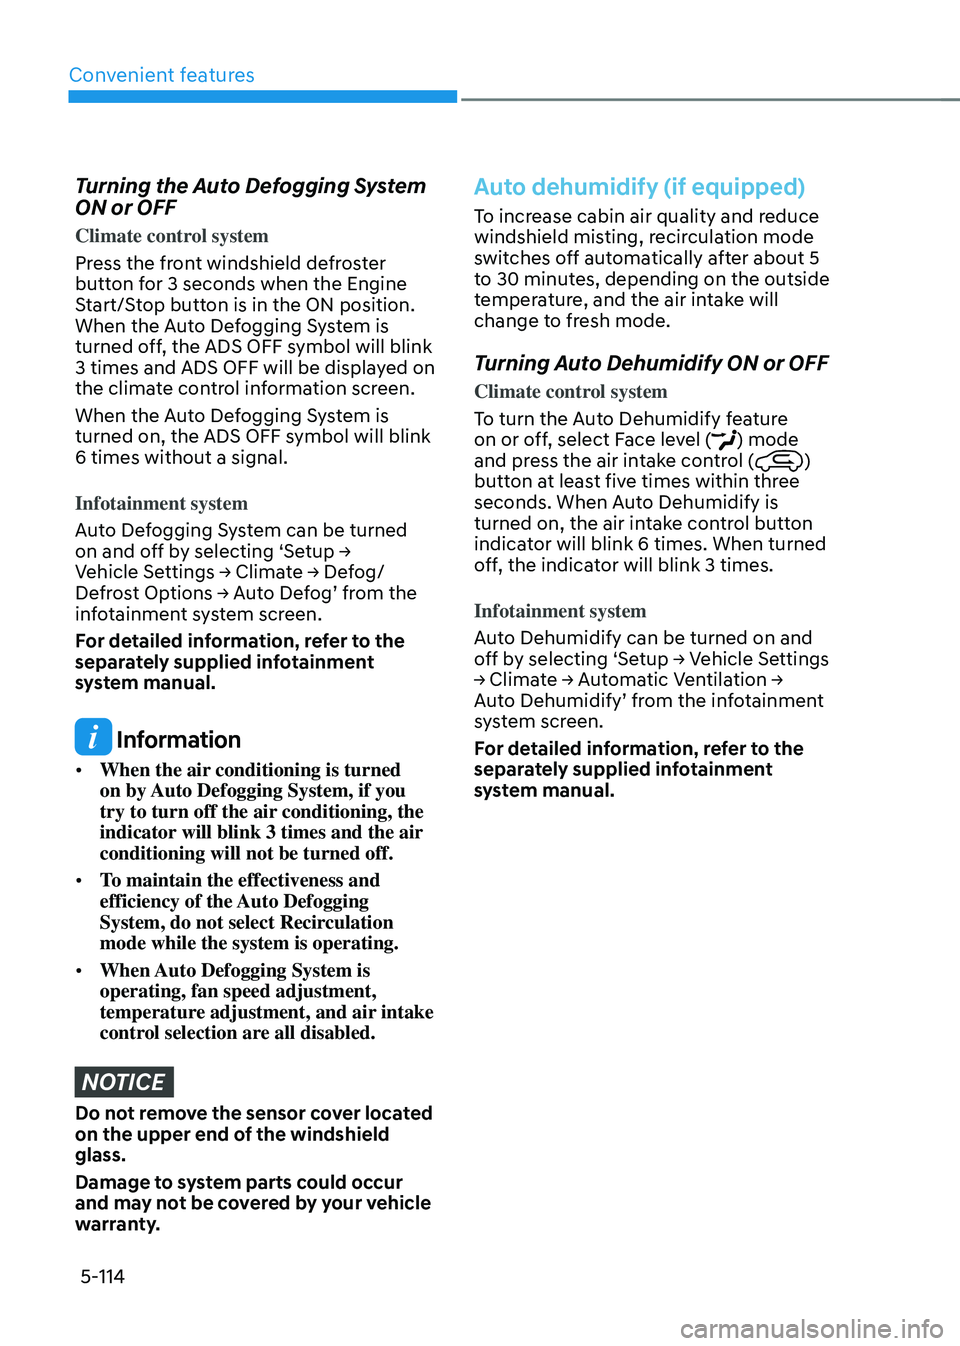
Turning the Auto Defogging System
ON or OFF
Climate control system
Press the front windshield defroster
button for 3 seconds when the Engine
Start/Stop button is in the ON position.
When the Auto Defogging System is
turned off, the ADS OFF symbol will blink
3 times and ADS OFF will be displayed on
the climate control information screen.
When the Auto Defogging System is
turned on, the ADS OFF symbol will blink
6 times without a signal.
Infotainment system
Auto Defogging System can be turned
on
and o
ff
b
y
selecting ‘Se
tup
→ Vehicle Se
ttings
→ Clima
te
→ De
fog/
Defrost
Op
tions
→ A
uto
De
fog’
fr
om
the inf
otainment system screen.
For detailed information, refer to the
separately supplied infotainment
system manual.
Information
• When the air conditioning is turned
on by Auto Defogging System, if you
try to turn off the air conditioning, the
indicator will blink 3 times and the air
conditioning will not be turned off.
• To maintain the effectiveness and
efficiency of the Auto Defogging
System, do not select Recirculation
mode while the system is operating.
• When Auto Defogging System is
operating, fan speed adjustment,
temperature adjustment, and air intake
control selection are all disabled.
NOTICE
Do not remove the sensor cover located
on the upper end of the windshield
glass.
Damage to system parts could occur
and may not be covered by your vehicle
warranty.
Auto dehumidify (if equipped)
To increase cabin air quality and reduce
windshield misting, recirculation mode
switches off automatically after about 5
to 30 minutes, depending on the outside
temperature, and the air intake will
change to fresh mode.
Turning Auto Dehumidify ON or OFF
Climate control system
To turn the Auto Dehumidify feature
on or off, select Face level (
) mode
and press the air intake control ()
button at least five times within three
seconds. When Auto Dehumidify is
turned on, the air intake control button
indicator will blink 6 times. When turned
off, the indicator will blink 3 times.
Infotainment system
Auto Dehumidify can be turned on and
off
b
y
selecting ‘Se
tup
→ V
ehicle
Se
ttings
→ Clima
te
→ A
utomatic
V
entilation
→ Aut
o Dehumidify’ from the infotainment
system screen.
For detailed information, refer to the
separately supplied infotainment
system manual.
Page 352 of 630
06
6-65
Backing up
Hold the bottom of the steering wheel
with one hand. Then, to move the trailer
to the left, move your hand to the left. To
move the trailer to the right, move your
hand to the right. Always back up slowly
and, if possible, have someone guide
you.
Making turns
When you’re turning with a trailer, make
wider turns than normal. Do this so your
trailer won’t strike soft shoulders, curbs,
road signs, trees, or other objects. Avoid
jerky or sudden maneuvers. Signal well in
advance.
Turn signals
When you tow a trailer, your vehicle has
to have a different turn signal flasher and
extra wiring. The green arrows on your
instrument panel will flash whenever you
signal a turn or lane change. Properly
connected, the trailer lights will also flash
to alert other drivers you’re about to turn,
change lanes, or stop.
When towing a trailer, the green arrows
on your instrument panel will flash for
turns even if the bulbs on the trailer
are burned out. Thus, you may think
drivers behind you are seeing your
signals when, in fact, they are not. It’s
important to check occasionally to be
sure the trailer bulbs are still working.
You must also check the lights every time
you disconnect and then reconnect the
wires.
WARNING
Do not connect a trailer lighting system
directly to your vehicle’s lighting
system. Use an approved trailer wiring
harness. Failure to do so could result in
damage to the vehicle electrical system
and/or personal injury. We recommend
that you consult an authorized
HYUNDAI dealer for assistance.
Driving on hills
Reduce speed and shift to a lower gear
before you start down a long or steep
downgrade. If you don’t shift down, you
might have to use your brakes so much
that they would get overheated and may
not operate efficiently.
On a long uphill grade, shift down and
reduce your speed to around 45 mph (70
km/h) to reduce the possibility of engine
and transmission overheating.
If your trailer weighs more than the
maximum trailer weight without trailer
brakes and you have a automatic
transmission, you should drive in D
(Drive) when towing a trailer.
Operating your vehicle in D (Drive)
when towing a trailer will minimize heat
build-up and extend the life of your
transmission.