HYUNDAI VELOSTER 2011 Owners Manual
Manufacturer: HYUNDAI, Model Year: 2011, Model line: VELOSTER, Model: HYUNDAI VELOSTER 2011Pages: 386, PDF Size: 7.79 MB
Page 351 of 386
759
Maintenance
3. Check the removed fuse; replace it if it
is blown. To remove or insert the fuse,
use the fuse puller in the engine com-
partment fuse panel.
4. Push in a new fuse of the same rating,
and make sure it fits tightly in the clips.
If it fits loosely, consult an authorized
HYUNDAI dealer.
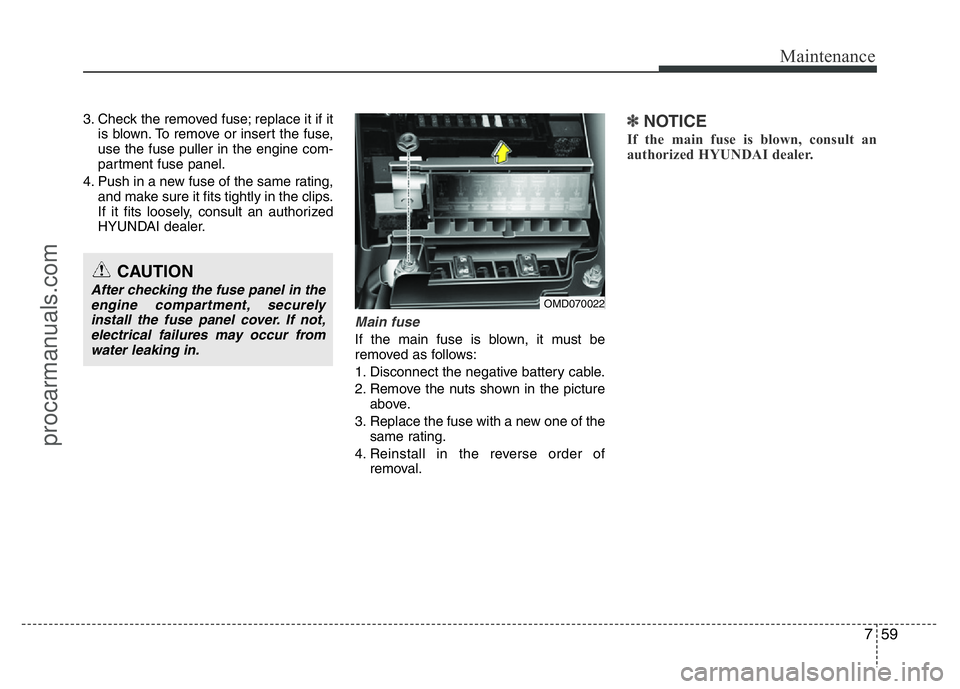
Main fuse
If the main fuse is blown, it must be
removed as follows:
1. Disconnect the negative battery cable.
2. Remove the nuts shown in the picture
above.
3. Replace the fuse with a new one of the
same rating.
4. Reinstall in the reverse order of
removal.
✽NOTICE
If the main fuse is blown, consult an
authorized HYUNDAI dealer.
CAUTION
After checking the fuse panel in the
engine compartment, securely
install the fuse panel cover. If not,
electrical failures may occur from
water leaking in.OMD070022
procarmanuals.com
Page 352 of 386
Maintenance
60 7
✽NOTICE
Not all fuse panel descriptions in this
manual may be applicable to your vehi-
cle, the information is accurate at the
time of printing. When you inspect the
fuse panel in your vehicle, refer to the
fuse panel label.
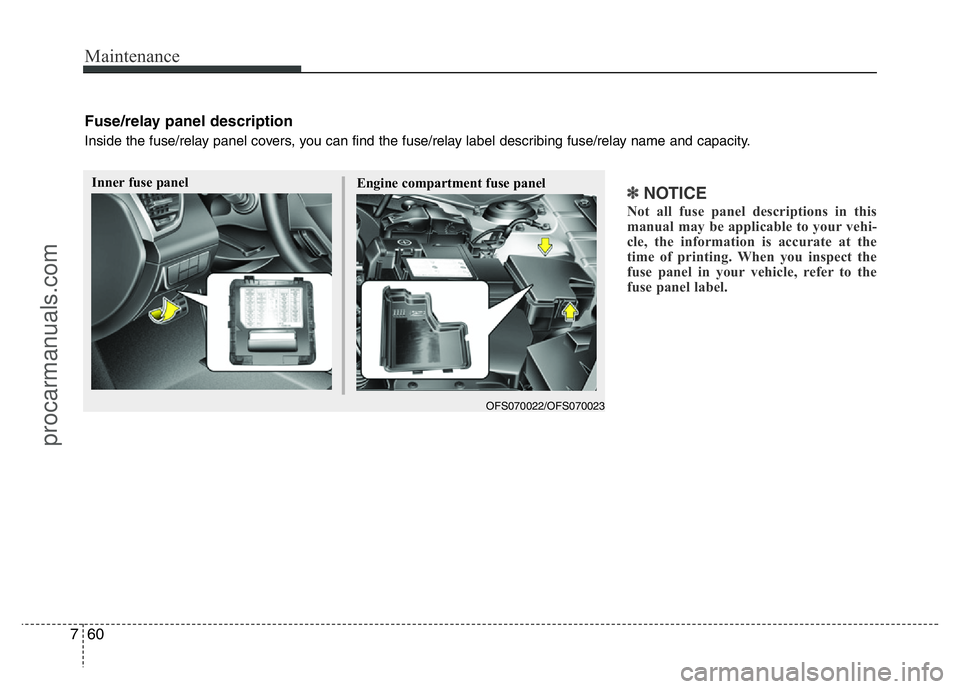
Inner fuse panel
OFS070022/OFS070023
Engine compartment fuse panel
Fuse/relay panel description
Inside the fuse/relay panel covers, you can find the fuse/relay label describing fuse/relay name and capacity.
procarmanuals.com
Page 353 of 386
761
Maintenance
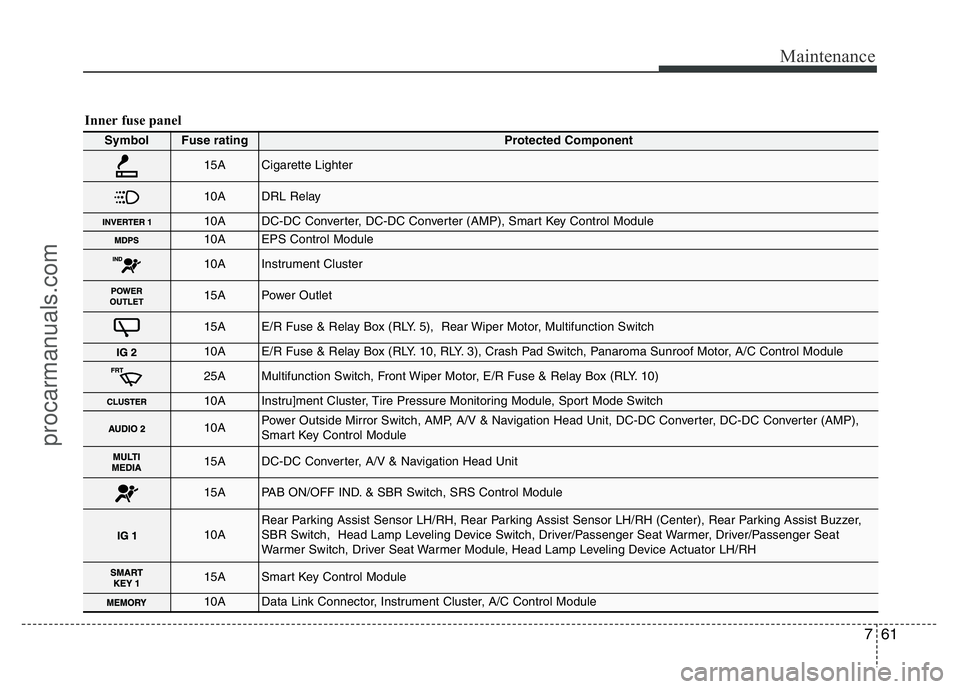
Inner fuse panel
Symbol Fuse ratingProtected Component
15ACigarette Lighter
10ADRL Relay
10ADC-DC Converter, DC-DC Converter (AMP), Smart Key Control Module
10AEPS Control Module
10AInstrument Cluster
15APower Outlet
15AE/R Fuse & Relay Box (RLY. 5), Rear Wiper Motor, Multifunction Switch
10AE/R Fuse & Relay Box (RLY. 10, RLY. 3), Crash Pad Switch, Panaroma Sunroof Motor, A/C Control Module
25AMultifunction Switch, Front Wiper Motor, E/R Fuse & Relay Box (RLY. 10)
10AInstru]ment Cluster, Tire Pressure Monitoring Module, Sport Mode Switch
10APower Outside Mirror Switch, AMP, A/V & Navigation Head Unit, DC-DC Converter, DC-DC Converter (AMP),
Smart Key Control Module
15ADC-DC Converter, A/V & Navigation Head Unit
15APAB ON/OFF IND. & SBR Switch, SRS Control Module
10ARear Parking Assist Sensor LH/RH, Rear Parking Assist Sensor LH/RH (Center), Rear Parking Assist Buzzer,
SBR Switch, Head Lamp Leveling Device Switch, Driver/Passenger Seat Warmer, Driver/Passenger Seat
Warmer Switch, Driver Seat Warmer Module, Head Lamp Leveling Device Actuator LH/RH
15ASmart Key Control Module
10AData Link Connector, Instrument Cluster, A/C Control Module
procarmanuals.com
Page 354 of 386
Maintenance
62 7
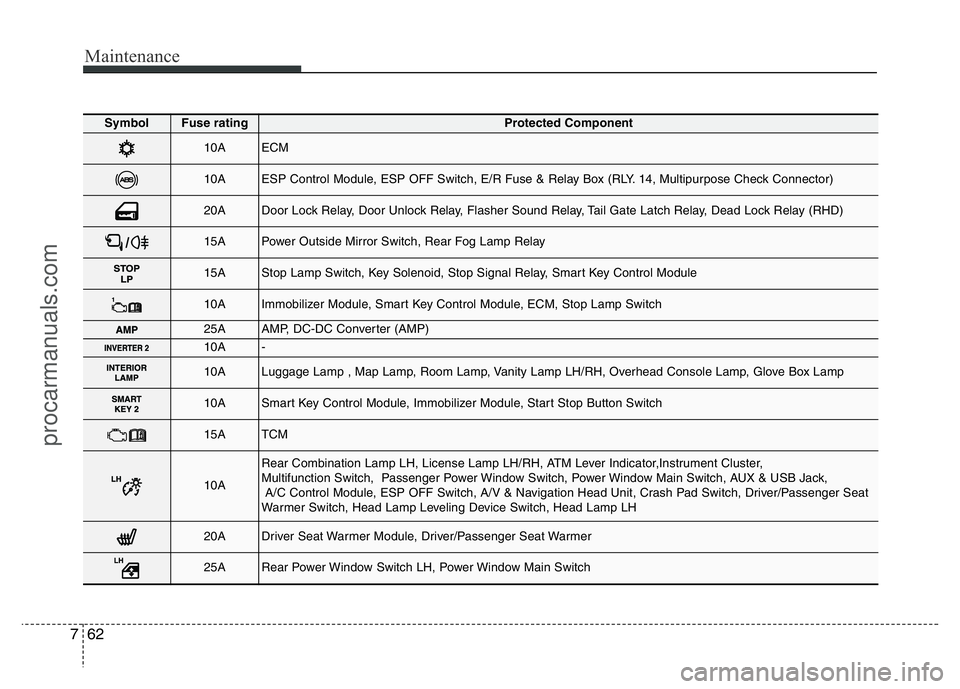
Symbol Fuse ratingProtected Component
10AECM
10AESP Control Module, ESP OFF Switch, E/R Fuse & Relay Box (RLY. 14, Multipurpose Check Connector)
20ADoor Lock Relay, Door Unlock Relay, Flasher Sound Relay, Tail Gate Latch Relay, Dead Lock Relay (RHD)
15APower Outside Mirror Switch, Rear Fog Lamp Relay
15AStop Lamp Switch, Key Solenoid, Stop Signal Relay, Smart Key Control Module
10AImmobilizer Module, Smart Key Control Module, ECM, Stop Lamp Switch
25AAMP, DC-DC Converter (AMP)
10A-
10ALuggage Lamp , Map Lamp, Room Lamp, Vanity Lamp LH/RH, Overhead Console Lamp, Glove Box Lamp
10ASmart Key Control Module, Immobilizer Module, Start Stop Button Switch
15ATCM
10A
Rear Combination Lamp LH, License Lamp LH/RH, ATM Lever Indicator,Instrument Cluster,
Multifunction Switch, Passenger Power Window Switch, Power Window Main Switch, AUX & USB Jack,
A/C Control Module, ESP OFF Switch, A/V & Navigation Head Unit, Crash Pad Switch, Driver/Passenger Seat
Warmer Switch, Head Lamp Leveling Device Switch, Head Lamp LH
20ADriver Seat Warmer Module, Driver/Passenger Seat Warmer
25ARear Power Window Switch LH, Power Window Main Switch
procarmanuals.com
Page 355 of 386
763
Maintenance
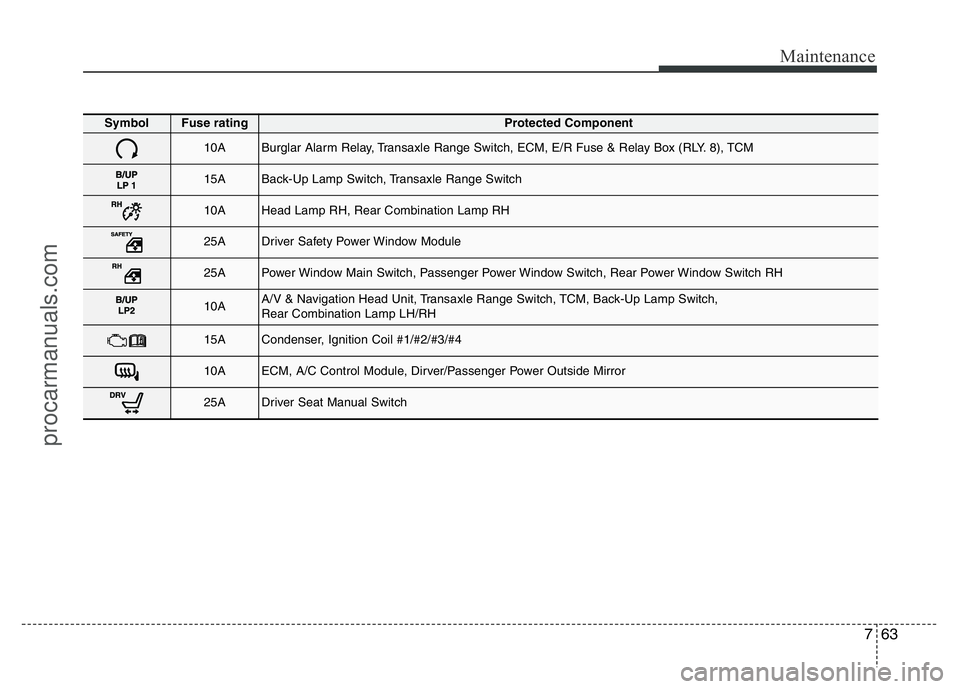
Symbol Fuse ratingProtected Component
10ABurglar Alarm Relay, Transaxle Range Switch, ECM, E/R Fuse & Relay Box (RLY. 8), TCM
15ABack-Up Lamp Switch, Transaxle Range Switch
10AHead Lamp RH, Rear Combination Lamp RH
25ADriver Safety Power Window Module
25APower Window Main Switch, Passenger Power Window Switch, Rear Power Window Switch RH
10AA/V & Navigation Head Unit, Transaxle Range Switch, TCM, Back-Up Lamp Switch,
Rear Combination Lamp LH/RH
15ACondenser, Ignition Coil #1/#2/#3/#4
10AECM, A/C Control Module, Dirver/Passenger Power Outside Mirror
25ADriver Seat Manual Switch
procarmanuals.com
Page 356 of 386
Maintenance
64 7
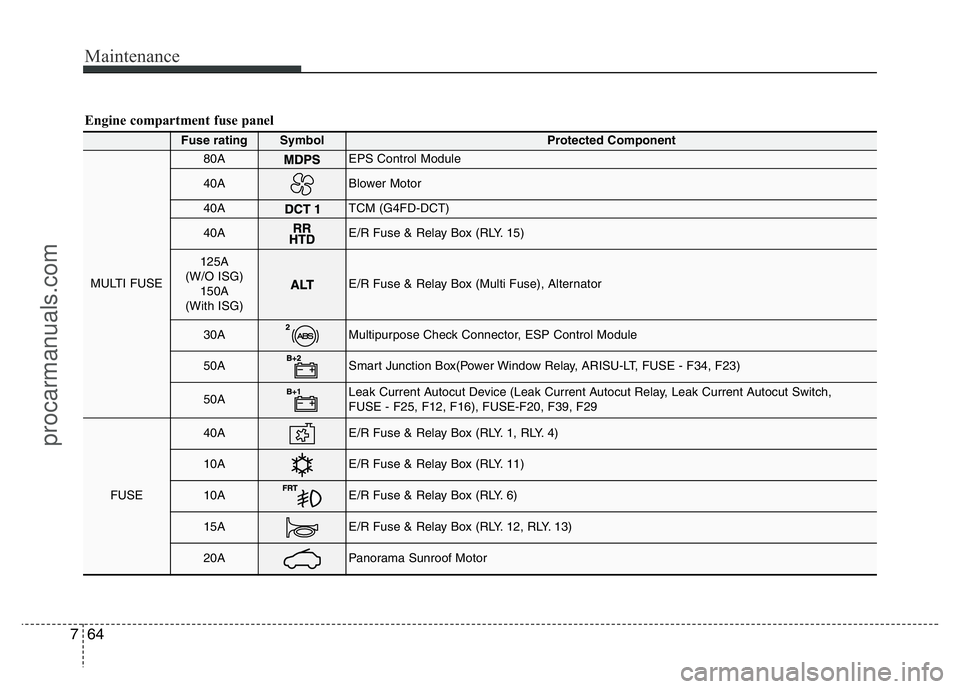
Engine compartment fuse panel
Fuse ratingSymbol Protected Component
MULTI FUSE
80AEPS Control Module
40ABlower Motor
40ATCM (G4FD-DCT)
40AE/R Fuse & Relay Box (RLY. 15)
125A
(W/O ISG)
150A
(With ISG)
E/R Fuse & Relay Box (Multi Fuse), Alternator
30AMultipurpose Check Connector, ESP Control Module
50ASmart Junction Box(Power Window Relay, ARISU-LT, FUSE - F34, F23)
50ALeak Current Autocut Device (Leak Current Autocut Relay, Leak Current Autocut Switch,
FUSE - F25, F12, F16), FUSE-F20, F39, F29
FUSE
40AE/R Fuse & Relay Box (RLY. 1, RLY. 4)
10AE/R Fuse & Relay Box (RLY. 11)
10AE/R Fuse & Relay Box (RLY. 6)
15AE/R Fuse & Relay Box (RLY. 12, RLY. 13)
20APanorama Sunroof Motor
procarmanuals.com
Page 357 of 386
765
Maintenance
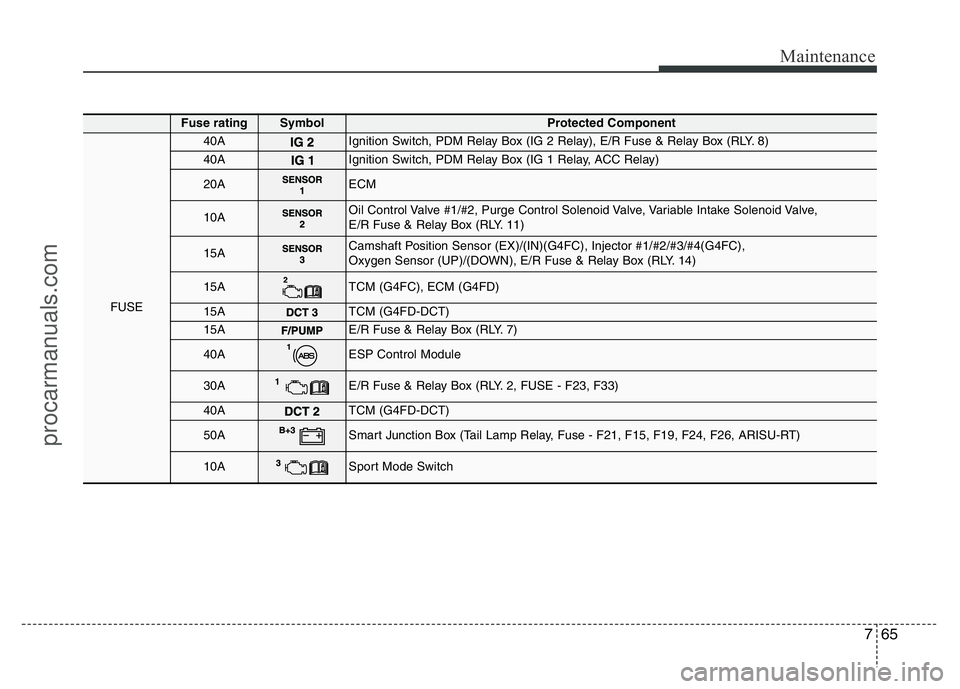
Fuse ratingSymbol Protected Component
FUSE
40AIgnition Switch, PDM Relay Box (IG 2 Relay), E/R Fuse & Relay Box (RLY. 8)
40AIgnition Switch, PDM Relay Box (IG 1 Relay, ACC Relay)
20AECM
10AOil Control Valve #1/#2, Purge Control Solenoid Valve, Variable Intake Solenoid Valve,
E/R Fuse & Relay Box (RLY. 11)
15ACamshaft Position Sensor (EX)/(IN)(G4FC), Injector #1/#2/#3/#4(G4FC),
Oxygen Sensor (UP)/(DOWN), E/R Fuse & Relay Box (RLY. 14)
15ATCM (G4FC), ECM (G4FD)
15ATCM (G4FD-DCT)
15AE/R Fuse & Relay Box (RLY. 7)
40AESP Control Module
30AE/R Fuse & Relay Box (RLY. 2, FUSE - F23, F33)
40ATCM (G4FD-DCT)
50ASmart Junction Box (Tail Lamp Relay, Fuse - F21, F15, F19, F24, F26, ARISU-RT)
10ASport Mode Switch
procarmanuals.com
Page 358 of 386
Maintenance
66 7
LIGHT BULBS
Use only the bulbs of the specified
wattage.
✽NOTICE
After heavy, driving rain or washing,
headlight and taillight lenses could
appear frosty. This condition is caused by
the temperature difference between the
lamp inside and outside. This is similar
to the condensation on your windows
inside your vehicle during the rain and
doesn’t indicate a problem with your
vehicle. If the water leaks into the lamp
bulb circuitry, have the vehicle checked
by an authorized HYUNDAI dealer.
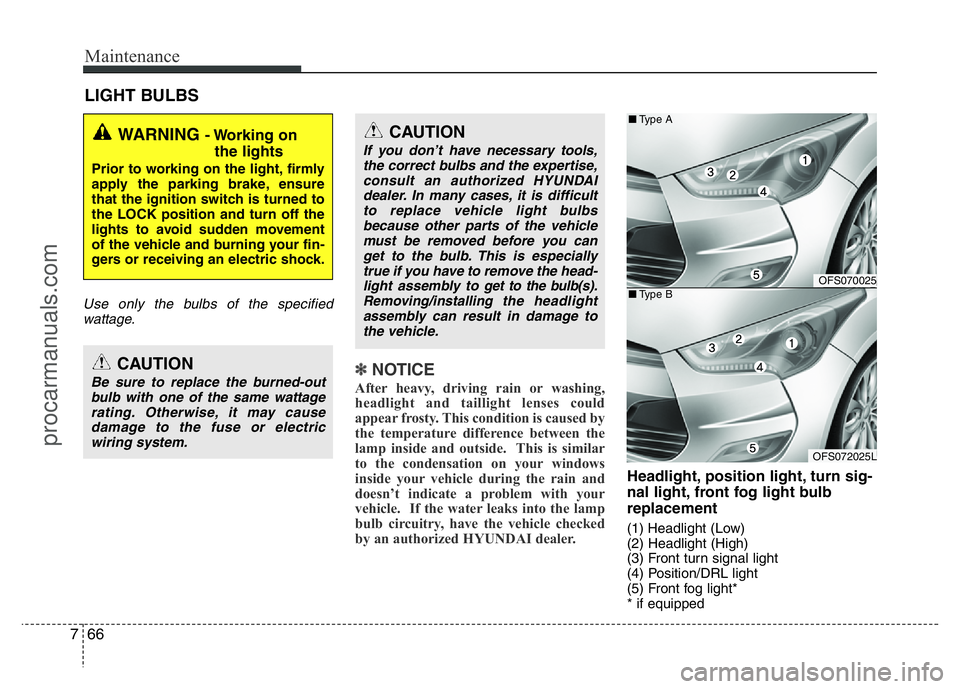
Headlight, position light, turn sig-
nal light, front fog light bulb
replacement
(1) Headlight (Low)
(2) Headlight (High)
(3) Front turn signal light
(4) Position/DRL light
(5) Front fog light*
* if equipped
WARNING - Working on
the lights
Prior to working on the light, firmly
apply the parking brake, ensure
that the ignition switch is turned to
the LOCK position and turn off the
lights to avoid sudden movement
of the vehicle and burning your fin-
gers or receiving an electric shock.
CAUTION
Be sure to replace the burned-out
bulb with one of the same wattage
rating. Otherwise, it may cause
damage to the fuse or electric
wiring system.
CAUTION
If you don’t have necessary tools,
the correct bulbs and the expertise,
consult an authorized HYUNDAI
dealer. In many cases, it is difficult
to replace vehicle light bulbs
because other parts of the vehicle
must be removed before you can
get to the bulb. This is especially
true if you have to remove the head-
light assembly to
get to the bulb(s).
Removing/installingthe headlight
assembly can result in damage to
the vehicle.
OFS070025
OFS072025L ■Type A
■Type B
procarmanuals.com
Page 359 of 386
767
Maintenance
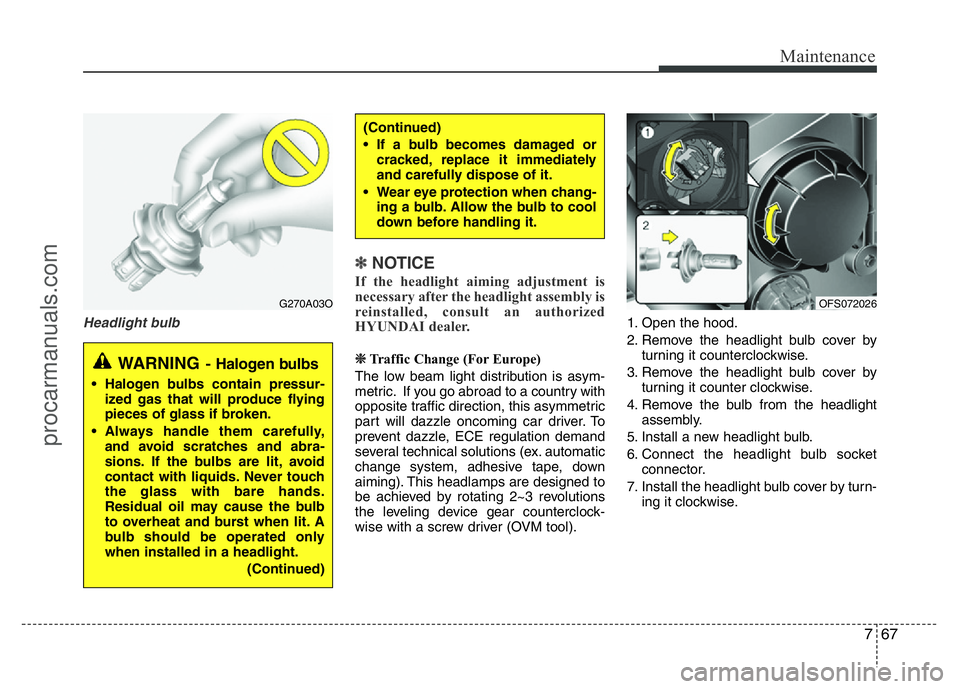
Headlight bulb
✽NOTICE
If the headlight aiming adjustment is
necessary after the headlight assembly is
reinstalled, consult an authorized
HYUNDAI dealer.
❈Traffic Change (For Europe)
The low beam light distribution is asym-
metric. If you go abroad to a country with
opposite traffic direction, this asymmetric
part will dazzle oncoming car driver. To
prevent dazzle, ECE regulation demand
several technical solutions (ex. automatic
change system, adhesive tape, down
aiming). This headlamps are designed to
be achieved by rotating 2~3 revolutions
the leveling device gear counterclock-
wise with a screw driver (OVM tool).1. Open the hood.
2. Remove the headlight bulb cover by
turning it counterclockwise.
3. Remove the headlight bulb cover by
turning it counter clockwise.
4. Remove the bulb from the headlight
assembly.
5. Install a new headlight bulb.
6. Connect the headlight bulb socket
connector.
7. Install the headlight bulb cover by turn-
ing it clockwise.
(Continued)
• If a bulb becomes damaged or
cracked, replace it immediately
and carefully dispose of it.
• Wear eye protection when chang-
ing a bulb. Allow the bulb to cool
down before handling it.
G270A03O
WARNING- Halogen bulbs
• Halogen bulbs contain pressur-
ized gas that will produce flying
pieces of glass if broken.
• Always handle them carefully,
and avoid scratches and abra-
sions. If the bulbs are lit, avoid
contact with liquids. Never touch
the glass with bare hands.
Residual oil may cause the bulb
to overheat and burst when lit. A
bulb should be operated only
when installed in a headlight.
(Continued)
OFS072026
procarmanuals.com
Page 360 of 386
Maintenance
68 7
Position light (if equipped)
If the light does not operate, have the
vehicle checked by an authorized
HYUNDAI dealer.
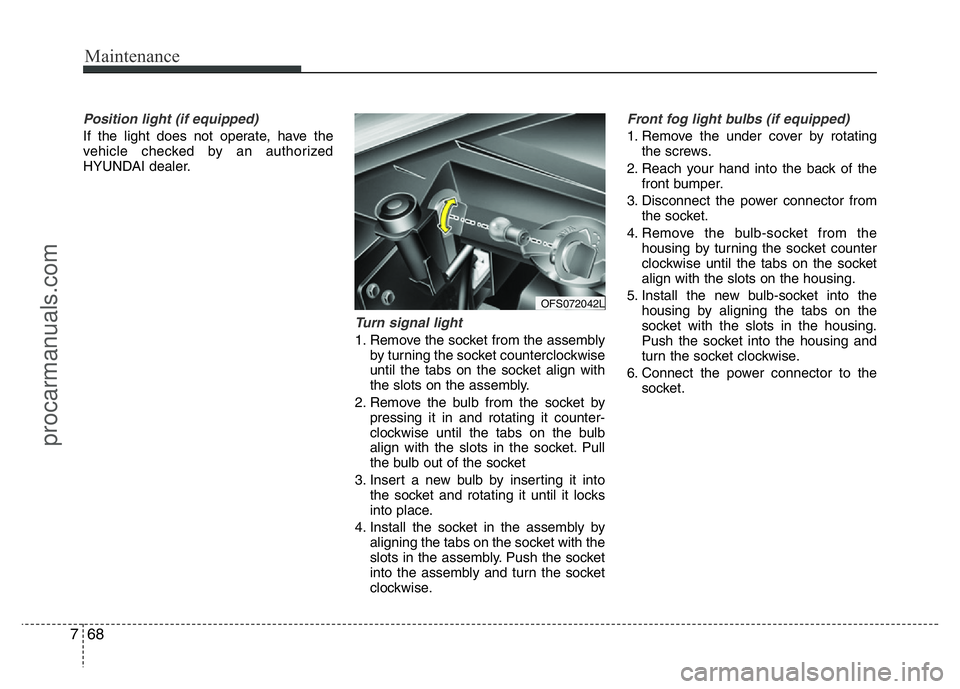
Turn signal light
1. Remove the socket from the assembly
by turning the socket counterclockwise
until the tabs on the socket align with
the slots on the assembly.
2. Remove the bulb from the socket by
pressing it in and rotating it counter-
clockwise until the tabs on the bulb
align with the slots in the socket. Pull
the bulb out of the socket
3. Insert a new bulb by inserting it into
the socket and rotating it until it locks
into place.
4. Install the socket in the assembly by
aligning the tabs on the socket with the
slots in the assembly. Push the socket
into the assembly and turn the socket
clockwise.
Front fog light bulbs (if equipped)
1. Remove the under cover by rotating
the screws.
2. Reach your hand into the back of the
front bumper.
3. Disconnect the power connector from
the socket.
4. Remove the bulb-socket from the
housing by turning the socket counter
clockwise until the tabs on the socket
align with the slots on the housing.
5. Install the new bulb-socket into the
housing by aligning the tabs on the
socket with the slots in the housing.
Push the socket into the housing and
turn the socket clockwise.
6. Connect the power connector to the
socket.
OFS072042L
procarmanuals.com