height HYUNDAI VELOSTER 2011 Owners Manual
[x] Cancel search | Manufacturer: HYUNDAI, Model Year: 2011, Model line: VELOSTER, Model: HYUNDAI VELOSTER 2011Pages: 386, PDF Size: 7.79 MB
Page 18 of 386
Safety features of your vehicle
2 3
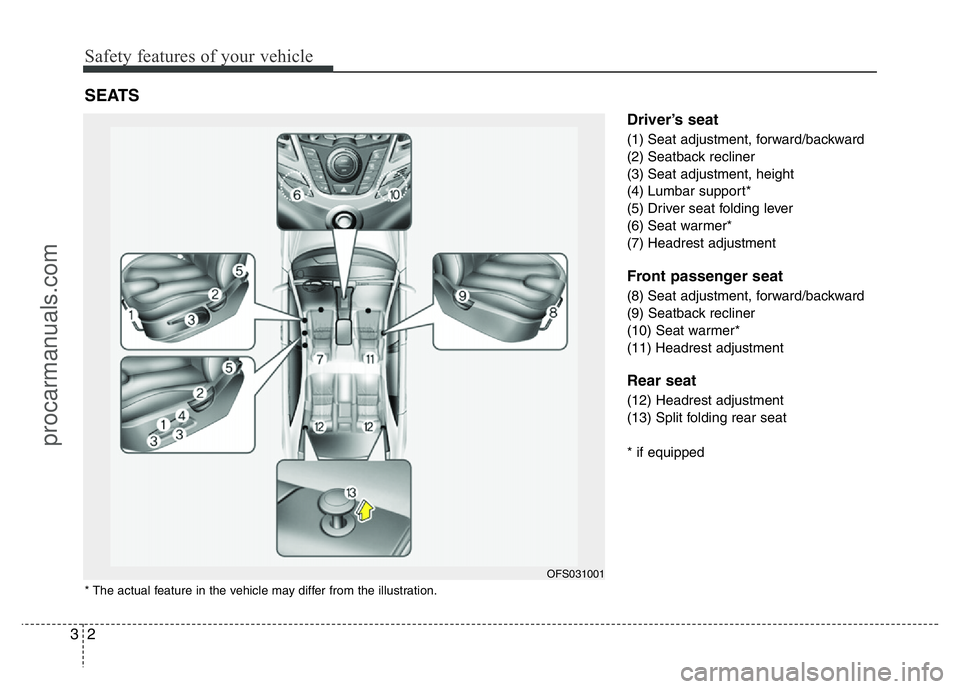
Driver’s seat
(1) Seat adjustment, forward/backward
(2) Seatback recliner
(3) Seat adjustment, height
(4) Lumbar support*
(5) Driver seat folding lever
(6) Seat warmer*
(7) Headrest adjustment
Front passenger seat
(8) Seat adjustment, forward/backward
(9) Seatback recliner
(10) Seat warmer*
(11) Headrest adjustment
Rear seat
(12) Headrest adjustment
(13) Split folding rear seat
* if equipped
SEATS
OFS031001
* The actual feature in the vehicle may differ from the illustration.
procarmanuals.com
Page 22 of 386
Safety features of your vehicle
6 3
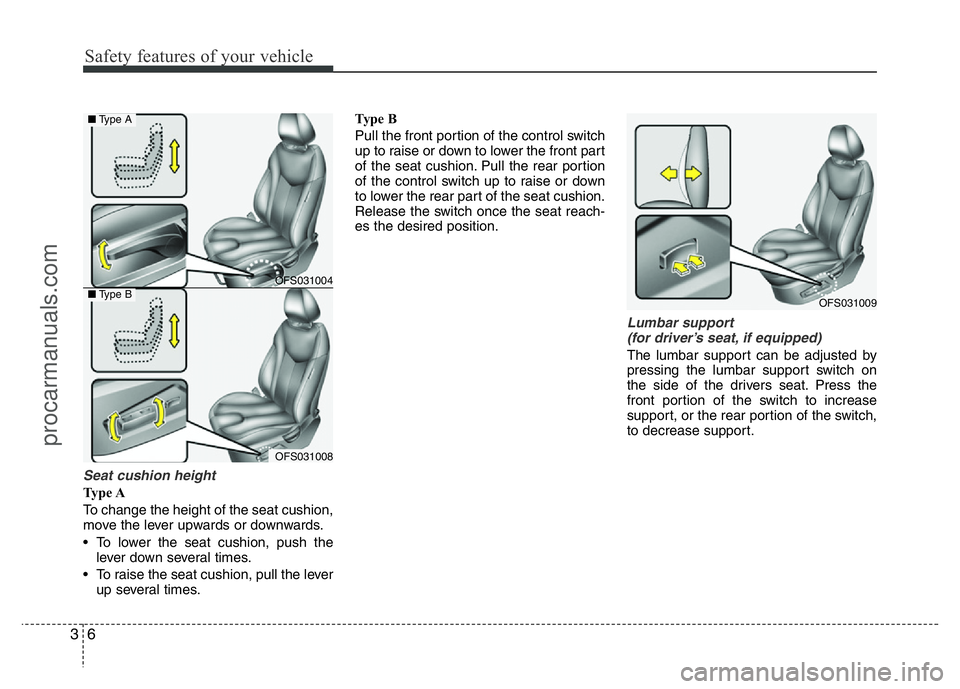
Seat cushion height
Ty p e A
To change the height of the seat cushion,
move the lever upwards or downwards.
• To lower the seat cushion, push the
lever down several times.
• To raise the seat cushion, pull the lever
up several times.Ty p e B
Pull the front portion of the control switch
up to raise or down to lower the front part
of the seat cushion. Pull the rear portion
of the control switch up to raise or down
to lower the rear part of the seat cushion.
Release the switch once the seat reach-
es the desired position.
Lumbar support
(for driver’s seat, if equipped)
The lumbar support can be adjusted by
pressing the lumbar support switch on
the side of the drivers seat. Press the
front portion of the switch to increase
support, or the rear portion of the switch,
to decrease support.
OFS031004
OFS031008
■Type A
■Type BOFS031009
procarmanuals.com
Page 24 of 386
Safety features of your vehicle
8 3
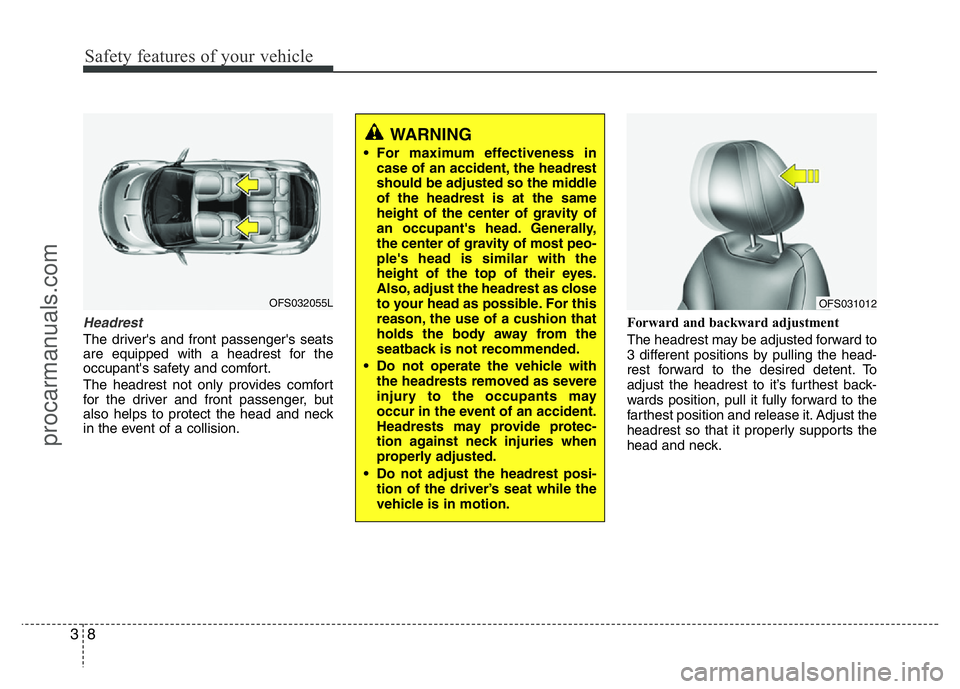
Headrest
The driver's and front passenger's seats
are equipped with a headrest for the
occupant's safety and comfort.
The headrest not only provides comfort
for the driver and front passenger, but
also helps to protect the head and neck
in the event of a collision.Forward and backward adjustment
The headrest may be adjusted forward to
3 different positions by pulling the head-
rest forward to the desired detent. To
adjust the headrest to it’s furthest back-
wards position, pull it fully forward to the
farthest position and release it. Adjust the
headrest so that it properly supports the
head and neck.
OFS032055L
WARNING
• For maximum effectiveness in
case of an accident, the headrest
should be adjusted so the middle
of the headrest is at the same
height of the center of gravity of
an occupant's head. Generally,
the center of gravity of most peo-
ple's head is similar with the
height of the top of their eyes.
Also, adjust the headrest as close
to your head as possible. For this
reason, the use of a cushion that
holds the body away from the
seatback is not recommended.
• Do not operate the vehicle with
the headrests removed as severe
injury to the occupants may
occur in the event of an accident.
Headrests may provide protec-
tion against neck injuries when
properly adjusted.
• Do not adjust the headrest posi-
tion of the driver’s seat while the
vehicle is in motion.
OFS031012
procarmanuals.com
Page 25 of 386
39
Safety features of your vehicle
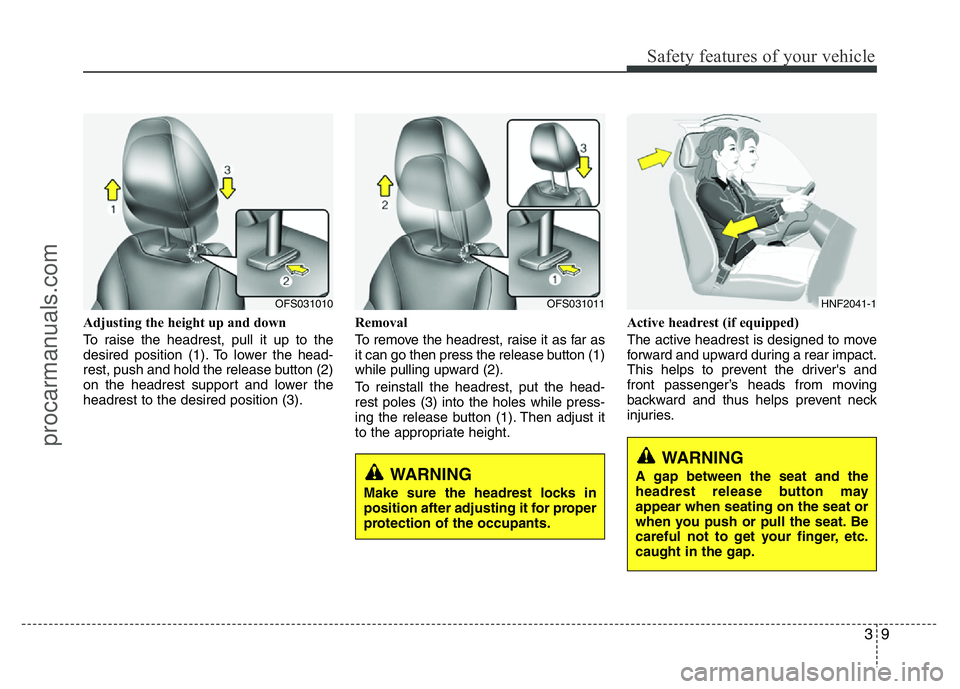
Adjusting the height up and down
To raise the headrest, pull it up to the
desired position (1). To lower the head-
rest, push and hold the release button (2)
on the headrest support and lower the
headrest to the desired position (3).Removal
To remove the headrest, raise it as far as
it can go then press the release button (1)
while pulling upward (2).
To reinstall the headrest, put the head-
rest poles (3) into the holes while press-
ing the release button (1). Then adjust it
to the appropriate height.Active headrest (if equipped)
The active headrest is designed to move
forward and upward during a rear impact.
This helps to prevent the driver's and
front passenger’s heads from moving
backward and thus helps prevent neck
injuries.
OFS031010
WARNING
Make sure the headrest locks in
position after adjusting it for proper
protection of the occupants.
OFS031011HNF2041-1
WARNING
A gap between the seat and the
headrest release button may
appear when seating on the seat or
when you push or pull the seat. Be
careful not to get your finger, etc.
caught in the gap.
procarmanuals.com
Page 30 of 386
Safety features of your vehicle
14 3
Headrest
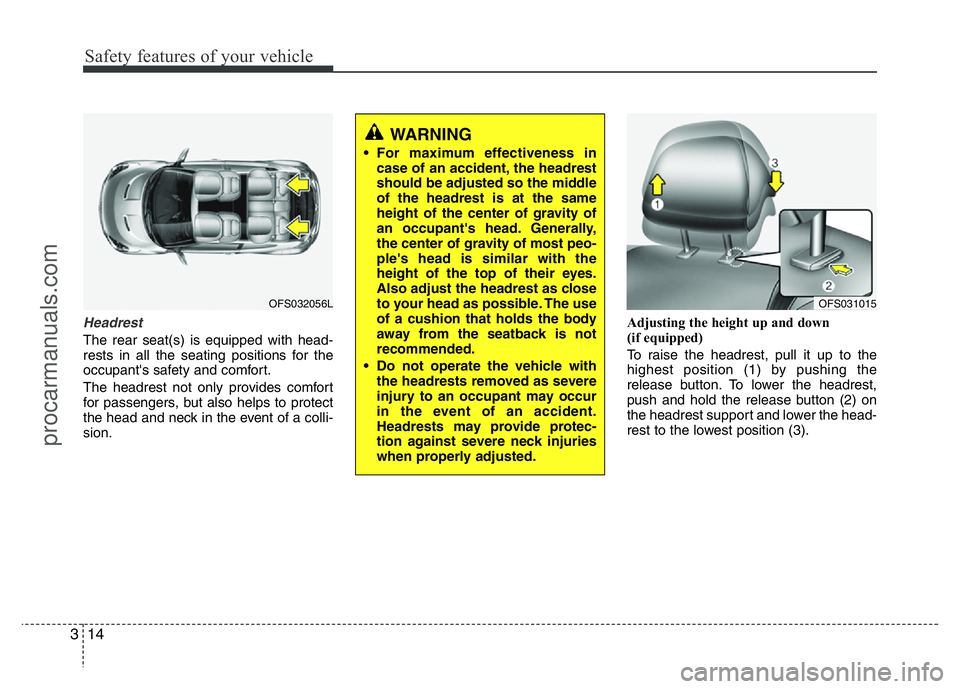
The rear seat(s) is equipped with head-
rests in all the seating positions for the
occupant's safety and comfort.
The headrest not only provides comfort
for passengers, but also helps to protect
the head and neck in the event of a colli-
sion.Adjusting the height up and down
(if equipped)
To raise the headrest, pull it up to the
highest position (1) by pushing the
release button. To lower the headrest,
push and hold the release button (2) on
the headrest support and lower the head-
rest to the lowest position (3).
OFS032056L
WARNING
• For maximum effectiveness in
case of an accident, the headrest
should be adjusted so the middle
of the headrest is at the same
height of the center of gravity of
an occupant's head. Generally,
the center of gravity of most peo-
ple's head is similar with the
height of the top of their eyes.
Also adjust the headrest as close
to your head as possible. The use
of a cushion that holds the body
away from the seatback is not
recommended.
• Do not operate the vehicle with
the headrests removed as severe
injury to an occupant may occur
in the event of an accident.
Headrests may provide protec-
tion against severe neck injuries
when properly adjusted.
OFS031015
procarmanuals.com
Page 31 of 386
315
Safety features of your vehicle
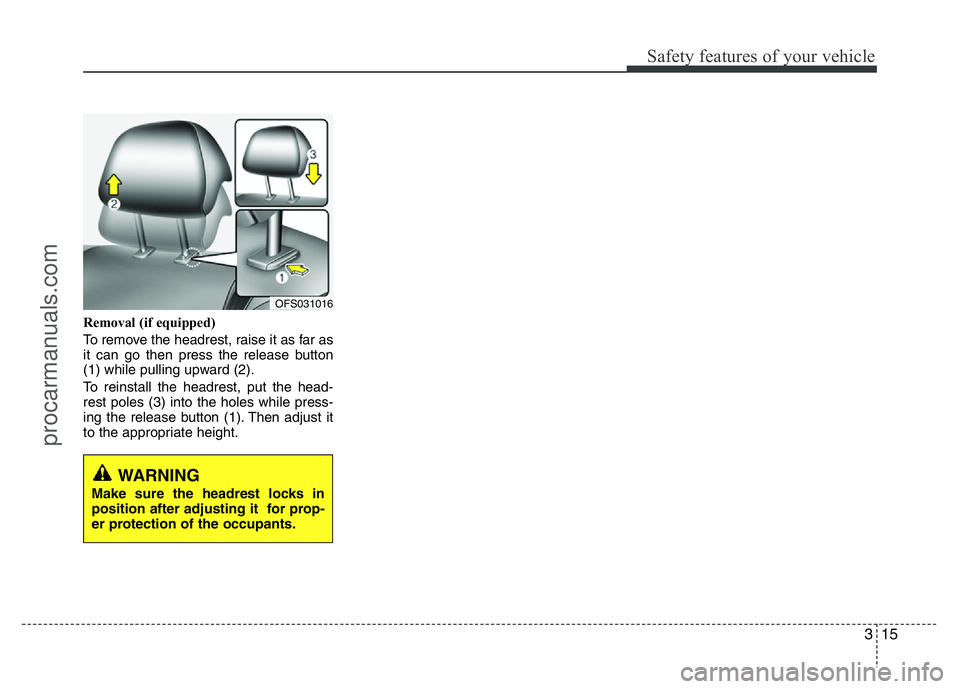
Removal (if equipped)
To remove the headrest, raise it as far as
it can go then press the release button
(1) while pulling upward (2).
To reinstall the headrest, put the head-
rest poles (3) into the holes while press-
ing the release button (1). Then adjust it
to the appropriate height.
WARNING
Make sure the headrest locks in
position after adjusting it for prop-
er protection of the occupants.
OFS031016
procarmanuals.com
Page 39 of 386
323
Safety features of your vehicle
Infant or small child
You should be aware of the specific
requirements in your country. Child
and/or infant seats must be properly
placed and installed in the rear seat. For
more information about the use of these
restraints, refer to “Child restraint sys-
tem” in this section.✽NOTICE
Small children are best protected from
injury in an accident when properly
restrained in the rear seat by a child
restraint system that meets the require-
ments of the Safety Standards of your
country. Before buying any child
restraint system, make sure that it has a
label certifying that it meets Safety
Standards of your country. The restraint
must be appropriate for your child's
height and weight. Check the label on
the child restraint for this information.
Refer to “Child restraint system” in this
section.
Larger children
Children who are too large for child
restraint systems should always occupy
the rear seat and use the available
lap/shoulder belts. The lap portion should
be fastened and snugged on the hips
and as low as possible. Check if the belt
fits periodically. A child's squirming could
put the belt out of position. Children are
given the most safety in the event of an
accident when they are restrained by a
proper restraint system in the rear seat. If
a larger child (over age 12) must be seat-
ed in the front seat, the child should be
securely restrained by the available
lap/shoulder belt and the seat should be
placed in the rearmost position. Children
age 12 and under should be restrained
securely in the rear seat. NEVER place a
child age 12 and under in the front seat.
NEVER place a rear facing child seat in
the front seat of a vehicle.
If the shoulder belt portion slightly touch-
es the child’s neck or face, try placing the
child closer to the center of the vehicle. If
the shoulder belt still touches their face
or neck they need to be returned to a
child restraint system.
WARNING
Every person in your vehicle needs
to be properly restrained at all
times, including infants and chil-
dren. Never hold a child in your
arms or lap when riding in a vehi-
cle. The violent forces created dur-
ing a crash will tear the child from
your arms and throw the child
against the interior. Always use a
child restraint appropriate for your
child's height and weight.
procarmanuals.com
Page 51 of 386
335
Safety features of your vehicle
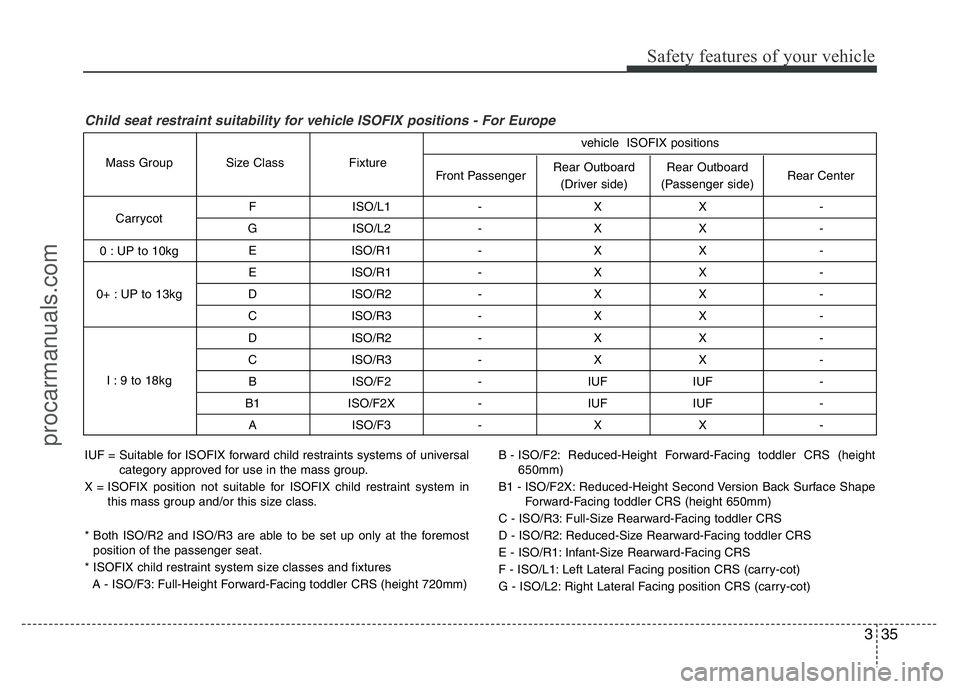
Child seat restraint suitability for vehicle ISOFIX positions - For Europe
IUF = Suitable for ISOFIX forward child restraints systems of universal
category approved for use in the mass group.
X = ISOFIX position not suitable for ISOFIX child restraint system in
this mass group and/or this size class.
* Both ISO/R2 and ISO/R3 are able to be set up only at the foremost
position of the passenger seat.
* ISOFIX child restraint system size classes and fixtures
A - ISO/F3: Full-Height Forward-Facing toddler CRS (height 720mm)B - ISO/F2: Reduced-Height Forward-Facing toddler CRS (height
650mm)
B1 - ISO/F2X: Reduced-Height Second Version Back Surface Shape
Forward-Facing toddler CRS (height 650mm)
C - ISO/R3: Full-Size Rearward-Facing toddler CRS
D - ISO/R2: Reduced-Size Rearward-Facing toddler CRS
E - ISO/R1: Infant-Size Rearward-Facing CRS
F - ISO/L1: Left Lateral Facing position CRS (carry-cot)
G - ISO/L2: Right Lateral Facing position CRS (carry-cot) F ISO/L1 - X X -
G ISO/L2 - X X -
E ISO/R1 - X X -
E ISO/R1 - X X -
D ISO/R2 - X X -
C ISO/R3 - X X -
D ISO/R2 - X X -
C ISO/R3 - X X -
B ISO/F2 - IUF IUF -
B1 ISO/F2X - IUF IUF -
A ISO/F3 - X X -
Rear Outboard
(Passenger side) Rear Outboard
(Driver side) Front Passenger Fixture Size Class Mass Group
Carrycot
0 : UP to 10kg
0+ : UP to 13kg
I : 9 to 18kgRear Center vehicle ISOFIX positions
procarmanuals.com
Page 73 of 386
357
Safety features of your vehicle
Additional safety precautions
•Never let passengers ride in the
cargo area or on top of a folded-
down back seat.All occupants should
sit upright, fully back in their seats with
their seat belts on and their feet on the
floor.
•Passengers should not move out of
or change seats while the vehicle is
moving.A passenger who is not wear-
ing a seat belt during a crash or emer-
gency stop can be thrown against the
inside of the vehicle, against other
occupants, or out of the vehicle.
•Each seat belt is designed to
restrain one occupant.If more than
one person uses the same seat belt,
they could be seriously injured or killed
in a collision.
•Do not use any accessories on seat
belts.Devices claiming to improve
occupant comfort or reposition the seat
belt can reduce the protection provided
by the seat belt and increase the
chance of serious injury in a crash.
•Passengers should not place hard
or sharp objects between them-
selves and the air bags.Carrying
hard or sharp objects on your lap or in
your mouth can result in injuries if an
air bag inflates.•Keep occupants away from the air
bag covers.All occupants should sit
upright, fully back in their seats with
their seat belts on and their feet on the
floor. If occupants are too close to the
air bag covers, they could be injured if
the air bags inflate.
•Do not attach or place objects on or
near the air bag covers.Any object
attached to or placed on the front or
side impact air bag covers could inter-
fere with the proper operation of the air
bags.
•Do not modify the front seats.
Modification of the front seats could
interfere with the operation of the sup-
plemental restraint system sensing
components or side impact air bags.
•Do not place items under the front
seats.Placing items under the front
seats could interfere with the operation
of the supplemental restraint system
sensing components and wiring har-
nesses.
•Never hold an infant or child on your
lap.The infant or child could be seri-
ously injured or killed in the event of a
crash. All infants and children should
be properly restrained in appropriate
child safety seats or seat belts in the
rear seat.
Adding equipment to or modifying
your air bag-equipped vehicle
If you modify your vehicle by changing
your vehicle's frame, bumper system,
front end or side sheet metal or ride
height, this may affect the operation of
your vehicle's air bag system.
WARNING
• Sitting improperly or out of posi-
tion can cause occupants to be
shifted too close to a deploying
air bag, strike the interior struc-
ture or be thrown from the vehicle
resulting in serious injury or
death.
• Always sit upright with the seat-
back in an upright position, cen-
tered on the seat cushion with
your seat belt on, legs comfort-
ably extended and your feet on
the floor.
procarmanuals.com
Page 111 of 386
437
Features of your vehicle
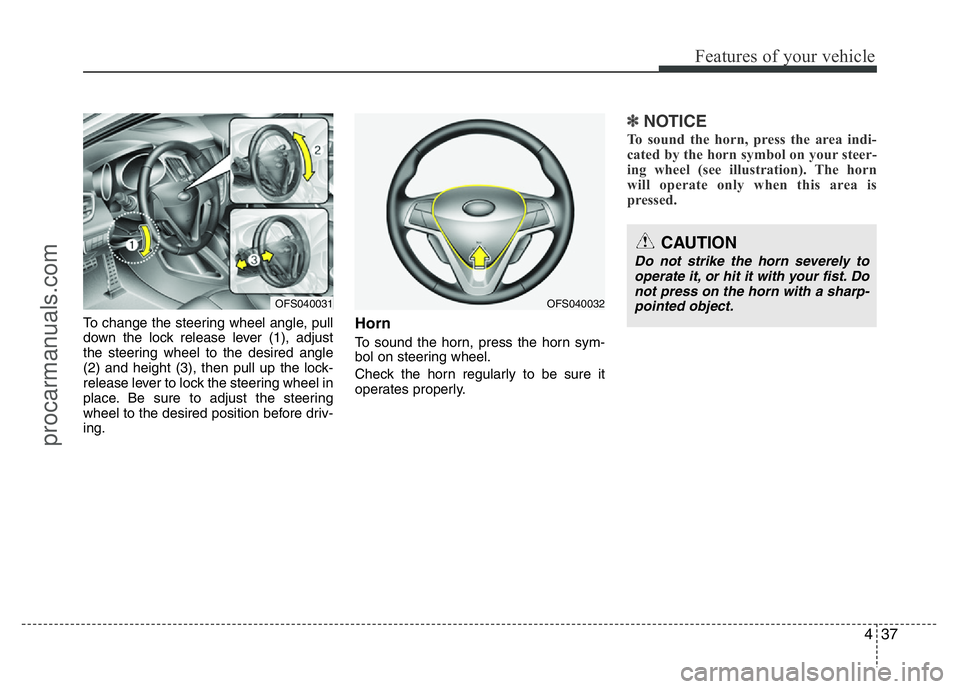
To change the steering wheel angle, pull
down the lock release lever (1), adjust
the steering wheel to the desired angle
(2) and height (3), then pull up the lock-
release lever to lock the steering wheel in
place. Be sure to adjust the steering
wheel to the desired position before driv-
ing.Horn
To sound the horn, press the horn sym-
bol on steering wheel.
Check the horn regularly to be sure it
operates properly.
✽NOTICE
To sound the horn, press the area indi-
cated by the horn symbol on your steer-
ing wheel (see illustration). The horn
will operate only when this area is
pressed.
CAUTION
Do not strike the horn severely to
operate it, or hit it with your fist. Do
not press on the horn with a sharp-
pointed object.
OFS040032OFS040031
procarmanuals.com