sunroof HYUNDAI VELOSTER 2012 Owners Manual
[x] Cancel search | Manufacturer: HYUNDAI, Model Year: 2012, Model line: VELOSTER, Model: HYUNDAI VELOSTER 2012Pages: 385, PDF Size: 24.4 MB
Page 80 of 385
4
Keys / 4-3
Smart key / 4-6
Remote keyless entry / 4-12
Theft-alarm system / 4-15
Door locks / 4-19
Trunk / 4-23
Windows / 4-25
Hood / 4-29
Fuel filler lid / 4-31
Sunroof / 4-34
Steering wheel / 4-38
Mirrors / 4-40
Instrument cluster / 4-43
Rear view camera / 4-60
Hazard warning flasher / 4-60
Lighting / 4-61
Wipers and washers / 4-66
Interior light / 4-68
Defroster / 4-70
Manual climate control system / 4-71
Automatic climate control system / 4-80
Features of your vehicle
Page 107 of 385
Features of your vehicle
28 4
Power windows
The ignition switch must be in the ON
position for power windows to operate.
Each door has a power window switch
that controls the door's window. The driv-
er has a master power window switch
that controls all the windows in the vehi-
cle. Also, a power window lock switch
which that can block the operation of rear
passenger windows. The power windows
can be operated for approximately 30
seconds after the ignition key is removed
or turned to the ACC or LOCK position.
However, if the front doors are opened,
the power windows cannot be operated
within the 30 seconds period.
✽ ✽
NOTICE
While driving with the rear windows
down or with the sunroof (if equipped)
opened (or partially opened), your vehi-
cle may demonstrate a wind buffeting or
pulsation noise. This noise is a normal
occurrence and can be reduced or elim-
inated by taking the following actions.
If the noise occurs with one or both of
the rear windows down, partially lower
both front windows approximately one
inch. If you experience the noise with
the sunroof open, slightly reduce the size
of the sunroof opening
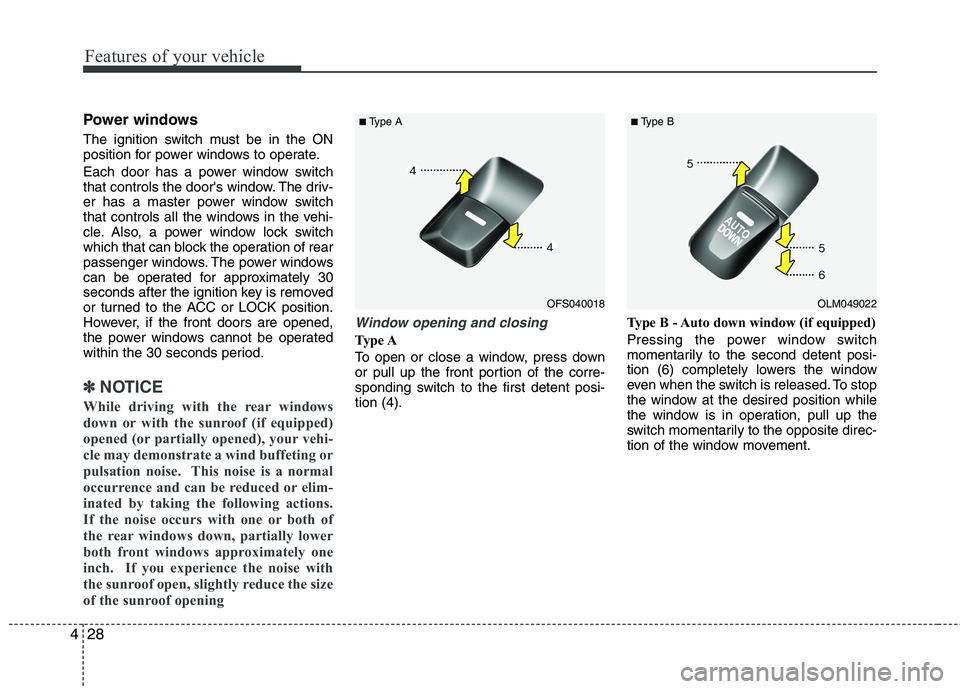
Window opening and closing
Type A
To open or close a window, press down
or pull up the front portion of the corre-
sponding switch to the first detent posi-
tion (4).Type B - Auto down window (if equipped)
Pressing the power window switch
momentarily to the second detent posi-
tion (6) completely lowers the window
even when the switch is released. To stop
the window at the desired position while
the window is in operation, pull up the
switch momentarily to the opposite direc-
tion of the window movement.
OLM049022
■Type B
OFS040018
■Type A
Page 115 of 385
Features of your vehicle
36 4
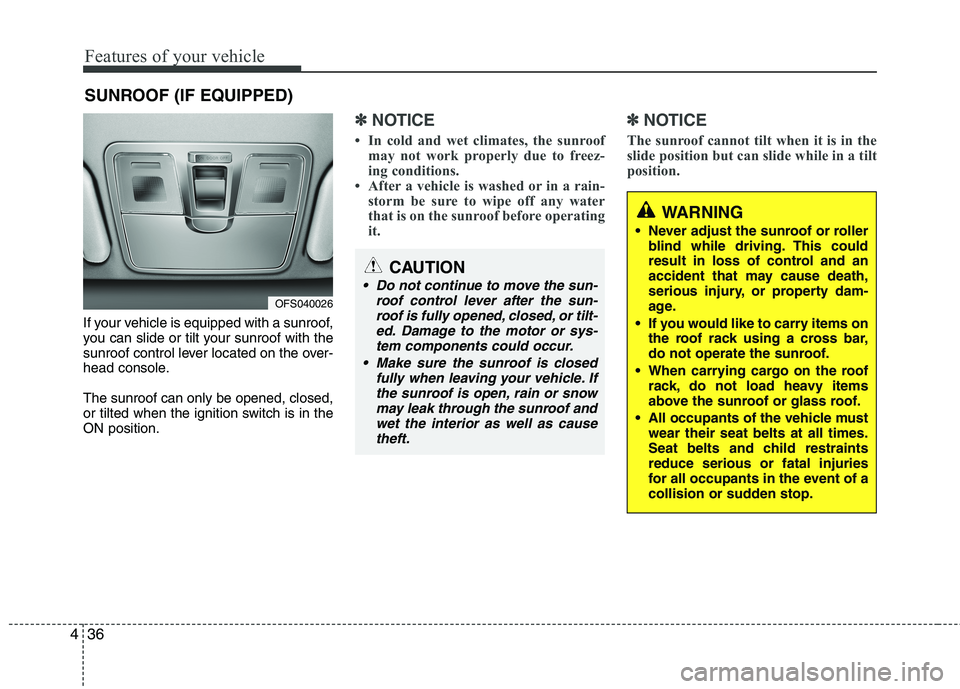
If your vehicle is equipped with a sunroof,
you can slide or tilt your sunroof with the
sunroof control lever located on the over-
head console.
The sunroof can only be opened, closed,
or tilted when the ignition switch is in the
ON position.
✽ ✽
NOTICE
• In cold and wet climates, the sunroof
may not work properly due to freez-
ing conditions.
• After a vehicle is washed or in a rain-
storm be sure to wipe off any water
that is on the sunroof before operating
it.
✽ ✽
NOTICE
The sunroof cannot tilt when it is in the
slide position but can slide while in a tilt
position.
SUNROOF (IF EQUIPPED)
OFS040026
CAUTION
Do not continue to move the sun-
roof control lever after the sun-
roof is fully opened, closed, or tilt-
ed. Damage to the motor or sys-
tem components could occur.
Make sure the sunroof is closed
fully when leaving your vehicle. If
the sunroof is open, rain or snow
may leak through the sunroof and
wet the interior as well as cause
theft.
WARNING
Never adjust the sunroof or roller
blind while driving. This could
result in loss of control and an
accident that may cause death,
serious injury, or property dam-
age.
If you would like to carry items on
the roof rack using a cross bar,
do not operate the sunroof.
When carrying cargo on the roof
rack, do not load heavy items
above the sunroof or glass roof.
All occupants of the vehicle must
wear their seat belts at all times.
Seat belts and child restraints
reduce serious or fatal injuries
for all occupants in the event of a
collision or sudden stop.
Page 116 of 385
437
Features of your vehicle
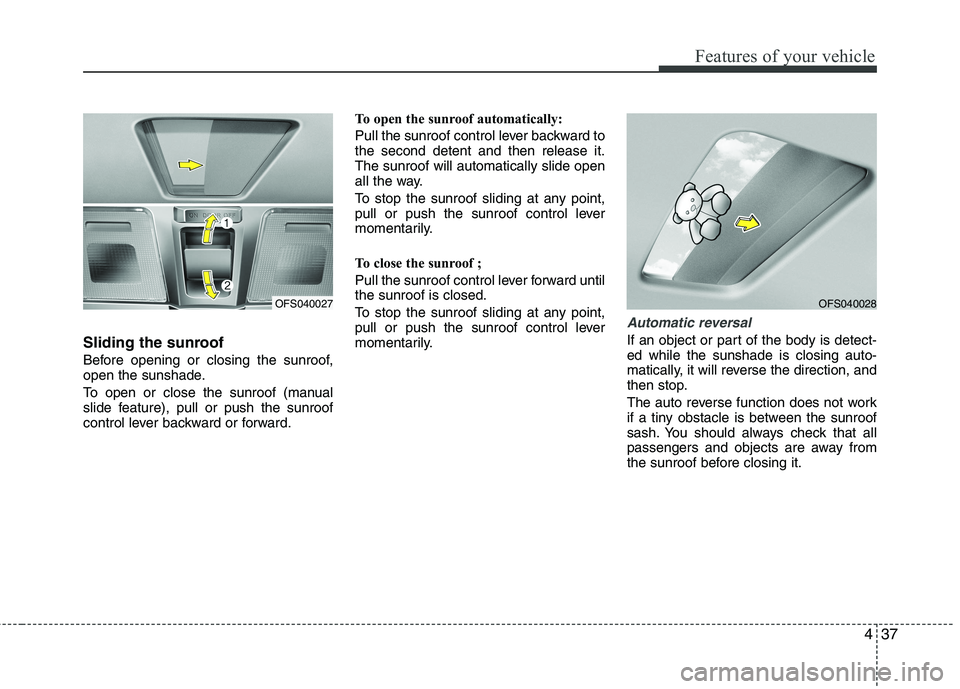
Sliding the sunroof
Before opening or closing the sunroof,
open the sunshade.
To open or close the sunroof (manual
slide feature), pull or push the sunroof
control lever backward or forward.To open the sunroof automatically:
Pull the sunroof control lever backward to
the second detent and then release it.
The sunroof will automatically slide open
all the way.
To stop the sunroof sliding at any point,
pull or push the sunroof control lever
momentarily.
To close the sunroof ;
Pull the sunroof control lever forward until
the sunroof is closed.
To stop the sunroof sliding at any point,
pull or push the sunroof control lever
momentarily.
Automatic reversal
If an object or part of the body is detect-
ed while the sunshade is closing auto-
matically, it will reverse the direction, and
then stop.
The auto reverse function does not work
if a tiny obstacle is between the sunroof
sash. You should always check that all
passengers and objects are away from
the sunroof before closing it.
OFS040027OFS040028
Page 117 of 385
Features of your vehicle
38 4
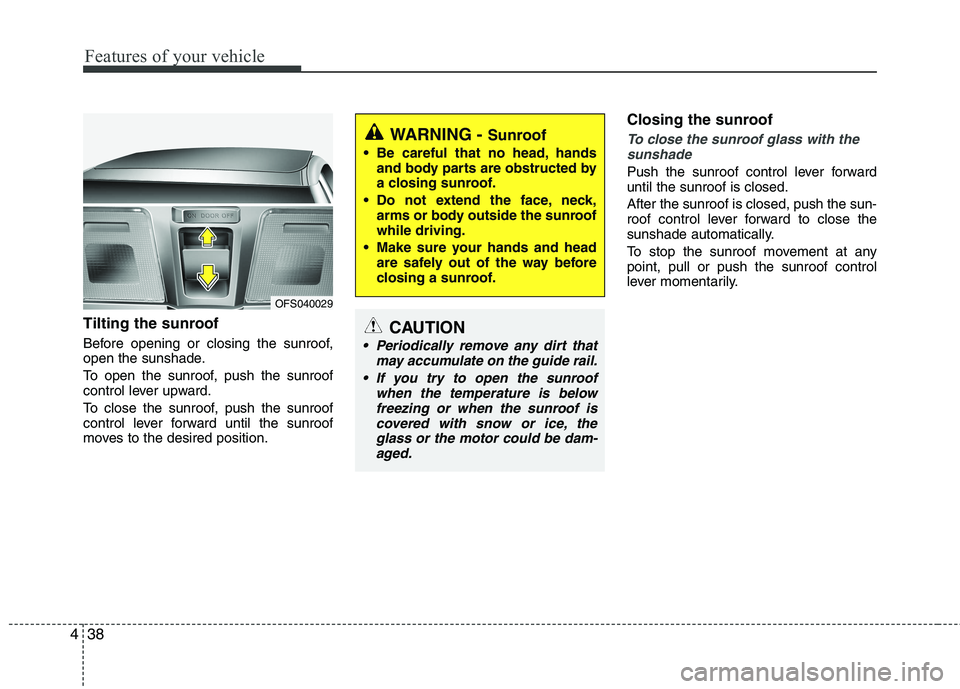
Tilting the sunroof
Before opening or closing the sunroof,
open the sunshade.
To open the sunroof, push the sunroof
control lever upward.
To close the sunroof, push the sunroof
control lever forward until the sunroof
moves to the desired position.
Closing the sunroof
To close the sunroof glass with the
sunshade
Push the sunroof control lever forward
until the sunroof is closed.
After the sunroof is closed, push the sun-
roof control lever forward to close the
sunshade automatically.
To stop the sunroof movement at any
point, pull or push the sunroof control
lever momentarily.
OFS040029
WARNING - Sunroof
Be careful that no head, hands
and body parts are obstructed by
a closing sunroof.
Do not extend the face, neck,
arms or body outside the sunroof
while driving.
Make sure your hands and head
are safely out of the way before
closing a sunroof.
CAUTION
Periodically remove any dirt that
may accumulate on the guide rail.
If you try to open the sunroof
when the temperature is below
freezing or when the sunroof is
covered with snow or ice, the
glass or the motor could be dam-
aged.
Page 118 of 385
439
Features of your vehicle
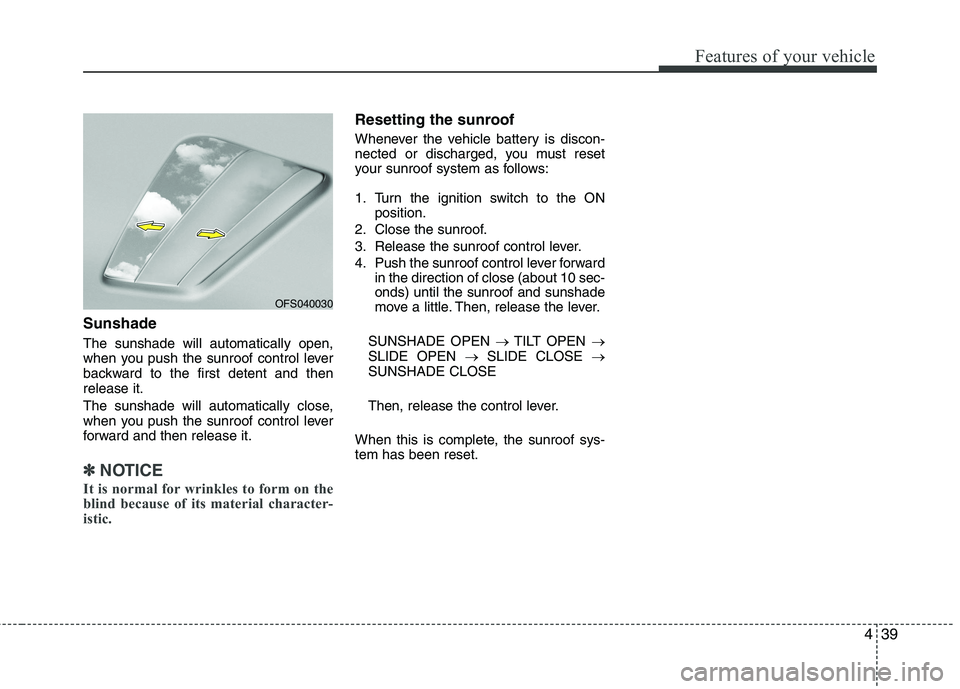
Sunshade
The sunshade will automatically open,
when you push the sunroof control lever
backward to the first detent and then
release it.
The sunshade will automatically close,
when you push the sunroof control lever
forward and then release it.
✽ ✽
NOTICE
It is normal for wrinkles to form on the
blind because of its material character-
istic.
Resetting the sunroof
Whenever the vehicle battery is discon-
nected or discharged, you must reset
your sunroof system as follows:
1. Turn the ignition switch to the ON
position.
2. Close the sunroof.
3. Release the sunroof control lever.
4. Push the sunroof control lever forward
in the direction of close (about 10 sec-
onds) until the sunroof and sunshade
move a little. Then, release the lever.
SUNSHADE OPEN →TILT OPEN →
SLIDE OPEN →SLIDE CLOSE →
SUNSHADE CLOSE
Then, release the control lever.
When this is complete, the sunroof sys-
tem has been reset.
OFS040030
Page 328 of 385
Maintenance
34 7
Reset items
Items should be reset after the battery
has been discharged or the battery has
been disconnected.
Auto up/down window (See section 4)
Sunroof (See section 4)
Trip computer (See section 4)
Climate control system
(See section 4)
Clock (See section 4)
Audio (See section 4)WARNING
Before performing maintenance
or recharging the battery, turn off
all accessories and stop the
engine.
The negative battery cable must
be removed first and installed
last when the battery is discon-
nected.
Operation related to the battery
should be done in an authorized
HYUNDAI dealer.
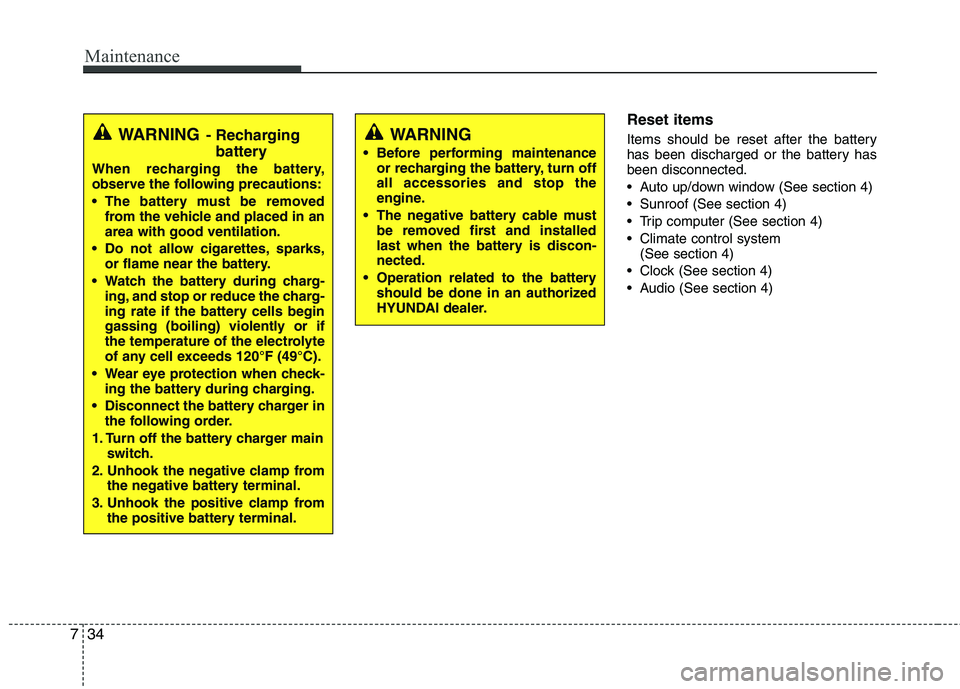
WARNING- Recharging
battery
When recharging the battery,
observe the following precautions:
The battery must be removed
from the vehicle and placed in an
area with good ventilation.
Do not allow cigarettes, sparks,
or flame near the battery.
Watch the battery during charg-
ing, and stop or reduce the charg-
ing rate if the battery cells begin
gassing (boiling) violently or if
the temperature of the electrolyte
of any cell exceeds 120°F (49°C).
Wear eye protection when check-
ing the battery during charging.
Disconnect the battery charger in
the following order.
1. Turn off the battery charger main
switch.
2. Unhook the negative clamp from
the negative battery terminal.
3. Unhook the positive clamp from
the positive battery terminal.
Page 347 of 385
753
Maintenance
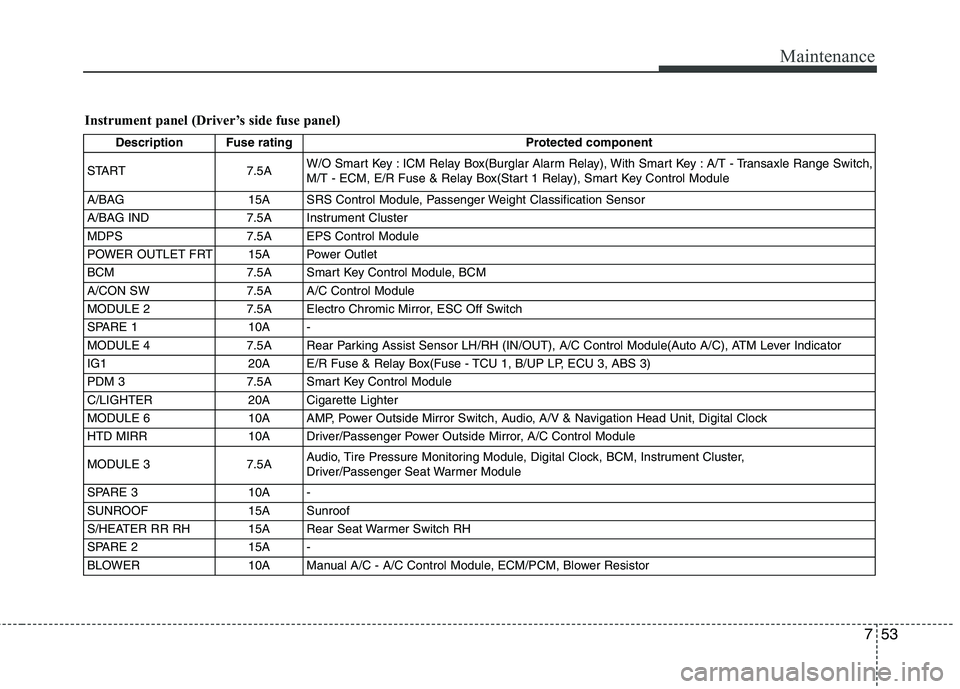
Instrument panel (Driver’s side fuse panel)
Description Fuse rating Protected component
START 7.5AW/O Smart Key : ICM Relay Box(Burglar Alarm Relay), With Smart Key : A/T - Transaxle Range Switch,
M/T - ECM, E/R Fuse & Relay Box(Start 1 Relay), Smart Key Control Module
A/BAG 15A SRS Control Module, Passenger Weight Classification Sensor
A/BAG IND 7.5A Instrument Cluster
MDPS 7.5A EPS Control Module
POWER OUTLET FRT 15A Power Outlet
BCM 7.5A Smart Key Control Module, BCM
A/CON SW 7.5A A/C Control Module
MODULE 2 7.5A Electro Chromic Mirror, ESC Off Switch
SPARE 1 10A -
MODULE 4 7.5A Rear Parking Assist Sensor LH/RH (IN/OUT), A/C Control Module(Auto A/C), ATM Lever Indicator
IG1 20A E/R Fuse & Relay Box(Fuse - TCU 1, B/UP LP, ECU 3, ABS 3)
PDM 3 7.5A Smart Key Control Module
C/LIGHTER 20A Cigarette Lighter
MODULE 6 10A AMP, Power Outside Mirror Switch, Audio, A/V & Navigation Head Unit, Digital Clock
HTD MIRR 10A Driver/Passenger Power Outside Mirror, A/C Control Module
MODULE 3 7.5AAudio, Tire Pressure Monitoring Module, Digital Clock, BCM, Instrument Cluster,
Driver/Passenger Seat Warmer Module
SPARE 3 10A -
SUNROOF 15A Sunroof
S/HEATER RR RH 15A Rear Seat Warmer Switch RH
SPARE 2 15A -
BLOWER 10A Manual A/C - A/C Control Module, ECM/PCM, Blower Resistor
Page 348 of 385
Maintenance
54 7
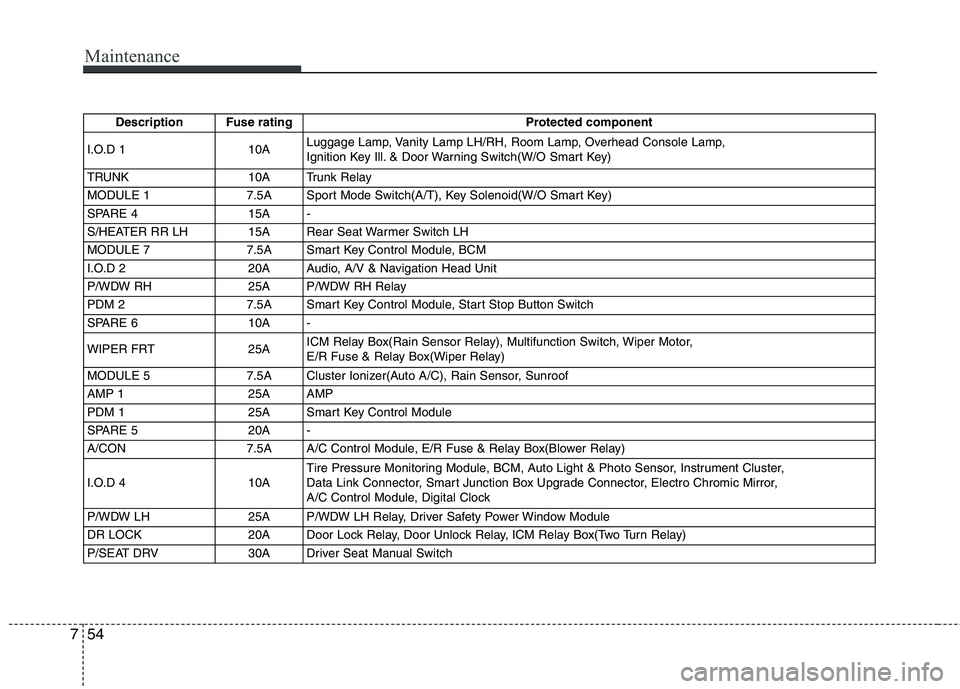
Description Fuse rating Protected component
I.O.D 1 10ALuggage Lamp, Vanity Lamp LH/RH, Room Lamp, Overhead Console Lamp,
Ignition Key Ill. & Door Warning Switch(W/O Smart Key)
TRUNK 10A Trunk Relay
MODULE 1 7.5A Sport Mode Switch(A/T), Key Solenoid(W/O Smart Key)
SPARE 4 15A -
S/HEATER RR LH 15A Rear Seat Warmer Switch LH
MODULE 7 7.5A Smart Key Control Module, BCM
I.O.D 2 20A Audio, A/V & Navigation Head Unit
P/WDW RH 25A P/WDW RH Relay
PDM 2 7.5A Smart Key Control Module, Start Stop Button Switch
SPARE 6 10A -
WIPER FRT 25AICM Relay Box(Rain Sensor Relay), Multifunction Switch, Wiper Motor,
E/R Fuse & Relay Box(Wiper Relay)
MODULE 5 7.5A Cluster Ionizer(Auto A/C), Rain Sensor, Sunroof
AMP 1 25A AMP
PDM 1 25A Smart Key Control Module
SPARE 5 20A -
A/CON 7.5A A/C Control Module, E/R Fuse & Relay Box(Blower Relay)
I.O.D 4 10ATire Pressure Monitoring Module, BCM, Auto Light & Photo Sensor, Instrument Cluster,
Data Link Connector, Smart Junction Box Upgrade Connector, Electro Chromic Mirror,
A/C Control Module, Digital Clock
P/WDW LH 25A P/WDW LH Relay, Driver Safety Power Window Module
DR LOCK 20A Door Lock Relay, Door Unlock Relay, ICM Relay Box(Two Turn Relay)
P/SEAT DRV 30A Driver Seat Manual Switch
Page 349 of 385
755
Maintenance
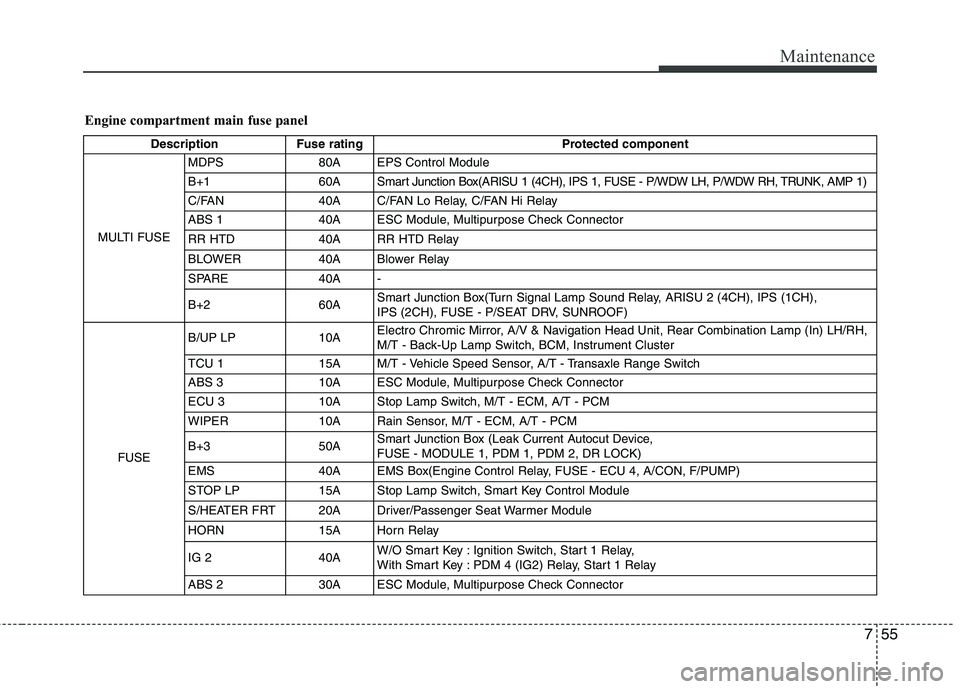
Engine compartment main fuse panel
Description Fuse rating Protected component
MULTI FUSEMDPS 80A EPS Control Module
B+1 60A Smart Junction Box(ARISU 1 (4CH), IPS 1, FUSE - P/WDW LH, P/WDW RH, TRUNK, AMP 1)
C/FAN 40A C/FAN Lo Relay, C/FAN Hi Relay
ABS 1 40A ESC Module, Multipurpose Check Connector
RR HTD 40A RR HTD Relay
BLOWER 40A Blower Relay
SPARE 40A -
B+260ASmart Junction Box(Turn Signal Lamp Sound Relay, ARISU 2 (4CH), IPS (1CH),
IPS (2CH), FUSE - P/SEAT DRV, SUNROOF)
FUSEB/UP LP 10AElectro Chromic Mirror, A/V & Navigation Head Unit, Rear Combination Lamp (In) LH/RH,
M/T - Back-Up Lamp Switch, BCM, Instrument Cluster
TCU 115AM/T - Vehicle Speed Sensor, A/T - Transaxle Range Switch
ABS 3 10A ESC Module, Multipurpose Check Connector
ECU 3 10A Stop Lamp Switch, M/T - ECM, A/T - PCM
WIPER 10A Rain Sensor, M/T - ECM, A/T - PCM
B+3 50ASmart Junction Box (Leak Current Autocut Device,
FUSE - MODULE 1, PDM 1, PDM 2, DR LOCK)
EMS 40A EMS Box(Engine Control Relay, FUSE - ECU 4, A/CON, F/PUMP)
STOP LP 15A Stop Lamp Switch, Smart Key Control Module
S/HEATER FRT 20A Driver/Passenger Seat Warmer Module
HORN 15A Horn Relay
IG 2 40AW/O Smart Key : Ignition Switch, Start 1 Relay,
With Smart Key : PDM 4 (IG2) Relay, Start 1 Relay
ABS 2 30A ESC Module, Multipurpose Check Connector