wheel HYUNDAI VELOSTER N 2022 Repair Manual
[x] Cancel search | Manufacturer: HYUNDAI, Model Year: 2022, Model line: VELOSTER N, Model: HYUNDAI VELOSTER N 2022Pages: 446, PDF Size: 9.71 MB
Page 318 of 446
5-124
Driving your vehicle
Summer tires
• Summer tires are used to maxi-
mize the driving performance on
dry roads.
• If the temperature is below 45°F
(7°C) or you are driving on snowy
or icy roads, the summer tires lose
their brake performance and trac-
tion as the tire grip weakens signif-
icantly.
• If the temperature is below 45°F
(7°C) or you are driving on snowy
or icy roads, mount snow tires or
all-season tires of the same size
with your vehicle's standard tire for
safe driving. Both snow and all-
season tires have M+S markings.
• When using the M+S tires, use
tires with the same tread produced
by the same manufacturer for safe
driving.
• When driving with the M+S tires
with the lower maximum allowable
speed than that of the vehicle's
standard summer tire, be careful
not to exceed the speed allowed
for the M+S tires.
Tire chains
Since the sidewalls of radial tires are
thinner than other types of tires, they
may be damaged by mounting some
types of tire chains on them.
Therefore the use of snow tires is
preferred over the use of tire chains.
Do not mount tire chains on vehicles
equipped with aluminum wheels; if
unavoidable, use a wire or fabric type
snow chain.
If the road and weather conditions
require the use of tire chains, be sure
to use tire chains that have been
properly selected for the size of tire
on your HYUNDAI vehicle.
Be sure to follow the guidelines and
installation instructions provided
from the tire chain manufacturer.
Damage to your vehicle caused by
improper tire chain use is not cov-
ered by your vehicle manufacturer’s
warranty.
If your vehicle has 235/35R19 size
tires, do not use tire chain; they
can damage your vehicle (wheel,
suspension and body).
Information
• Install tire chains on both left and
right front tires. It should be noted
that installing tire chains on the
tires will provide a greater driving
force, but will not prevent side
skids.
• Do not install studded tires without
first checking local, state and
municipal regulations for possible
restrictions against their use.
i
NOTICE
The use of tire chains may
adversely affect vehicle han-
dling:
•Drive less than 20 mph
(30 km/h) or the chain manu-
facturer's recommended speed
limit, whichever is lower.
•Drive carefully and avoid
bumps, holes, sharp turns,
and other road hazards, which
may cause the vehicle to
bounce.
•Avoid sharp turns or locked
wheel braking.
WARNING
Page 319 of 446
5-125
Driving your vehicle
5
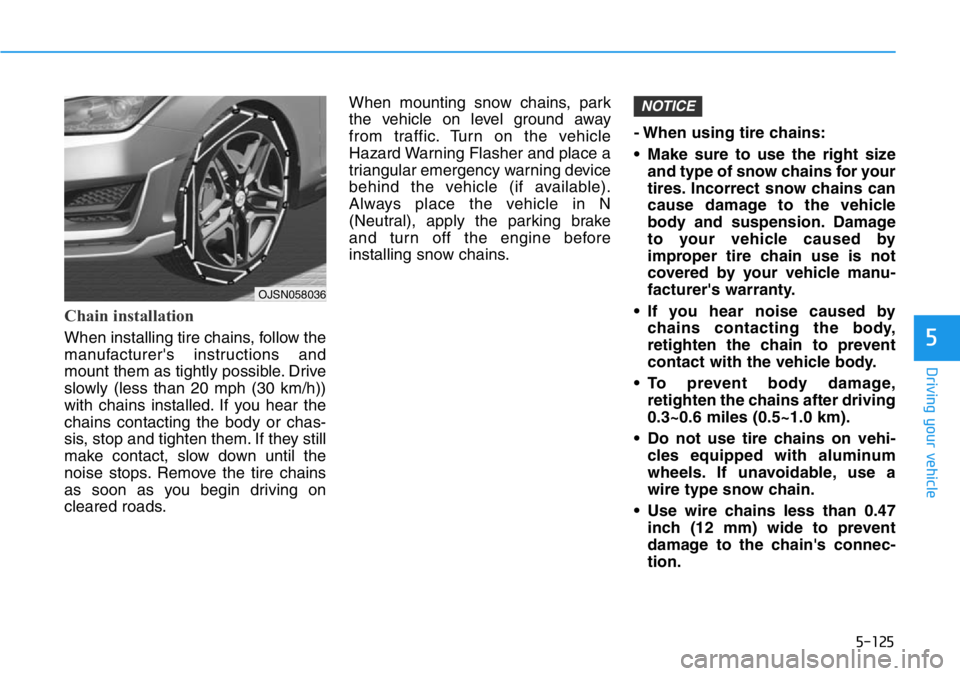
Chain installation
When installing tire chains, follow the
manufacturer's instructions and
mount them as tightly possible. Drive
slowly (less than 20 mph (30 km/h))
with chains installed. If you hear the
chains contacting the body or chas-
sis, stop and tighten them. If they still
make contact, slow down until the
noise stops. Remove the tire chains
as soon as you begin driving on
cleared roads.When mounting snow chains, park
the vehicle on level ground away
from traffic. Turn on the vehicle
Hazard Warning Flasher and place a
triangular emergency warning device
behind the vehicle (if available).
Always place the vehicle in N
(Neutral), apply the parking brake
and turn off the engine before
installing snow chains.- When using tire chains:
• Make sure to use the right size
and type of snow chains for your
tires. Incorrect snow chains can
cause damage to the vehicle
body and suspension. Damage
to your vehicle caused by
improper tire chain use is not
covered by your vehicle manu-
facturer's warranty.
• If you hear noise caused by
chains contacting the body,
retighten the chain to prevent
contact with the vehicle body.
• To prevent body damage,
retighten the chains after driving
0.3~0.6 miles (0.5~1.0 km).
• Do not use tire chains on vehi-
cles equipped with aluminum
wheels. If unavoidable, use a
wire type snow chain.
• Use wire chains less than 0.47
inch (12 mm) wide to prevent
damage to the chain's connec-
tion.
NOTICE
OJSN058036
Page 320 of 446
5-126
Driving your vehicle
Winter Precautions
Use high quality ethylene glycol
coolant
Your vehicle is delivered with high
quality ethylene glycol coolant in the
cooling system. It is the only type of
coolant that should be used because
it helps prevent corrosion in the cool-
ing system, lubricates the water
pump and prevents freezing. Be sure
to replace or replenish your coolant
in accordance with the maintenance
schedule in chapter 7. Before winter,
have your coolant tested to assure
that its freezing point is sufficient for
the temperatures anticipated during
the winter.
Change to "winter weight" oil if
necessary
In some climates it is recommended
that a lower viscosity "winter weight"
oil be used during cold weather. See
chapter 8 for recommendations. If
you aren't sure what weight oil you
should use, consult an authorized
HYUNDAI dealer.
Check battery and cables
Winter puts additional burdens on
the battery system. Visually inspect
the battery and cables as described
in chapter 7. The level of charge in
your battery can be checked by an
authorized HYUNDAI dealer or a
service station.
Check spark plugs and ignition
system
Inspect your spark plugs as
described in chapter 7 and replace
them if necessary. Also check all
ignition wiring and components to be
sure they are not cracked, worn or
damaged in any way.
Use approved window washer
anti-freeze in system
To keep the water in the window
washer system from freezing, add an
approved window washer anti-freeze
solution in accordance with instruc-
tions on the container. Window wash-
er anti-freeze is available from an
authorized HYUNDAI dealer and
most auto parts outlets. Do not use
engine coolant or other types of anti-
freeze as these may damage the
paint finish.
Do not let your parking brake
freeze
Under some conditions your parking
brake can freeze in the engaged
position. This is most likely to happen
when there is an accumulation of
snow or ice around or near the rear
brakes or if the brakes are wet. If
there is a risk the parking brake may
freeze, apply it only temporarily while
you have parked the vehicle and
blocked the rear wheels so the car
cannot roll. Then release the parking
brake.
Page 321 of 446
5-127
Driving your vehicle
5
Do not let ice and snow accu-
mulate underneath
Under some conditions, snow and
ice can build up under the fenders
and interfere with the steering. When
driving in severe winter conditions
where this may happen, you should
periodically check underneath the
car to be sure the movement of the
front wheels and the steering com-
ponents is not obstructed.
Don't place foreign objects or
materials in the engine com-
partment
Placement of foreign object or mate-
rials which prevent cooling of the
engine, in the engine compartment,
may cause a failure or combustion.
The manufacturer is not responsible
for the damage caused by such
placement.
To keep locks from freezing
To keep the locks from freezing,
squirt an approved de-icer fluid or
glycerine into the key opening. If a
lock is covered with ice, squirt it with
an approved de-icing fluid to remove
the ice. If the lock is frozen internally,
you may be able to thaw it out by
using a heated key. Handle the heat-
ed key with care to avoid injury.
Page 336 of 446
6-9
What to do in an emergency
6
Tire Pressure Monitoring
System
Each tire, including the spare (if pro-
vided), should be checked monthly
when cold and inflated to the inflation
pressure recommended by the vehicle
manufacturer on the vehicle placard or
tire inflation pressure label. A cold tire
means the vehicle has been sitting for
3 hours and driven for less than 1 mile
(1.6 km) in that 3 hour period.
Allow the tire to cool before measur-
ing the inflation pressure. Always be
sure the tire is cold before inflating to
the recommended pressure. If your
vehicle has tires of a different size
than the size indicated on the vehicle
placard or tire inflation pressure
label, you should determine the
proper tire inflation pressure for
those tires.As an added safety feature, your
vehicle has been equipped with a tire
pressure monitoring system (TPMS)
that illuminates a low tire pressure
telltale when one or more of your
tires is significantly under-inflated.
Accordingly, when the low tire pres-
sure telltale illuminates, you should
stop and check your tires as soon as
possible, and inflate them to the
proper pressure. Driving on a signifi-
cantly under-inflated tire causes the
tire to overheat and can lead to tire
failure.
Under-inflation also reduces fuel effi-
ciency and tire tread life, and may
affect the vehicle's handling and
stopping ability.
Please note that the TPMS is not a
substitute for proper tire mainte-
nance, and it is the driver's responsi-
bility to maintain correct tire pres-
sure, even if under-inflation has not
reached the level to trigger illumina-
tion of the TPMS low tire pressure
telltale.Your vehicle has also been equipped
with a TPMS malfunction indicator to
indicate when the system is not
operating properly. The TPMS mal-
function indicator is combined with
the low tire pressure telltale. When
the system detects a malfunction,
the telltale will flash for approximate-
ly one minute and then remain con-
tinuously illuminated. This sequence
will continue upon subsequent vehi-
cle start-ups as long as the malfunc-
tion exists.
When the malfunction indicator is
illuminated, the system may not be
able to detect or signal low tire pres-
sure as intended. TPMS malfunc-
tions may occur for a variety of rea-
sons, including the installation of
replacement or alternate tires or
wheels on the vehicle that prevent
the TPMS from functioning properly.
Always check the TPMS malfunction
telltale after replacing one or more
tires or wheels on your vehicle to
ensure that the replacement or alter-
nate tires and wheels allow the TPMS
to continue to function properly. Over-inflation or under-inflation
can reduce tire life, adversely
affect vehicle handling, and
lead to sudden tire failure that
may cause loss of vehicle con-
trol resulting in an accident.
WARNING
Page 339 of 446
6-12
What to do in an emergency
The TPMS Malfunction Indicator
may illuminate after blinking for
one minute if the vehicle is near
electric power supply cables or
radio transmitters such as police
stations, government and public
offices, broadcasting stations,
military installations, airports,
transmitting towers, etc.
Additionally, the TPMS Malfunction
Indicator may illuminate if snow
chains are used or electronic
devices such as computers, charg-
ers, remote starters, navigation,
etc. This may interfere with normal
operation of the TPMS.
Changing a Tire with TPMS
If you have a flat tire, the Low Tire
Pressure and LCD position indicator
will come on. Have the flat tire
repaired by an authorized HYUNDAI
dealer as soon as possible.
Once the original tire equipped with
a tire pressure monitoring sensor is
reinflated to the recommended pres-
sure and reinstalled on the vehicle,
the Low Tire Pressure LCD position
indicator and TPMS Malfunction
Indicator will go off within a few min-
utes of driving.
If the indicators do not disappear
after a few minutes, please visit an
authorized HYUNDAI dealer.Each wheel is equipped with a tire
pressure sensor mounted inside the
tire behind the valve stem. You must
use TPMS specific wheels. It is rec-
ommended that you always have
your tires serviced by an authorized
HYUNDAI dealer.
You may not be able identify a tire
with low pressure by simply looking
at it. Always use a good quality tire
pressure gage to measure the tire's
inflation pressure. Please note that a
tire that is hot (from being driven) will
have a higher pressure measure-
ment than a tire that is cold.
A cold tire means the vehicle has
been sitting for 3 hours and driven for
less than 1 mile (1.6 km) in that 3
hour period.
Allow the tire to cool before measur-
ing the inflation pressure. Always be
sure the tire is cold before inflating to
the recommended pressure.
NOTICE
Never use a puncture-repairing
agent not approved by HYUNDAI
dealer to repair and/or inflate a
low pressure tire. Tire sealant
not approved by HYUNDAI deal-
er may damage the tire pressure
sensor.
CAUTION
Page 342 of 446
6-15
What to do in an emergency
6
The Tire Mobility Kit is not designed
or intended as a permanent tire
repair method and is to be used for
one tire only.
This instruction shows you step by
step how to temporarily seal the
puncture simply and reliably.
Read the section "Notes on the safe
use of the Tire Mobility Kit".Notes on the safe use of the
Tire Mobility Kit
• Park your car at the side of the
road so that you can work with the
Tire Mobility Kit away from moving
traffic.
• To be sure your vehicle will not
move, even when you're on fairly
level ground, always set your park-
ing brake.
• Only use the Tire Mobility Kit for
sealing/inflation passenger car
tires. Only punctured areas located
within the tread region of the tire
can be sealed using the tire mobil-
ity kit.
• Do not use on motorcycles, bicy-
cles or any other type of tires.
• When the tire and wheel are dam-
aged, do not use Tire Mobility Kit
for your safety.
• Use of the Tire Mobility Kit may not
be effective for tire damage larger
than approximately 0.24 inch (6
mm).
Please contact the nearest
HYUNDAI dealership if the tire
cannot be made roadworthy with
the Tire Mobility Kit.• Do not use the Tire Mobility Kit if a
tire is severely damaged by driving
run flat or with insufficient air pres-
sure.
• Do not remove any foreign objects
such as nails or screws that have
penetrated the tire.
• Provided the car is outdoors, leave
the engine running. Otherwise
operating the compressor may
eventually drain the car battery.
• Never leave the Tire Mobility Kit
unattended while it is being used.
• Do not leave the compressor run-
ning for more than 10 minutes at a
time or it may overheat.
• Do not use the Tire Mobility Kit if
the ambient temperature is below
-22°F (-30°C).
• In case of skin contact with the-
sealant, wash the area thoroughly-
with plenty of water. If the irritation-
persists, seek medical attention.
• In case of eye contact with the
sealant, flush your eyes for at least
15 minutes. If the irritation persists,
seek medical attention.
Page 343 of 446
6-16
What to do in an emergency
• In case of swallowing the sealant,
rinse the mouth and drink plenty
ofwater. However, never give any-
thing to an unconscious person
and seek medical attention imme-
diately.
• Long time exposure to the sealant-
may cause damage to bodily tissue
such as kidney, etc.
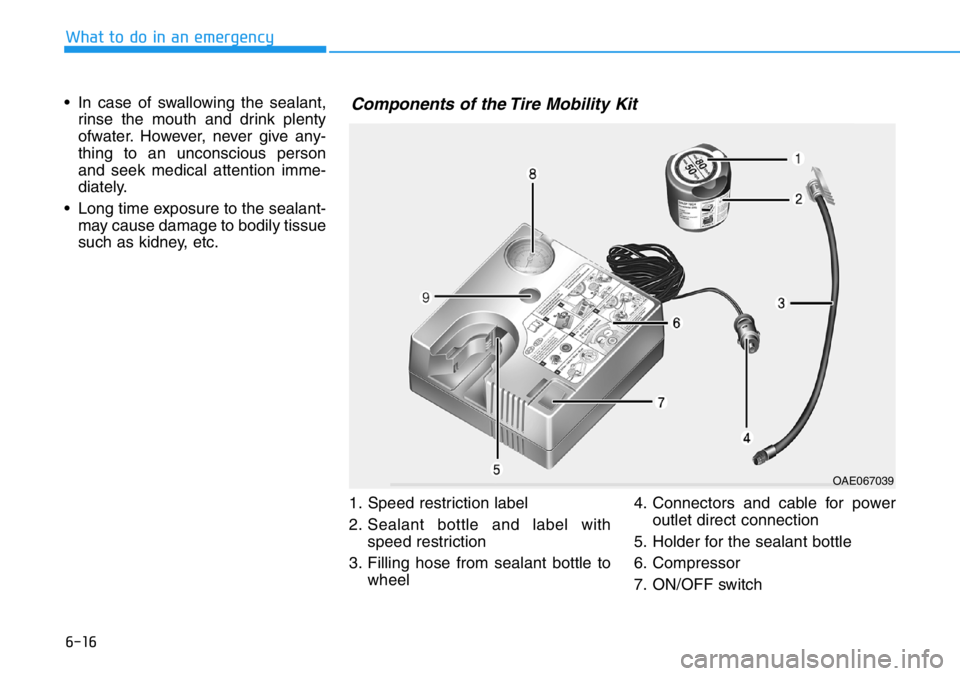
1. Speed restriction label
2. Sealant bottle and label with
speed restriction
3. Filling hose from sealant bottle to
wheel4. Connectors and cable for power
outlet direct connection
5. Holder for the sealant bottle
6. Compressor
7. ON/OFF switch
Components of the Tire Mobility Kit
OAE067039
Page 344 of 446

6-17
What to do in an emergency
6
8. Pressure gauge for displaying the
tire inflation pressure
9. Button for reducing tire inflation
pressure
Connectors, cable and connection
hose are stored in the compressor
housing.
Strictly follow the specified sequence,
otherwise the sealant may escape
under high pressure.Using the Tire Mobility Kit
1. Shake the sealant bottle (2).2. Screw the filling hose (3) onto the
connector of the sealant bottle (2).
3. Insert the sealant bottle into the
housing of the compressor (5) so
that the bottle is upright.
4. Ensure that the button (9) on the
compressor is not pressed. Do not use the tire sealant after
the sealant has expired (i.e.
pasted the expiration date on
the sealant container). This can
increase the risk of tire failure.
WARNING
•Keep out of reach of children.
•Avoid contact with eyes.
•Do not swallow.
WARNING
Detach the speed restriction
label (1) from the sealant bottle
(2), and place it in a highly visi-
ble place inside the vehicle
such as on the steering wheel
to remind the driver not to drive
too fast.
CAUTION
OJSN068011
OAEPH067041L
Page 345 of 446
6-18
What to do in an emergency
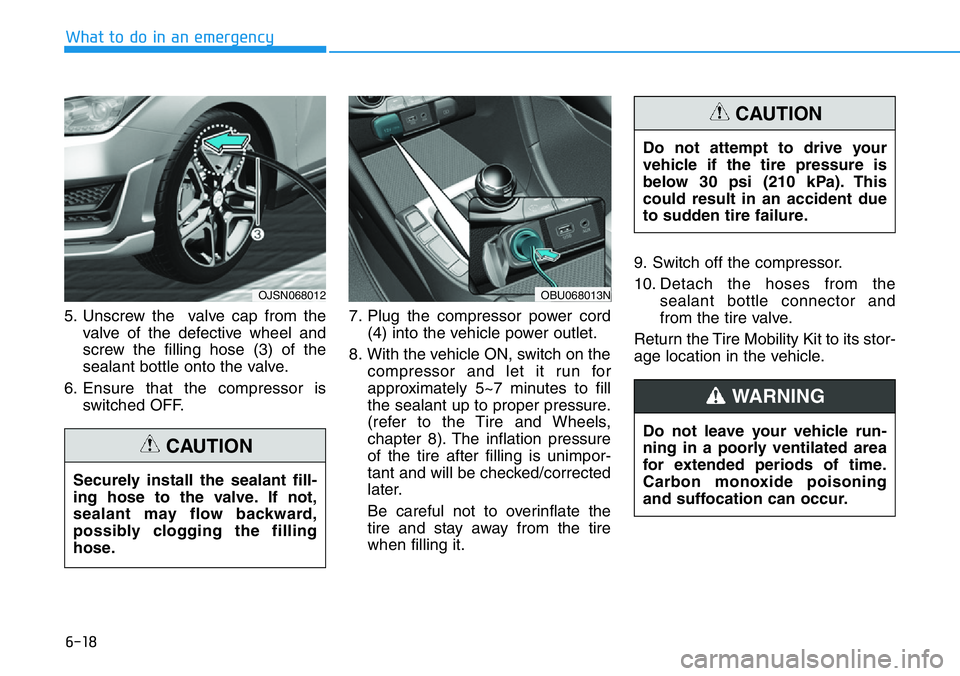
5. Unscrew the valve cap from the
valve of the defective wheel and
screw the filling hose (3) of the
sealant bottle onto the valve.
6. Ensure that the compressor is
switched OFF.7. Plug the compressor power cord
(4) into the vehicle power outlet.
8. With the vehicle ON, switch on the
compressor and let it run for
approximately 5~7 minutes to fill
the sealant up to proper pressure.
(refer to the Tire and Wheels,
chapter 8). The inflation pressure
of the tire after filling is unimpor-
tant and will be checked/corrected
later.
Be careful not to overinflate the
tire and stay away from the tire
when filling it.9. Switch off the compressor.
10. Detach the hoses from the
sealant bottle connector and
from the tire valve.
Return the Tire Mobility Kit to its stor-
age location in the vehicle.
OJSN068012 OBU068013N
Securely install the sealant fill-
ing hose to the valve. If not,
sealant may flow backward,
possibly clogging the filling
hose.
CAUTION
Do not attempt to drive your
vehicle if the tire pressure is
below 30 psi (210 kPa). This
could result in an accident due
to sudden tire failure.
CAUTION
Do not leave your vehicle run-
ning in a poorly ventilated area
for extended periods of time.
Carbon monoxide poisoning
and suffocation can occur.
WARNING