oil level HYUNDAI XG350 2005 Owners Manual
[x] Cancel search | Manufacturer: HYUNDAI, Model Year: 2005, Model line: XG350, Model: HYUNDAI XG350 2005Pages: 247, PDF Size: 7.28 MB
Page 10 of 247

YOUR VEHICLE AT A GLANCEB255A01L-AATINDICATOR SYMBOLS ON THE INSTRUMENT PANEL* More detailed explanations of these items will be found beginning on page 1-42
Turn Signal Indicator Lights SRS (Airbag) Service Reminder Indicator (SRI)Seat Belt Reminder Light and Chime
High Beam Indicator LightLow Oil Pressure Warning Light
Parking Brake/Low Brake Fluid Level Warning LightCharging System Warning Light
Door Ajar Warning Light and Chime
Trunk Lid Open Warning Light
Front Fog Indicator LightLow Fuel Level Warning LightABS Service Reminder Indicator
Traction Control Indicator Light Malfunction Indicator LightCruise Indicator Light
Stop/Tail Light Failure Warning Light
xgflhma-0.p656/16/04, 3:05 PM 10
Page 53 of 247

1
FEATURES OF YOUR HYUNDAI
41
1. Cruise Indicator Light
2. Tachometer
3. Turn Signal Indicator Light
4. Speedometer
5. High Beam Indicator Light
6. Fuel Gauge
7. Traction Control Indicator Light
8. Front Fog Indicator Light
9. Stop/Tail Light Failure Warning Light
10.Parking Brake/Brake Fluid Level Warning Light
11.Seat Belt Warning Light
12.Charging System Warning Light13.Door Ajar Warning Light
14.Oil Pressure Warning Light
15.Trunk Lid Open Warning Light
16.SRS (Airbag) Warning Light
17.Odometer/ Trip Odometer
18.Odometer/ Trip Odometer Reset Switch
19.Malfunction Indicator Light (MIL)
20.Coolant Temperature Gauge
21.Automatic Transaxle Position Indicator Light
22.Low Fuel Warning Light
23.Anti-Lock Brake Warning Light
xgflhma-1.p656/16/04, 3:03 PM 41
Page 54 of 247

1FEATURES OF YOUR HYUNDAI42
WARNING AND INDICATOR LIGHTSB260D01A-AAT
TURN SIGNAL INDICATOR
LIGHTS
The blinking green arrows on the instrument
panel show the direction indicated by the turn
signals. If the arrow comes on but does not blink,
blinks more rapidly than normal, or does not
illuminate at all, a malfunction in the turn signal
system is indicated. Your dealer should be
consulted for repairs.
B260E01L-AAT
SEAT BELT REMINDER LIGHT
AND CHIME
Seat belt reminder light comes and stays on until
the seat belt is fastened when the ignition key is
turned "ON" or "START".
And, the warning chime will also sound for about
6 seconds.B260F01A-AAT
HIGH BEAM INDICATOR LIGHT
The high beam indicator light comes on when-
ever the headlights are switched to the high
beam or flash position.
B260G01A-AAT
LOW OIL PRESSURE
WARNING LIGHT
CAUTION:
If the oil pressure warning light stays on
while the engine is running, serious engine
damage may result. The oil pressure warn-
ing light comes on whenever there is insuf-
ficient oil pressure. In normal operation, it
should come on when the ignition switch
is turned on, then go out when the engine
is started. If the oil pressure warning light
stays on while the engine is running, there
is a serious malfunction.
If this happens, stop the car as soon as it is
safe to do so, turn off the engine and check
the oil level. If the oil level is low, fill the
engine oil to the proper level and start the
engine again. If the light stays on with the
engine running, turn the engine off imme-
diately. In any instance where the oil light
stays on when the engine is running, the
engine should be checked by a Hyundai
dealer before the car is driven again.
!
B260B01L-AAT
SRS (Airbag) SERVICE
REMINDER INDICATOR
(SRI)
The SRS service reminder indicator (SRI) comes
on and flashes for about 6 seconds after the
ignition key is turned to the "ON" position or after
the engine is started, after which it will go out.
This light also comes on when the SRS is not
working properly. If the SRI does not come on,
or continuously remains on after flashing for
about 6 seconds, or goes out for a second after
illuminating for about 6 seconds and then con-
tinuously comes on again when you turned the
ignition key to the "ON" position or started the
engine, or if it comes on while driving, have the
SRS inspected by an authorized Hyundai Dealer.
xgflhma-1.p656/16/04, 3:03 PM 42
Page 154 of 247
32WHAT TO DO IN AN EMERGENCY
IF THE ENGINE WILL NOT START!
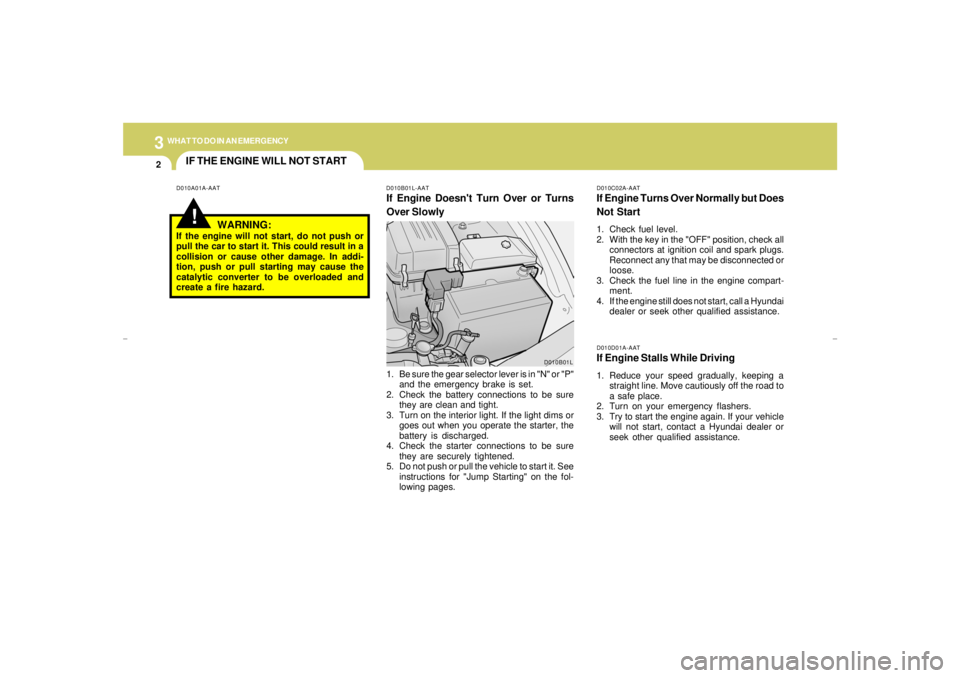
D010A01A-AAT D010B01L-AAT
If Engine Doesn't Turn Over or Turns
Over Slowly
D010C02A-AATIf Engine Turns Over Normally but Does
Not Start1. Check fuel level.
2. With the key in the "OFF" position, check all
connectors at ignition coil and spark plugs.
Reconnect any that may be disconnected or
loose.
3. Check the fuel line in the engine compart-
ment.
4. If the engine still does not start, call a Hyundai
dealer or seek other qualified assistance.D010D01A-AATIf Engine Stalls While Driving1. Reduce your speed gradually, keeping a
straight line. Move cautiously off the road to
a safe place.
2. Turn on your emergency flashers.
3. Try to start the engine again. If your vehicle
will not start, contact a Hyundai dealer or
seek other qualified assistance.
WARNING:
If the engine will not start, do not push or
pull the car to start it. This could result in a
collision or cause other damage. In addi-
tion, push or pull starting may cause the
catalytic converter to be overloaded and
create a fire hazard.
1. Be sure the gear selector lever is in "N" or "P"
and the emergency brake is set.
2. Check the battery connections to be sure
they are clean and tight.
3. Turn on the interior light. If the light dims or
goes out when you operate the starter, the
battery is discharged.
4. Check the starter connections to be sure
they are securely tightened.
5. Do not push or pull the vehicle to start it. See
instructions for "Jump Starting" on the fol-
lowing pages.
D010B01L
xgflhma-3.p656/16/04, 3:00 PM 2
Page 181 of 247

Engine Compartment .................................................... 6-2
General Checks ............................................................ 6-3
Checking the Engine Oil ............................................... 6-4
Changing the Oil and Filter ............................................ 6-5
Checking and Changing the Engine Coolant ................ 6-6
Spark Plugs .................................................................. 6-8
Changing the Air Cleaner Filter ..................................... 6-9
Checking the Transaxle Fluid .....................................6-11
Checking the Brakes ..................................................6-12
Air Conditioning Care..................................................6-14
Changing the Conoitioner Air Filter
(For Evaporator and Blower Unit) .............................6-15
Checking Drive Belts ..................................................6-17
Checking and Replacing Fuses..................................6-17
Power Steering Fluid Level .........................................6-20
Headlight Aiming Adjustment......................................6-21
Replacement of Light Bulbs ........................................6-22
Bulb Wattage ...............................................................6-31
Junction Box Description............................................6-32
Do-It-Yourself Maintenance
6
6
xgflhma-6.p656/16/04, 2:58 PM 1
Page 182 of 247
6
DO-IT-YOURSELF MAINTENANCE
2
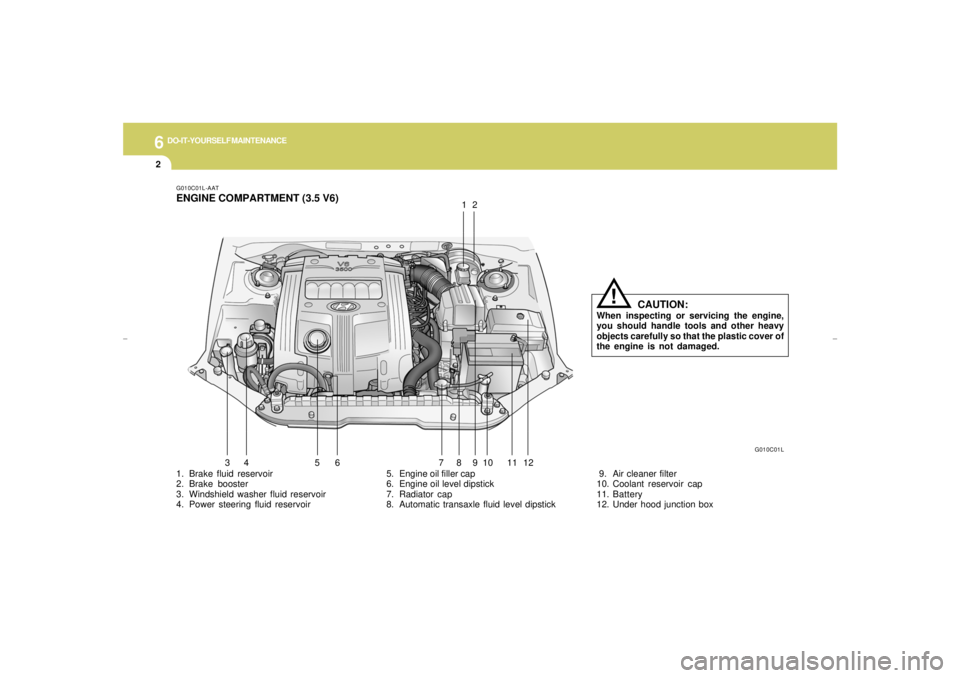
1. Brake fluid reservoir
2. Brake booster
3. Windshield washer fluid reservoir
4. Power steering fluid reservoir5. Engine oil filler cap
6. Engine oil level dipstick
7. Radiator cap
8. Automatic transaxle fluid level dipstickG010C01L-AATENGINE COMPARTMENT (3.5 V6)
9. Air cleaner filter
10. Coolant reservoir cap
11. Battery
12. Under hood junction box
G010C01L
12
34 5 6 7891011
CAUTION:
When inspecting or servicing the engine,
you should handle tools and other heavy
objects carefully so that the plastic cover of
the engine is not damaged.
!
12
xgflhma-6.p656/16/04, 2:58 PM 2
Page 183 of 247
6
DO-IT-YOURSELF MAINTENANCE
3
GENERAL CHECKS
G020C01L-AATVehicle InteriorThe following should be checked each time
when the vehicle is driven:
o Lights operation
o Windshield wiper operation
o Horn operation
o Defroster, heating system operation (and air
conditioning, if installed)
o Steering operation and condition
o Mirror condition and operation
o Turn signal operation
o Accelerator pedal operation
o Brake operation, including parking brake
o Automatic transaxle operation, including
"Park" mechanism operation
o Seat control condition and operation
o Seat belt condition and operation
o Sunvisor operation
If you notice anything that does not operate
correctly or appears to be functioning incor-
rectly, inspect it carefully and seek assistance
from your Hyundai dealer if service is needed.
G020B01A-AATVehicle ExteriorThe following should be checked monthly:
o Overall appearance and condition
o Wheel condition and wheel nut torque
o Exhaust system condition
o Light condition and operation
o Windshield glass condition
o Wiper blade condition
o Paint condition and body corrosion
o Fluid leaks
o Door and hood lock condition
o Tire pressure and condition (including spare
tire)
G020A01L-AATEngine CompartmentThe following should be checked regularly:
o Engine oil level and condition
o Transaxle fluid level and condition
o Brake fluid level
o Coolant level
o Windshield washer fluid level
o Accessory drive belt condition
o Engine coolant hose condition
o Fluid leaks (on or below components)
o Power steering fluid level
o Battery condition
o Air filter condition
xgflhma-6.p656/16/04, 2:58 PM 3
Page 184 of 247
6
DO-IT-YOURSELF MAINTENANCE
4
CHECKING THE ENGINE OIL
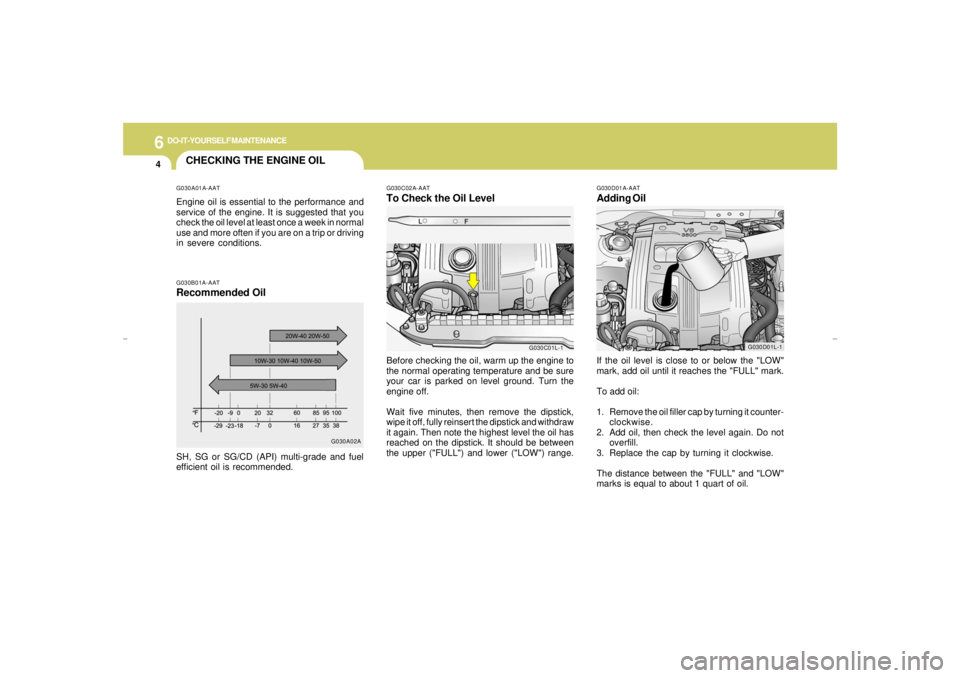
G030D01A-AATAdding OilIf the oil level is close to or below the "LOW"
mark, add oil until it reaches the "FULL" mark.
To add oil:
1. Remove the oil filler cap by turning it counter-
clockwise.
2. Add oil, then check the level again. Do not
overfill.
3. Replace the cap by turning it clockwise.
The distance between the "FULL" and "LOW"
marks is equal to about 1 quart of oil.
G030A01A-AATEngine oil is essential to the performance and
service of the engine. It is suggested that you
check the oil level at least once a week in normal
use and more often if you are on a trip or driving
in severe conditions.
G030C02A-AATTo Check the Oil Level
G030B01A-AATRecommended OilSH, SG or SG/CD (API) multi-grade and fuel
efficient oil is recommended.Before checking the oil, warm up the engine to
the normal operating temperature and be sure
your car is parked on level ground. Turn the
engine off.
Wait five minutes, then remove the dipstick,
wipe it off, fully reinsert the dipstick and withdraw
it again. Then note the highest level the oil has
reached on the dipstick. It should be between
the upper ("FULL") and lower ("LOW") range.
G030A02AG030C01L-1
G030D01L-1
xgflhma-6.p656/16/04, 2:58 PM 4
Page 185 of 247
6
DO-IT-YOURSELF MAINTENANCE
5
!
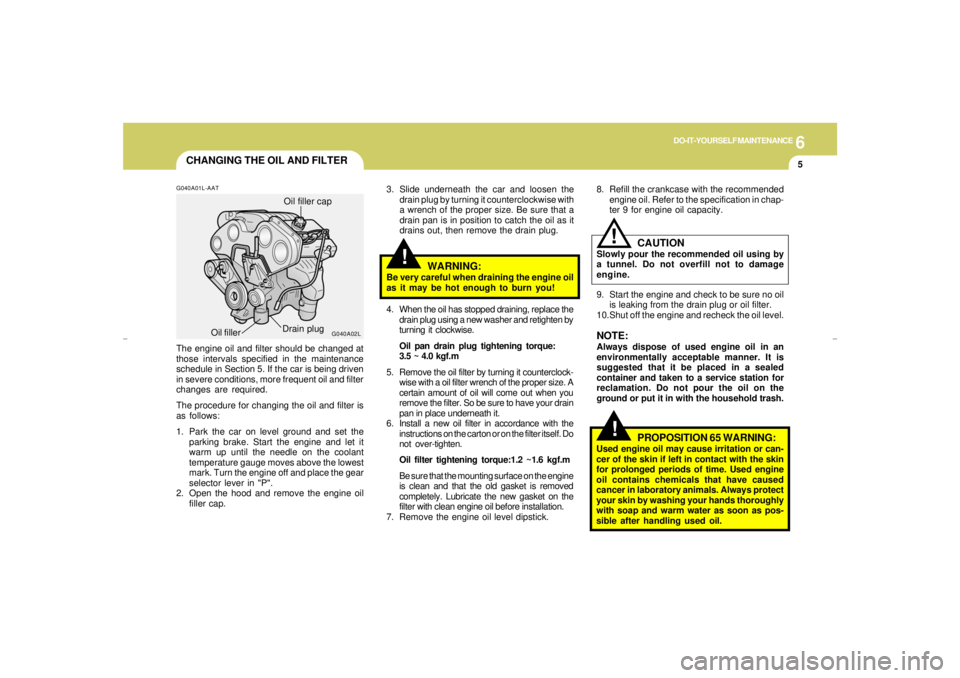
CHANGING THE OIL AND FILTER
!
WARNING:
Be very careful when draining the engine oil
as it may be hot enough to burn you!
G040A01L-AATThe engine oil and filter should be changed at
those intervals specified in the maintenance
schedule in Section 5. If the car is being driven
in severe conditions, more frequent oil and filter
changes are required.
The procedure for changing the oil and filter is
as follows:
1. Park the car on level ground and set the
parking brake. Start the engine and let it
warm up until the needle on the coolant
temperature gauge moves above the lowest
mark. Turn the engine off and place the gear
selector lever in "P".
2. Open the hood and remove the engine oil
filler cap.
G040A02L
3. Slide underneath the car and loosen the
drain plug by turning it counterclockwise with
a wrench of the proper size. Be sure that a
drain pan is in position to catch the oil as it
drains out, then remove the drain plug.
4. When the oil has stopped draining, replace the
drain plug using a new washer and retighten by
turning it clockwise.
Oil pan drain plug tightening torque:
3.5 ~ 4.0 kgf.m
5. Remove the oil filter by turning it counterclock-
wise with a oil filter wrench of the proper size. A
certain amount of oil will come out when you
remove the filter. So be sure to have your drain
pan in place underneath it.
6. Install a new oil filter in accordance with the
instructions on the carton or on the filter itself. Do
not over-tighten.
Oil filter tightening torque:1.2 ~1.6 kgf.m
Be sure that the mounting surface on the engine
is clean and that the old gasket is removed
completely. Lubricate the new gasket on the
filter with clean engine oil before installation.
7. Remove the engine oil level dipstick.8. Refill the crankcase with the recommended
engine oil. Refer to the specification in chap-
ter 9 for engine oil capacity.
Oil filler cap
Oil fillerDrain plug9. Start the engine and check to be sure no oil
is leaking from the drain plug or oil filter.
10.Shut off the engine and recheck the oil level.
NOTE:Always dispose of used engine oil in an
environmentally acceptable manner. It is
suggested that it be placed in a sealed
container and taken to a service station for
reclamation. Do not pour the oil on the
ground or put it in with the household trash.
CAUTION
Slowly pour the recommended oil using by
a tunnel. Do not overfill not to damage
engine.
!
PROPOSITION 65 WARNING:
Used engine oil may cause irritation or can-
cer of the skin if left in contact with the skin
for prolonged periods of time. Used engine
oil contains chemicals that have caused
cancer in laboratory animals. Always protect
your skin by washing your hands thoroughly
with soap and warm water as soon as pos-
sible after handling used oil.
xgflhma-6.p656/16/04, 2:58 PM 5
Page 190 of 247

6
DO-IT-YOURSELF MAINTENANCE
10
!
FILLING THE WASHER RESERVOIR
WINDSHIELD WIPER BLADES
G090A01A-AATThe washer fluid reservoir supplies fluid to the
windshield washer system.
A good quality washer fluid should be used to fill
the washer reservoir. The fluid level should be
checked more frequently during inclement
weather or whenever the washer system is in
more frequent use.
The capacity of the washer reservoir is 3.2 U.S.
quarts (3.0 Liters).
CAUTION:
o Radiator anti-freeze (engine coolant)
should not be used in the washer system
because it will damage the car's finish.
o The washer should not be operated if the
washer reservoir is empty. This can dam-
age the washer fluid pump.
HXG2007
G080A02A-AATThe wiper blades should be carefully inspected
from time to time and cleaned to remove accu-
mulations of road film or other debris. To clean
the wiper blades and arms, use a clean sponge
or cloth with a mild soap or detergent and water.
If the wipers continue to streak or smear the
glass, replace them with genuine Hyundai re-
placement parts or their equivalent.
HEF119
!
CAUTION:
o Do not operate the wipers on dry glass.
This can result in more rapid wear of the
wiper blades and may scratch the glass.
o Keep the blade rubber out of contact
with petroleum products such as engine
oil, gasoline, etc.
xgflhma-6.p656/16/04, 2:58 PM 10