warning lights INFINITI EX 2013 User Guide
[x] Cancel search | Manufacturer: INFINITI, Model Year: 2013, Model line: EX, Model: INFINITI EX 2013Pages: 498, PDF Size: 2.5 MB
Page 91 of 498

2-20Instruments and controls
SIC3252
The dot matrix liquid crystal display*1is
located between the tachometer and the
speedometer, and it displays the auto-
matic transmission position indicator, the
Intelligent Cruise Control (ICC) system (if so
equipped), the Distance Control Assist
(DCA) system (if so equipped) information,
the Intelligent Key operation information
and other warnings and information.
For detailed information about each sys-
tem, see the following sections:
. Automatic Transmission (AT)
—“ Warning/indicator lights and audi-
ble reminders” earlier in this sec-
tion. —“
Driving the vehicle” in the“5.
Starting and driving” section.
. Intelligent Cruise Control (ICC) system
—“ Intelligent Cruise Control (ICC) sys-
tem (FULL SPEED RANGE)” in the“5.
Starting and driving” section.
. Distance Control Assist (DCA) system
—“ Distance Control Assist (DCA) sys-
tem” in the “5. Starting and driving”
section.
. Intelligent Key system
—“ Intelligent Key system” in the“3.
Pre-driving checks and adjust-
ments” section.
—“ Push-button ignition switch” in the
“5. Starting and driving” section.
DOT MATRIX LIQUID CRYSTAL DISPLAY
Page 105 of 498

2-34Instruments and controls
SIC3239
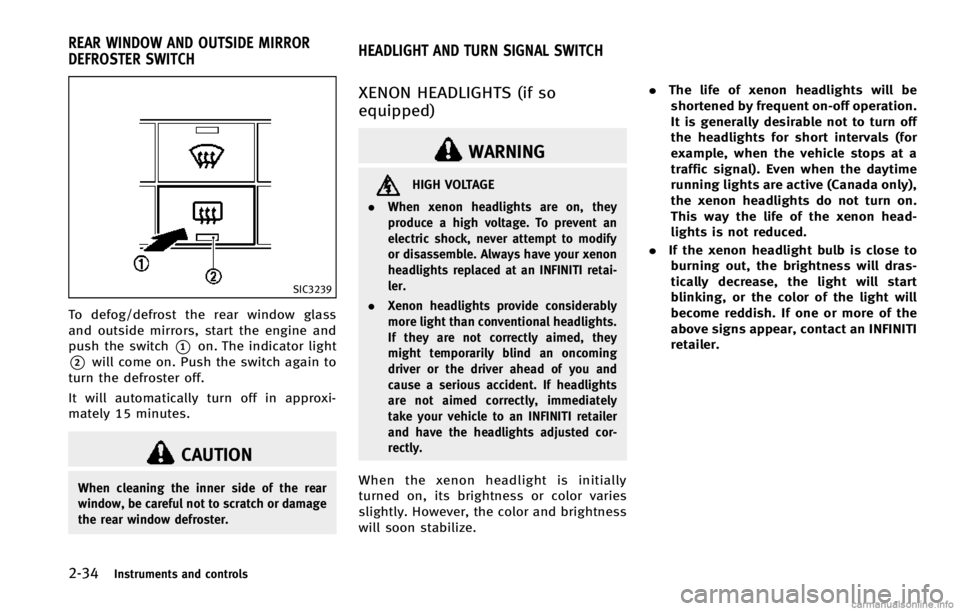
To defog/defrost the rear window glass
and outside mirrors, start the engine and
push the switch
*1on. The indicator light
*2will come on. Push the switch again to
turn the defroster off.
It will automatically turn off in approxi-
mately 15 minutes.
CAUTION
When cleaning the inner side of the rear
window, be careful not to scratch or damage
the rear window defroster.
XENON HEADLIGHTS (if so
equipped)
WARNING
HIGH VOLTAGE
. When xenon headlights are on, they
produce a high voltage. To prevent an
electric shock, never attempt to modify
or disassemble. Always have your xenon
headlights replaced at an INFINITI retai-
ler.
. Xenon headlights provide considerably
more light than conventional headlights.
If they are not correctly aimed, they
might temporarily blind an oncoming
driver or the driver ahead of you and
cause a serious accident. If headlights
are not aimed correctly, immediately
take your vehicle to an INFINITI retailer
and have the headlights adjusted cor-
rectly.
When the xenon headlight is initially
turned on, its brightness or color varies
slightly. However, the color and brightness
will soon stabilize. .
The life of xenon headlights will be
shortened by frequent on-off operation.
It is generally desirable not to turn off
the headlights for short intervals (for
example, when the vehicle stops at a
traffic signal). Even when the daytime
running lights are active (Canada only),
the xenon headlights do not turn on.
This way the life of the xenon head-
lights is not reduced.
. If the xenon headlight bulb is close to
burning out, the brightness will dras-
tically decrease, the light will start
blinking, or the color of the light will
become reddish. If one or more of the
above signs appear, contact an INFINITI
retailer.
REAR WINDOW AND OUTSIDE MIRROR
DEFROSTER SWITCH HEADLIGHT AND TURN SIGNAL SWITCH
Page 108 of 498

Battery saver system
A chime will sound when the driver side
door is opened with the light switch in the
orposition and the ignition switch
in the ACC, OFF or LOCK position.
When the headlight switch is in the
orposition while the ignition switch is in
the ON position, the lights will automati-
cally turn off within a period of time after
the ignition switch has been pushed to the
OFF position.
When the headlight switch remains in the
orposition after the lights
automatically turn off, the lights will turn
on when the ignition switch is pushed to
the ON position.
CAUTION
. When you turn on the headlight switch
again after the lights automatically turn
off, the lights will not turn off auto-
matically. Be sure to turn the light
switch to the OFF position when you
leave the vehicle for extended periods of
time, otherwise the battery will be
discharged. .
Never leave the light switch on when the
engine is not running for extended
periods of time even if the headlights
turn off automatically.
Daytime running light system (Ca-
nada only)
The daytime running lights automatically
illuminate when the engine is started with
the parking brake released. The daytime
running lights operate with the headlight
switch in the OFF position or in the
position. Turn the headlight switch to theposition for full illumination when
driving at night.
If the parking brake is applied before the
engine is started, the daytime running
lights do not illuminate. The daytime
running lights illuminate once the parking
brake is released. The daytime running
lights will remain on until the ignition
switch is pushed to the OFF position.
WARNING
When the daytime running light system is
active, tail lights on your vehicle are not on.
It is necessary at dusk to turn on your headlights. Failure to do so could cause an
accident injuring yourself and others.
Adaptive Front lighting System
(AFS) (if so equipped)
The Adaptive Front lighting System (AFS)
will automatically adjust the headlights
(low beam) toward the turning direction to
improve the driver’s view. When the head-
light switch is ON and the driver operates
the steering wheel in a turn, the AFS
system will be activated.
The AFS will operate:
.
when the headlight switch is ON.
. when the selector lever is in any
position other than P (Park) or R
(Reverse).
. when the vehicle is driven at above 16
MPH (25 km/h) for the left-side head-
light. Note that the right-side low beam
headlight will swivel but the left side
will not swivel when the vehicle is at a
stop and the steering wheel is turned.
The vehicle must attain a speed above
16 MPH (25 km/h) before AFS activates
the left-side headlight.
AFS will also adjust the headlight to a
proper axis automatically, depending on
Instruments and controls2-37
Page 113 of 498

2-42Instruments and controls
Spot Warning (BSW) indicator lights, lo-
cated next to the outside mirrors, when the
radar sensors detect a vehicle in the
detection zone. If the turn signal is
activated in the direction of the detected
vehicle, a chime sounds twice and the BSW
indicator light will flash. (See“Blind Spot
Warning (BSW) system” in the“5. Starting
and driving” section.)
The FCW system will sound a warning
chime and the vehicle ahead detection
indicator light blinks to alert the driver if
the vehicle is traveling close to the vehicle
ahead. (See “Forward Collision Warning
(FCW) system” in the“5. Starting and
driving” section.)
The warning systems switch is automati-
cally turned on when the engine is started,
and the warning systems ON indicator
*1
on the switch illuminates.
To cancel the warning systems, push the
warning systems switch to turn off the
system. The warning systems ON indicator
will turn off.
NOTE:
If you continue to push the warning
systems switch from off to on for over 4
seconds, a chime will sound. This will change the default status of the LDW, BSW
and FCW systems to OFF so that these
systems will not automatically turn on
when the engine is started. If this proce-
dure is repeated, the default status will
return to ON.
SIC3602
For driving or starting the vehicle on snowy
roads or slippery areas, turn on the SNOW
mode switch. The indicator light
*1on the
switch will illuminate. When the SNOW
mode is activated, engine output is con-
trolled to avoid wheel spin.
Turn off the SNOW mode for normal
driving.
SNOW MODE SWITCH
Page 120 of 498

SIC3248
COAT HOOKS
The coat hooks are equipped beside the
rear personal lights.
CAUTION
Do not place items which are more than 2 lb
(1 kg) on the hook.
SIC4072
LUGGAGE HOOKS
WARNING
.Always make sure that the cargo is
properly secured. Use the suitable ropes
and hooks.
. Unsecured cargo can become dangerous
in an accident or sudden stop.
CAUTION
Do not apply a total load of more than 22 lb
(10 kg) to a single hook.
Instruments and controls2-49
Page 130 of 498

SIC2925
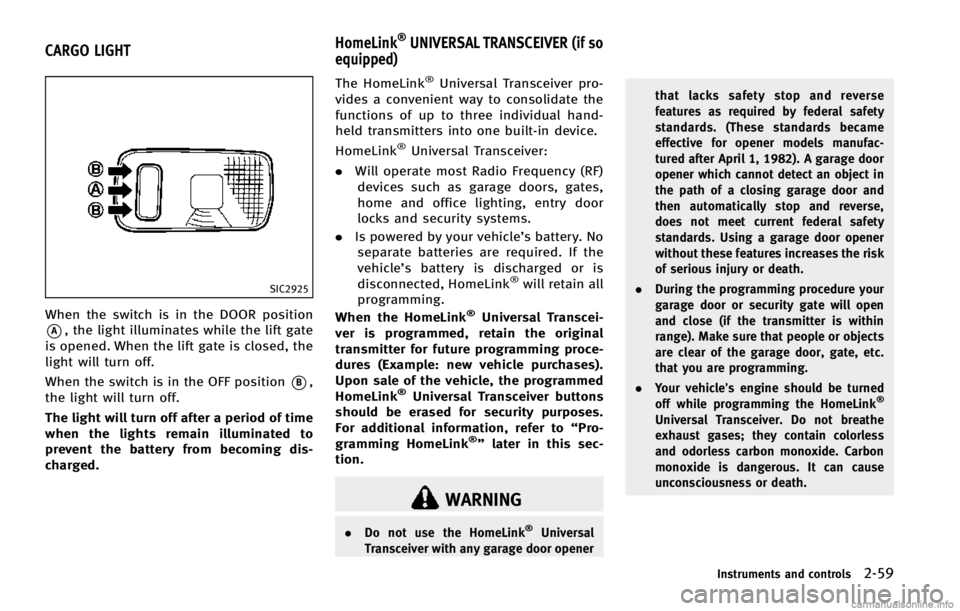
When the switch is in the DOOR position
*A, the light illuminates while the lift gate
is opened. When the lift gate is closed, the
light will turn off.
When the switch is in the OFF position
*B,
the light will turn off.
The light will turn off after a period of time
when the lights remain illuminated to
prevent the battery from becoming dis-
charged. The HomeLink
®Universal Transceiver pro-
vides a convenient way to consolidate the
functions of up to three individual hand-
held transmitters into one built-in device.
HomeLink
®Universal Transceiver:
. Will operate most Radio Frequency (RF)
devices such as garage doors, gates,
home and office lighting, entry door
locks and security systems.
. Is powered by your vehicle’s battery. No
separate batteries are required. If the
vehicle’s battery is discharged or is
disconnected, HomeLink
®will retain all
programming.
When the HomeLink
®Universal Transcei-
ver is programmed, retain the original
transmitter for future programming proce-
dures (Example: new vehicle purchases).
Upon sale of the vehicle, the programmed
HomeLink
®Universal Transceiver buttons
should be erased for security purposes.
For additional information, refer to “Pro-
gramming HomeLink
®” later in this sec-
tion.
WARNING
. Do not use the HomeLink®Universal
Transceiver with any garage door opener that lacks safety stop and reverse
features as required by federal safety
standards. (These standards became
effective for opener models manufac-
tured after April 1, 1982). A garage door
opener which cannot detect an object in
the path of a closing garage door and
then automatically stop and reverse,
does not meet current federal safety
standards. Using a garage door opener
without these features increases the risk
of serious injury or death.
. During the programming procedure your
garage door or security gate will open
and close (if the transmitter is within
range). Make sure that people or objects
are clear of the garage door, gate, etc.
that you are programming.
. Your vehicle’s engine should be turned
off while programming the HomeLink
®
Universal Transceiver. Do not breathe
exhaust gases; they contain colorless
and odorless carbon monoxide. Carbon
monoxide is dangerous. It can cause
unconsciousness or death.
Instruments and controls2-59
CARGO LIGHT HomeLink®UNIVERSAL TRANSCEIVER (if so
equipped)
Page 150 of 498

2. Close all the doors and the lift gate.
3. Push the LOCK
button*1on the
Intelligent Key.
4. All the doors, the lift gate and fuel-filler door will lock.
5. The hazard indicator flashes twice and the horn chirps once.
*: Doors will lock with the Intelligent Key
while the ignition switch is in the ACC or
ON position.
Unlocking doors and fuel-filler door
1. Push the UNLOCKbutton*2on the
Intelligent Key once.
2. The hazard indicator flashes once. The driver’s door and fuel-filler door will
unlock.
3. Push the UNLOCK
button on the
Intelligent Key again within 60 sec-
onds.
4. The hazard indicator flashes once again. All the doors and the lift gate
will unlock.
All doors will be locked automatically
unless one of the following operations is
performed within 1 minute after pushing
the UNLOCK
button on the Intelligent
Key while the doors are locked. If during this 1-minute time period, the UNLOCK
button on the Intelligent Key is pushed, all
doors will be locked automatically after
another 1 minute.
.
Opening any door
. Pushing the ignition switch
Opening windows
The UNLOCKbutton operation also
allows you to open a window that is
equipped with the automatic open/close
function. (See “Power windows” in the“2.
Instruments and controls” section.)
To open the windows, push the door
UNLOCK
button on the Intelligent Key
for about 3 seconds after the door is
unlocked.
To stop opening, release the UNLOCK
button.
Window cannot be closed using the In-
telligent Key.
The door window can be opened or closed
by turning the mechanical key in a door
lock. (See “Doors”earlier in this section.)
Using panic alarm
If you are near your vehicle and feel
threatened, you may activate the alarm to call attention as follows:
1. Push the PANIC
button*3on the
Intelligent Key for more than 1 second.
2. The theft warning alarm and headlights will stay on for 25 seconds.
3. The panic alarm stops when:
.It has run for 25 seconds, or.Any of the buttons on the Intelligent key are pushed. (Note: Panic button
should be pushed for more than 1
second.)
Setting hazard indicator and horn
mode
This vehicle is set in hazard indicator and
horn mode when you first receive the
vehicle.
In hazard indicator and horn mode, when
the LOCK
button*1is pushed, the
hazard indicator flashes twice and the horn
chirps once. When the UNLOCK
button
*2is pushed, the hazard indicator flashes
once.
If horns are not necessary, the system can
be switched to the hazard indicator mode.
In hazard indicator mode, when the LOCK
button is pushed, the hazard indicator
flashes twice. When the UNLOCK
Pre-driving checks and adjustments3-15
Page 158 of 498

2. To block glare from the side, removethe main sun visor from the center
mount and swing the visor to the side
*2.
3. Slide the sun visor
*3in or out as
needed.
SPA2447
INSIDE MIRROR
Adjust the height and the angle of the
inside mirror to the desired position.
SPA2143
Manual anti-glare type
The night position*1will reduce glare
from the headlights of vehicles behind you
at night.
Use the day position
*2when driving in
daylight hours.
WARNING
Use the night position only when necessary,
because it reduces rearview clarity.
Pre-driving checks and adjustments3-23
MIRRORS
Page 159 of 498

3-24Pre-driving checks and adjustments
SPA2450
Automatic anti-glare type
The inside mirror is designed so that it
automatically changes reflection according
to the intensity of the headlights of the
following vehicle.
The anti-glare system will be automatically
turned on when the ignition switch is
pushed to the ON position.
When the anti-glare system is turned on,
the indicator light
*Awill illuminate and
excessive glare from the headlights of the
vehicle behind you will be reduced.
Push the “*”switch
*Cto make the
inside rearview mirror operate normally. The indicator light will turn off. Push the
“I”
switch
*Dto turn the system on.
Do not allow any object to cover the
sensors
*Eor apply glass cleaner on
them. Doing so will reduce the sensitivity
of the sensor, resulting in improper
operation.
For the HomeLink
®Universal Transceiver
operation, see “HomeLink®Universal
Transceiver” in the“2. Instruments and
controls” section.
SPA2319
OUTSIDE MIRRORS
WARNING
Objects viewed in the outside mirror on the
passenger side are closer than they appear.
Be careful when moving to the right. Using
only this mirror could cause an accident.
Use the inside mirror or glance over your
shoulder to properly judge distances to
other objects.
Page 323 of 498

5-12Starting and driving
SSD0785
INTELLIGENT KEY BATTERY DIS-
CHARGE
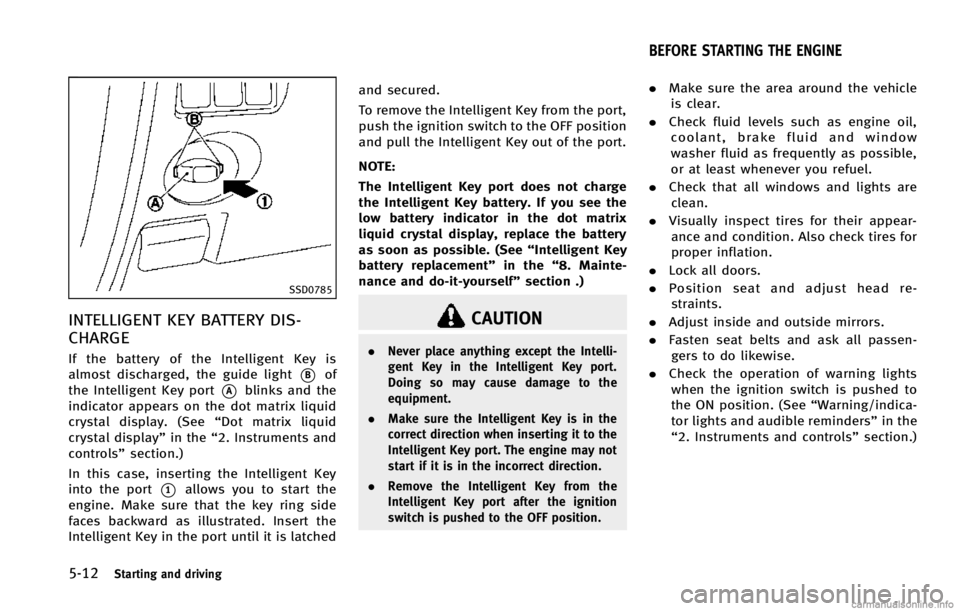
If the battery of the Intelligent Key is
almost discharged, the guide light
*Bof
the Intelligent Key port
*Ablinks and the
indicator appears on the dot matrix liquid
crystal display. (See “Dot matrix liquid
crystal display” in the“2. Instruments and
controls” section.)
In this case, inserting the Intelligent Key
into the port
*1allows you to start the
engine. Make sure that the key ring side
faces backward as illustrated. Insert the
Intelligent Key in the port until it is latched and secured.
To remove the Intelligent Key from the port,
push the ignition switch to the OFF position
and pull the Intelligent Key out of the port.
NOTE:
The Intelligent Key port does not charge
the Intelligent Key battery. If you see the
low battery indicator in the dot matrix
liquid crystal display, replace the battery
as soon as possible. (See
“Intelligent Key
battery replacement” in the“8. Mainte-
nance and do-it-yourself” section .)
CAUTION
.Never place anything except the Intelli-
gent Key in the Intelligent Key port.
Doing so may cause damage to the
equipment.
. Make sure the Intelligent Key is in the
correct direction when inserting it to the
Intelligent Key port. The engine may not
start if it is in the incorrect direction.
. Remove the Intelligent Key from the
Intelligent Key port after the ignition
switch is pushed to the OFF position.
.Make sure the area around the vehicle
is clear.
. Check fluid levels such as engine oil,
coolant, brake fluid and window
washer fluid as frequently as possible,
or at least whenever you refuel.
. Check that all windows and lights are
clean.
. Visually inspect tires for their appear-
ance and condition. Also check tires for
proper inflation.
. Lock all doors.
. Position seat and adjust head re-
straints.
. Adjust inside and outside mirrors.
. Fasten seat belts and ask all passen-
gers to do likewise.
. Check the operation of warning lights
when the ignition switch is pushed to
the ON position. (See “Warning/indica-
tor lights and audible reminders” in the
“2. Instruments and controls” section.)
BEFORE STARTING THE ENGINE