ignition INFINITI FX35 2008 Service Manual
[x] Cancel search | Manufacturer: INFINITI, Model Year: 2008, Model line: FX35, Model: INFINITI FX35 2008Pages: 3924, PDF Size: 81.37 MB
Page 700 of 3924

INFINITI MOBILE ENTERTAINMENT SYSTEMAV-153
< SERVICE INFORMATION >
C
DE
F
G H
I
J
L
M A
B
AV
N
O P
Check the inspection items below to diagnose the malfunction.
Check that the signal is received at the rear seat.
Check that transmission part has any seals or dirt that interrupts signal.
Check that the head phone battery has run down.
OK or NG
OK >> GO TO 2.
NG >> Receive signal with head phone at the rear seat. Remove seal or dirt that is interrupting signal.
If the battery has run down, replace it with new one.
2.CHECK HEAD PHONE
Check that sound is heard with another head phone.
OK or NG
OK >> Replace malfunction head phone.
NG >> GO TO 3.
3.CHECK HARNESS
1. Turn ignition switch OFF.
2. Disconnect DVD player and DVD display connectors.
3. Check continuity between DVD player harness connector B19 terminals 17, 18, 19, 20 and DVD display harness connector
B61 terminals 1, 2, 3, 4.
4. Check continuity between DVD player harness connector B19 terminals 17, 18, 19, 20 and ground.
OK or NG
OK >> GO TO 4.
NG >> Repair harness or connector.
4.CHECK MES SOUND SIGNAL
1. Connect DVD player and DVD display connectors.
2. Turn the ignition switch ACC and Press “POWER” switch of DVD player.
3. Check the signal between DVD player harness connector B19 terminals 17, 18, 20 and 19 with CONSULT-III or oscilloscope.
OK or NG
OK >> Replace DVD display.
NG >> Replace DVD player.
Remote Controller Does Not WorkINFOID:0000000001328785
1.CHECK DVD PLAYER OPERATION SWITCH
SKIA5852E
17 – 1 : Continuity should exist.
18 – 2 : Continuity should exist.
19 – 3 : Continuity should exist.
20 – 4 : Continuity should exist.
17, 18, 19, 20 – Ground : Co ntinuity should not exist.
SKIA7033E
Te r m i n a l
Condition Reference value
(+) (–)
17 19 Play CD or DVD video. Refer to
AV- 1 4 6 , "
Terminal and Ref-
erence Value for DVD Player".
18
20
SKIA7047E
3AA93ABC3ACD3AC03ACA3AC03AC63AC53A913A773A893A873A873A8E3A773A983AC73AC93AC03AC3
3A893A873A873A8F3A773A9D3AAF3A8A3A8C3A863A9D3AAF3A8B3A8C
Page 701 of 3924

AV-154
< SERVICE INFORMATION >
INFINITI MOBILE ENTERTAINMENT SYSTEM
1. Turn ignition switch ACC.
2. Press “POWER” switch of DVD player and operate DVD player switch.
Dose the DVD player switches work?
YES >> Replace remote controller.
NO >> GO TO 2.
2.CHECK REMOTE CONTROLLER AND SENSOR
Check the inspection items below to diagnose the malfunction.
Check that remote controller is facing to the sensor.
Check that sensor does not have any seals or dirt that is interrupt-
ing signal.
Check that the remote controller battery has run down.
OK or NG
OK >> GO TO 3.
NG >> When operating, face remote controller to the sensor. Remove seal or dirt that is interrupting signal.
If the battery has run down, replace it with new one.
3.CHECK HARNESS
1. Turn ignition switch OFF.
2. Disconnect DVD player and DVD display connectors.
3. Check continuity between DVD player harness connector B19 terminal 30 and DVD display harness connector B61 terminal
14.
4. Check continuity between DVD player harness connector B19 terminal 30 (BR) and ground.
OK or NG
OK >> GO TO 4.
NG >> Repair harness or connector.
4.CHECK DATA (LCD – DVD) SIGNAL
1. Connect DVD display connector.
2. Turn ignition switch ACC.
3. Check the signal between DVD player harness connector B19 terminal 30 and ground.
OK or NG
OK >> Replace DVD player.
NG >> Replace DVD display.
No CD·DVD Sound from All SpeakersINFOID:0000000001328786
1.VERIFY THE PHENOMENON
1. Turn ignition switch ACC.
2. Turn on the radio, receive radio program, che ck that the sound is heard from all the speakers.
SKIA5855E
30 – 14 : Continuity should exist.
30 – Ground : Continuity should not exist.
SKIB0335E
30 – Ground:
SKIA7043ESKIA5832E
3AA93ABC3ACD3AC03ACA3AC03AC63AC53A913A773A893A873A873A8E3A773A983AC73AC93AC03AC3
3A893A873A873A8F3A773A9D3AAF3A8A3A8C3A863A9D3AAF3A8B3A8C
Page 702 of 3924

INFINITI MOBILE ENTERTAINMENT SYSTEMAV-155
< SERVICE INFORMATION >
C
DE
F
G H
I
J
L
M A
B
AV
N
O P
OK or NG
OK >> GO TO 2.
NG >> Replace audio unit.
2.CHECK A/C AND AV SWITCH SELF-DIAGNOSIS
A/C and AV switch self-diagnosis. Check “REAR AV” switch. Refer to AV-78, "
A/C and AV Switch Self-Diagno-
sis Function".
OK or NG
OK >> GO TO 3.
NG >> Replace A/C and AV switch.
3.CHECK HARNESS
1. Turn ignition switch OFF.
2. Disconnect DVD player and audio unit connectors.
3. Check continuity between DVD player harness connector M73 terminals 1, 2, 3, 4 and audio unit harness connector M65 termi-
nals 37, 39, 43, 42.
4. Check continuity between DVD player harness connector M73 terminals 1, 2, 3, 4 and ground.
OK or NG
OK >> GO TO 4.
NG >> Repair harness or connector.
4.CHECK MES SOUND SIGNAL
1. Connect DVD player and audio unit connectors.
2. Turn ignition switch ACC and Press “POWER” switch of DVD player.
3. Check the signal between DVD player harness connector M73 terminals 1 and 2, 3 and 4 with CONSULT-III or oscilloscope.
OK or NG
OK >> Replace audio unit.
NG >> Replace DVD player.
Removal and Installation for DVD PlayerINFOID:0000000001328787
REMOVAL
1. Remove center console. Refer to IP-10.
2. Remove center console rear finisher. Refer to IP-11, "
Removal and Installation".
1 – 37 : Continuity should exist.
2 – 39 : Continuity should exist.
3 – 43 : Continuity should exist.
4 – 42 : Continuity should exist.
1, 2, 3, 4 – Ground : Co
ntinuity should not exist.
SKIA7034E
Te r m i n a l
Condition Reference value
(+) (–)
12
Play CD or DVD video.
34
SKIA7035E
SKIA8863J
3AA93ABC3ACD3AC03ACA3AC03AC63AC53A913A773A893A873A873A8E3A773A983AC73AC93AC03AC3
3A893A873A873A8F3A773A9D3AAF3A8A3A8C3A863A9D3AAF3A8B3A8C
Page 713 of 3924

AV-166
< SERVICE INFORMATION >
TELEPHONE
Terminal and Reference Va lue for TEL Adapter Unit
INFOID:0000000001328793
Te r m i n a l
(Wire color) ItemSignal
input/
output Condition
Reference value
+– Ignition
switch Operation
1 (W/L) Ground Battery power supply Input OFF — Battery voltage 2 (LG) Ground ACC power supply Input ACC — Battery voltage3 (W) Ground Ignition signal Input ON — Battery voltage4 (B) Ground Ground — ON — Approx. 0 V 6—Shield —— — —
7 (R) 8 (B) MIC. signal Input ON Uttering in front of the micro-
phone while using the
hands-free phone system.
9 (P) 10 (L) TEL voice signal Output ON Receiving the party's voice
while using the hands-free
phone system.
11 (L/W) Ground TEL ON signal Output ON While using handsfree
phone system.
Approx. 0 V
While not using handsfree
phone system. Approx. 5 V
12 (LG) Ground Remote control A Input ON Press switch
Approx. 0 V
Press SEEK UP switch Approx. 1.7 V
Press VOL UP switch Approx. 3.3 V
Except for above Approx. 5 V
13 (GY) Ground Remote control B Input ON Press switch
Approx. 0 V
Press SEEK DOWN switch Approx. 1.7 V
Press VOL DOWN switch Approx. 3.3 V
Except for above Approx. 5 V
14 (SB) Ground Remote control
ground — ON — Approx. 0 V
15 (PU) Ground Indicator signal Output ON Microphone indicator ON,
and lighting switch OFF
Approx. 1.3 V
Microphone indicator ON,
and lighting switch ON Approx. 0.8 V
Microphone unit indicator
OFF Approx. 12 V
PKIB5037J
SKIB3609E
3AA93ABC3ACD3AC03ACA3AC03AC63AC53A913A773A893A873A873A8E3A773A983AC73AC93AC03AC3
3A893A873A873A8F3A773A9D3AAF3A8A3A8C3A863A9D3AAF3A8B3A8C
Page 714 of 3924

TELEPHONEAV-167
< SERVICE INFORMATION >
C
DE
F
G H
I
J
L
M A
B
AV
N
O P
Self-Diagnosis FunctionINFOID:0000000001328794
The followings are diagnosis functions performed by TEL adapter unit.
Performs the unit self −diagnosis and antenna diagnosis, and informs results with the indicator and voice
guidance.
Informs vehicle speed pulse count from the time of key switch ON with voice guidance, and enables to check
vehicle speed signal.
Outputs voice giving to microphone with speaker, and enables to check microphone function.
OPERATION PROCEDURE
1. Start the engine.
2. Press and hold switch for 5 seconds or more.
This allows the indicator to blink concurrently with voice guidance outputs, and determines if there is any
current error in the state of blinking.
17 (R/W) Ground Remote control A Output ON Press switch
Approx. 0 V
Press SEEK UP switch Approx. 1.7 V
Press VOL UP switch Approx. 3.3 V
Except for above Approx. 5 V
18 (G/W) Ground Remote control B Output ON Press switch
Approx. 0 V
Press SEEK DOWN switch Approx. 1.7 V
Press VOL DOWN switch Approx. 3.3 V
Except for above Approx. 5 V
19 (B/Y) Ground Remote control
ground — ON — Approx. 0 V
22 (B) Ground Ground — ON — Approx. 0 V
23 (B) Ground Ground — ON — Approx. 0 V
28 (G) Ground Ve h i c l e
speed signal
(8-pulse) Input ON
When vehicle speed is ap-
prox. 40 km/h (25 MPH)
29 (W) Ground MIC. VCC Output ON — Approx. 5 V 41 — TEL signal — — — — Te r m i n a l
(Wire color) ItemSignal
input/
output Condition
Reference value
+– Ignition
switch Operation
SKIA6649J
SKIB7570E
3AA93ABC3ACD3AC03ACA3AC03AC63AC53A913A773A893A873A873A8E3A773A983AC73AC93AC03AC3
3A893A873A873A8F3A773A9D3AAF3A8A3A8C3A863A9D3AAF3A8B3A8C
Page 715 of 3924

AV-168
< SERVICE INFORMATION >
TELEPHONE
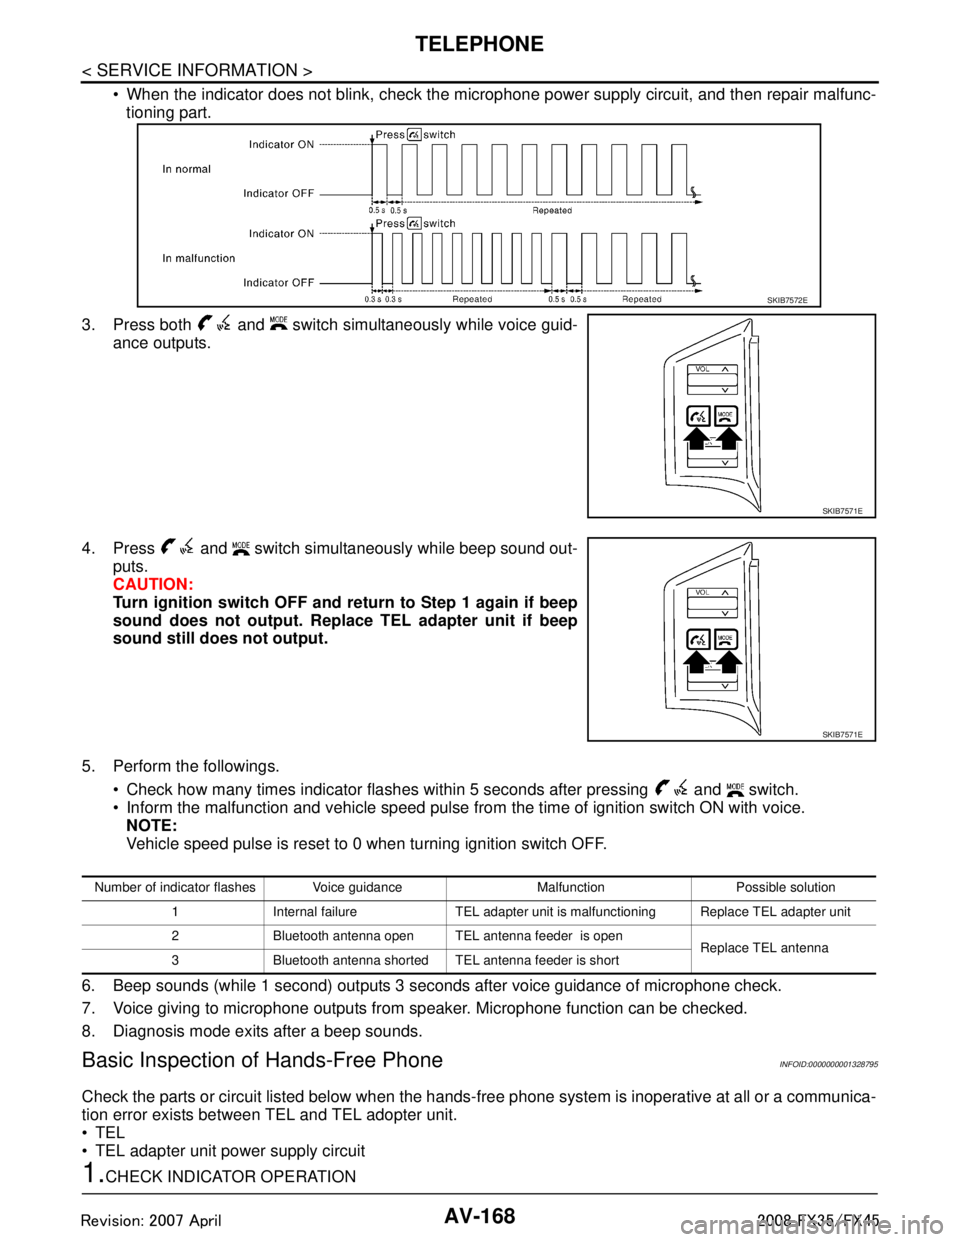
When the indicator does not blink, check the microphone power supply circuit, and then repair malfunc-
tioning part.
3. Press both and switch simultaneously while voice guid- ance outputs.
4. Press and switch simultaneously while beep sound out- puts.
CAUTION:
Turn ignition switch OFF and re turn to Step 1 again if beep
sound does not output. Replace TEL adapter unit if beep
sound still does not output.
5. Perform the followings. Check how many times indicator flashes within 5 seconds after pressing and switch.
Inform the malfunction and vehicle speed pulse from the time of ignition switch ON with voice.
NOTE:
Vehicle speed pulse is reset to 0 when turning ignition switch OFF.
6. Beep sounds (while 1 second) outputs 3 seconds after voice guidance of microphone check.
7. Voice giving to microphone outputs from speaker. Microphone function can be checked.
8. Diagnosis mode exits after a beep sounds.
Basic Inspection of Hands-Free PhoneINFOID:0000000001328795
Check the parts or circuit listed below when the hands-f ree phone system is inoperative at all or a communica-
tion error exists between TEL and TEL adopter unit.
TEL
TEL adapter unit power supply circuit
1.CHECK INDICATOR OPERATION
SKIB7572E
SKIB7571E
SKIB7571E
Number of indicator flashes Voice guidance Malfunction Possible solution
1 Internal failure TEL adapter unit is malfunctioning Replace TEL adapter unit
2 Bluetooth antenna open TEL antenna feeder is open Replace TEL antenna
3 Bluetooth antenna shorted TEL antenna feeder is short
3AA93ABC3ACD3AC03ACA3AC03AC63AC53A913A773A893A873A873A8E3A773A983AC73AC93AC03AC3
3A893A873A873A8F3A773A9D3AAF3A8A3A8C3A863A9D3AAF3A8B3A8C
Page 716 of 3924

TELEPHONEAV-169
< SERVICE INFORMATION >
C
DE
F
G H
I
J
L
M A
B
AV
N
O P
1. Turn ignition switch ACC.
2. Check the indicator is blinking.
OK or NG
OK >> GO TO 2
NG >> Check indicator circuit and MIC. circuit.
2.CHECK AUDIO STEERING WHEEL SWITCH OPERATION
1. Press the switch.
2. Check the indicator is blinking.
OK or NG
OK >> INSPECTION END
NG >> Check audio steering wheel switch circuit.
Audio Steering Wheel S witch Does Not OperateINFOID:0000000001328796
1.CHECK HARNESS
1. Turn ignition switch OFF.
2. Disconnect A/C and AV switch and TEL adapter unit connectors.
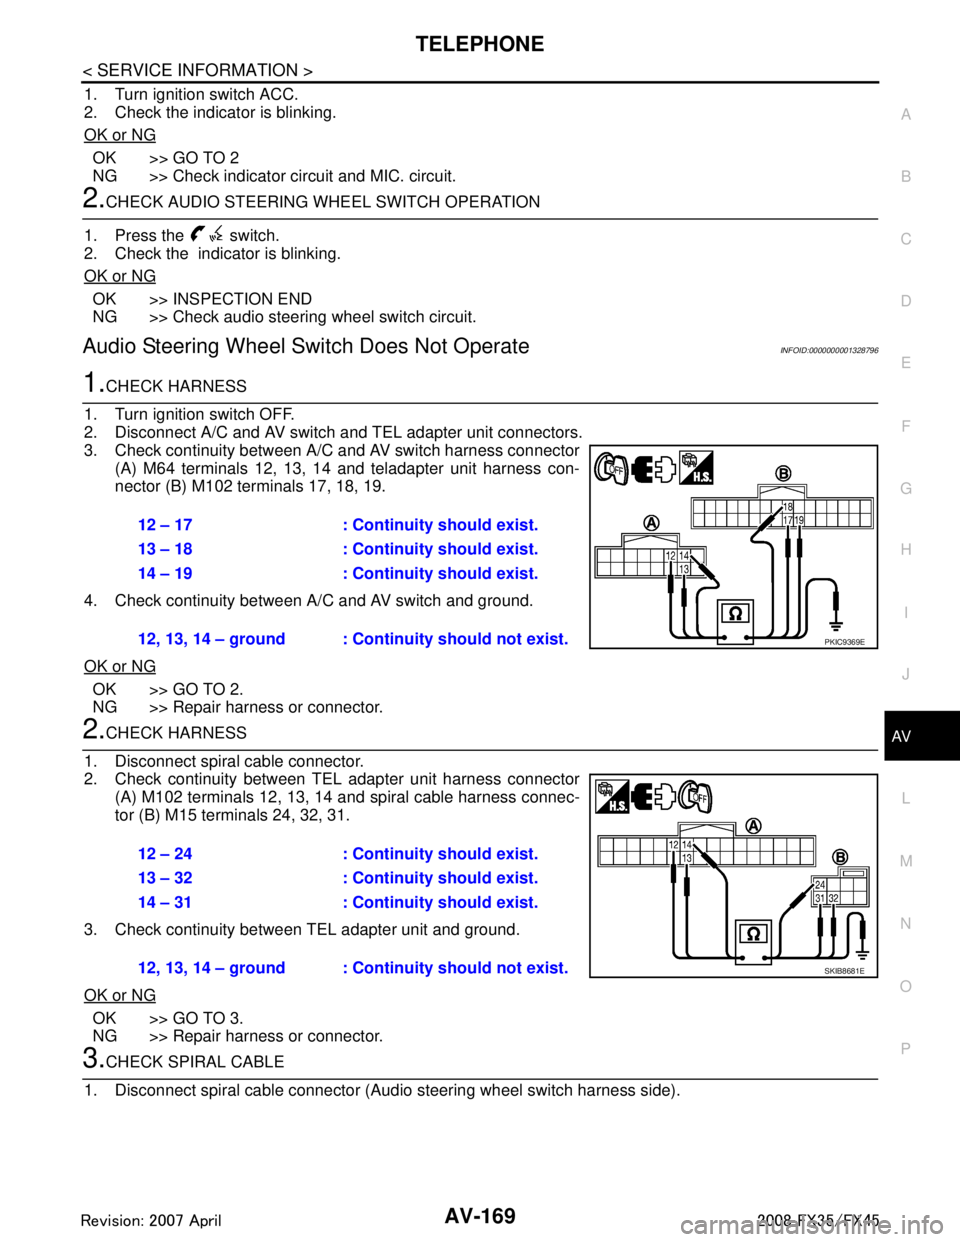
3. Check continuity between A/C and AV switch harness connector (A) M64 terminals 12, 13, 14 and teladapter unit harness con-
nector (B) M102 terminals 17, 18, 19.
4. Check continuity between A/C and AV switch and ground.
OK or NG
OK >> GO TO 2.
NG >> Repair harness or connector.
2.CHECK HARNESS
1. Disconnect spiral cable connector.
2. Check continuity between TEL adapter unit harness connector (A) M102 terminals 12, 13, 14 and spiral cable harness connec-
tor (B) M15 terminals 24, 32, 31.
3. Check continuity between TEL adapter unit and ground.
OK or NG
OK >> GO TO 3.
NG >> Repair harness or connector.
3.CHECK SPIRAL CABLE
1. Disconnect spiral cable connector (Audio steering wheel switch harness side).
12 – 17 : Continuity should exist.
13 – 18 : Continuity should exist.
14 – 19 : Continuity should exist.
12, 13, 14 – ground : Contin uity should not exist.
PKIC9369E
12 – 24 : Continuity should exist.
13 – 32 : Continuity should exist.
14 – 31 : Continuity should exist.
12, 13, 14 – ground : Continuity should not exist.
SKIB8681E
3AA93ABC3ACD3AC03ACA3AC03AC63AC53A913A773A893A873A873A8E3A773A983AC73AC93AC03AC3
3A893A873A873A8F3A773A9D3AAF3A8A3A8C3A863A9D3AAF3A8B3A8C
Page 717 of 3924

AV-170
< SERVICE INFORMATION >
TELEPHONE
2. Check continuity between spiral cable connector M15 terminals24, 31, 32 and spiral cable connector M203 terminals 20, 17, 16.
OK or NG
OK >> GO TO 4.
NG >> Replace spiral cable.
4.CHECK AUDIO STEERING WHEEL SWITCH RESISTANCE
Check resistance audio steering wheel switch terminals.
OK or NG
OK >> INSPECTION END
NG >> Replace audio steering wheel switch.
Voice Activated Control Function Does Not OperateINFOID:0000000001328797
NOTE:
Even under the normal condition, TE L voice guidance may not occur when pressing audio steering wheel
switch.
TEL VOICE GUIDANCE IS HEARD WHEN PR ESSING AUDIO STEERING WHEEL SWITCH
1.CHECK HARNESS BETWEEN TEL ADAPTER UNIT AND MICROPHONE UNIT
1. Turn ignition switch OFF.
2. Disconnect TEL adapter unit and microphone unit connectors.
3. Check continuity between TEL adapter unit harness connector (A) M102 terminals 7, 8, 29 and microphone unit harness con-
nector (B) R59 terminals 5, 6, 4.
4. Check continuity between TEL adapter unit harness connector (A) M102 terminals 7, 8, 29 and ground.
OK or NG
OK >> GO TO 2.
NG >> Repair harness or connector.
2.CHECK MIC. POWER SUPPLY
1. Connect TEL adapter unit and microphone unit connectors.
2. Turn ignition switch ON. 24 – 20 : Continuity should exist.
31 – 17 : Continuity should exist.
32 – 16 : Continuity should exist.
SKIA5874E
Terminal Signal name Condition
Resistance
(Ω )
16 17Mode Depress mode switch. Approx. 0
Seek down Depress (station) down switch. Approx. 165
Volume (down) Depress volume down switch. Approx. 652
20 PTT Depress PTT switch. Approx. 0
Seek up Depress (station) up switch. Approx. 165
Volume (up) Depress volume up switch. Approx. 652
SKIA5010E
7 – 5 : Continuity should exist.
8 – 6 : Continuity should exist.
29 – 4 : Continuity should exist.
7, 8, 29 – Ground : Continuity should not exist.
SKIB7348E
3AA93ABC3ACD3AC03ACA3AC03AC63AC53A913A773A893A873A873A8E3A773A983AC73AC93AC03AC3
3A893A873A873A8F3A773A9D3AAF3A8A3A8C3A863A9D3AAF3A8B3A8C
Page 718 of 3924

TELEPHONEAV-171
< SERVICE INFORMATION >
C
DE
F
G H
I
J
L
M A
B
AV
N
O P
3. Check voltage between microphone unit harness connector R59 terminal 4 and ground.
YES or NO
YES >> GO TO 3.
NO >> Replace TEL adapter unit.
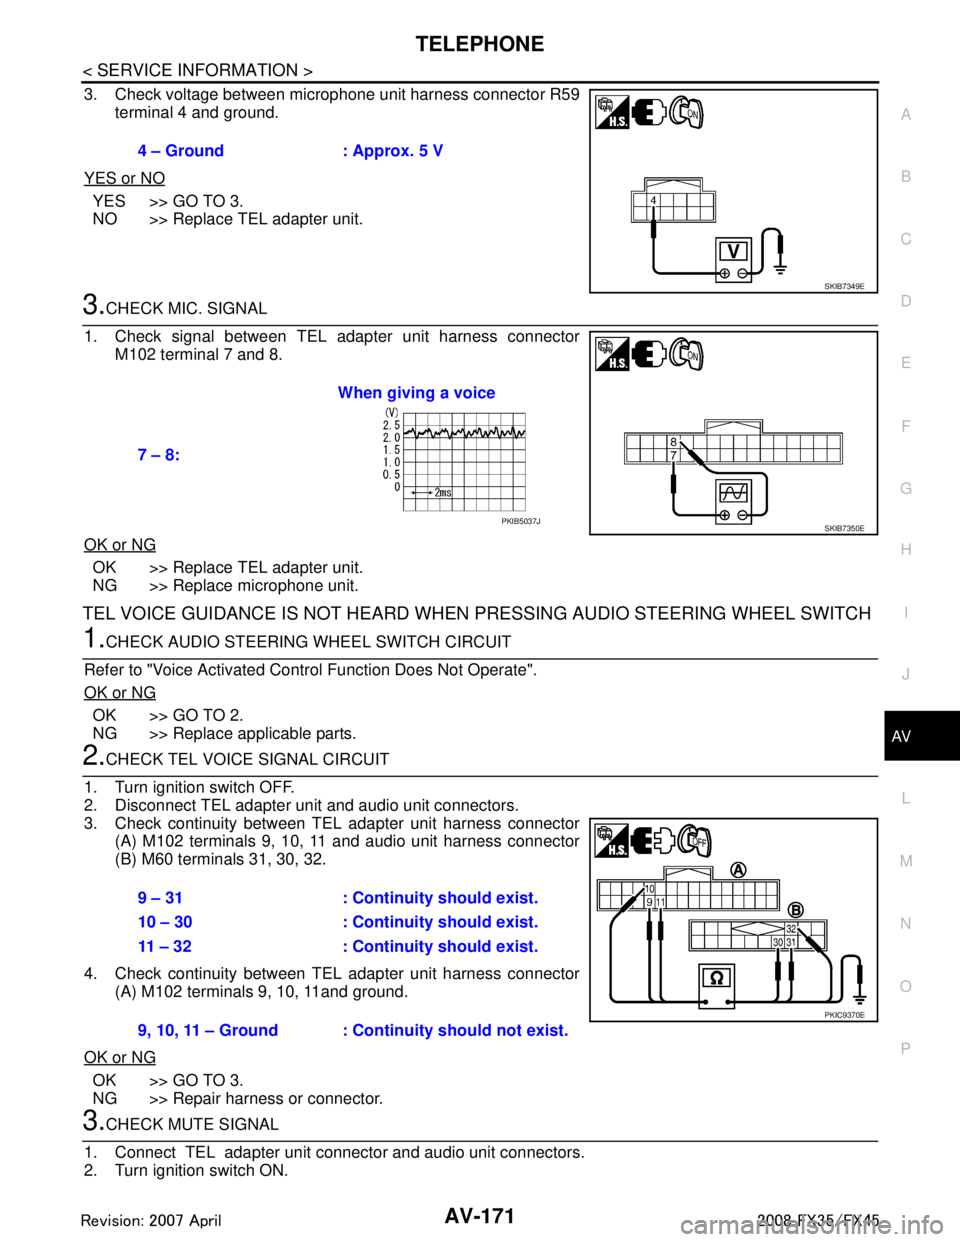
3.CHECK MIC. SIGNAL
1. Check signal between TEL adapter unit harness connector M102 terminal 7 and 8.
OK or NG
OK >> Replace TEL adapter unit.
NG >> Replace microphone unit.
TEL VOICE GUIDANCE IS NOT HEARD WHEN PRESSING AUDIO STEERING WHEEL SWITCH
1.CHECK AUDIO STEERING WHEEL SWITCH CIRCUIT
Refer to "Voice Activated Control Function Does Not Operate".
OK or NG
OK >> GO TO 2.
NG >> Replace applicable parts.
2.CHECK TEL VOICE SIGNAL CIRCUIT
1. Turn ignition switch OFF.
2. Disconnect TEL adapter unit and audio unit connectors.
3. Check continuity between TEL adapter unit harness connector (A) M102 terminals 9, 10, 11 and audio unit harness connector
(B) M60 terminals 31, 30, 32.
4. Check continuity between TEL adapter unit harness connector (A) M102 terminals 9, 10, 11and ground.
OK or NG
OK >> GO TO 3.
NG >> Repair harness or connector.
3.CHECK MUTE SIGNAL
1. Connect TEL adapter unit connector and audio unit connectors.
2. Turn ignition switch ON. 4 – Ground : Approx. 5 V
SKIB7349E
7 – 8:
When giving a voice
SKIB7350EPKIB5037J
9 – 31 : Continuity should exist.
10 – 30 : Continuity should exist.
11 – 32 : Continuity should exist.
9, 10, 11 – Ground : Continuity should not exist.
PKIC9370E
3AA93ABC3ACD3AC03ACA3AC03AC63AC53A913A773A893A873A873A8E3A773A983AC73AC93AC03AC3
3A893A873A873A8F3A773A9D3AAF3A8A3A8C3A863A9D3AAF3A8B3A8C
Page 726 of 3924

BCS-6
< SERVICE INFORMATION >
BCM (BODY CONTROL MODULE)
When BCM is in sleep status, transistors of OUTPUT 1 and 5 stop the output, and BCM enters low power
mode. Mean while OUTPUT 2, 3, and 4 send out ON signal every 60 ms, and accept input from lighting
switch system.
CAN COMMUNICATION CONTROL
CAN communication allows a high rate of information transmission through the two communication lines (CAN
L line, CAN H line) connecting the various control units in the system. Each control unit transmits/receives
data but selectively reads required data only. For details of signals that are transmitted/received by BCM via
CAN communication, refer to LAN-43, "
CAN System Specification Chart".
BCM STATUS CONTROL
BCM changes its status depending on the operation stat us in order to save power consumption.
1. CAN communication status With ignition switch ON, CAN communicates with other control units normally.
Control by BCM is being operated properly.
When ignition switch is OFF, switching to sleep mode is possible.
Even when ignition switch is OFF, if CAN communication with IPDM E/R and combination meter isactive, CAN communication status is active.
2. Sleep transient status This status shuts down CAN communication when ignition switch is turned OFF.
It transmits sleep request signal to IPDM E/R and combination meter.
2 seconds after CAN communication of all control units stops, sleep transient status is switched to CAN
communication inactive status.
3. CAN communication inactive status With ignition switch OFF, CAN communication is not active.
With ignition switch OFF, control performed only by BCM is active.
3 seconds after CAN communication of all control units stops, CAN communication inactive status is
switched to sleep status.
4. Sleep status BCM is activated with low power mode.
CAN communication is not active.
When CAN communication operation is detected, it switches to CAN communication status.
When a state of the following switches changes , it switches to CAN communication state.
- Key switch
- Hazard switch
PKIC4919E
3AA93ABC3ACD3AC03ACA3AC03AC63AC53A913A773A893A873A873A8E3A773A983AC73AC93AC03AC3
3A893A873A873A8F3A773A9D3AAF3A8A3A8C3A863A9D3AAF3A8B3A8C