headlights INFINITI G CONVERTIBLE 2013 Owner's Manual
[x] Cancel search | Manufacturer: INFINITI, Model Year: 2013, Model line: G CONVERTIBLE, Model: INFINITI G CONVERTIBLE 2013Pages: 466
Page 70 of 466

2 Instruments and controls
Cockpit...
................................................................ 2-3
Instrument panel ...
................................................. 2-4
Meters and gauges ...
.............................................. 2-6
Speedometer and odometer ...
............................ 2-7
Tachometer ...
...................................................... 2-8
Engine coolant temperature gauge ...
.................. 2-8
Fuel gauge ...
...................................................... 2-9
Warning/indicator lights and
audible reminders ...
............................................. 2-10
Checking bulbs ...
.............................................. 2-10
Warning lights ...
............................................... 2-10
Indicator lights ...
.............................................. 2-15
Audible reminders ...
......................................... 2-16
Dot matrix liquid crystal display ...
........................ 2-17
Indicators for operation ...
................................. 2-19
Indicators for retractable hard top ...
................. 2-22
Indicators for maintenance ...
............................ 2-23
Trip computer ...
................................................ 2-25
Security systems ...
............................................... 2-27
Vehicle Security System ...
................................ 2-27
INFINITI Vehicle Immobilizer System ...
.............. 2-29
Windshield wiper and washer switch ...
................. 2-30
Rain-sensing auto wiper system (if
so equipped) ...
................................................. 2-32 Rear window and outside mirror
defroster switch
...
................................................ 2-33
Headlight and turn signal switch ...
....................... 2-33
Xenon headlights ...
......................................... 2-33
Headlight switch ...
.......................................... 2-34
Turn signal switch ...
........................................ 2-37
Fog light switch ...
........................................... 2-38
Hazard warning flasher switch ...
.......................... 2-38
Horn ...
................................................................. 2-39
Heated seats (if so equipped) ...
........................... 2-39
Climate controlled seats (if so equipped) ...
.......... 2-40
Vehicle Dynamic Control (VDC) OFF switch ...
......... 2-42
Clock ...
................................................................. 2-42
Adjusting the time ...
....................................... 2-42
Power outlets ...
.................................................... 2-43
Cigarette lighter and ashtrays (if so equipped) ...
.... 2-44
Front ...
............................................................ 2-44
Rear ...
............................................................. 2-44
Storage ...
............................................................. 2-45
Cup holders ...
................................................. 2-45
Glove box ...
.................................................... 2-46
Console box ...
................................................. 2-47
Storage box (if so equipped) ...
........................ 2-48
Windows ...
........................................................... 2-48
Power windows ...
............................................ 2-48>
Page 84 of 466

thus alerting the driver that the vehicle is
nearing its traction limits. The road surface
may be slippery.
When the vehicle dynamic control warning
light illuminates when the vehicle dynamic
control system is turned on, this light
alerts the driver to the fact that the vehicle
dynamic control system’s fail-safe mode is
operating, for example the vehicle dynamic
control system may not be functioning
properly. Have the system checked by an
INFINITI retailer. If a malfunction occurs in
the system, the vehicle dynamic control
system function will be canceled but the
vehicle is still driveable. For additional
information, see“Vehicle Dynamic Control
(VDC) system” (P.5-55) of this manual.
INDICATOR LIGHTSGUID-64224243-3D85-45E9-840F-E29B74A1855A
Automatic transmission posi-
tion indicator light (if so equipped)
GUID-F12DE2FF-4D6B-4F62-8F44-84CE06C5841EWhen the ignition switch is pushed to the
ON position, the indicator shows the
automatic selector shift position.
In the manual shift mode, when the
transmission does not shift to the selected
gear due to the transmission protection
mode, the AT position indicator light will
blink and a chime will sound. (See
“Automatic transmission” (P.5-13).)
Exterior light indicatorGUID-74BD5266-0D40-44BC-B993-5808317E4C38This indicator illuminates when the head-
light switch is turned to the AUTO,orposition and the front side marker
lights, the front parking lights, instrument
panel lights, rear combination lights,
license plate lights or headlights are on.
The indicator turns off when these lights
are turned off.
Front fog light indicator lightGUID-89DB9C0E-A5A2-42CB-8F4C-563F783E6EF9The front fog light indicator light illumi-
nates when the front fog lights are on. (See
“Fog light switch” (P.2-38).)
Front passenger air bag status
light
GUID-56567F38-A7E9-4445-882A-4C4EC06CF83FThe front passenger air bag status light
() located under the climate controls
will be lit and the passenger front air bag
will be OFF depending on how the front
passenger seat is being used.
For front passenger air bag status light
operation, see “INFINITI Advanced Air Bag
System (front seats)” (P.1-40) of this
manual.
High beam indicator lightGUID-9E559E28-47EC-4A74-B9B9-B97EFBAD0089This light comes on when the headlight
high beam is on and goes out when the low
beam is selected.
Malfunction Indicator Light
(MIL)
GUID-CCF62CD3-CAC8-43D4-8902-CA55F37F5E80If the malfunction indicator light comes on
steady or blinks while the engine is
running, it may indicate a potential emis-
sion control malfunction.
The malfunction indicator light may also
come on steady if the fuel-filler cap is loose
or missing, or if the vehicle runs out of fuel.
Check to make sure the fuel-filler cap is
installed and closed tightly, and that the
vehicle has at least 3 US gallons (14 liters)
of fuel in the fuel tank.
After a few driving trips, the
light
should turn off if no other potential
emission control system malfunction ex-
ists.
If this indicator light remains on for 20
seconds and then blinks for 10 seconds
when the engine is not running, it indicates
that the vehicle is not ready for an
emission control system inspection/main-
tenance test. (See “Readiness for Inspec-
tion/Maintenance (I/M) test” (P.9-23).)
Instruments and controls2-15
Page 97 of 466

2-28Instruments and controls
SIC2045
How to arm the vehicle security
system
GUID-CE9139D0-6229-4D12-B5B7-B83BCD0085811. Close all windows.The system can be armed even if the
windows are open.
2. Push the ignition switch to the OFF position.
3. Remove the Intelligent Key from the vehicle.
4. Close all doors, hood and trunk. Lock all doors. The doors can be locked with
the Intelligent Key, door handle request
switch, power door lock switch or
mechanical key. 5. Confirm that the security indicator light
comes on. The security indicator light
stays on for about 30 seconds. The
vehicle security system is now pre-
armed. After about 30 seconds the
vehicle security system automatically
shifts into the armed phase. The
security light begins to flash once every
approximately 3 seconds. If, during this
30-second pre-arm time period, the
door is unlocked, or the ignition switch
is pushed to ACC or ON, the system will
not arm.
Even when the driver and/or passengers
are in the vehicle, the system will activate
with all doors, hood, and trunk lid locked
with the ignition switch in the LOCK
position. When pushing the ignition switch
to the ACC or ON position, the system will
be released.
Vehicle security system activationGUID-54D57BB8-9F18-4163-B041-408144181E15The vehicle security system will give the
following alarm:
. The headlights blink and the horn
sounds intermittently.
. The alarm automatically turns off after
approximately 1 minute. However, the
alarm reactivates if the vehicle is tampered with again.
The alarm is activated by:
. Unlocking the door or opening the trunk
lid without using the button on the
Intelligent Key, the door handle request
switch or the mechanical key. (Even if
the door is opened by releasing the
door inside lock knob, the alarm will
activate.)
. Opening the hood.
How to stop an activated alarmGUID-C1AF44C3-20AE-4AC5-8638-2FC58DC203BFThe alarm will stop by unlocking a door by
pushing the unlock button on the Intelli-
gent Key, the door handle request switch
or using the mechanical key, or when the
ignition switch is pushed to the ACC or ON
position.
If the system does not operate as de-
scribed above, have it checked by an
INFINITI retailer.
Page 102 of 466

GUID-7DBA5951-7A07-431B-9E38-2EEF2D178DF7
SIC3239
To defog/defrost the rear window glass
and outside mirrors, start the engine and
push the switch
*1on. The indicator light
*2will come on. Push the switch again to
turn the defroster off.
It will automatically turn off in approxi-
mately 15 minutes.
CAUTION
When cleaning the inner side of the rear
window, be careful not to scratch or damage
the rear window defroster.
GUID-B880B927-0D4A-4166-BD8D-A23B5CA4EDFD
XENON HEADLIGHTSGUID-B40150F6-DD79-4915-B6F1-208ABCF3DCF8
WARNING
HIGH VOLTAGE
. When xenon headlights are on, they
produce a high voltage. To prevent an
electric shock, never attempt to modify
or disassemble. Always have your xenon
headlights replaced at an INFINITI retai-
ler.
. Xenon headlights provide considerably
more light than conventional headlights.
If they are not correctly aimed, they
might temporarily blind an oncoming
driver or the driver ahead of you and
cause a serious accident. If headlights
are not aimed correctly, immediately
take your vehicle to an INFINITI retailer
and have the headlights adjusted cor-
rectly.
When the xenon headlight is initially
turned on, its brightness or color varies
slightly. However, the color and brightness
will soon stabilize.
.The life of xenon headlights will be
shortened by frequent on-off operation. It is generally desirable not to turn off
the headlights for short intervals (for
example, when the vehicle stops at a
traffic signal). Even when the daytime
running lights are active (Canada only),
the xenon headlights do not turn on.
This way the life of the xenon head-
lights is not reduced.
. If the xenon headlight bulb is close to
burning out, the brightness will dras-
tically decrease, the light will start
blinking, or the color of the light will
become reddish. If one or more of the
above signs appear, contact an INFINITI
retailer.
Instruments and controls2-33
REAR WINDOW AND OUTSIDE MIRROR
DEFROSTER SWITCH HEADLIGHT AND TURN SIGNAL SWITCH
Page 103 of 466

2-34Instruments and controls
SIC3267
HEADLIGHT SWITCHGUID-76D80EAC-25C9-4FA9-9E51-3DD686E0F7FF
LightingGUID-DCBEA9C5-43F7-4E89-B759-FBA0A4AF7A87*1Turn the switch to theposition:
The front parking, side marker, tail,
license plate and instrument lights
will come on.
*2Turn the switch to theposition:
Headlights will come on and all the
other lights remain on.
SIC3268
Autolight systemGUID-10AD22BD-6D98-4EA5-AEB9-CB66853B9602The autolight system allows the headlights
to be set so they turn on and off
automatically.
To set the autolight system:
1. Make sure the headlight switch is in the AUTO position
*1.
2. Push the ignition switch to the ON position.
3. The autolight system automatically
turns the headlights on and off.
To turn the autolight system off, turn the
switch to the OFF,
orposition. The autolight system can turn on the
headlights automatically when it is dark
and turn off the headlights when it is light.
If the ignition switch is pushed to the OFF
position and one of the doors is opened
and this condition is continued, the head-
lights remain on for 5 minutes.
Page 104 of 466

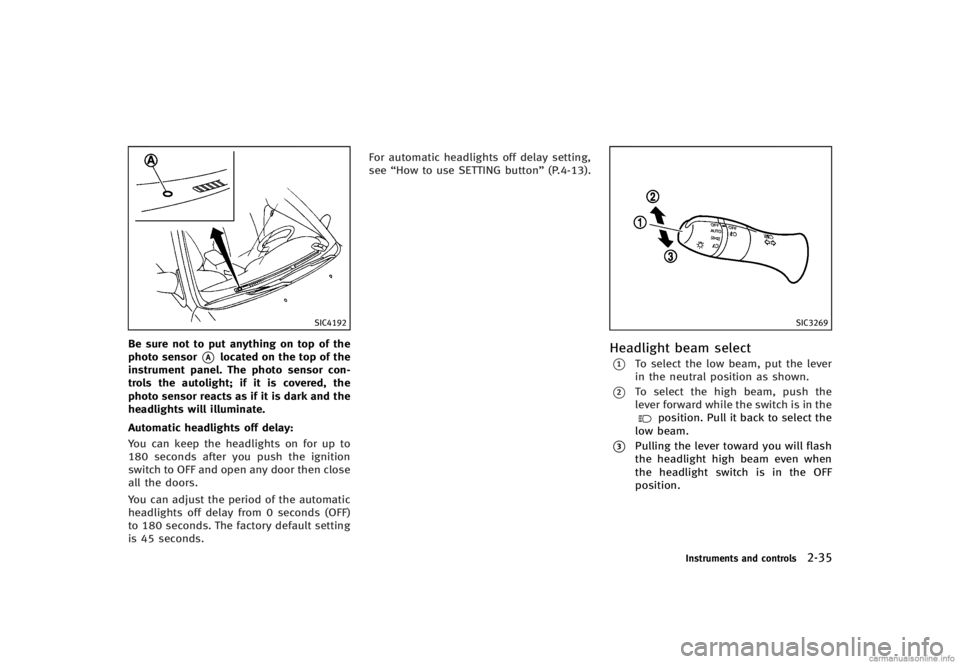
SIC4192
Be sure not to put anything on top of the
photo sensor
*Alocated on the top of the
instrument panel. The photo sensor con-
trols the autolight; if it is covered, the
photo sensor reacts as if it is dark and the
headlights will illuminate.
Automatic headlights off delay:
GUID-D73A39BF-43C8-459F-9C24-47B7F579C407You can keep the headlights on for up to
180 seconds after you push the ignition
switch to OFF and open any door then close
all the doors.
You can adjust the period of the automatic
headlights off delay from 0 seconds (OFF)
to 180 seconds. The factory default setting
is 45 seconds. For automatic headlights off delay setting,
see
“How to use SETTING button” (P.4-13).
SIC3269
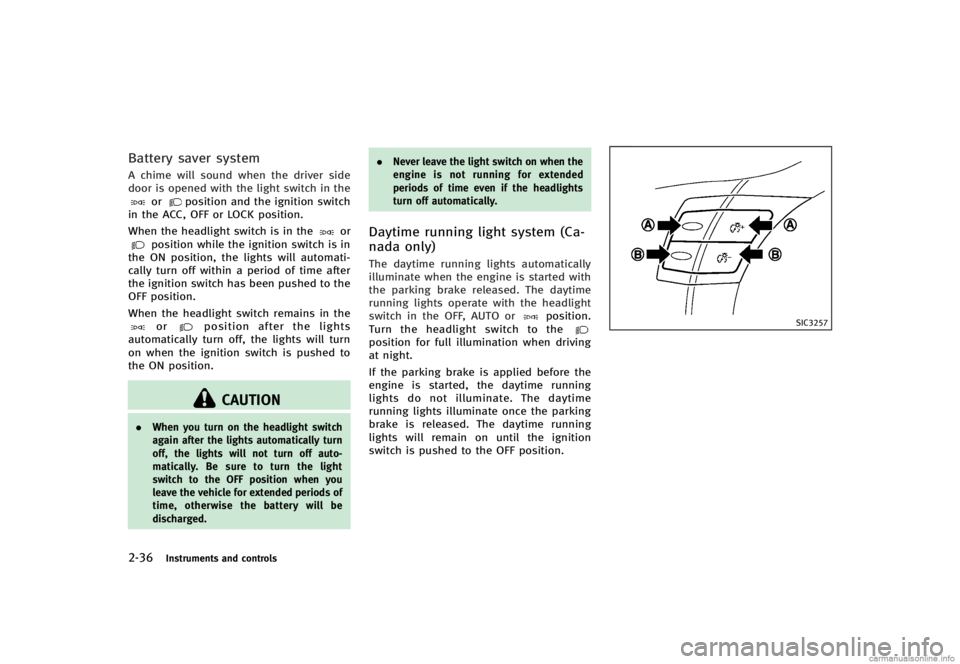
Headlight beam selectGUID-A356FC5F-5977-428C-9511-7C0A81EB4995*1To select the low beam, put the lever
in the neutral position as shown.
*2To select the high beam, push the
lever forward while the switch is in the
position. Pull it back to select the
low beam.
*3Pulling the lever toward you will flash
the headlight high beam even when
the headlight switch is in the OFF
position.
Instruments and controls2-35
Page 105 of 466

2-36Instruments and controls
Battery saver systemGUID-F8729D36-FA75-4013-8DEE-B286CA93AFCAA chime will sound when the driver side
door is opened with the light switch in the
orposition and the ignition switch
in the ACC, OFF or LOCK position.
When the headlight switch is in the
orposition while the ignition switch is in
the ON position, the lights will automati-
cally turn off within a period of time after
the ignition switch has been pushed to the
OFF position.
When the headlight switch remains in the
orposition after the lights
automatically turn off, the lights will turn
on when the ignition switch is pushed to
the ON position.
CAUTION
. When you turn on the headlight switch
again after the lights automatically turn
off, the lights will not turn off auto-
matically. Be sure to turn the light
switch to the OFF position when you
leave the vehicle for extended periods of
time, otherwise the battery will be
discharged. .
Never leave the light switch on when the
engine is not running for extended
periods of time even if the headlights
turn off automatically.
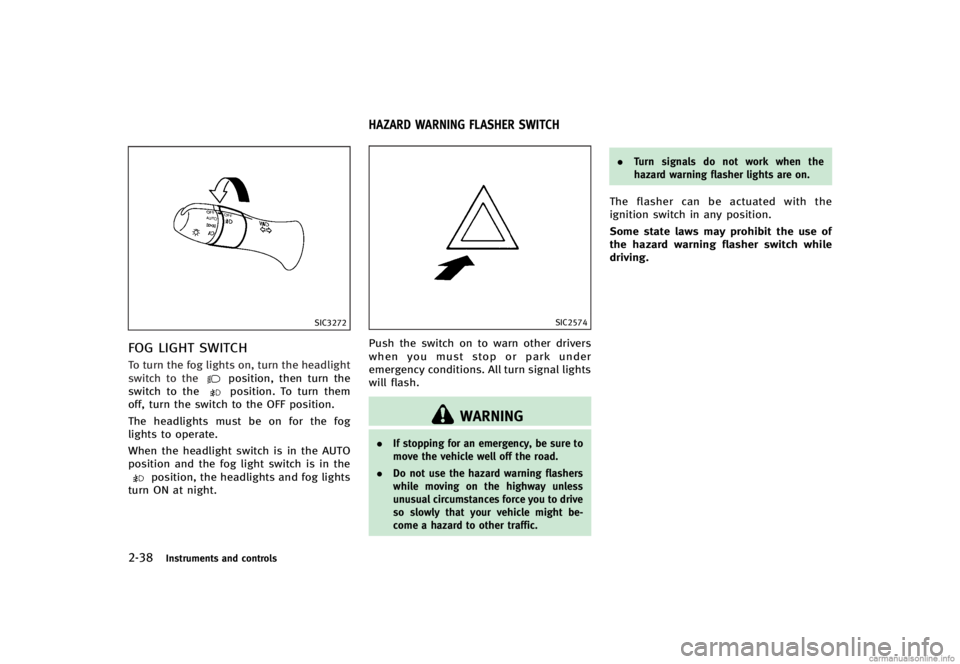
Daytime running light system (Ca-
nada only)
GUID-6568CCD7-0FEB-47FA-B444-6F45312F6507The daytime running lights automatically
illuminate when the engine is started with
the parking brake released. The daytime
running lights operate with the headlight
switch in the OFF, AUTO or
position.
Turn the headlight switch to the
position for full illumination when driving
at night.
If the parking brake is applied before the
engine is started, the daytime running
lights do not illuminate. The daytime
running lights illuminate once the parking
brake is released. The daytime running
lights will remain on until the ignition
switch is pushed to the OFF position.
SIC3257
Page 107 of 466

2-38Instruments and controls
SIC3272
FOG LIGHT SWITCHGUID-68AA7C2A-9996-4CFA-A902-0702C250C7CCTo turn the fog lights on, turn the headlight
switch to theposition, then turn the
switch to theposition. To turn them
off, turn the switch to the OFF position.
The headlights must be on for the fog
lights to operate.
When the headlight switch is in the AUTO
position and the fog light switch is in the
position, the headlights and fog lights
turn ON at night.
GUID-04921CB0-1CCD-4C7F-8AB7-03840CFD9788
SIC2574
Push the switch on to warn other drivers
when you must stop or park under
emergency conditions. All turn signal lights
will flash.
WARNING
. If stopping for an emergency, be sure to
move the vehicle well off the road.
. Do not use the hazard warning flashers
while moving on the highway unless
unusual circumstances force you to drive
so slowly that your vehicle might be-
come a hazard to other traffic. .
Turn signals do not work when the
hazard warning flasher lights are on.
The flasher can be actuated with the
ignition switch in any position.
Some state laws may prohibit the use of
the hazard warning flasher switch while
driving.
HAZARD WARNING FLASHER SWITCH
Page 112 of 466

GUID-CFC63CE6-3D5A-4EEA-A57E-D000A5F2D43D
JVI0329X
Automatic transmission models
SIC4316
Automatic transmission models
SIC4684
Manual transmission models
The power outlet is located in the center
console box and storage box (if so
equipped).
CAUTION
. The outlet and plug may be hot during or
immediately after use.
. Do not use with accessories that exceed
a 12 volt, 120W (10A) power draw. Do
not use double adapters or more than
one electrical accessory.
. Use power outlet with the engine run-
ning to avoid discharging the vehicle battery.
. Avoid using power outlet when the air
conditioner, headlights or rear window
defroster is on.
. This power outlet is not designed for use
with a cigarette lighter unit.
. Push the plug in as far as it will go. If
good contact is not made, the plug may
overheat or the internal temperature
fuse may blow.
. Before inserting or disconnecting a plug,
be sure the electrical accessory being
used is turned OFF.
. When not in use, be sure to close the
cap. Do not allow water or any liquid to
contact the outlet.
Instruments and controls2-43
POWER OUTLETS
Page 142 of 466

Locking doors and fuel-filler doorGUID-09809553-3B07-4862-B215-A1FF242834CD1. Push the ignition switch to the OFFposition and make sure you carry the
Intelligent Key with you.*
2. Close all the doors.
3. Push the LOCK
button*1on the
Intelligent Key.
4. All the doors and fuel-filler door will lock.
5. The hazard indicator flashes twice and the horn chirps once.
*: Doors will lock with the Intelligent Key
while the ignition switch is in the ACC or
ON position.
Operate the door handles to confirm that
the doors have been securely locked.
Unlocking doors and fuel-filler doorGUID-B7124241-FD3A-4997-9928-A746875E388B1. Push the UNLOCKbutton*2on the
Intelligent Key once.
2. The hazard indicator flashes once. The driver’s door and fuel-filler door will
unlock.
3. Push the UNLOCK
button on the
Intelligent Key again within 5 seconds.
4. The hazard indicator flashes once
again. All the doors will unlock. All doors will be locked automatically
unless one of the following operations is
performed within 1 minute after pushing
the UNLOCK button on the Intelligent Key
while the doors are locked. If during this 1-
minute time period, the UNLOCK button on
the Intelligent Key is pushed, all doors will
be locked automatically after another 1
minute.
.
Opening any door
. Pushing the ignition switch
. Inserting the Intelligent Key into the
Intelligent Key port. During this 1
minute time period, if the UNLOCK
button on the Intelligent Key is
pushed, all doors will be locked auto-
matically after another 1 minute.
Opening windowsGUID-3A460518-A39A-4053-97C5-4C9A78B9DAC6The UNLOCKbutton*2operation also
allows you to open the window that is
equipped with the automatic open func-
tion. This function will not operate while
the window timer is activated or the
windows need to be initialized. (See
“Power windows” (P.2-48).)
To open the window, push the UNLOCK
button on the Intelligent Key for about 3
seconds after the door is unlocked. To stop opening, release the UNLOCK
button.
If the window open operation is stopped
on the way while pushing the UNLOCK
button, release and push the UNLOCKbutton again until the window opens
completely.
Window cannot be closed using the In-
telligent Key.
The door window can also be operated by
turning the mechanical key in a door lock.
(See
“Doors” (P.3-5).)
Opening trunk lidGUID-A58D9955-697C-486A-B1F1-A517923ECD681. Push the TRUNK*3button on the
Intelligent Key for more than 1 second.
2. The trunk will unlatch.
3. Raise the trunk lid to open the trunk.
Using panic alarmGUID-F5755412-6D53-4825-A62F-7FCB9A73C172If you are near your vehicle and feel
threatened, you may activate the alarm to
call attention as follows:
1. Push the PANIC
button*4on the
key for more than 1 second.
2. The theft warning alarm and headlights will stay on for 25 seconds.
Pre-driving checks and adjustments3-15