light INFINITI G COUPE 2013 Quick Reference Guide
[x] Cancel search | Manufacturer: INFINITI, Model Year: 2013, Model line: G COUPE, Model: INFINITI G COUPE 2013Pages: 24, PDF Size: 2.18 MB
Page 2 of 24
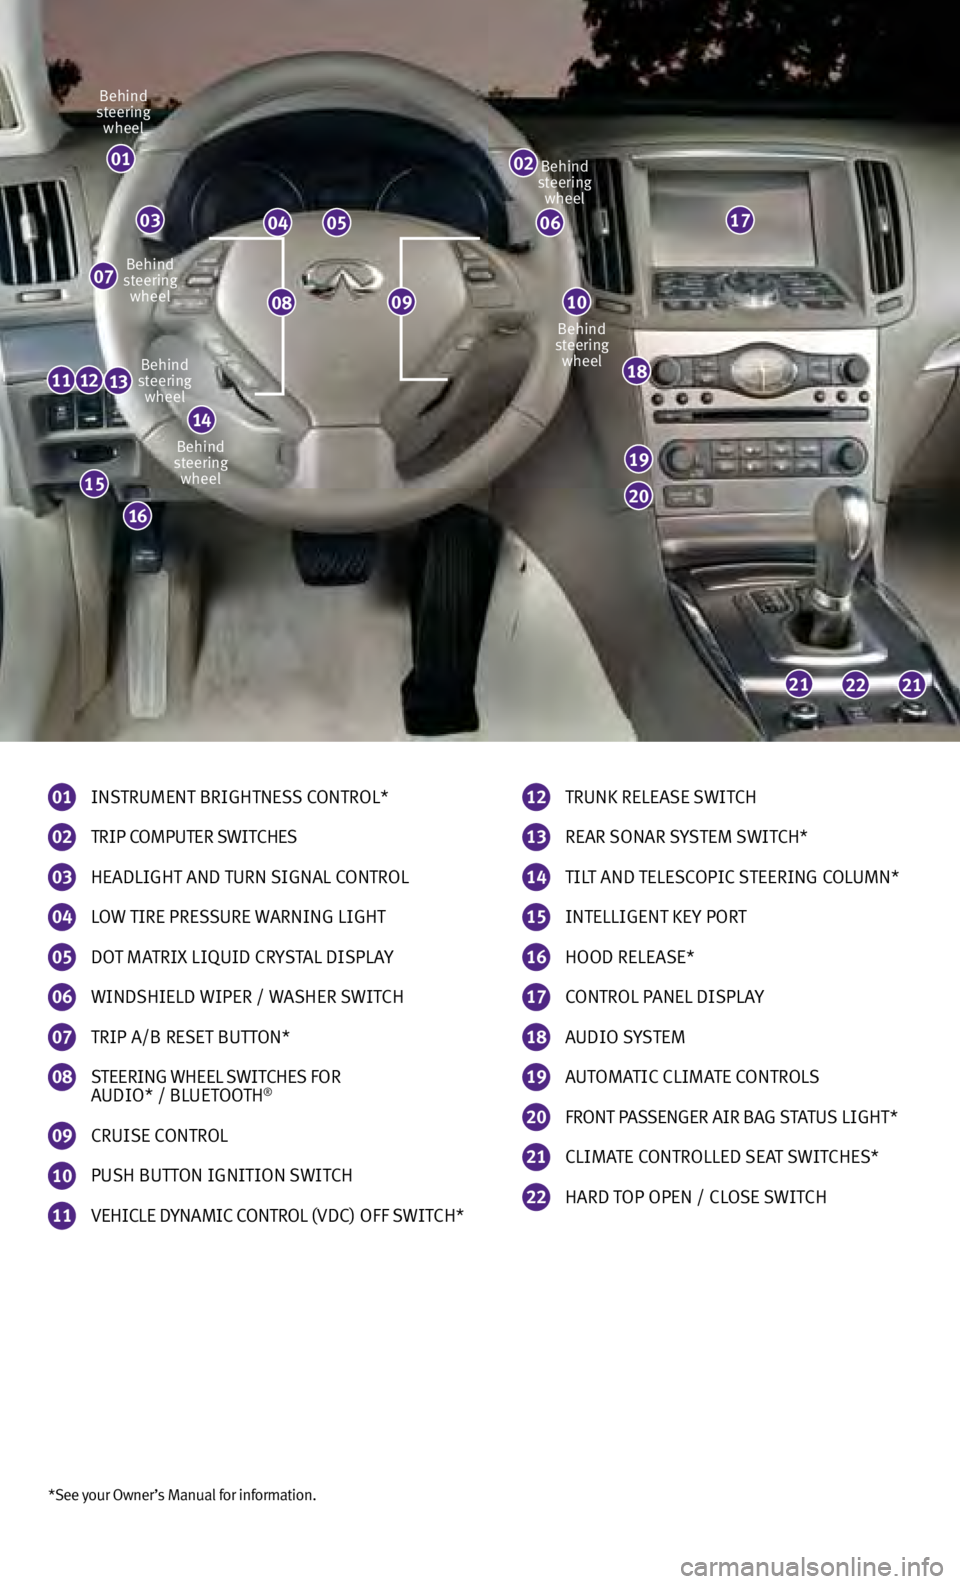
*See your Owner’s Manual for information.
01 INSTRUMENT BRIGHTNESS CONTROL*
02 TRIP COMPUTER SWITCHES
03 HEADLIGHT AND TURN SIGNAL CONTROL
04 LOW TIRE PRESSURE
WARNING LIGHT
05 DOT MATRI x LIQUID CR yS TAL DISPLAy
06 WINDSHIELD WIPER / WASHER SWITCH
07 TRIP A/B RE SET BUTTON*
08 STEERING WHEEL SWITCHES
FOR A
UDIO* / BLUETOOTH®
09 CRUIS E CONTROL
10 PUSH BUT TON IGNITION SWITCH
11 VEHICLE Dy NAMIC CONTROL (VDC) OFF SWITCH*
01
0710
19
18
20
212221
111213
14
040317
12 TRUNK RELEASE SWITCH
13
REAR SONAR SyS TEM SWITCH *
14 TILT AND TELESCOPIC STEERING COLUMN*
15 INTELLIGENT KE y POR T
16 HOOD RELEASE*
17 CONTROL PANEL DISPLAy
18 A UDIO SyS TEM
19 AUTOMATIC CLIMATE CONTROLS
20 FRONT P ASSENGER AIR BAG
STATUS LIGHT*
21 CLIMATE CONTROLLED
SEAT SWITCH ES *
22 HARD TOP OPEN / CLOSE SWITCH
0908
Behind
steering wheel
Behind
steering wheel
Behind
steering wheel
Behind
steering wheel
Behind
steering wheel
Behind
steering wheel
05
02
06
15
16
Page 3 of 24
table of contents
Additional information about your vehicle is also available in your Owner’s Manual, Navigation System Owner’s Manual and at www.InfinitiUSA.com.
• A cellular telephone should not be used for any purpose while driving so full attention
m ay be given to vehicle operation.
• Always wear your seat belt.
• Supplemental air bags do not replace proper seat belt usage.
• Children 12 and under should always ride in the rear seat properly secured in child
r
estraints or seat belts according to their age and weight.
• Do not drink and drive.
For more information, refer to the “Safety –– Seats, seat belts and supplemental
restraint system (section 1)”, “Monitor, climate, audio, phone and voice recognition
systems (section 4)” and the “Starting and driving (section 5)” of your Owner’s Manual.
essential information Loose Fuel Cap .................................................2 Tir
e Pressure Monitoring System (TPMS) ............................2 Openin
g/Closing the Hard Top (Convertible models) ..................
3 Aut
omatic Power Windows
.......................................3 A
ccessing the Front Cup Holders (if so equipped)
.....................3
first drive features INFINITI Int elligent Key™ System..................................4 T
runk Lid Release
...............................................5 Se
at Adjustments
...............................................5 Se
at Belt Guide (Convertible models)
...............................6 P
assenger Rear Seat Entry/Exit
....................................6 Aut
omatic Drive Positioner (if so equipped)
..........................6 Outs
ide Mirror Control Switch .....................................
7 St
arting/Stopping the Engine .....................................
7
He
adlight Control Switch . . . . . . . . . . . . . . . . . . . . . . . . . . . . . . . . . . . .\
. . . . . 8
W
indshield Wiper/Washer Switch
..................................9
C
limate Controls (if so equipped) ..................................
9 FM/AM/Sirius
x
M
™ Satellite Radio With CD/DVD Player (with Navigation System) (if so equipped)
................................................11
USB/iPod
® Interface (if so equipped) ..................................12 C
onventional (Fixed Speed) Cruise Control .........................12 Intelligent Cruise Control (ICC) System (if so equipped)
...............
13 Openin
g/Closing the Hard Top (Convertible models) .................
14 F
uel-Filler Door ................................................
14
system guide Trip Computer.................................................15 Bluetooth® Hands-free Phone System (if so equipped) ...............15
System Operating Tips ........................................15
Bluet
ooth
® System with Navigation (if so equipped)................16 Bluet
ooth® System without Navigation (if so equipped).............18 Nav
igation System (if so equipped) ...............................19 D
VD Player (if so equipped)
......................................20
HomeLink
® Universal Transceiver (if so equipped) ...................21
Page 4 of 24
2
essential information
Loose Fuel Cap
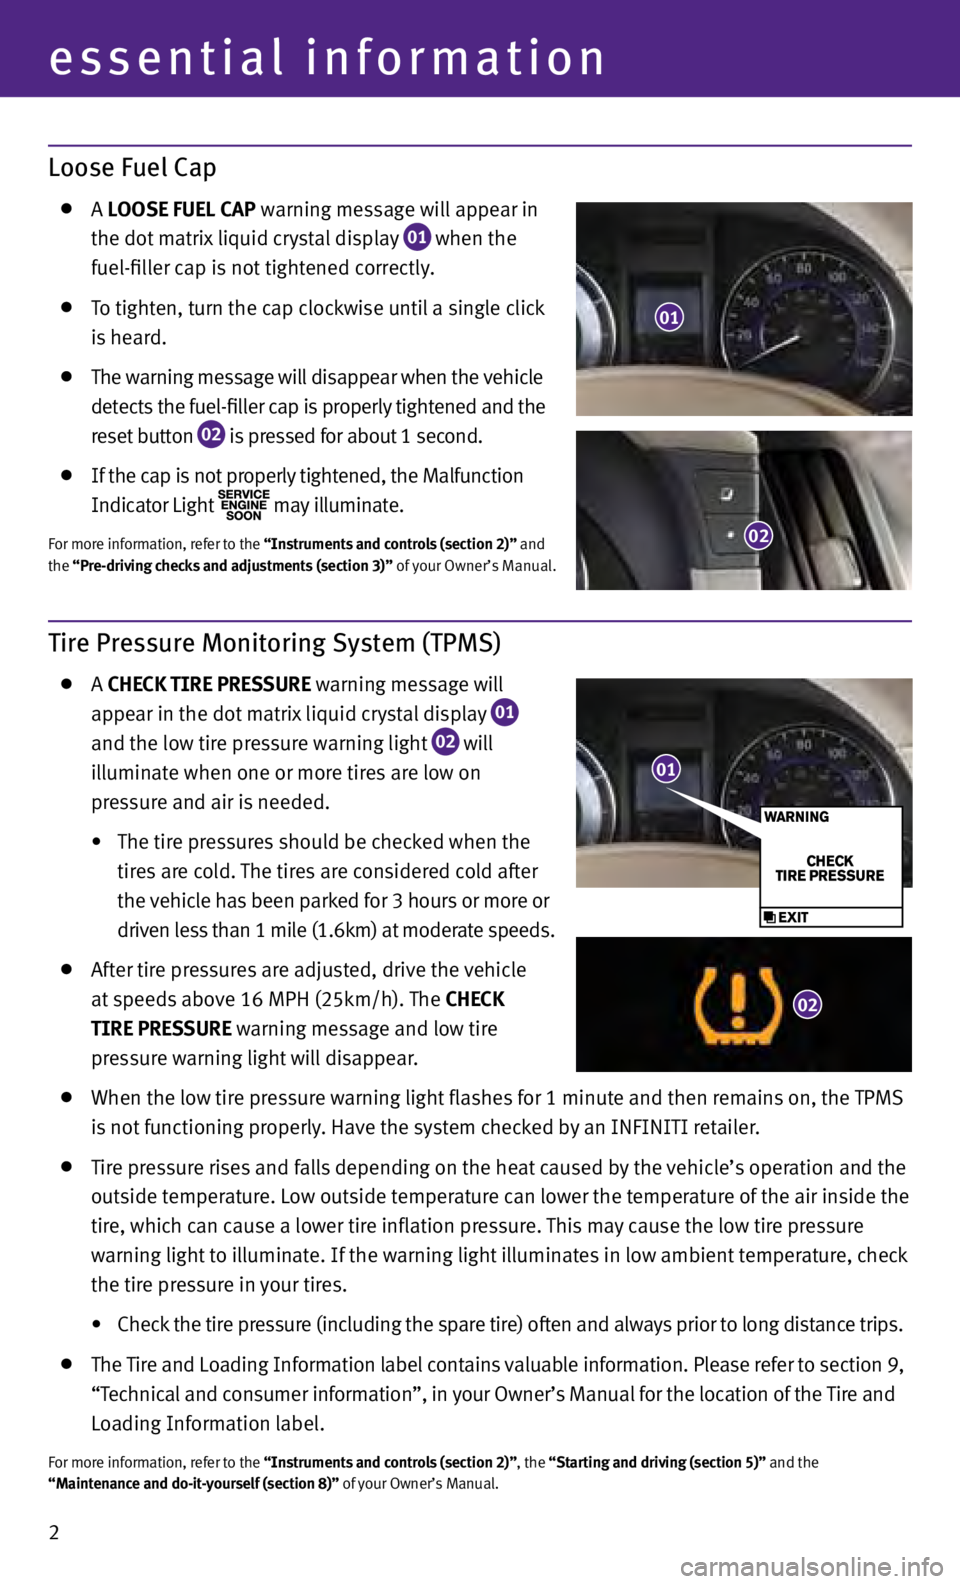
A LOOSE FUEL CAP
warning message will appear in
the dot
matrix liquid crystal display
01 when the
fuel-filler cap is not tightened correctly.
T o tighten, turn the cap clockwise until a single click
is h
eard.
The warning message will disappear when the vehicle
detects the fuel-filler cap is properly tightened and the
reset button 02 is pressed for about 1 second.
If the cap is not properly tightened, the Malfunction
Indicator Light may illuminate.
For more information, refer to the “Instruments and controls (section 2)” and
the “Pre-driving checks and adjustments (section 3)” of your Owner’s Manual.
Tire Pressure Monitoring System (TPMS)
A
Ch
EC k t I r E P r ESSU r E warning message will
ap
pear in the dot matrix liquid crystal display
01
and the lo
w tire pressure warning light 02 will
i
lluminate when one or more tires are low on
pr
essure and air is needed.
• The
tire
pressures
should
be
checked
when the
tir
es are cold. The tires are considered cold after
the
vehicle has been parked for 3 hours or more or
driv
en less than 1 mile (1.6km) at moderate speeds.
Af ter tire pressures are adjusted, drive the vehicle
at
speeds above 16 MPH (25km/h). The C h EC k
t I r E P r ESSU r E warning message and low tire
pr
essure warning light will disappear.
When the lo w tire pressure warning light flashes for 1 minute and then remains on, the TPMS
i
s not functioning properly. Have the system checked by an INFINITI retailer.
Tir e pressure rises and falls depending on the heat caused by the vehicle’s operation and the
outs
ide temperature. Low outside temperature can lower the temperature of the air inside the
tir
e, which can cause a lower tire inflation pressure. This may cause the low tire pressure
w
arning light to illuminate. If the warning light illuminates in low ambient temperature, check
the tir
e pressure in your tires.
• Check
the tire pressure (including the spare tire) often and always
prior to long distance trips.
The Tire and Loading Information label contains valuable information. Please refer to section 9,
“T
echnical and consumer information”, in your Owner’s Manual for the location of the Tire and
L
oading Information label.
For more information, refer to the “Instruments and controls (section 2)”, the “Starting and driving (section 5)” and the
“Maintenance and do-it-yourself (section 8)” of your Owner’s Manual.
01
02
02
01
Page 5 of 24
3
Opening/Closing the Hard Top (Convertible models)
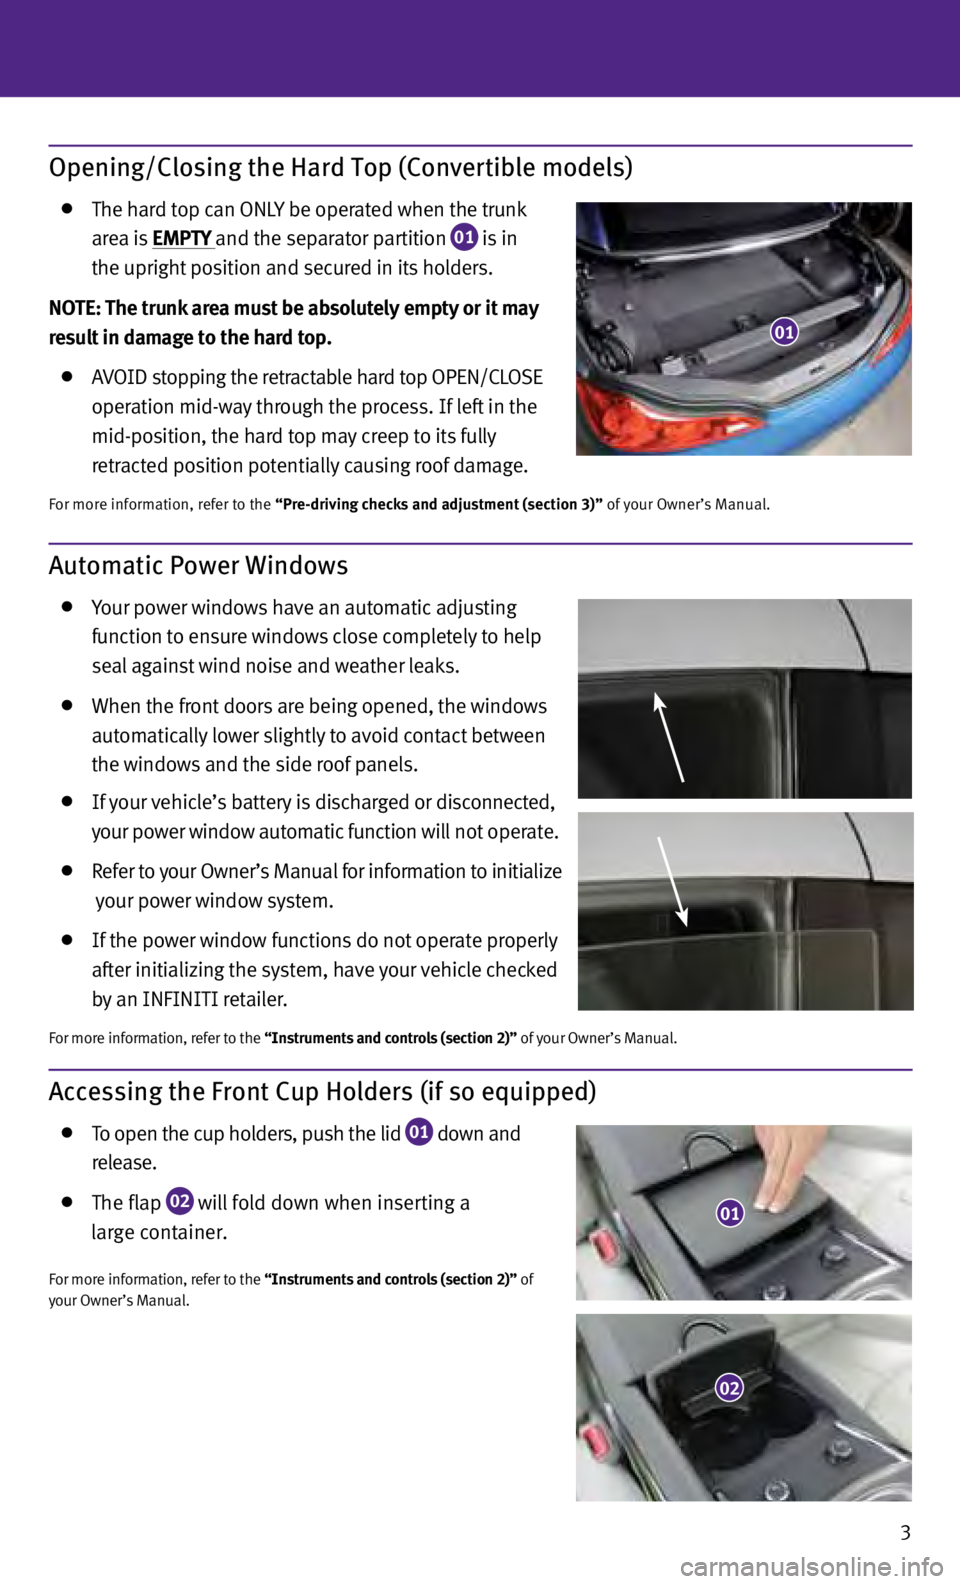
The h
ard top can ONLy be oper ated when the trunk
a
rea is EMP t Y and the separator partition
01 is in
the upright
position and secured in its holders.
NO
t
E:
t
he trunk area must be absolutely empty or it may
result in damage to the hard top.
A VOID stopping the retractable hard top OPEN/CLOSE
oper
ation mid-way through the process. If left in the
mid-po
sition, the hard top may creep to its fully
r
etracted position potentially causing roof damage.
For more information, refer to the “Pre-driving checks and adjustment (section 3)” of your Owner’s Manual.
Accessing the Front Cup Holders (if so equipped)
T o open the cup holders, push the lid
01 down and
r
elease.
The flap 02 will fold down when inserting a
l
arge container.
For more information, refer to the “Instruments and controls (section 2)” of
your Owner’s Manual.
Automatic Power Windows
your po wer windows have an automatic adjusting
f
unction to ensure windows close completely to help
se
al against wind noise and weather leaks.
When the fr ont doors are being opened, the windows
aut
omatically lower slightly to avoid contact between
the w
indows and the side roof panels.
If your vehicle’s battery is discharged or disconnected,
y
our power window automatic function will not operate.
R efer to your Owner’s Manual for information to initialize
your power window system.
If the power window functions do not operate properly
af
ter initializing the system, have your vehicle checked
b
y an INFINITI retailer.
For more information, refer to the “Instruments and controls (section 2)” of your Owner’s Manual.
01
01
02
Page 6 of 24
4
first drive features
INFINITI Intelligent Key™ System
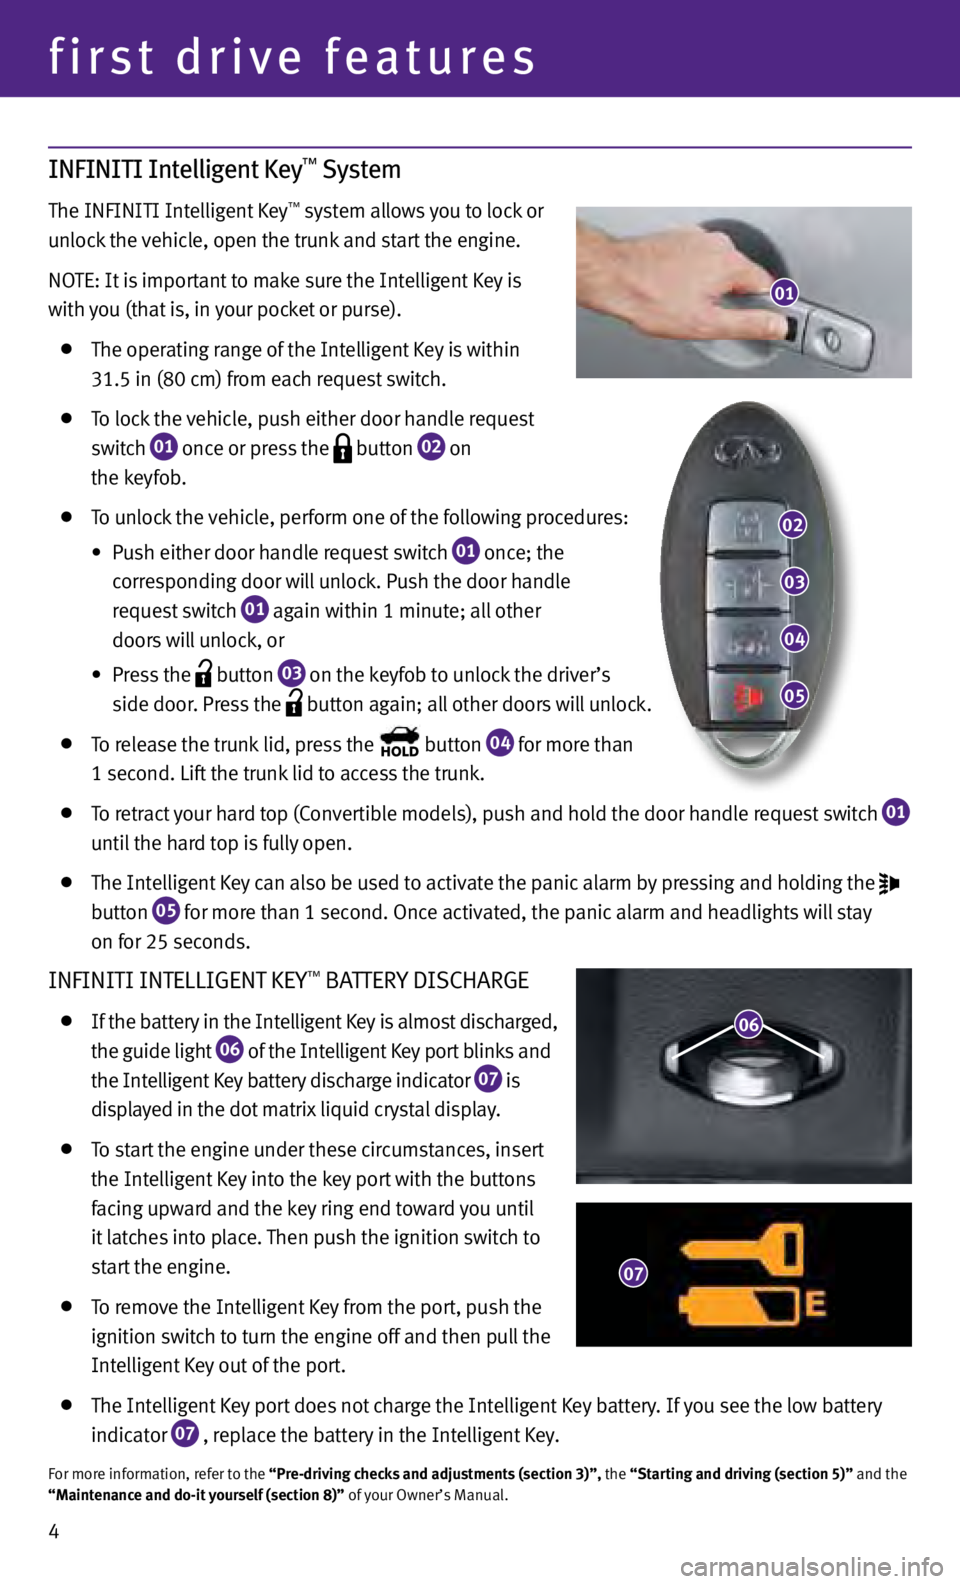
The INFINITI Intelligent Key™ system allows you to lock or
unlock the vehicle, open the trunk and start the engine.
NOTE: It is important to make sure the Intelligent Key is
with you (that is, in your pocket or purse).
The oper ating range of the Intelligent Key is within
31.5 in (80 c
m) from each request switch.
To lock the vehicle, push either door handle request
s
witch
01 once or press the
button
02 on
the k
eyfob.
T o unlock the vehicle, perform one of the following procedures:
• Push
either door handle request
switch
01 once; the
c
orresponding door will unlock. Push the door handle
r
equest switch
01 again within 1 minute; all other
door
s will unlock, or
• Press
the
button
03 on the keyfob to unlock the driver’s
s
ide door. Press the
button again; all other doors will unlock.
T
o release the trunk lid, press the button
04 for more than
1 sec
ond. Lift the trunk lid to access the trunk.
T o retract your hard top (Convertible models), push and hold the door handle request switch
01
u
ntil the hard top is fully open.
The Int elligent Key can also be used to activate the panic alarm by pressing and holding the
b
utton 05 for more than 1 second. Once activated, the panic alarm and headlights will stay
on f
or 25 seconds.
INFINITI INTELLIGENT KEy™ BATTERy DISCHARGE
If the battery in the Intelligent Key is almost discharged,
the guide light 06 of the Intelligent Key port blinks and
the Int
elligent Key battery discharge indicator 07 is
di
splayed in the dot matrix liquid crystal display.
T o start the engine under these circumstances, insert
the Int
elligent Key into the key port with the buttons
f
acing upward and the key ring end toward you until
it
latches into place. Then push the ignition switch to
s
tart the engine.
To remove the Intelligent Key from the port, push the
ignition sw
itch to turn the engine off and then pull the
Int
elligent Key out of the port.
The Int elligent Key port does not charge the Intelligent Key battery. If you see the low battery
indic
ator
07 , replace the battery in the Intelligent Key.
For more information, refer to the “Pre-driving checks and adjustments (section 3)”, the “Starting and driving (section 5)” and the
“Maintenance and do-it yourself (section 8)” of your Owner’s Manual.
01
07
06
02
03
04
05
Page 8 of 24
6
first drive features
Seat Belt Guide (Convertible models)
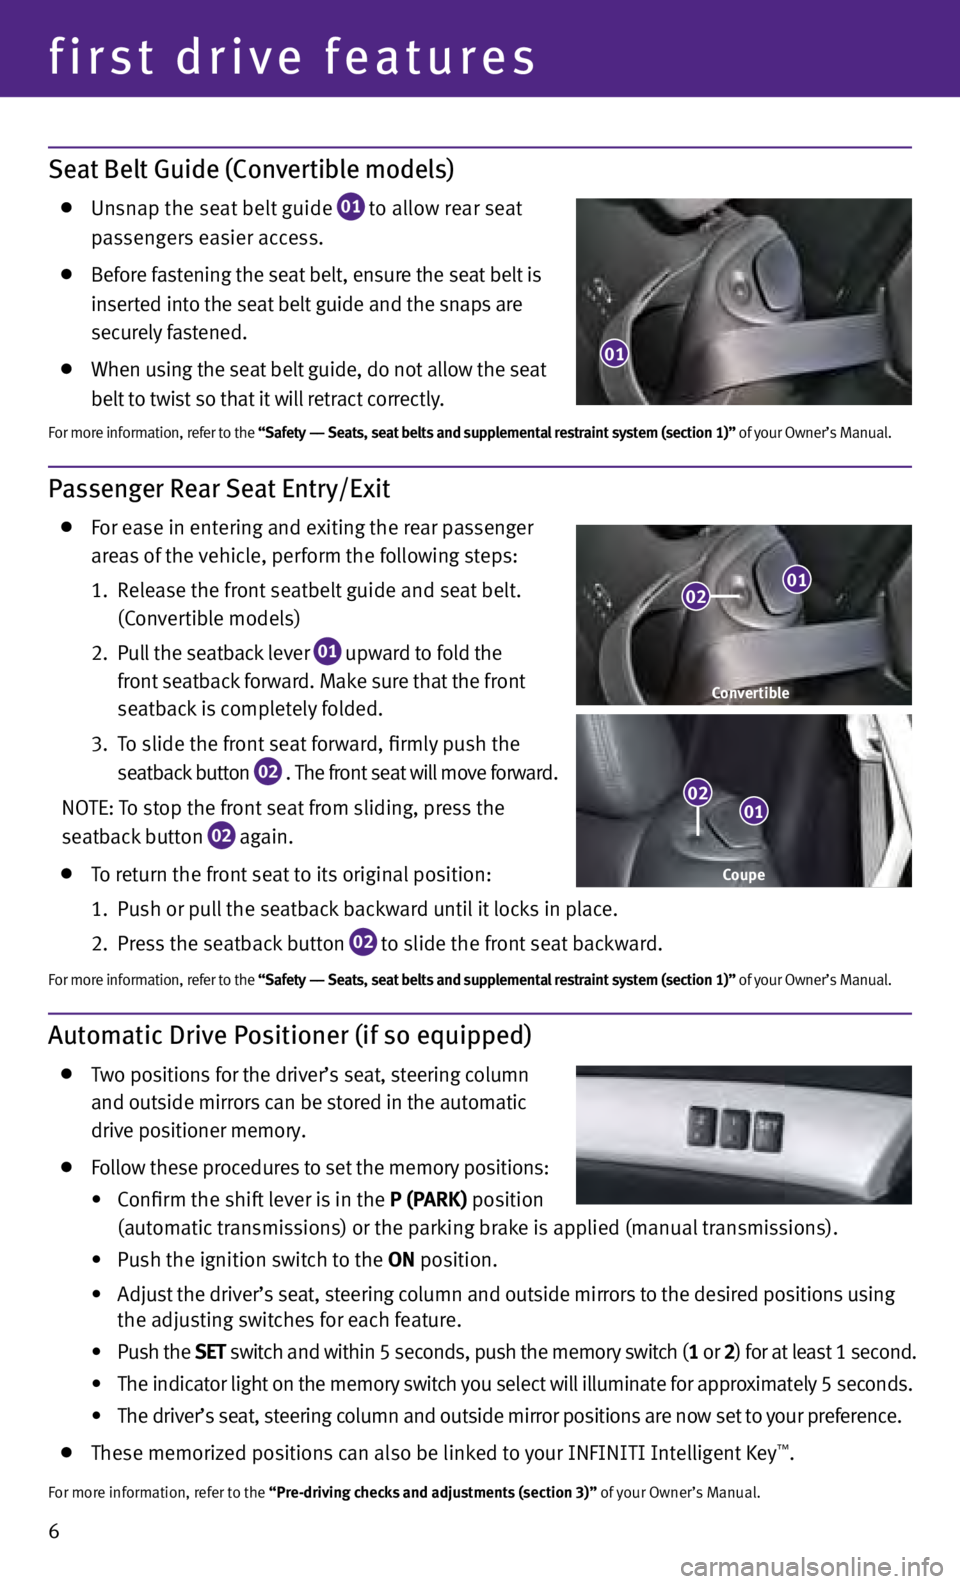
Un
snap the seat belt guide
01 to allow rear seat p
assengers easier access.
B efore fastening the seat belt, ensure the seat belt is
in
serted into the seat belt guide and the snaps are
sec
urely fastened.
When u sing the seat belt guide, do not allow the seat
belt
to twist so that it will retract correctly.
For more information, refer to the “Safety –– Seats, seat belts and supplemental restraint system (section 1)” of your Owner’s Manual.
Automatic Drive Positioner (if so equipped)
Two positions for the driver’s seat, steering column
and outside mirrors can be stored in the automatic
drive positioner memory.
F ollow these procedures to set the memory positions:
• Confirm
the shift
lever is
in the P (PA rk ) position
(aut
omatic transmissions) or the parking brake is applied (manual transmissions).
• Push
the ignition switch to the ON position.
• Adjust
the driver’s
seat, steering column and outside mirrors
to the desired positions
using
the a
djusting switches for each feature.
• Push
the SE
t sw
itch and within 5 seconds, push the memory switch (1 or 2) for at least 1 second.
• The
indicator light
on the memory
switch
y
ou select
will
illuminate for approximately
5 seconds.
• The driver’s
seat, steering column and outside mirror positions
are now set
to
y
our preference.
These memorized positions can also be linked to your INFINITI Intelligent Key™.
For more information, refer to the “Pre-driving checks and adjustments (section 3)” of your Owner’s Manual.
Passenger Rear Seat Entry/Exit
F
or ease in entering and exiting the rear passenger
ar
eas of the vehicle, perform the following steps:
1.
R
elease the front seatbelt guide and seat belt.
(C
onvertible models)
2.
P
ull the seatback lever
01 upward to fold the
fr
ont seatback forward. Make sure that the front
se
atback is completely folded.
3.
T
o slide the front seat forward, firmly push the
se
atback button
02 . The front seat will move forward.
NO
TE: To stop the front seat from sliding, press the
se
atback button
02 again.
T
o return the front seat to its original position:
1.
P
ush or pull the seatback backward until it locks in place.
2.
Pr
ess the seatback button
02 to slide the front seat backward.
For more information, refer to the “Safety –– Seats, seat belts and supplemental restraint system (section 1)” of your Owner’s Manual.
Coupe
Convertible
01
01
02
02
01
Page 10 of 24
8
first drive features
Headlight Control Switch
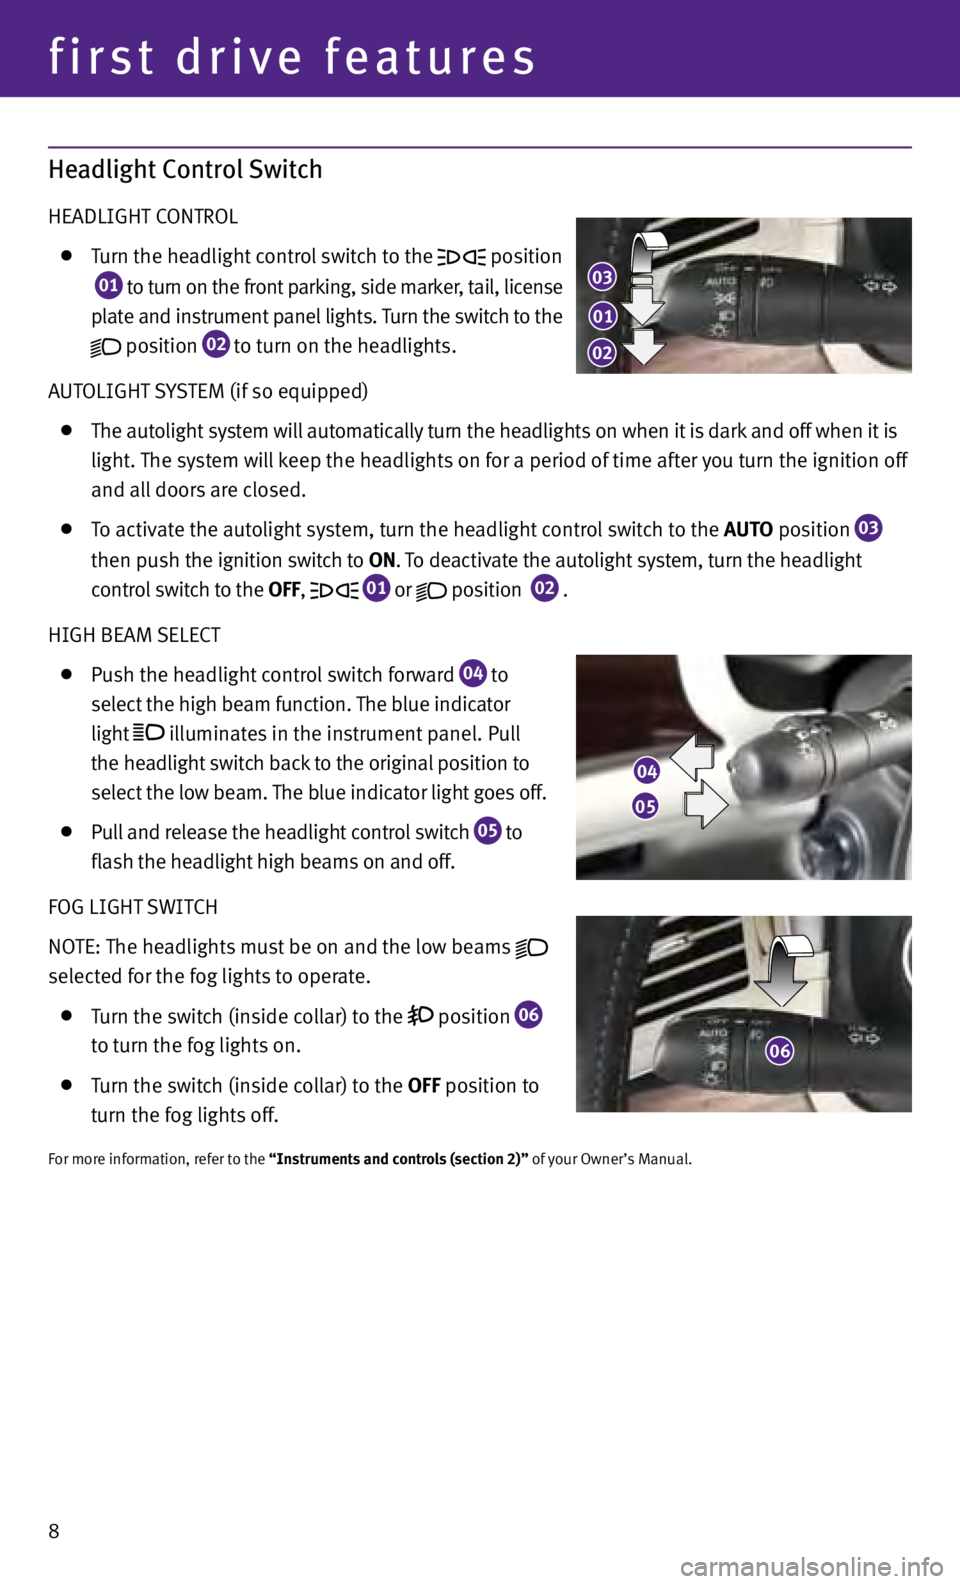
HEADLIGHT CONTROL
T
urn the headlight control switch to the position
01 to turn on the front parking, side marker, tail, license
p
late and instrument panel lights. Turn the switch to the
position
02 to turn on the headlights.
AUTOLIGHT S
yS
TEM (if so equipped)
The aut
olight system will automatically turn the headlights on when it is dark and off when it is
light
. The system will keep the headlights on for a period of time after you turn the ignition off
and al
l doors are closed.
T
o activate the autolight system, turn the headlight control switch to the AUt O position
03
t
hen push the ignition switch to ON. To deactivate the autolight system, turn the headlight
c
ontrol switch to the OFF,
01 or
position
02 .
HIGH BEAM SELECT
P
ush the headlight control switch forward
04 to
sel
ect the high beam function. The blue indicator
light
illuminates in the instrument panel. Pull
the he
adlight switch back to the original position to
sel
ect the low beam. The blue indicator light goes off.
P
ull and release the headlight control switch
05 to
fla
sh the headlight high beams on and off.
FOG LIGHT SWITCH
NOTE: The headlights must be on and the low beams
selected for the fog lights to operate.
T
urn the switch (inside collar) to the position
06
t
o turn the fog lights on.
T urn the switch (inside collar)
to the OFF position to
t
urn the fog lights off.
For more information, refer to the “Instruments and controls (section 2)” of your Owner’s Manual.
03
01
02
04
05
06
Page 12 of 24
10
first drive features
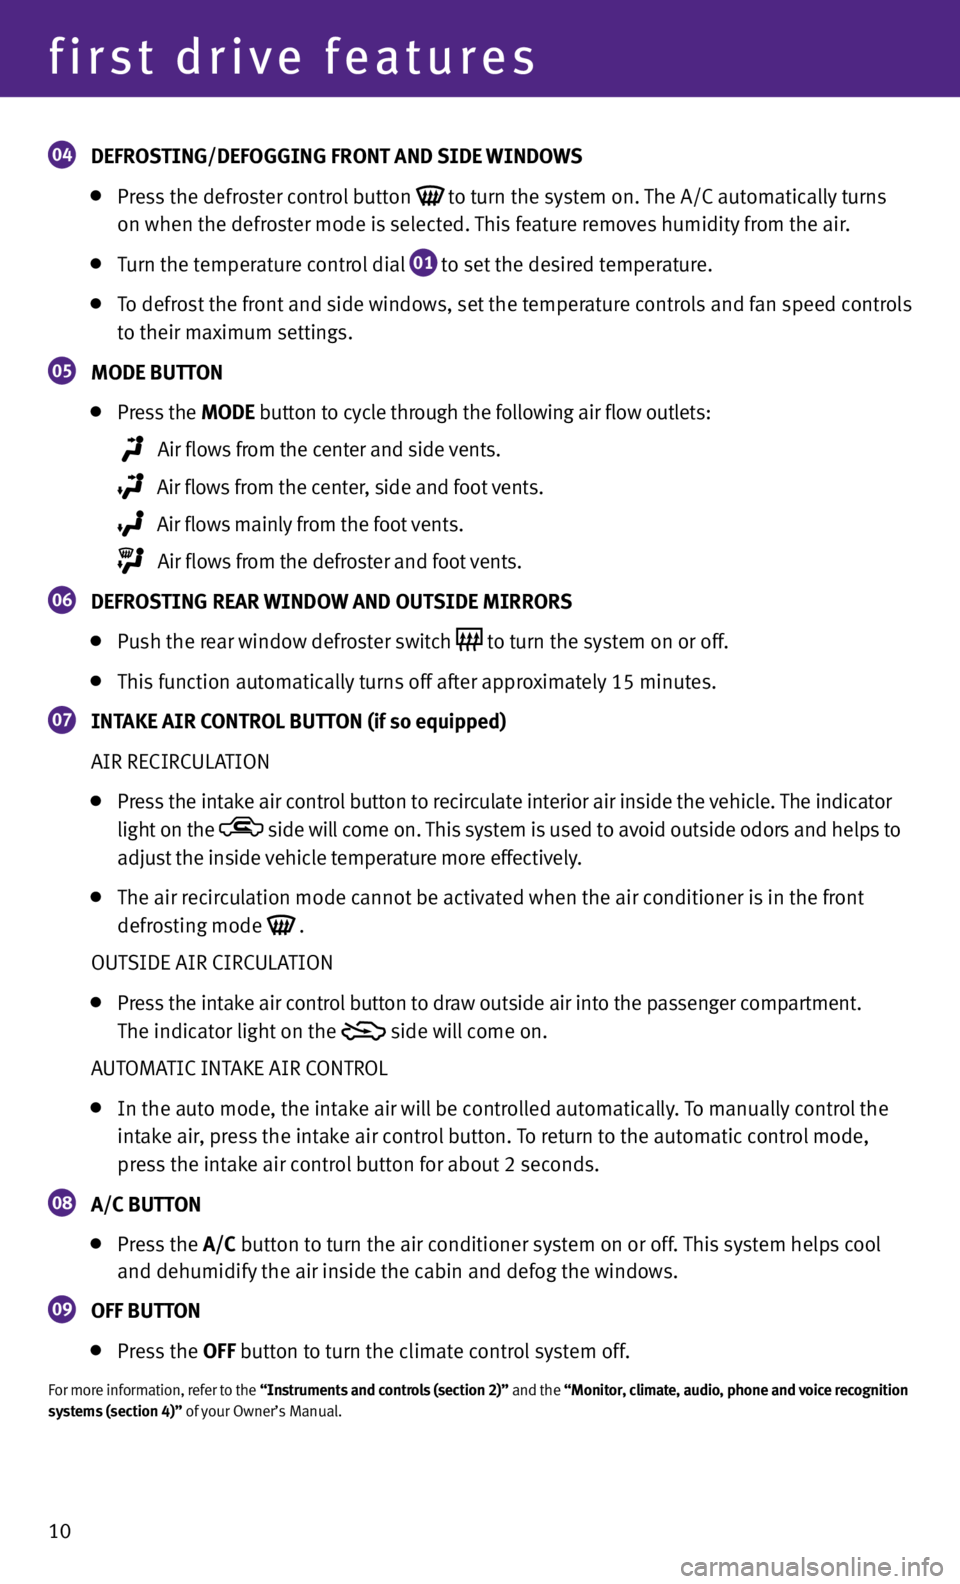
04 DEFr OSt ING/DEFOGGING F r ON t AND SIDE WINDOWS
Pr
ess the defroster control button to turn the system on. The A/C automatically turns
on when the defr
oster mode is selected. This feature removes humidity from the air.
T urn the temperature control dial
01 to set the desired temperature.
T
o defrost the front and side windows, set the temperature controls and fan speed controls
t
o their maximum settings.
05 MODE BU ttON
Pr
ess the MODE button
to cycle through the following air flow outlets:
Air flo ws from the center and side vents.
Air flows from the center, side and foot vents.
Air flows mainly from the foot vents.
Air flows from the defroster and foot vents.
06 DEF r OSt ING r EA r WINDOW AND OU tSIDE MI rr O r S
P
ush the rear window defroster switch to turn the system on or off.
Thi
s function automatically turns off after approximately 15 minutes.
07 INtA k E AI r CON tr OL BU ttON (if so equipped)
AIR RE
CIRCULATION
Pr ess the intake air control button
to recirculate interior air inside the vehicle. The indicator
light on the
side will come on. This system is used to avoid outside odors and helps to
adjust the inside vehicle temperature more effectively.
The air r ecirculation mode cannot be activated when the air conditioner is in the front
defr
osting mode
.
OUT
SIDE AIR CIRCULATION
Pr ess the intake air control button
to draw outside air into the passenger compartment.
The indic
ator light on the
side will come on.
A
UTOMATIC INTAKE AIR CONTROL
In the aut o mode, the intake air will be controlled automatically. To manually control the
int
ake air, press the intake air control button. To return to the automatic control mode,
pr
ess the intake air control button for about 2 seconds.
08 A/C
BU ttON
Pr
ess the A/C button to turn the air conditioner system on or off. This system helps cool
and dehumidif
y the air inside the cabin and defog the windows.
09 OFF BU ttON
Pr
ess the OFF button to turn the climate control system off.
For more information, refer to the “Instruments and controls (section 2)” and the “Monitor, climate, audio, phone and voice recognition
systems (section 4)” of your Owner’s Manual.
Page 14 of 24
12
first drive features
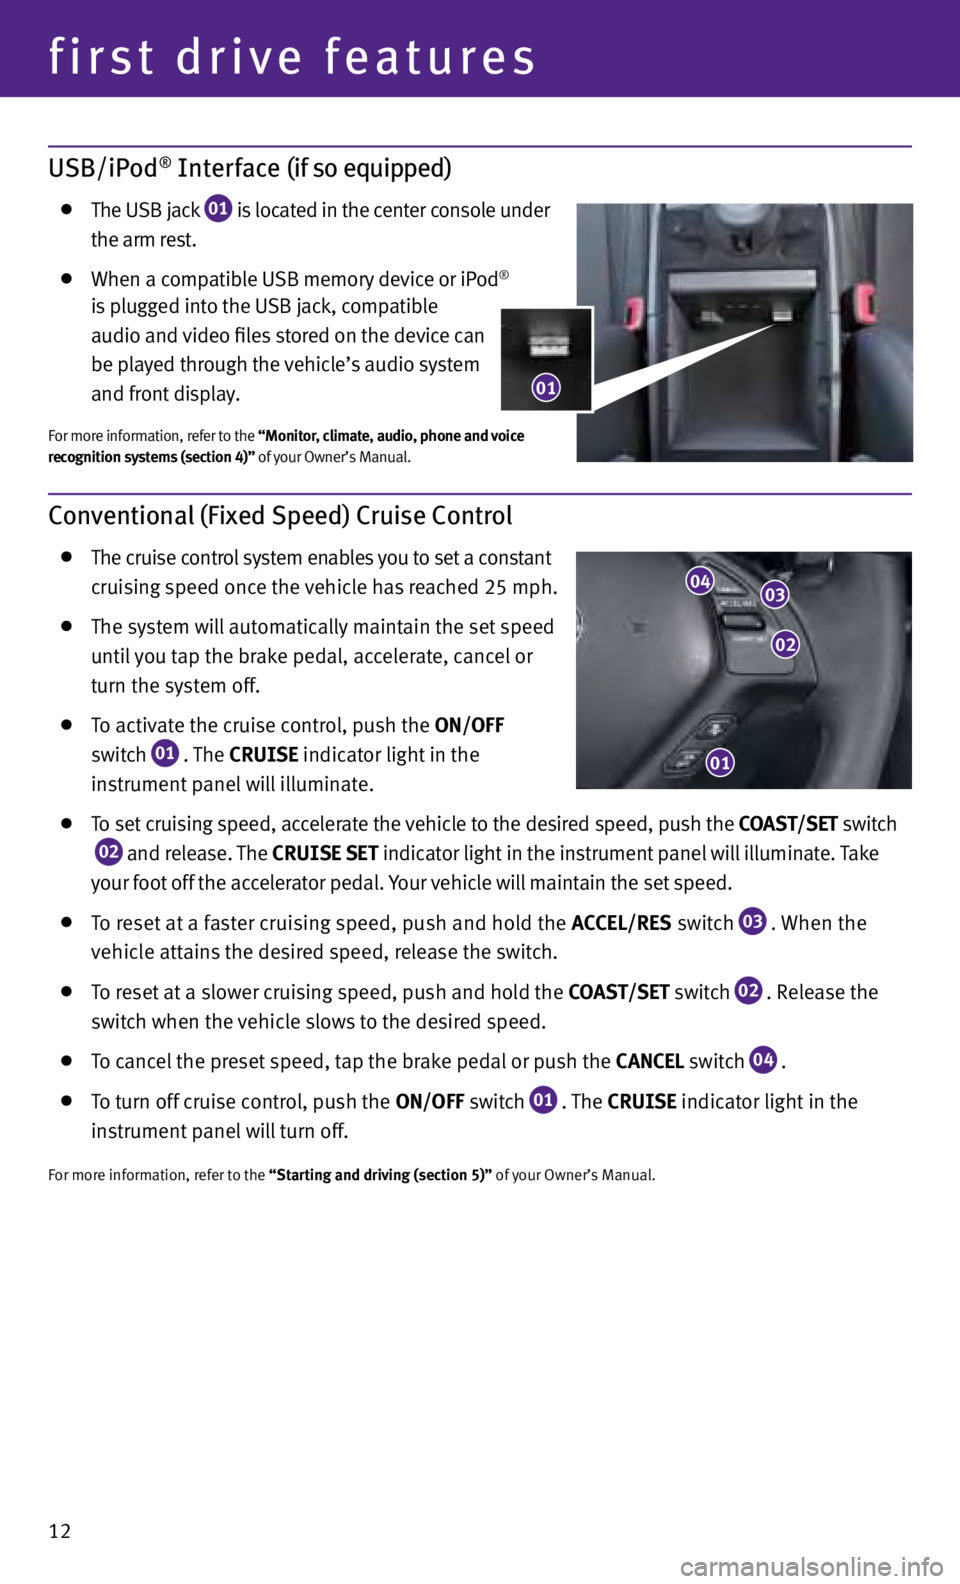
Conventional (Fixed Speed) Cruise Control
The cruise control system enables you to set a constant
c
ruising speed once the vehicle has reached 25 mph.
The sy stem will automatically maintain the set speed
u
ntil you tap the brake pedal, accelerate, cancel or
t
urn the system off.
T o activate the cruise control, push the ON/OFF
s
witch
01 . The
C r UISE
indicator light in the
in
strument panel will illuminate.
T o set cruising speed, accelerate the vehicle to the desired speed, push the COASt /SE t switch
02 and release. The
C r UISE SE t
indicator light
in the instrument panel will illuminate. Take
y
our foot off the accelerator pedal. your vehicle will maintain the set speed.
To reset at a faster cruising speed, push and hold the ACCEL/ r ES switch
03 . When the
v
ehicle attains the desired speed, release the switch.
T o reset at a slower cruising speed, push and hold the COASt /SE t switch
02 . Release the
sw
itch when the vehicle slows to the desired speed.
T o cancel the preset speed, tap the brake pedal or push the CANCEL switch
04 .
T
o turn off cruise control, push the ON/OFF switch
01 . The
C r UISE
indicator light
in the
in
strument panel will turn off.
For more information, refer to the “Starting and driving (section 5)” of your Owner’s Manual.
01
02
0304
USB/iPod® Interface (if so equipped)
The USB j ack
01 is located in the center console under
the arm r
est.
When a c
ompatible USB memory device or iPod®
i
s plugged into the USB jack, compatible
audio and
video files stored on the device can
be p
layed through the vehicle’s audio system
and fr
ont display.
For more information, refer to the “Monitor, climate, audio, phone and voice
recognition systems (section 4)” of your Owner’s Manual.
01
Page 15 of 24
13
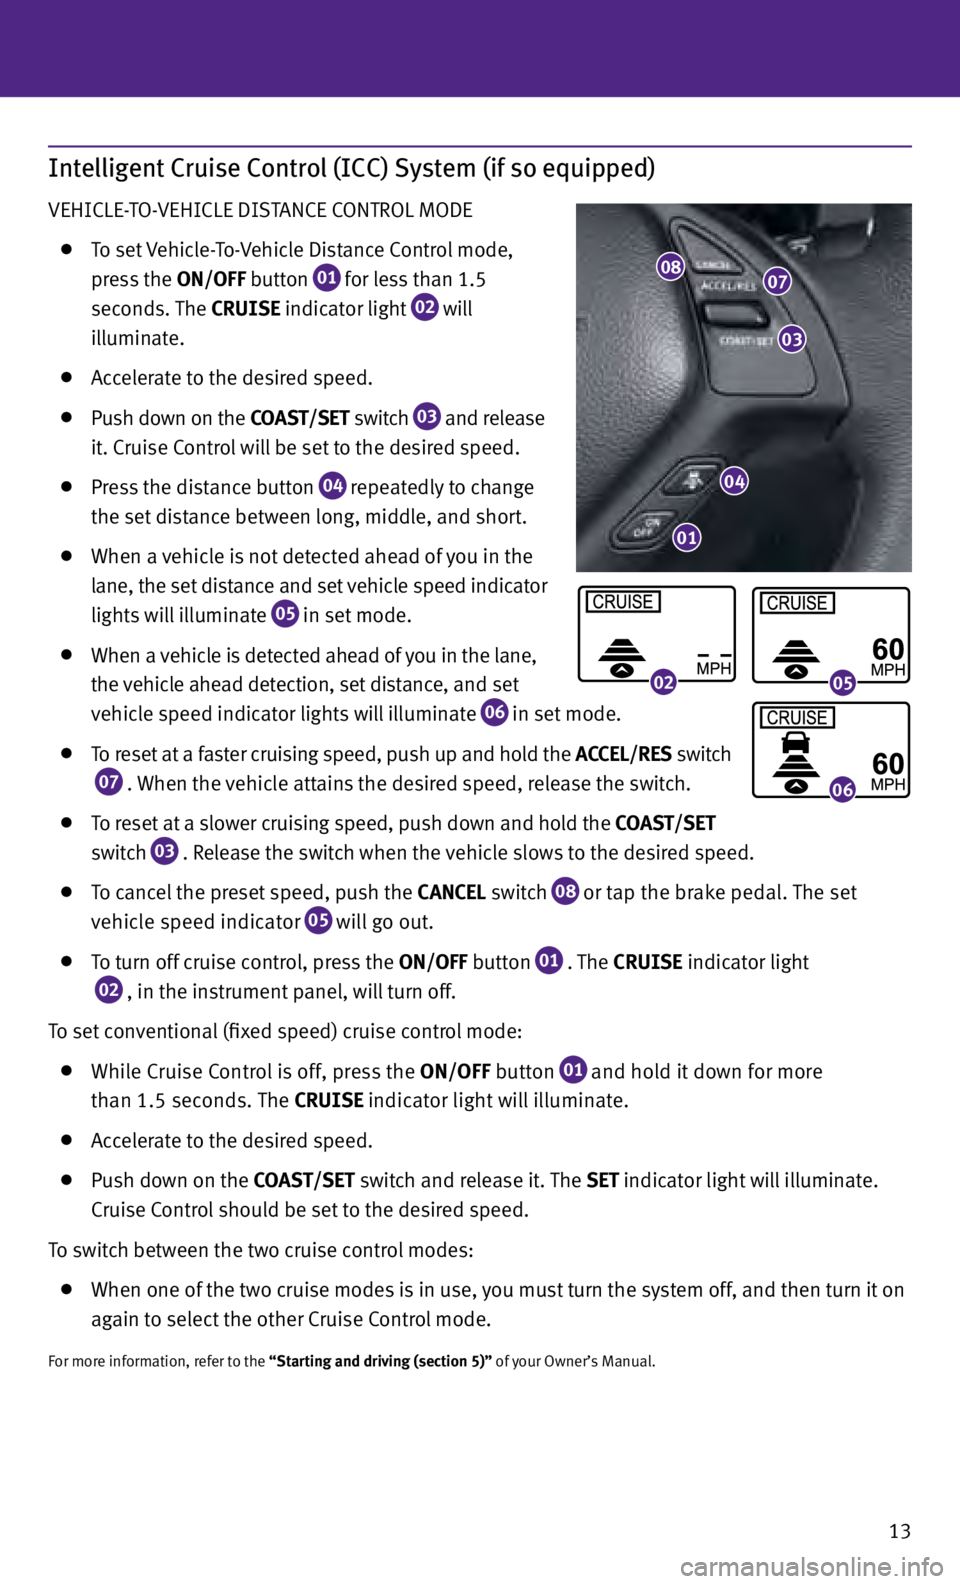
Intelligent Cruise Control (ICC) System (if so equipped)
VEHICLE-TO-VEHICLE DISTANCE CONTROL MODE
T
o set Vehicle-To-Vehicle Distance Control mode,
pr
ess the ON/OFF button
01 for less than 1.5
sec
onds. The C
r
UISE indicator light
02 will
i
lluminate.
A ccelerate to the desired speed.
Push down on the COASt /SE t switch
03 and release
it
. Cruise Control will be set to the desired speed.
Pr ess the distance button
04 repeatedly to change
the set
distance between long, middle, and short.
When a vehicle is not detected ahead of you in the
l
ane, the set distance and set vehicle speed indicator
lights
will illuminate
05 in set mode.
When a
vehicle is detected ahead of you in the lane,
the
vehicle ahead detection, set distance, and set
v
ehicle speed indicator lights will illuminate
06 in set mode.
T
o reset at a faster cruising speed, push up and hold the ACCEL/ r ES switch
07 . When the vehicle attains the desired speed, release the switch.
T
o reset at a slower cruising speed, push down and hold the COASt /SE t
s
witch
03 . Release the switch when the vehicle slows to the desired speed.
T o cancel the preset speed, push the CANCEL switch
08 or tap the brake pedal. The set
vehicle speed indicator 05 will go out.
T
o turn off cruise control, press the ON/OFF button
01 . The
C r UISE indicator light
02 , in the instrument panel, will turn off.
To set conventional (fixed speed) cruise control mode:
Whi le Cruise Control is off, press the ON/OFF
button
01 and hold it down for more
th
an 1.5 seconds. The C
r
UISE indicator light will illuminate.
A
ccelerate to the desired speed.
Push down on the COASt /SE t switch and release it. The SE t indicator light will illuminate.
C
ruise Control should be set to the desired speed.
To switch between the two cruise control modes:
When one of the two cruise modes is in use, you must turn the system off, and then turn it on
ag
ain to select the other Cruise Control mode.
For more information, refer to the “Starting and driving (section 5)” of your Owner’s Manual.
04
0807
03
01
0205
06