buttons INFINITI G35 2006 Owners Manual
[x] Cancel search | Manufacturer: INFINITI, Model Year: 2006, Model line: G35, Model: INFINITI G35 2006Pages: 344, PDF Size: 6.81 MB
Page 118 of 344
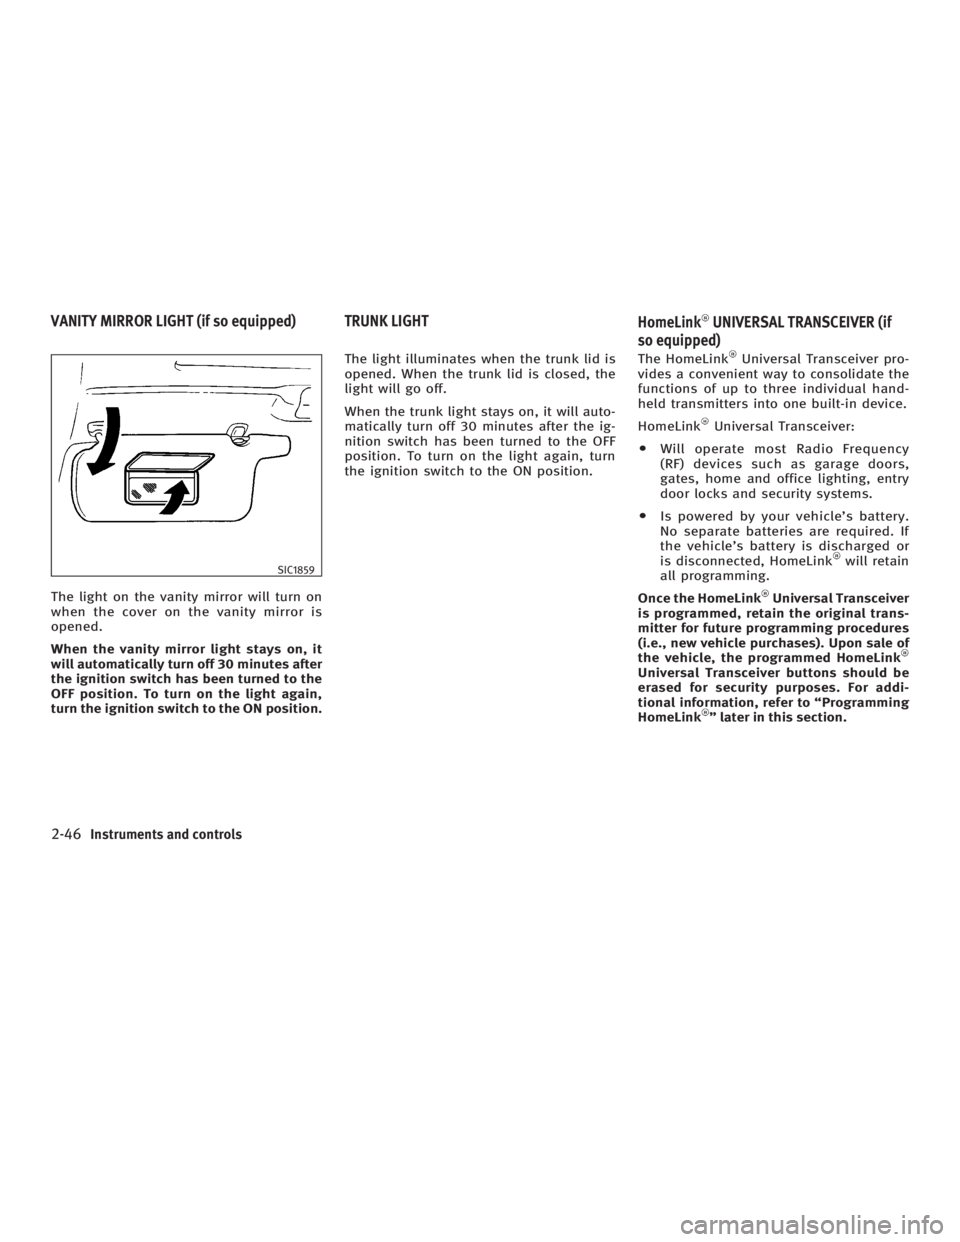
The light on the vanity mirror will turn on
when the cover on the vanity mirror is
opened.
When the vanity mirror light stays on, it
will automatically turn off 30 minutes after
the ignition switch has been turned to the
OFF position. To turn on the light again,
turn the ignition switch to the ON position. The light illuminates when the trunk lid is
opened. When the trunk lid is closed, the
light will go off.
When the trunk light stays on, it will auto-
matically turn off 30 minutes after the ig-
nition switch has been turned to the OFF
position. To turn on the light again, turn
the ignition switch to the ON position. The HomeLink Universal Transceiver pro-
vides a convenient way to consolidate the
functions of up to three individual hand-
held transmitters into one built-in device.
HomeLink Universal Transceiver:
O Will operate most Radio Frequency
(RF) devices such as garage doors,
gates, home and office lighting, entry
door locks and security systems.
O Is powered by your vehicle's battery.
No separate batteries are required. If
the vehicle's battery is discharged or
is disconnected, HomeLink will retain
all programming.
Once the HomeLink Universal Transceiver
is programmed, retain the original trans-
mitter for future programming procedures
(i.e., new vehicle purchases). Upon sale of
the vehicle, the programmed HomeLink
Universal Transceiver buttons should be
erased for security purposes. For addi-
tional information, refer to ªProgramming
HomeLink º later in this section.SIC1859
VANITY MIRROR LIGHT (if so equipped) TRUNK LIGHT
HomeLink UNIVERSAL TRANSCEIVER (if
so equipped)
2-46 Instruments and controls
w 06.1.4/V35-D/V5.0
X
Page 119 of 344

WARNINGO Do not use the HomeLink Universal
Transceiver with any garage door opener
that lacks safety stop and reverse features
as required by federal safety standards.
(These standards became effective for
opener models manufactured after April 1,
1982.) A garage door opener which cannot
detect an object in the path of a closing
garage door and then automatically stop
and reverse, does not meet current federal
safety standards. Using a garage door
opener without these features increases
the risk of serious injury or death.
O During the programming procedure, your
garage door or security gate will open or
close (if the transmitter is within range).
Make sure that people or objects are clear
of the garage door, gate, etc. that you are
programming.
O Your vehicle's engine should be turned
off while programming the HomeLink
Universal Transceiver. PROGRAMMING HomeLink To program your HomeLink Transceiver
to operate a garage door, gate, or entry
door opener, home or office lighting, you
need to be at the same location as the
device. Note: Garage door openers (manu-
factured after 1996) have ªrolling code
protectionº. To program a garage door
opener equipped with ªrolling code pro-
tectionº; you will need to use a ladder to
get up to the garage door opener motor to
be able to access the ªtrainingº program
button.
1. To begin, push and hold the 2 outer
HomeLink buttons (to clear the
memory) until the indicator light
q A
blinks (after 20 seconds). Release both
buttons.
2. Position the end of the hand-held trans-
mitte r1-3 inches (26 - 76 mm) away
from the HomeLink
surface. SIC3012
Instruments and controls
2-47
w 06.1.4/V35-D/V5.0
X
Page 120 of 344
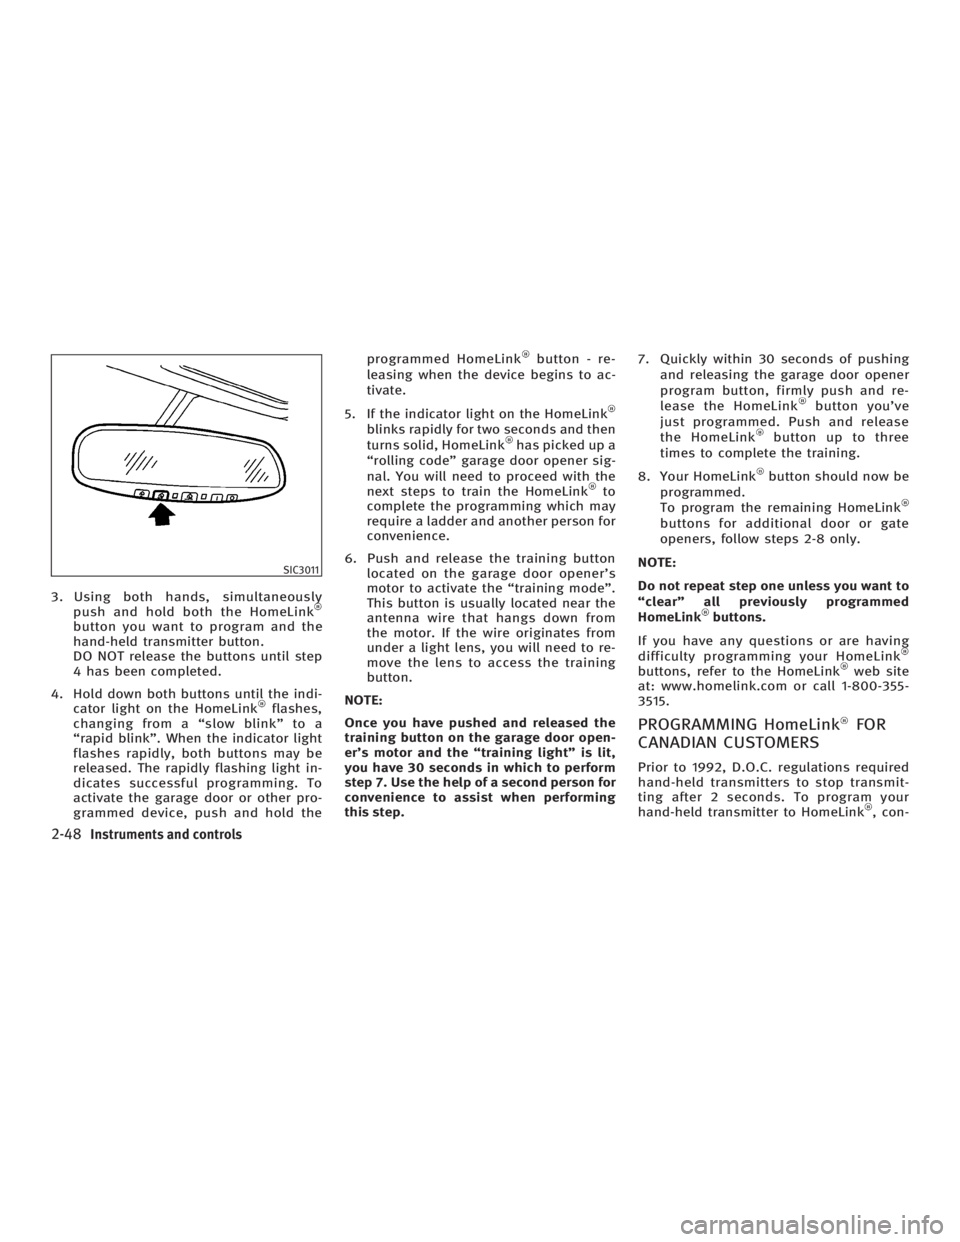
3. Using both hands, simultaneously
push and hold both the HomeLink
button you want to program and the
hand-held transmitter button.
DO NOT release the buttons until step
4 has been completed.
4. Hold down both buttons until the indi-
cator light on the HomeLink flashes,
changing from a ªslow blinkº to a
ªrapid blinkº. When the indicator light
flashes rapidly, both buttons may be
released. The rapidly flashing light in-
dicates successful programming. To
activate the garage door or other pro-
grammed device, push and hold the programmed HomeLink button - re-
leasing when the device begins to ac-
tivate.
5. If the indicator light on the HomeLink
blinks rapidly for two seconds and then
turns solid, HomeLink has picked up a
ªrolling codeº garage door opener sig-
nal. You will need to proceed with the
next steps to train the HomeLink to
complete the programming which may
require a ladder and another person for
convenience.
6. Push and release the training button
located on the garage door opener's
motor to activate the ªtraining modeº.
This button is usually located near the
antenna wire that hangs down from
the motor. If the wire originates from
under a light lens, you will need to re-
move the lens to access the training
button.
NOTE:
Once you have pushed and released the
training button on the garage door open-
er's motor and the ªtraining lightº is lit,
you have 30 seconds in which to perform
step 7. Use the help of a second person for
convenience to assist when performing
this step. 7. Quickly within 30 seconds of pushing
and releasing the garage door opener
program button, firmly push and re-
lease the HomeLink button you've
just programmed. Push and release
the HomeLink button up to three
times to complete the training.
8. Your HomeLink button should now be
programmed.
To program the remaining HomeLink
buttons for additional door or gate
openers, follow steps 2-8 only.
NOTE:
Do not repeat step one unless you want to
ªclearº all previously programmed
HomeLink buttons.
If you have any questions or are having
difficulty programming your HomeLink
buttons, refer to the HomeLink web site
at: www.homelink.com or call 1-800-355-
3515.
PROGRAMMING HomeLink FOR
CANADIAN CUSTOMERS Prior to 1992, D.O.C. regulations required
hand-held transmitters to stop transmit-
ting after 2 seconds. To program your
hand-held transmitter to HomeLink , con-SIC3011
2-48 Instruments and controls
w 06.1.4/V35-D/V5.0
X
Page 121 of 344
tinue to push and hold the HomeLink
button (note steps 2 through 4 under
ªProgramming HomeLink º) while you
push and re-push (ªcycleº) your hand-
held transmitter every 2 seconds until the
indicator light flashes rapidly (indicating
successful programming).
NOTE:
If programming a garage door opener, etc.,
it is advised to unplug the device during
the ªcyclingº process to prevent possible
damage to the garage door opener compo-
nents.
OPERATING THE HomeLink
UNIVERSAL TRANSCEIVER The HomeLink Universal Transceiver
(once programmed) may now be used to
activate the garage door, etc. To operate,
simply push the appropriate programmed
HomeLink Universal Transceiver button.
The red indicator light will illuminate
while the signal is being transmitted.
PROGRAMMING
TROUBLE-DIAGNOSIS If the HomeLink does not quickly learn
the hand-held transmitter information:
O replace the hand-held transmitter bat-
teries with new batteries. O position the hand-held transmitter
with its battery area facing away from
the HomeLink surface.
O push and hold both the HomeLink
and hand-held transmitter buttons
without interruption.
O position the hand-held transmitter 2
to 5 inches (50 to 127 mm) away from
the HomeLink surface. Hold the
transmitter in that position for up to 15
seconds. If HomeLink is not pro-
grammed within that time, try holding
the transmitter in another position -
keeping the indicator light in view at
all times.
If you continue to have programming diffi-
culties, please contact the INFINITI Con-
sumer Affairs Department. The phone
numbers are located in the Foreword of
this Owner's Manual.
CLEARING THE PROGRAMMED
INFORMATION Individual buttons cannot be cleared,
however to clear all programming, push
and hold the two outside buttons and re-
lease when the indicator light begins to
flash (approximately 20 seconds). REPROGRAMMING A SINGLE
HomeLink
BUTTON To reprogram a HomeLink Universal
Transceiver button, complete the fol-
lowing.
1. Push and hold the desired HomeLink
button. Do not release the button until
step 4 has been completed.
2. When the indicator light begins to
flash slowly (after 20 seconds), posi-
tion the hand-held transmitter 2 to 5
inches (50 to 127 mm) away from the
HomeLink surface.
3. Push and hold the hand-held trans-
mitter button.
4. The HomeLink indicator light will
flash, first slowly and then rapidly.
When the indicator light begins to
flash rapidly, release both buttons.
The HomeLink Universal Transceiver but-
ton has now been reprogrammed. The
new device can be activated by pushing
the HomeLink button that was just pro-
grammed. This procedure will not affect
any other programmed HomeLink but-
tons.
Instruments and controls
2-49
w 06.1.4/V35-D/V5.0
X
Page 130 of 344
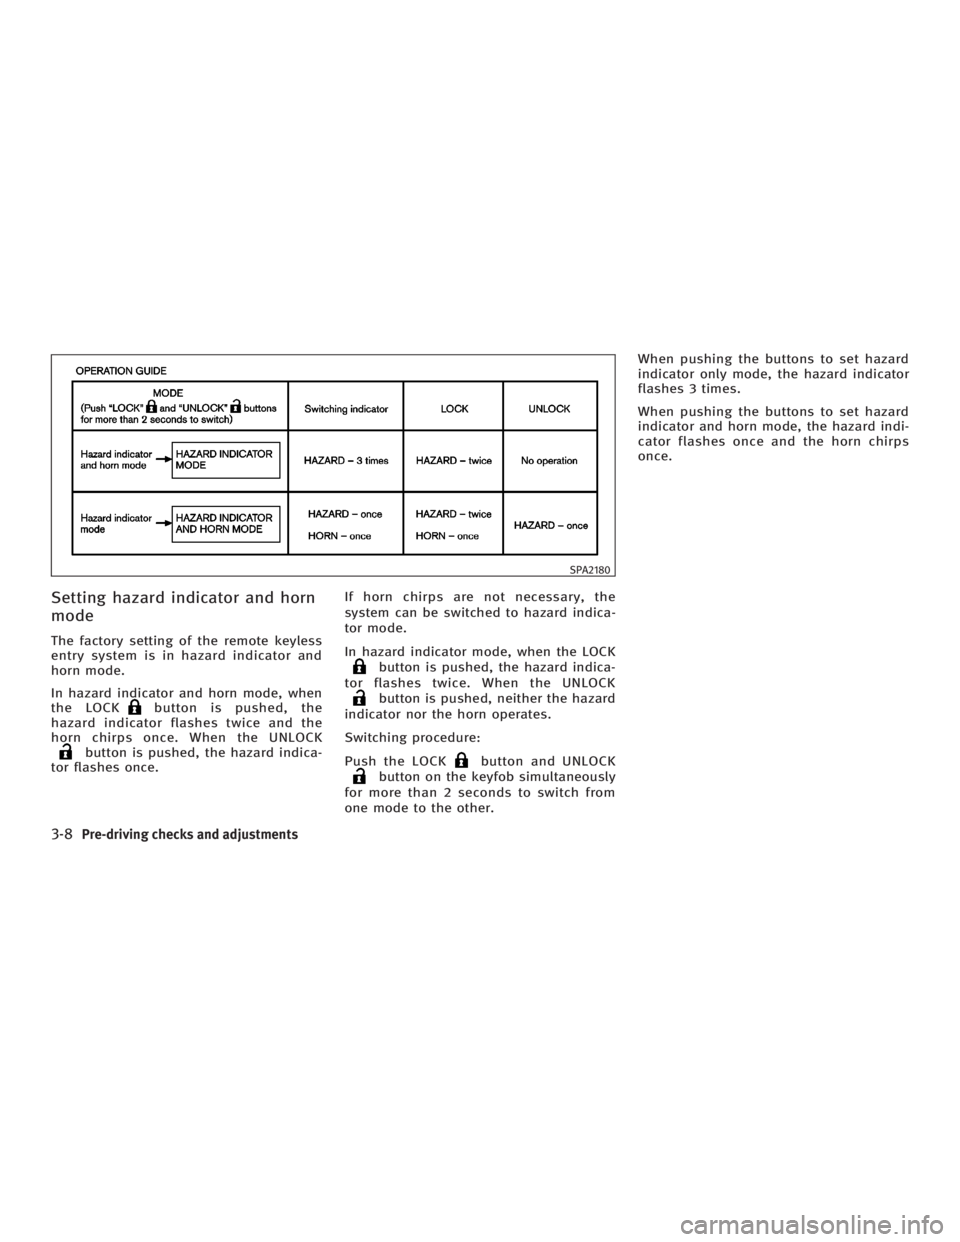
Setting hazard indicator and horn
mode The factory setting of the remote keyless
entry system is in hazard indicator and
horn mode.
In hazard indicator and horn mode, when
the LOCK button is pushed, the
hazard indicator flashes twice and the
horn chirps once. When the UNLOCK
button is pushed, the hazard indica-
tor flashes once. If horn chirps are not necessary, the
system can be switched to hazard indica-
tor mode.
In hazard indicator mode, when the LOCK
button is pushed, the hazard indica-
tor flashes twice. When the UNLOCK
button is pushed, neither the hazard
indicator nor the horn operates.
Switching procedure:
Push the LOCK button and UNLOCK
button on the keyfob simultaneously
for more than 2 seconds to switch from
one mode to the other. When pushing the buttons to set hazard
indicator only mode, the hazard indicator
flashes 3 times.
When pushing the buttons to set hazard
indicator and horn mode, the hazard indi-
cator flashes once and the horn chirps
once. SPA2180
3-8 Pre-driving checks and adjustments
w 06.1.4/V35-D/V5.0
X
Page 142 of 344
Troubleshooting examples When it is difficult to turn the ignition
switch
O Push the ignition switch and turn it to
the left and then to the right.
O While gently turning the steering
wheel to the left or right, turn the igni-
tion switch.
OPERATION WITH INTELLIGENT
REMOTE KEYLESS ENTRY SYSTEM It is possible to lock/unlock all doors,
fuel-filler door, activate the panic alarm
and open the windows by pushing the
buttons on the Intelligent Key from out-
side the vehicle.
Before locking the doors, make sure the
key is not left in the vehicle.
The LOCK /UNLOCK button on
the Intelligent Key can operate at a dis-
tance of approximately 33 ft (10 m) from
the vehicle. (The effective distance de-
pends upon the conditions around the ve-
hicle.)
As many as 4 Intelligent Keys can be used
with one vehicle. For information concern-
ing the purchase and use of additional In-
telligent Key, contact an INFINITI dealer. The lock and unlock buttons on the Intel-
ligent Key will not operate when:
O the Intelligent Key is too far away from
the vehicle
O the Intelligent Key battery runs down
After locking with the Intelligent remote
keyless entry function, pull the door
handle to make sure the doors are se-
curely locked.
The operating range varies depending on
the environment. To securely operate the
lock and unlock buttons, approach the ve-
hicle to about 3 ft (1 m) from the door.
The panic alarm will not activate when the
mechanical key or the valet key is in the ig-
nition switch.
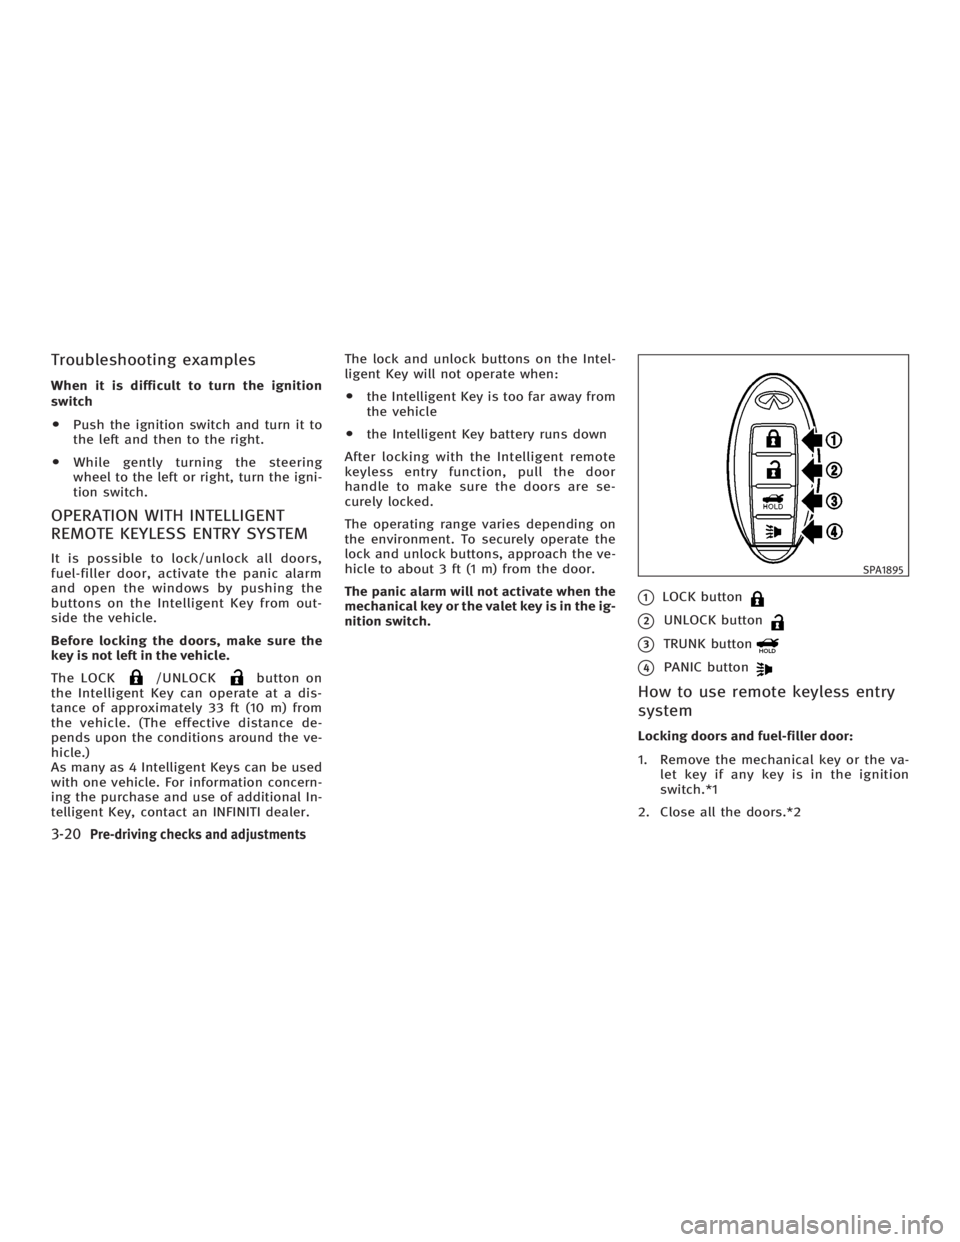
q 1
LOCK button
q 2
UNLOCK button
q 3
TRUNK button
q 4
PANIC button
How to use remote keyless entry
system Locking doors and fuel-filler door:
1. Remove the mechanical key or the va-
let key if any key is in the ignition
switch.*1
2. Close all the doors.*2 SPA1895
3-20 Pre-driving checks and adjustments
w 06.1.4/V35-D/V5.0
X
Page 145 of 344
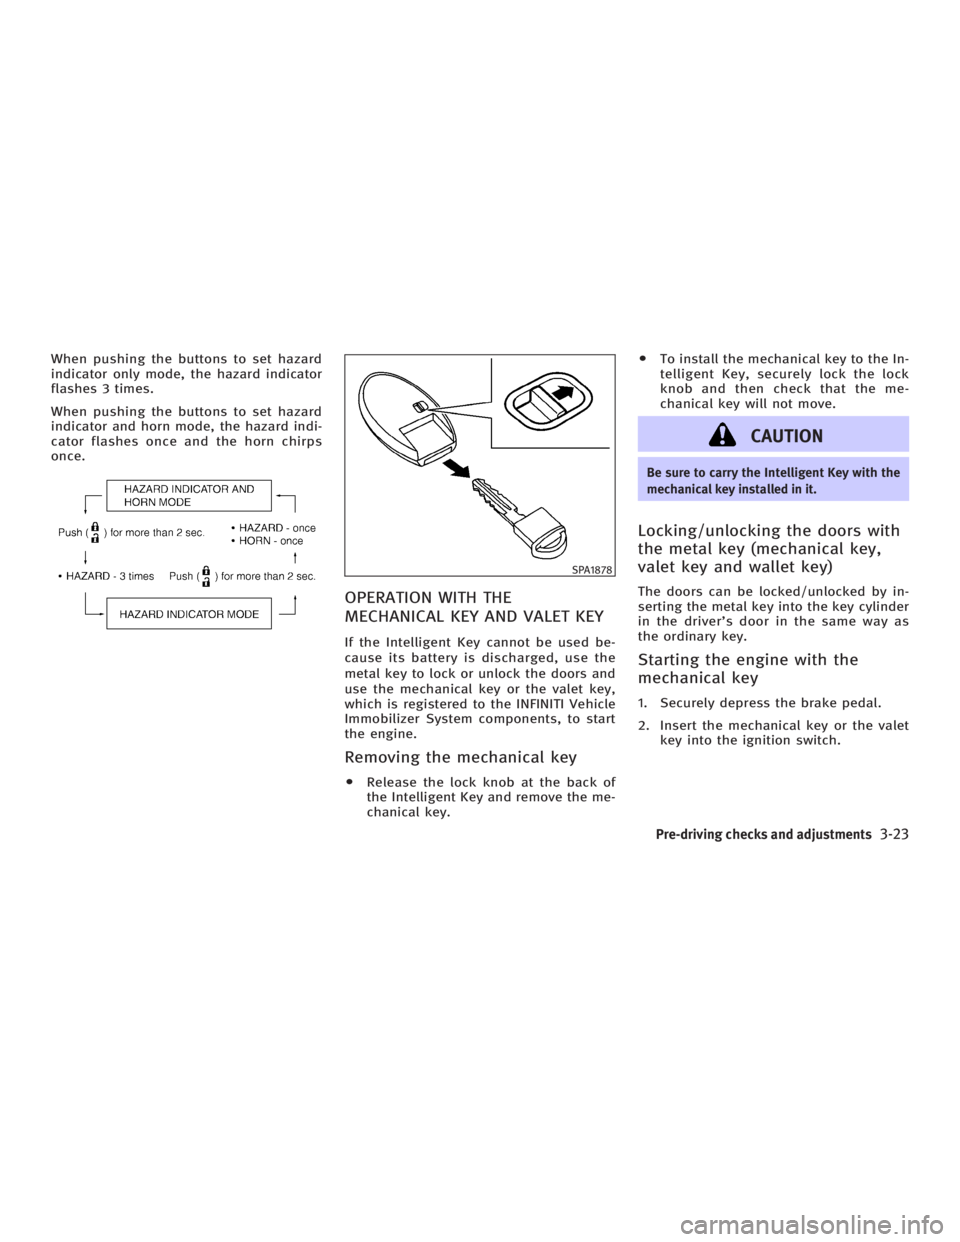
When pushing the buttons to set hazard
indicator only mode, the hazard indicator
flashes 3 times.
When pushing the buttons to set hazard
indicator and horn mode, the hazard indi-
cator flashes once and the horn chirps
once.
OPERATION WITH THE
MECHANICAL KEY AND VALET KEY If the Intelligent Key cannot be used be-
cause its battery is discharged, use the
metal key to lock or unlock the doors and
use the mechanical key or the valet key,
which is registered to the INFINITI Vehicle
Immobilizer System components, to start
the engine.
Removing the mechanical key O Release the lock knob at the back of
the Intelligent Key and remove the me-
chanical key. O To install the mechanical key to the In-
telligent Key, securely lock the lock
knob and then check that the me-
chanical key will not move.
CAUTION Be sure to carry the Intelligent Key with the
mechanical key installed in it.
Locking/unlocking the doors with
the metal key (mechanical key,
valet key and wallet key) The doors can be locked/unlocked by in-
serting the metal key into the key cylinder
in the driver's door in the same way as
the ordinary key.
Starting the engine with the
mechanical key 1. Securely depress the brake pedal.
2. Insert the mechanical key or the valet
key into the ignition switch. SPA1878
Pre-driving checks and adjustments
3-23
w 06.1.4/V35-D/V5.0
X
Page 161 of 344

4 Display screen, heater, air conditioner and
audio systems Safety note ....................................................... 4-2
Control panel buttons Ð with navigation
system ............................................................. 4-2
Names of the components .......................... 4-2
How to use joystick and ªENTERº button ..... 4-3
How to use ªBACKº button .......................... 4-3
Setting up the start-up screen..................... 4-3
How to use ªINFOº button ........................... 4-3
How to use ªSETTINGº button ..................... 4-7
How to use the
button ........................ 4-9
Ventilators........................................................ 4-9
Heater and air conditioner (Automatic)............ 4-10
Automatic operation ................................... 4-11
Manual operation....................................... 4-12
Dual button (if so equipped) ...................... 4-12
Ambient temperature ................................. 4-13
Operating tips............................................ 4-13
In-cabin microfilter..................................... 4-13
Servicing air conditioner ................................. 4-14 Audio system .................................................. 4-14
FM radio reception ..................................... 4-15
AM radio reception .................................... 4-15
Satellite radio reception (if so equipped) ... 4-15
Audio operation precautions ...................... 4-16
FM-AM-satellite radio with compact disc
(CD) changer ............................................. 4-22
CD care and cleaning ................................ 4-27
Steering wheel switch for audio control .... 4-28
Antenna .................................................... 4-29
Car phone or CB radio ................................... 4-29
Bluetooth
Hands-Free Phone System with
INFINITI Voice Recognition .............................. 4-30
Using the system ...................................... 4-32
Control buttons ......................................... 4-34
Getting started .......................................... 4-34
List of voice commands............................. 4-36
Speaker adaptation (SA) mode .................. 4-42
Troubleshooting guide .............................. 4-44
w 06.1.13/V35-D/V5.0
X
Page 162 of 344

WARNINGO Positioning of the heating or air condi-
tioning controls and display controls
should not be done while driving, in
order that full attention may be given to
driving operation.
O Do not disassemble or modify this
system. If you do, it may result in acci-
dents, fire, or electric shock.
O Do not use this system if you notice any
abnormality, such as a frozen screen or
lack of sound. Continued use of the
system may result in accident, fire or
electric shock.
O In case you notice any foreign object in
the system hardware, spill liquid on it, or
notice smoke or smell coming from it,
stop using the system immediately and
contact an INFINITI dealer. Ignoring such
conditions may lead to accidents, fire, or
electric shock. When you use this system, make sure the
engine is running.
If you use the system with the engine not
running (ignition ON or ACC) for a long
time, it will use up all the battery power,
and the engine will not start.
Reference symbols:
ªENTERº button Ð This is a button on the
control panel.
ª Display º key Ð This is a select key on
the screen. By selecting this key you can
proceed to the next function. NAMES OF THE COMPONENTS 1., 2., 5., 6., 9., 10. and 11.
For Navigation control buttons: refer to
the separate Navigation Owner's Manual.
3. ªSETTINGº button (P. 4-7)
4. ªINFOº button (P. 4-3)
7. Joystick and ªENTERº button (P. 4-3)
8. brightness control button
(P. 4-9)
12. ªBACKº button (P. 4-3) SAA1301
SAFETY NOTE
CONTROL PANEL BUTTONS Ð WITH
NAVIGATION SYSTEM
4-2 Display screen, heater, air conditioner and audio systems
w 06.1.4/V35-D/V5.0
X
Page 183 of 344

(With satellite radio)
AM ! FM1 ! FM2 ! SAT1 ! SAT2 ! AM
No satellite radio reception is available
unless optional satellite receiver and an-
tenna are installed and an XM or SIRI-
US TM
satellite radio service subscription
is active.
Satellite radio is not available in Alaska
and Hawaii.
When the RADIO band select button is
pushed while the ignition switch is in the
ACC or ON position, the radio will come
on at the station last played.
The last station/channel played will also
come on when the ON z OFF/VOL control
knob is pushed to ON.
If another audio source is playing when
the RADIO button is turned to ON, the
other audio source will automatically be
turned off and the last radio station
played will come on.
The FM stereo indicator ST will glow
during FM stereo reception. When the ste-
reo broadcast signal is weak, the radio
will automatically change from stereo to
monaural reception. TUNE (Tuning):
WARNING The radio should not be tuned while driving
so full attention may be given to vehicle op-
eration.
Push these buttons for manual tuning. To
move quickly through the channels, push
and hold either of the TUNE buttons down
for more than 0.5 second.
SEEK tuning:
For AM and FM radio:
Push the SEEK button or ,to
tune from high to low or low to high fre-
quencies and stops at the next broadcast-
ing station.
For satellite radio:
Push the SEEK button or to
seek channels of the next or previous cat-
egory. SCAN tuning:
Push the SCAN tuning button to tune from
low to high frequencies and stops at each
broadcasting station for 5 seconds. Push-
ing the button again during this 5 sec-
onds period will stop SCAN tuning and
the radio will remain tuned to that sta-
tion.
If the SCAN tuning button is not pushed
within 5 seconds, SCAN tuning moves to
the next station.
DISPLAY:
O By pushing the DISP button for more
than 1.5 seconds while receiving FM
radio waves, ªPS NAMEº switches be-
tween ON and OFF (Type A only).
O Pushing the DISP button will display
additional information about the satel-
lite radio broadcast (for example:
Artist name, Title).
Keep pushing the DISP button, and it
will change the information of the sat-
ellite radio broadcast to be displayed
as follows:
CH Number ! CH Name ! Artist
Name ! Song Title ! CH Number
Display screen, heater, air conditioner and audio systems
4-23
w 06.1.4/V35-D/V5.0
X