reset INFINITI JX 2013 Quick Reference Guide
[x] Cancel search | Manufacturer: INFINITI, Model Year: 2013, Model line: JX, Model: INFINITI JX 2013Pages: 36, PDF Size: 2.53 MB
Page 2 of 36
*See your Owner’s Manual for information.
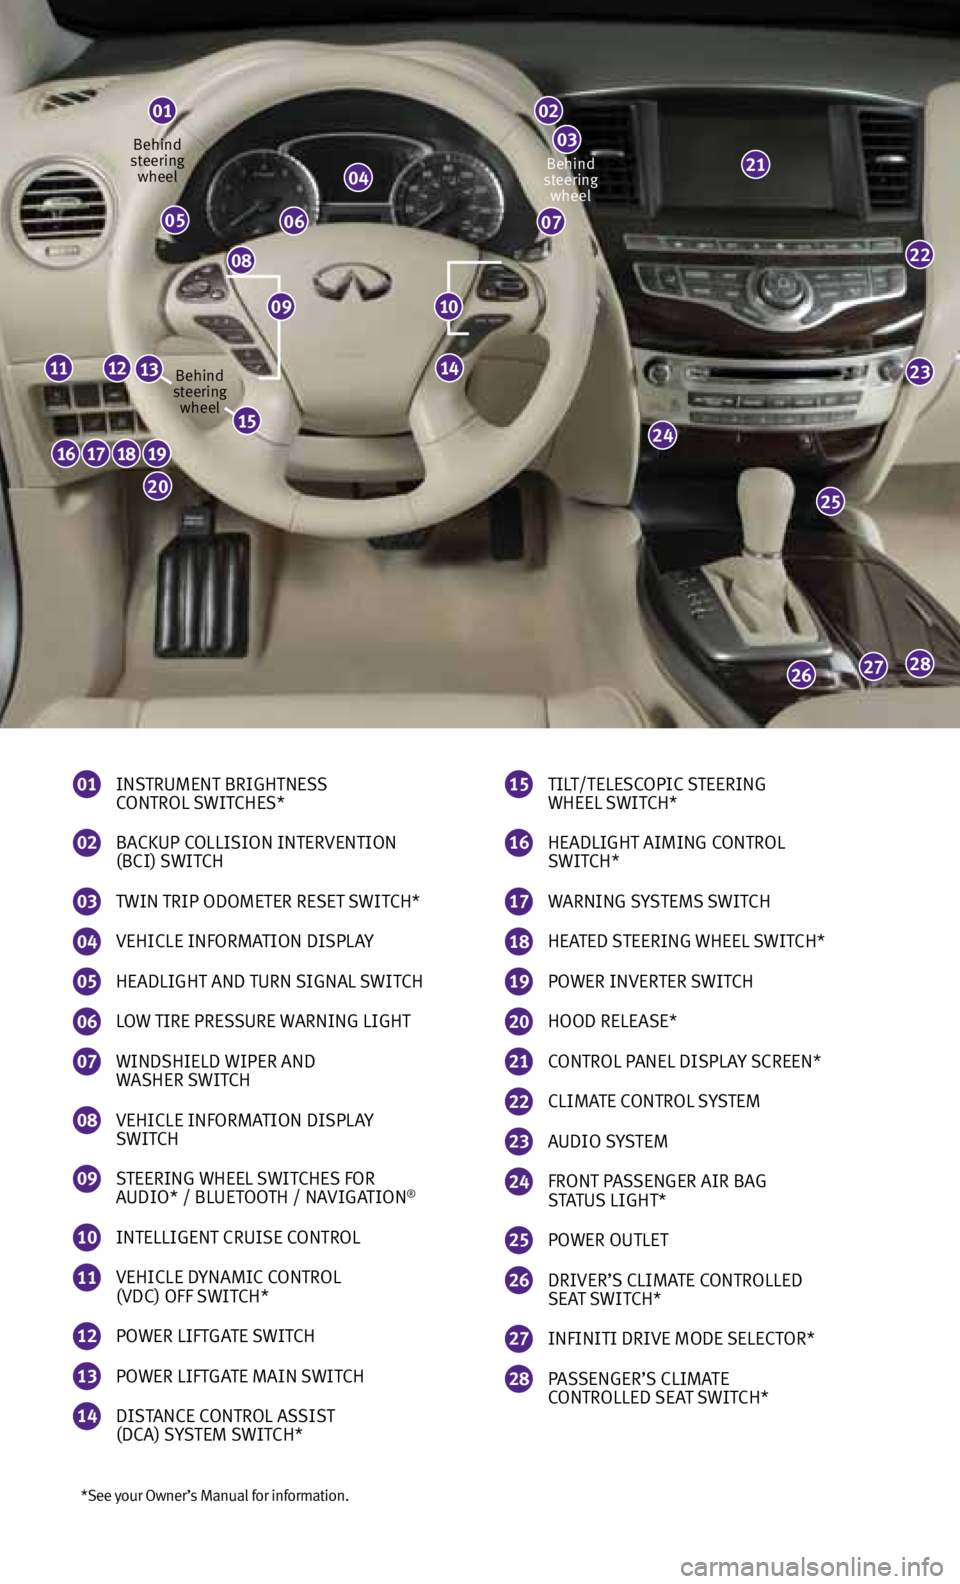
01
INSTRUMENT BRIGHTNESS
CONTROL SWITCHES*
02
BACKUP COLLISION INTERVENTION
(BCI) SWITCH
03
TWIN TRIP ODOMETER RESET SWITCH*
04
VEHICLE INfORMATION DISPLA y
05
HEADLIGHT AND TURN SIGNAL SWITCH
06
LOW TIRE PRESSURE WARNING LIGHT
07
WINDSHIELD WIPER AND
WASHER SWITCH
08
VEHICLE INfORMATION DISPLA y
SWITCH
09
STEERING WHEEL SWITCHES fOR
AUDIO* / BLUETOOTH / NAVIGATION®
10
INTELLIGENT CRUISE CONTROL
11
VEHICLE D yNAMIC CONTROL
(VDC) Off SWITCH*
12
POWER LIf TGATE SWITCH
13
POWER LIf TGATE MAIN SWITCH
14
DISTANCE CONTROL ASSIST
(DCA) S ySTEM SWITCH*
01
04
0605
08
07
22
23
25
24
282726
16171819
20
11121314
02
0321
15
TILT/TELESCOPIC STEERING
WHEEL SWITCH*
16
HEADLIGHT AIMING CONTROL
SWITCH*
17
WARNING S ySTEMS SWITCH
18
HEATED STEERING WHEEL SWITCH*
19
POWER INVERTER SWITCH
20
HOOD RELEASE*
21
CONTROL PANEL DISPLA y SCREEN*
22
CLIMATE CONTROL S ySTEM
23
AUDIO S ySTEM
24 fRONT PASSENGER AIR BAG
STATUS LIGHT*
25
POWER OUTLET
26
DRIVER’S CLIMATE CONTROLLED
SEAT SWITCH*
27
INfINITI DRIVE MODE SELECTOR*
28
PASSENGER’S CLIMATE
CONTROLLED SEAT SWITCH*
1009
Behind
steering wheel
Behind
steering wheel Behind
steering wheel
15
Page 9 of 36
essential information
Loose Fuel Cap
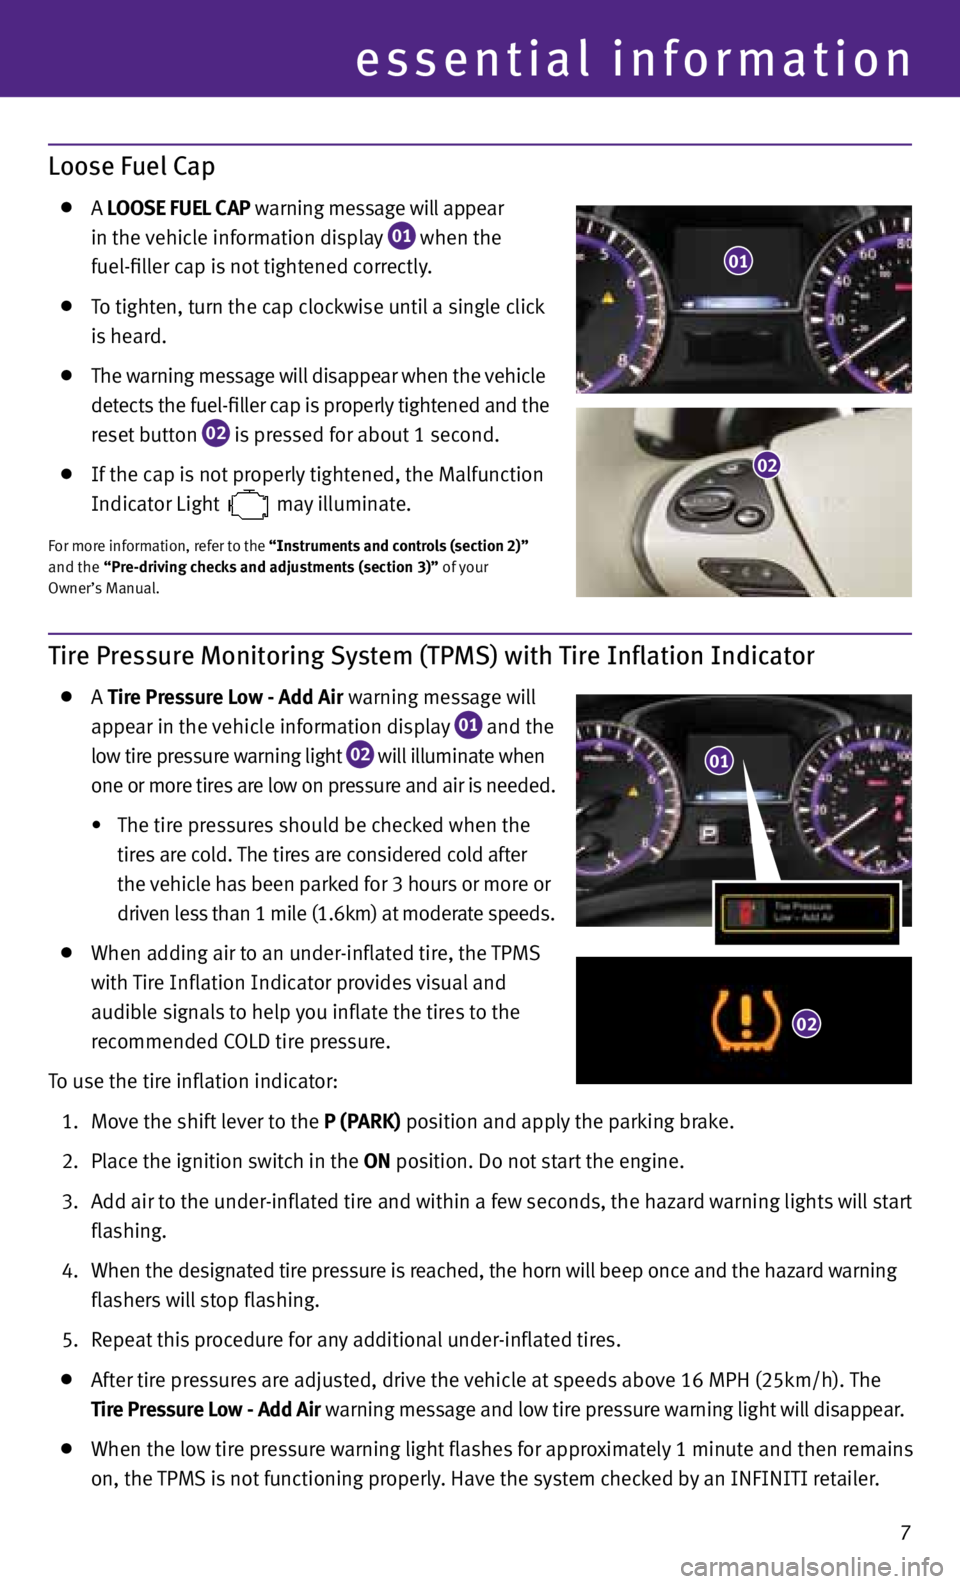
A LOOSE FUEL CAP warning message will appear
in the vehicle information display
01 when the
fuel-filler cap is not tightened correctly.
To tighten, turn the cap clockwise until a single click
is heard.
The warning message will disappear when the vehicle
detects the fuel-filler cap is properly tightened and the
reset button
02 is pressed for about 1 second.
If the cap is not properly tightened, the Malfunction
Indicator Light
may illuminate.
f
or more information, refer to the “Instruments and controls (section 2)”
and the “Pre-driving checks and adjustments (section 3)” of your
Owner’s Manual.
Tire Pressure Monitoring System (TPMS) with Tire Inflation Indicator
A Tire Pressure Low - Add Air warning message will
appear in the vehicle information display
01 and the
low tire pressure warning light
02 will illuminate when
one or more tires are low on pressure and air is needed.
• The tire pressures should be checked when the
tires are cold. The tires are considered cold after
the vehicle has been parked for 3 hours or more or
driven less than 1 mile (1.6km) at moderate speeds.
When adding air to an under-inflated tire, the TPMS
with Tire Inflation Indicator provides visual and
audible signals to help you inflate the tires to the
recommended COLD tire pressure.
To use the tire inflation indicator:
1. Move the shift lever to the P (PARK) position and apply the parking brake.
2. Place the ignition switch in the ON position. Do not start the engine.
3. Add air to the under-inflated tire and within a few seconds, the hazard warning lights will start
flashing.
4. When the designated tire pressure is reached, the horn will beep once and the hazard warning
flashers will stop flashing.
5. Repeat this procedure for any additional under-inflated tires.
After tire pressures are adjusted, drive the vehicle at speeds above 16 MPH (25km/h). The
Tire Pressure Low - Add Air warning message and low tire pressure warning light will disappear.
When the low tire pressure warning light flashes for approximately 1 minute and then remains
on, the TPMS is not functioning properly. Have the system checked by an INfINITI retailer.
01
01
02
7
02
Page 21 of 36
19
USB/iPod® Interface
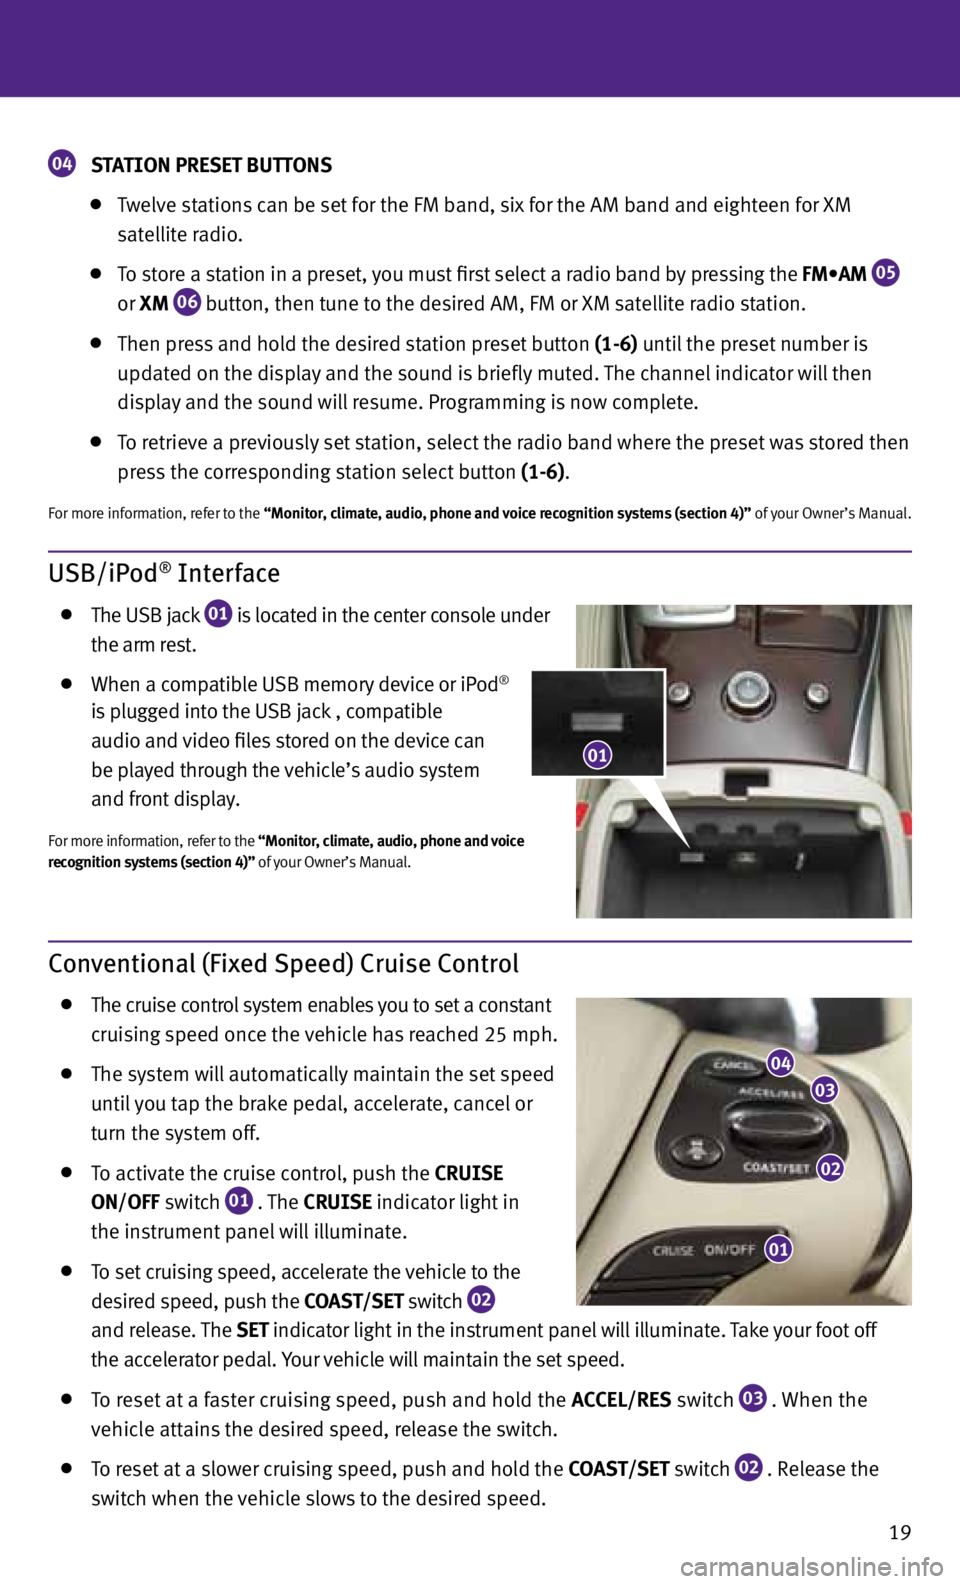
The USB jack
01 is located in the center console under
the arm rest.
When a compatible USB memory device or iPod®
is plugged into the USB jack
, compatible
audio and video files stored on the device can
be played through the vehicle’s audio system
and front display.
for more information, refer to the “Monitor, climate, audio, phone and voice
recognition systems (section 4)” of your Owner’s Manual.
Conventional (Fixed Speed) Cruise Control
The cruise control system enables you to set a constant
cruising speed once the vehicle has reached 25 mph.
The system will automatically maintain the set speed
until you tap the brake pedal, accelerate, cancel or
turn the system off.
To activate the cruise control, push the
CRUISE
ON/OFF switch
01 . The
CRUISE
indicator light in
the instrument panel will illuminate.
To set cruising speed, accelerate the vehicle to the
desired speed, push the COAST/SET switch
02
and release. The
SET
indicator light
in the instrument panel will illuminate. Take your foot off
the accelerator pedal. your vehicle will maintain the set speed.
To reset at a faster cruising speed, push and hold the ACCEL/RES switch
03 . When the
vehicle attains the desired speed, release the switch.
To reset at a slower cruising speed, push and hold the COAST/SET switch
02 . Release the
switch when the vehicle slows to the desired speed.
01
02
03
04
01
04 STATION PRESET BUTTONS
Twelve stations can be set for the fM band, six for the AM band and eighteen for XM
satellite radio.
To store a station in a preset, you must first select a radio band by pressing the FM•AM
05
or
XM
06 button, then tune to the desired AM, fM or XM satellite radio station.
Then press and hold the desired station preset button (1-6) until the preset number is
updated on the display and the sound is briefly muted. The channel indicator will then
display and the sound will resume. Programming is now complete.
To retrieve a previously set station, select the radio band where the preset was stored then
press the corresponding station select button (1-6).
for more information, refer to the “Monitor, climate, audio, phone and voice recognition systems (section 4)” of your Owner’s Manual.
Page 22 of 36
20
first drive features
Intelligent Cruise Control (ICC) System (if so equipped)
VEHICLE-TO-VEHICLE DISTANCE CONTROL MODE
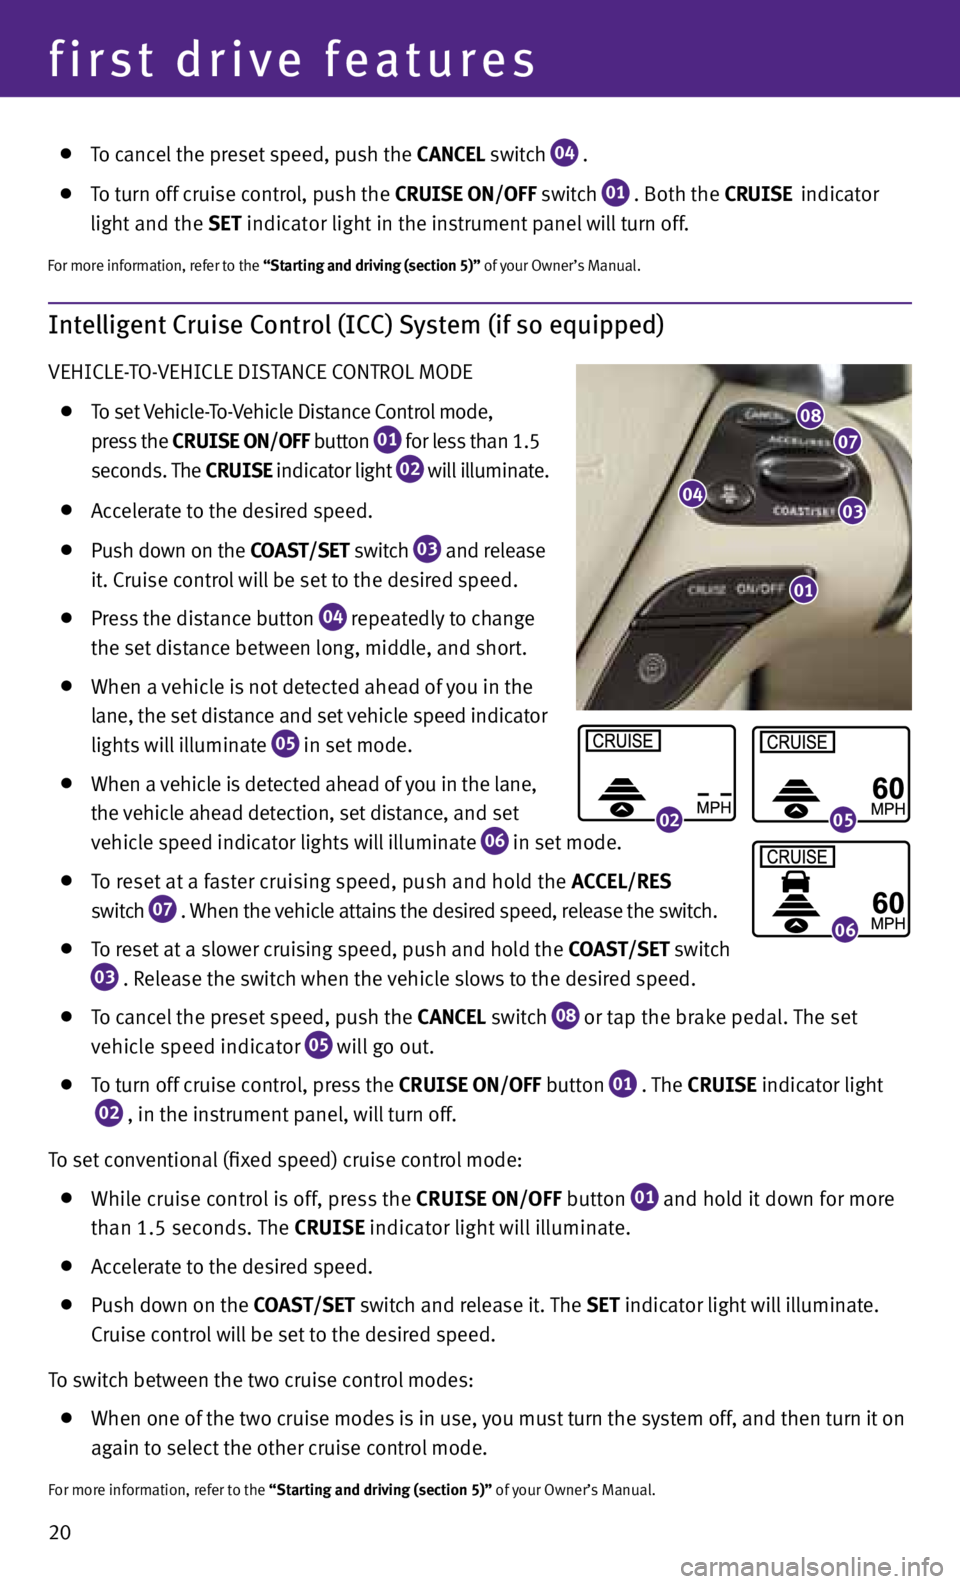
To set Vehicle-To-Vehicle Distance Control mode,
press the CRUISE ON/OFF button
01 for less than 1.5
seconds. The CRUISE indicator light
02 will illuminate.
Accelerate to the desired speed.
Push down on the COAST/SET switch
03 and release
it. Cruise control will be set to the desired speed.
Press the distance button
04 repeatedly to change
the set distance between long, middle, and short.
When a vehicle is not detected ahead of you in the
lane, the set distance and set vehicle speed indicator
lights will illuminate
05 in set mode.
When a vehicle is detected ahead of you in the lane,
the vehicle ahead detection, set distance, and set
vehicle speed indicator lights will illuminate
06 in set mode.
To reset at a faster cruising speed, push and hold the ACCEL/RES
switch
07 . When the vehicle attains the desired speed, release the switch.
To reset at a slower cruising speed, push and hold the COAST/SET switch
03 . Release the switch when the vehicle slows to the desired speed.
To cancel the preset speed, push the CANCEL switch
08 or tap the brake pedal. The set
vehicle speed indicator
05 will go out.
To turn off cruise control, press the CRUISE ON/OFF button
01 . The
CRUISE indicator light
02 , in the instrument panel, will turn off.
To set conventional (fixed speed) cruise control mode:
While cruise control is off, press the CRUISE ON/OFF
button
01 and hold it down for more
than 1.5 seconds. The CRUISE indicator light will illuminate.
Accelerate to the desired speed.
Push down on the COAST/SET switch and release it. The SET indicator light will illuminate.
Cruise control will be set to the desired speed.
To switch between the two cruise control modes:
When one of the two cruise modes is in use, you must turn the system off, and then turn it on
again to select the other cruise control mode.
for more information, refer to the “Starting and driving (section 5)” of your Owner’s Manual.
01
0403
0708
0205
06
To cancel the preset speed, push the CANCEL switch
04 .
To turn off cruise control, push the CRUISE
ON/OFF switch
01 . Both the
CRUISE indicator
light
and the SET
indicator light in the instrument panel will turn off.
for more information, refer to the “Starting and driving (section 5)” of your Owner’s Manual.
Page 24 of 36
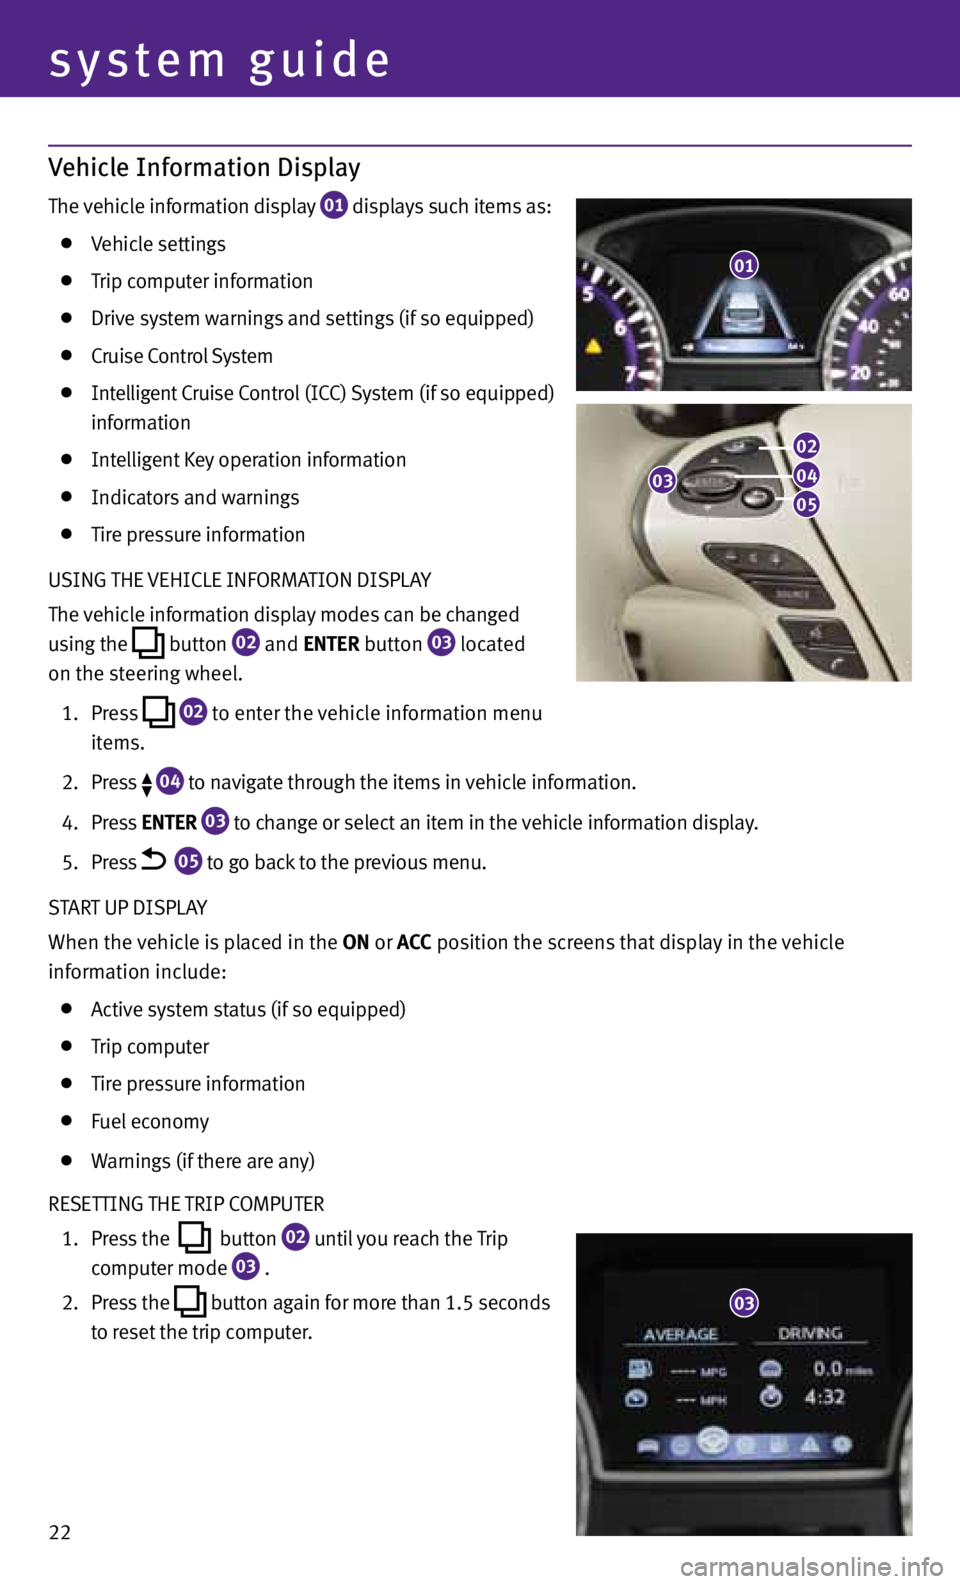
Vehicle Information Display
The vehicle information display 01 displays such items as:
Vehicle settings
Trip computer information
Drive system warnings and settings (if so equipped)
Cruise Control System
Intelligent Cruise Control (ICC) System (if so equipped)
information
Intelligent Key operation information
Indicators and warnings
Tire pressure information
USING THE VEHICLE INfORMATION DISPLA y
The vehicle information display modes can be changed
using the
button
02 and
ENTER button
03 located
on the steering wheel.
1. Press
02 to enter the vehicle information menu
items.
2. Press
04 to navigate through the items in vehicle information.
4. Press ENTER
03 to change or select an item in the vehicle information display.
5. Press
05 to go back to the previous menu.
START UP DISPLA y
When the vehicle is placed in the ON or ACC position the screens that display in the vehicle
information include:
Active system status (if so equipped)
Trip computer
Tire pressure information
fuel economy
Warnings (if there are any)
RESETTING THE TRIP COMPUTER
1. Press the
button
02 until you reach the Trip
computer mode
03 .
2. Press the
button again for more than 1.5 seconds
to reset the trip computer.
01
22
system guide
03
02
04
05
03