instrument panel INFINITI M 2013 Quick Reference Guide
[x] Cancel search | Manufacturer: INFINITI, Model Year: 2013, Model line: M, Model: INFINITI M 2013Pages: 28, PDF Size: 2.4 MB
Page 5 of 28

3
Automatic Anti-glare Mirrors
the inside rearview mirror and both outside mirrors are designed to automatically change
reflection according to the intensity of the headlights of the vehicle following you.
the anti-glare system will be automatically turned on when the ignition switch is in the ON position.
For more information, refer to the “Pre-driving checks and adjustments (section 3)” of your Owner’s Manual.
• If warranted, Roadside Assistance may also be used in conjunction with the emergency
Assistance service by pressing the SOS button.
My Schedule – Access your personal online Google c alendar™, hear details read via text-to-
speech** and select locations as a destination via the navigation system.
Report Stolen vehicle – A Response Specialist will attempt to obtain location information
from a reported stolen vehicle and provide that information to local law enforcement agencies
to assist in the recovery of your stolen vehicle.
Remote door Lock/unlock – Remotely access your vehicle via Infiniti c onnection Response
Specialist or designated website to remotely lock or unlock your vehicle.
Alarm notification – this system will notify you when the factory-installed vehicle alarm
system has been activated.
Scheduled Maintenance notification – Receive scheduled maintenance notifications based
on mileage data provided by your vehicle.
Maintenance Alert – Receive notification of a vehicle system malfunction that triggers
instrument panel warning lights.
destination Assistance – Receive point-of-interest assistance via guided IvR (Interactive
v oice Response), Response Specialist or Infiniti c onnection web portal.
destination Send-to vehicle – Find and download point-of interest information from
GoogleMaps™.
connected Search – Select “c onnected Search” from the d estination menu on the vehicle’s
navigation system to conduct a point-of-interest search within a certain distance of the
vehicle’s location.
drive Zone – Monitor the movement of your vehicle within a specified region. Set up boundaries
in the Monitoring section of the Infiniti c onnection web portal.
Max Speed Alert – Set up a maximum speed on the Infiniti c onnection web portal. you will
receive notifications if your vehicle exceeds the max speed setting.
Mobile Information Service (if so equipped) – Receive the latest news headlines, stock
quotes and sports scores by setting up preferences on the Mobile Information Service page
in the Infiniti c onnection web portal.
valet Alert – u se valet Alert to set up a 0.2 mile radius around your vehicle.
•
Activate alerts by pressing the “c onnect to voice Menu” button on the Infiniti c onnection
screen or by pressing the
key on the map screen.
•
At the prompt, say “v alet Alert” and then “Activate” or “d eactivate”.
**Laws in some communities may restrict the use of text-to-speech. check local regulations before using this feature.
For more information, refer to the “Viewing technical information (section 7)” of your navigation System Owner’s Manual.
Page 8 of 28

essential information
6
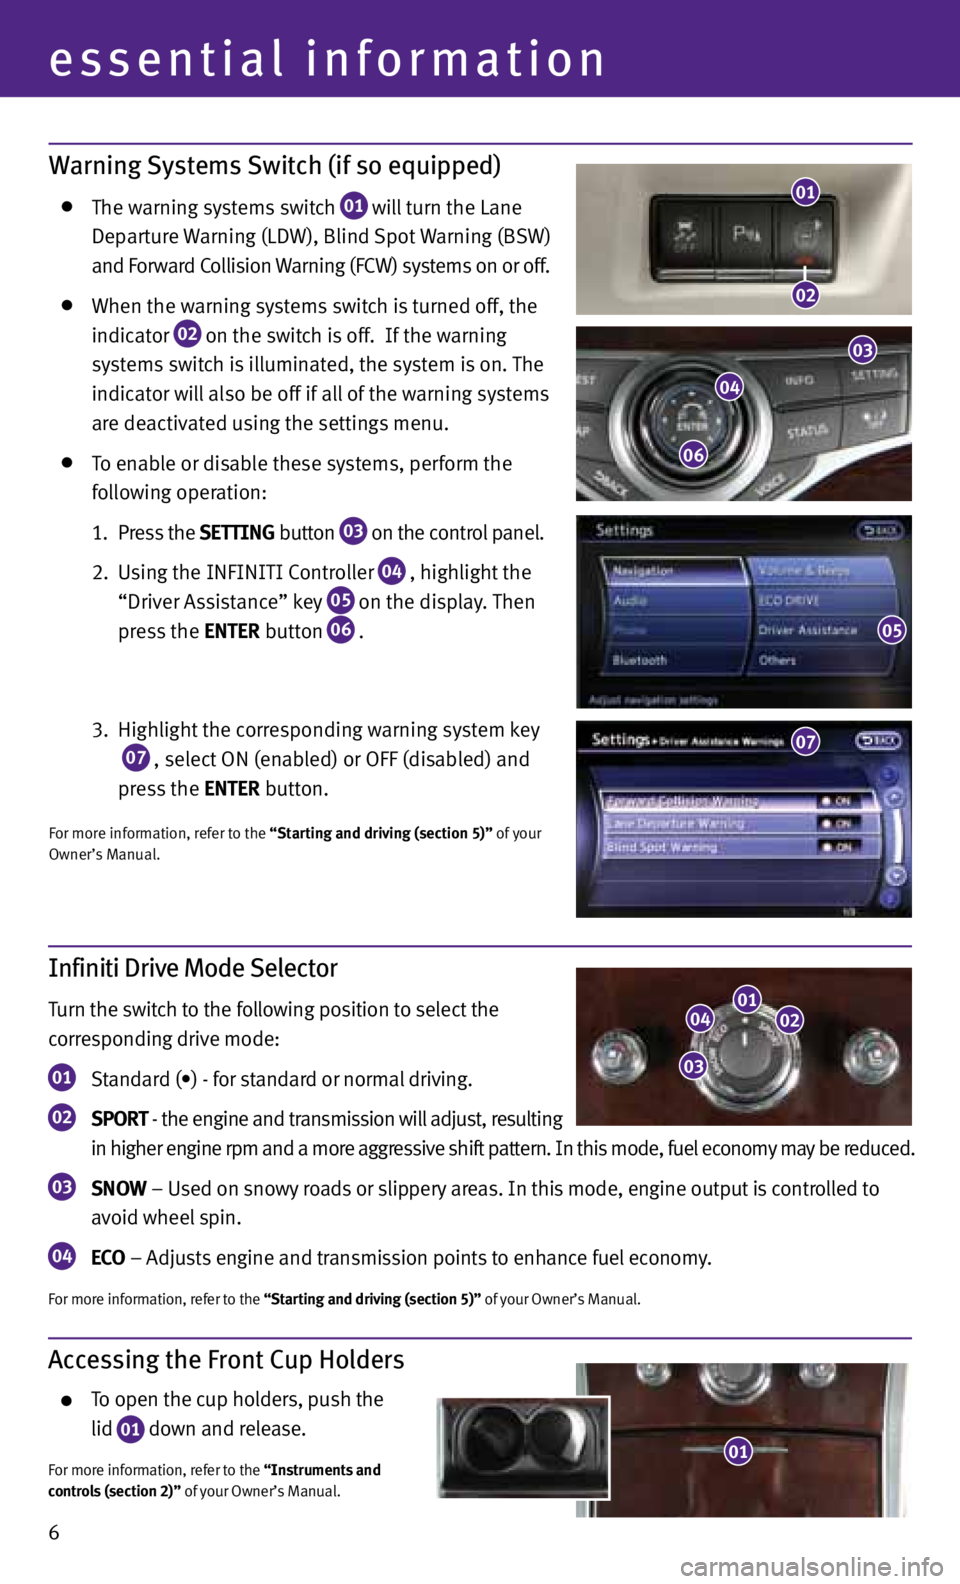
Warning Systems Switch (if so equipped)
the warning systems switch
01 will turn the Lane
d eparture warning (Ldw), Blind Spot warning (BS w)
and Forward c ollision warning (Fcw) systems on or off.
when the warning systems switch is turned off, the
indicator
02 on the switch is off. If the warning
systems switch is illuminated, the system is on. the
indicator will also be off if all of the warning systems
are deactivated using the settings menu.
to enable or disable these systems, perform the
following operation:
1. press the SEttING button
03 on the control panel.
2. using the InFInItI c ontroller
04 , highlight the
“driver Assistance” key
05 on the display.
then
press the ENtER button
06 .
3. highlight the corresponding warning system key
07 , select On (enabled) or OFF (disabled) and
press the ENtER button.
For more information, refer to the “Starting and driving (section 5)” of your
Owner’s Manual.
01
02
03
04
06
05
07
Accessing the Front Cup Holders
to open the cup holders, push the
lid
01 down and release.
For more information, refer to the “Instruments and
controls (section 2)” of your Owner’s Manual. 01
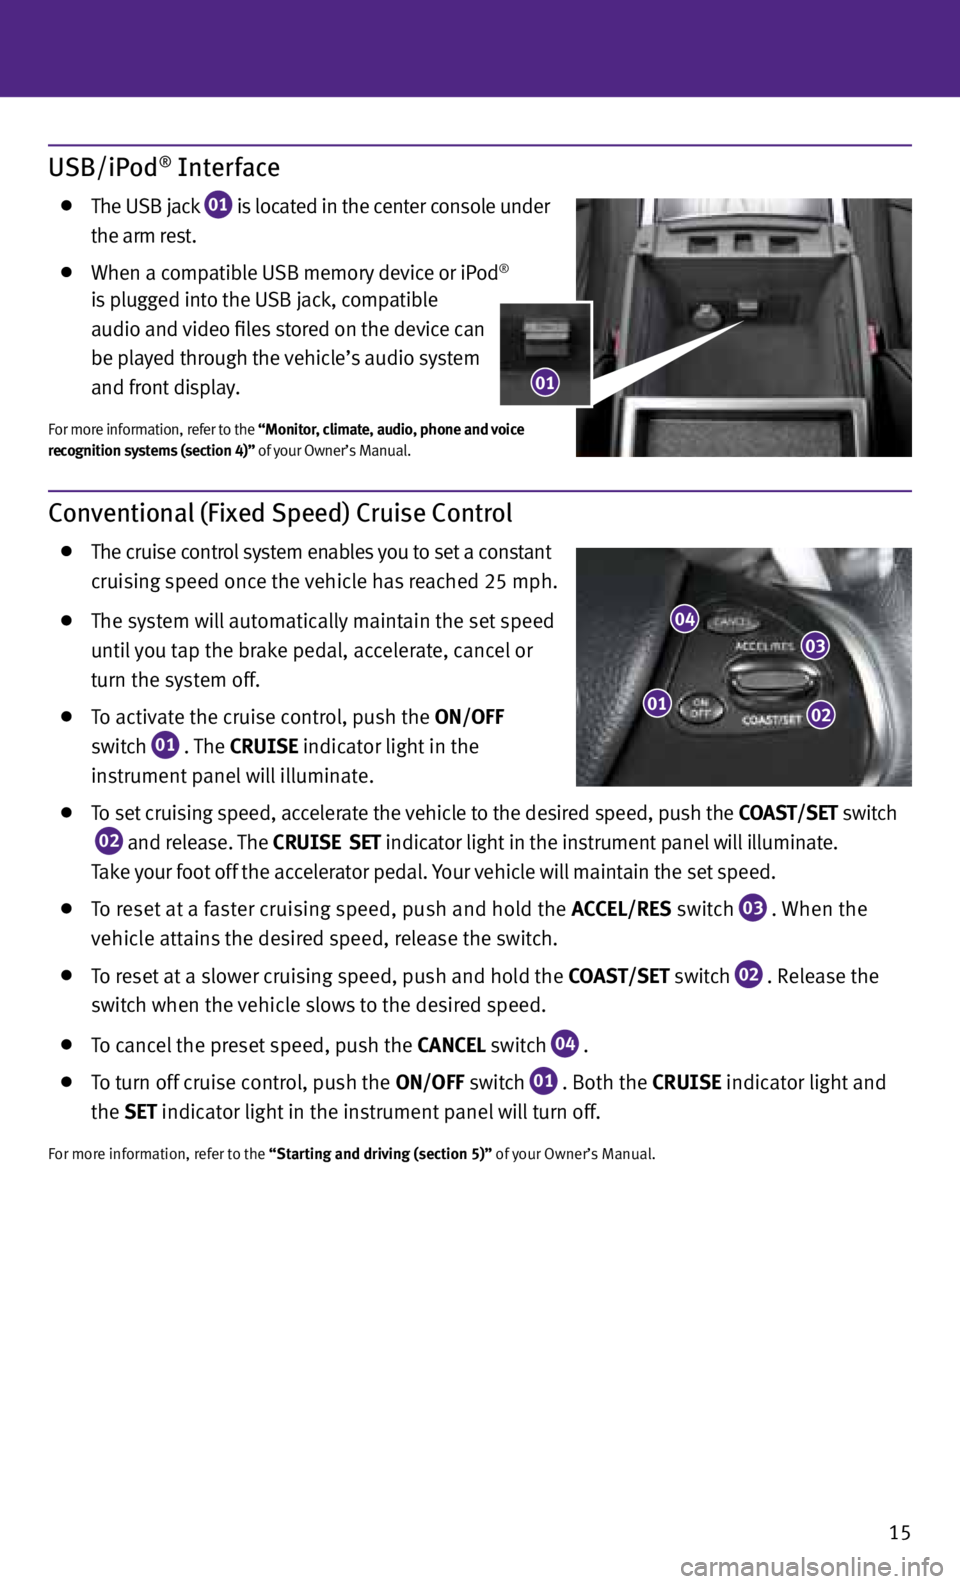
Infiniti Drive Mode Selector
turn the switch to the following position to select the
corresponding drive mode:
01 Standard (•) - for standard or normal
driving.
02 SPOR
t - the engine and transmission will adjust, resulting
in higher engine rpm and a more aggressive shift pattern. In this mode, fuel economy may be reduced.
03 SNOW – u
sed on snowy roads or slippery areas. In this mode, engine output is controlled to
avoid wheel spin.
04 ECO
– Adjusts engine and transmission points to enhance fuel economy.
For more information, refer to the “Starting and driving (section 5)” of your Owner’s Manual.
0102
03
04
Page 12 of 28

first drive features
10
Starting/Stopping the Engine
depress the brake pedal.
press the ignition switch S tAR t/S tOP button to
start the engine.
nOte: It is important to make sure the InFInItI Intelligent
key
™ is with you (that is, in your pocket or purse).
TURNING THE ENGINE OFF
Move the shift lever to the P (PARk) position and
apply the parking brake.
press the ignition switch S tAR t/S tOP button to turn the engine off.
eMeRGency enGIne Shut OFF
t o shut off the engine in an emergency situation while driving, perform one of the following procedures:
Rapidly push the push button ignition switch 3 consecutive times, or
push and hold the push button ignition switch for more than 2 seconds.
For more information, refer to the “Starting and driving (section 5)” of your Owner’s Manual.
Headlight Control Switch
heAdLIGht c OntROL
turn the headlight control switch to the
position
01 to turn on the front parking, side marker, tail, license
plate and instrument panel lights. turn the switch to
the
position
02 to turn on the headlights.
A ut OLIGht S yS teM
the autolight system will automatically turn the headlights on when it is dark and off when it is
light. the system will keep the headlights on for a period of time after you turn the ignition off
and all doors are closed.
to activate the autolight system, turn the headlight control switch to the AU tO position
03
then push the ignition switch to ON.
to deactivate the autolight system, turn the headlight
control switch to the OFF,
01 or
position
02 .
hIGh BeAM S eLect
push the headlight control switch forward
04 to
select the high beam function. the blue indicator light
illuminates in the instrument panel. p ull the
headlight switch back to the original position to
select the low beam. the blue indicator light goes off.
pull and release the headlight control switch
05 to
flash the headlight high beams on and off.
03
01
02
04
05
Page 17 of 28

15
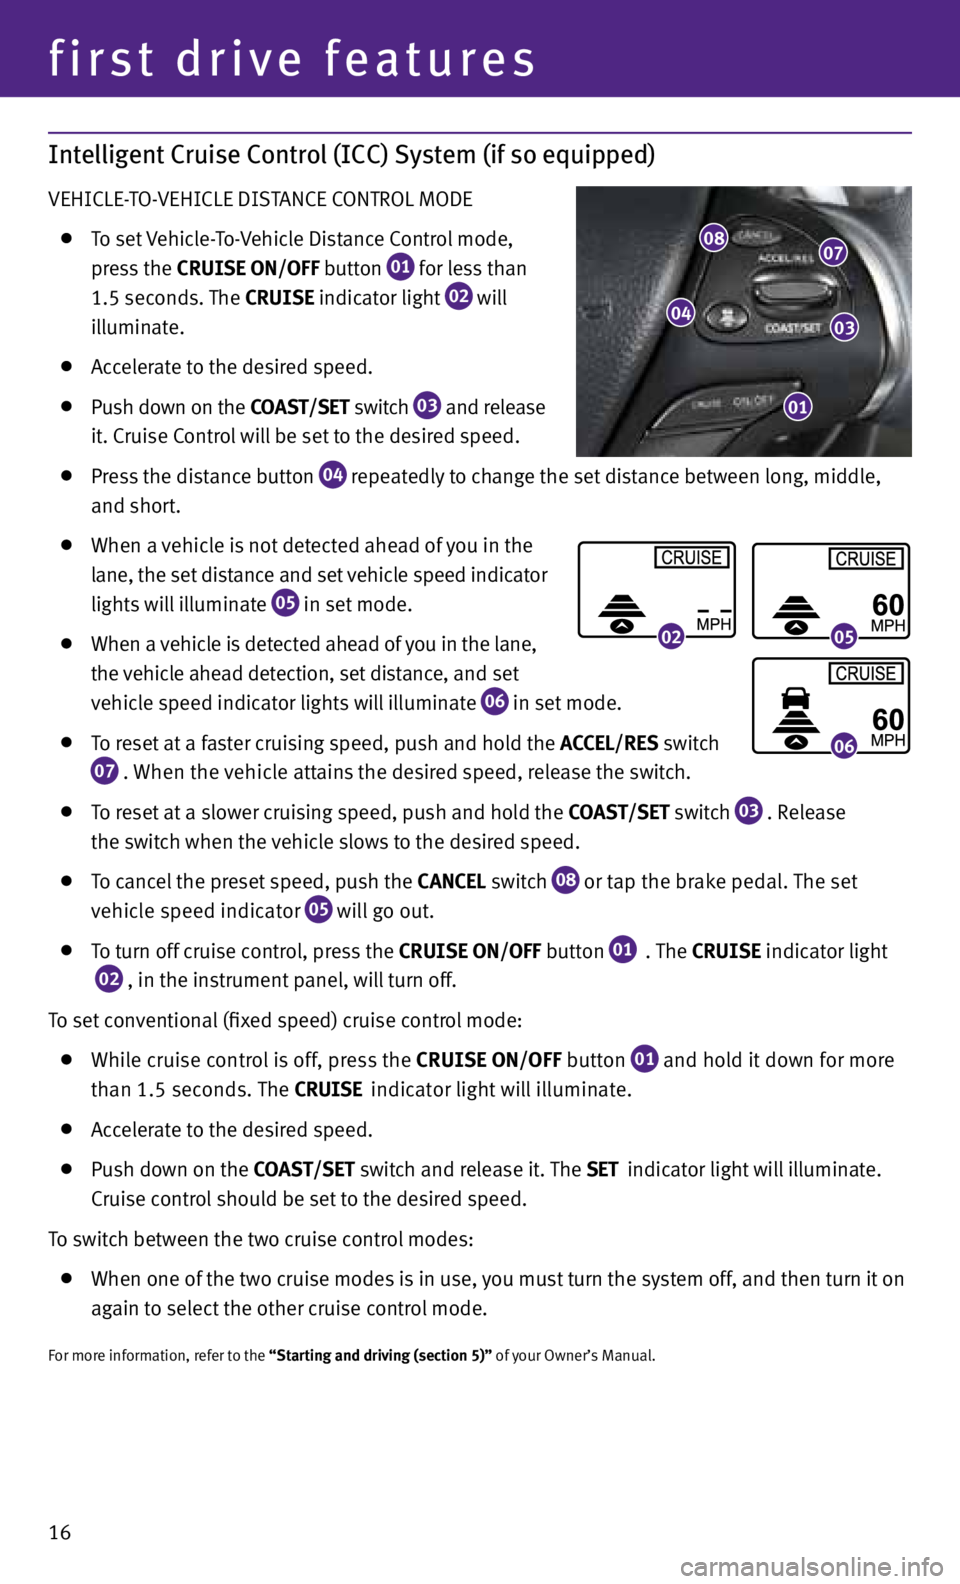
Conventional (Fixed Speed) Cruise Control
the cruise control system enables you to set a constant
cruising speed once the vehicle has reached 25 mph.
the system will automatically maintain the set speed
until you tap the brake pedal, accelerate, cancel or
turn the system off.
to activate the cruise control, push the ON/OFF
switch
01 . the
CRUISE
indicator light in the
instrument panel will illuminate.
to set cruising speed, accelerate the vehicle to the desired speed, push the COAS t/SEt switch
02 and release. the
CRUISE SEt
indicator light
in the instrument panel will illuminate.
t ake your foot off the accelerator pedal. your vehicle will maintain the set speed.
to reset at a faster cruising speed, push and hold the ACCEL/RES switch
03 . when the
vehicle attains the desired speed, release the switch.
to reset at a slower cruising speed, push and hold the COAS t/SEt switch
02 . Release the
switch when the vehicle slows to the desired speed.
to cancel the preset speed, push the CANCEL switch
04 .
to turn off cruise control, push the ON/OFF switch
01 . Both the CRUISE indicator light and
the SEt indicator light in the instrument panel will turn off.
For more information, refer to the “Starting and driving (section 5)” of your Owner’s Manual.
01
03
02
04
USB/iPod® Interface
the uSB jack
01 is located in the center console under
the arm rest.
when a compatible uSB memory device or ip od®
is plugged into the uSB jack, compatible
audio and video files stored on the device can
be played through the vehicle’s audio system
and front display.
For more information, refer to the “Monitor, climate, audio, phone and voice
recognition systems (section 4)” of your Owner’s Manual.
01
Page 18 of 28

first drive features
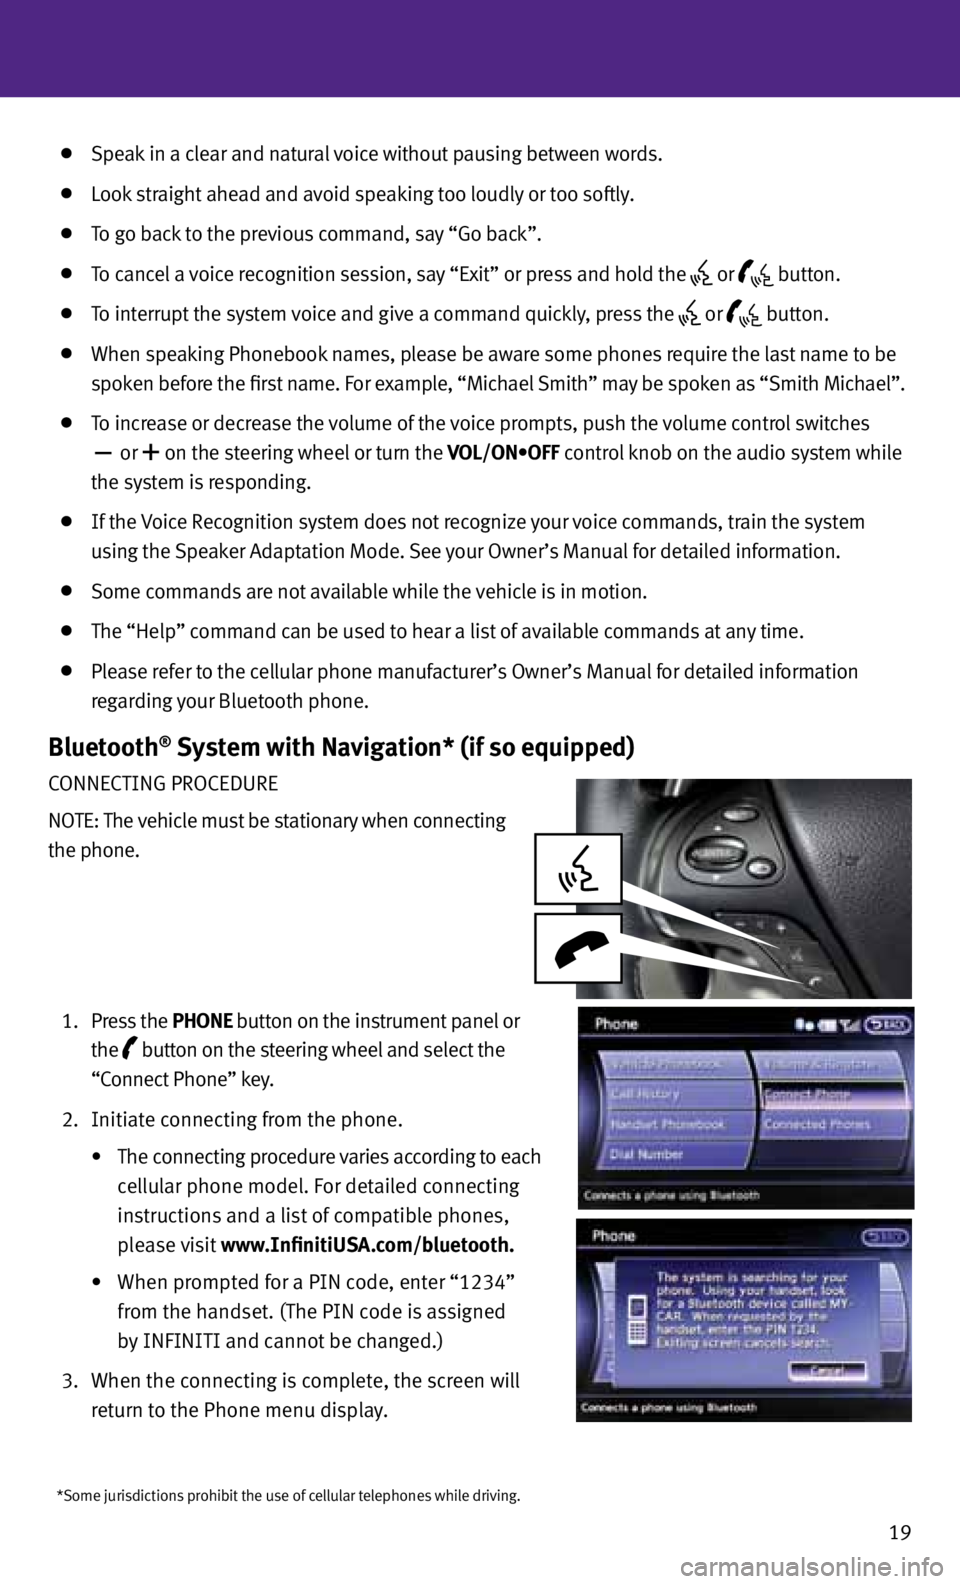
Intelligent Cruise Control (ICC) System (if so equipped)
vehIcLe-t O- vehIcLe dIStAnce cOntROL MOde
to set vehicle- to- vehicle distance c ontrol mode,
press the CRUISE ON/OFF button
01 for less than
1.5 seconds. the CRUISE indicator light
02 will
illuminate.
Accelerate to the desired speed.
push down on the COAS t/SEt switch
03 and release
it. cruise c ontrol will be set to the desired speed.
press the distance button
04 repeatedly to change the set distance between long, middle,
and short.
when a vehicle is not detected ahead of you in the
lane, the set distance and set vehicle speed indicator
lights will illuminate
05 in set mode.
when a vehicle is detected ahead of you in the lane,
the vehicle ahead detection, set distance, and set
vehicle speed indicator lights will illuminate
06 in set mode.
to reset at a faster cruising speed, push and hold the ACCEL/RES switch
07 . w
hen the vehicle attains the desired speed, release the switch.
to reset at a slower cruising speed, push and hold the COAS t/SEt switch
03 . Release
the switch when the vehicle slows to the desired speed.
to cancel the preset speed, push the CANCEL switch
08 or tap the brake pedal.
the set
vehicle speed indicator
05 will go out.
to turn off cruise control, press the CRUISE ON/OFF button
01 . the
CRUISE indicator light
02 , in the instrument panel, will turn off.
t o set conventional (fixed speed) cruise control mode:
while cruise control is off, press the CRUISE ON/OFF
button
01 and hold it down for more
than 1.5 seconds. the
CRUISE indicator light will illuminate.
Accelerate to the desired speed.
push down on the COAS t/SEt switch and release it. the SEt indicator light will illuminate.
c ruise control should be set to the desired speed.
t o switch between the two cruise control modes:
when one of the two cruise modes is in use, you must turn the system off, and then turn it on
again to select the other cruise control mode.
For more information, refer to the “Starting and driving (section 5)” of your Owner’s Manual.
0205
06
0807
03
01
04
16
Page 21 of 28

19
*Some jurisdictions prohibit the use of cellular telephones while driving.
Speak in a clear and natural voice without pausing between words.
Look straight ahead and avoid speaking too loudly or too softly.
to go back to the previous command, say “Go back”.
to cancel a voice recognition session, say “exit” or press and hold the
or
button.
to interrupt the system voice and give a command quickly, press the
or
button.
when speaking phonebook names, please be aware some phones require the last name to be
spoken before the first name. For example, “Michael Smith” may be spoken as “Smith Michael”.
to increase or decrease the volume of the voice prompts, push the volume control switches
or
+ on the steering wheel or turn the VOL/ON•OFF control knob on the audio system while
the system is responding.
If the voice Recognition system does not recognize your voice commands, train the system
using the Speaker Adaptation Mode. See your Owner’s Manual for detailed information.
Some commands are not available while the vehicle is in motion.
the “help” command can be used to hear a list of available commands at any time.
please refer to the cellular phone manufacturer’s Owner’s Manual for detailed information
regarding your Bluetooth phone.
Bluetooth® System with Navigation* (if so equipped)
cOnnectInG pROceduRe
nO te: the vehicle must be stationary when connecting
the phone.
1. press the PhONE button on the instrument panel or
the
button on the steering wheel and select the
“connect phone” key.
2. Initiate connecting from the phone.
• The connecting procedure varies according to each
cellular phone model. For detailed connecting
instructions and a list of compatible phones,
please visit www.InfinitiUSA.com/bluetooth.
• When prompted for a PIN code, enter “1234”
from the handset. (the pIn code is assigned
by InFInItI and cannot be changed.)
3. when the connecting is complete, the screen will
return to the phone menu display.