navigation system INFINITI M-HEV 2013 Workshop Manual
[x] Cancel search | Manufacturer: INFINITI, Model Year: 2013, Model line: M-HEV, Model: INFINITI M-HEV 2013Pages: 530, PDF Size: 3.71 MB
Page 264 of 530
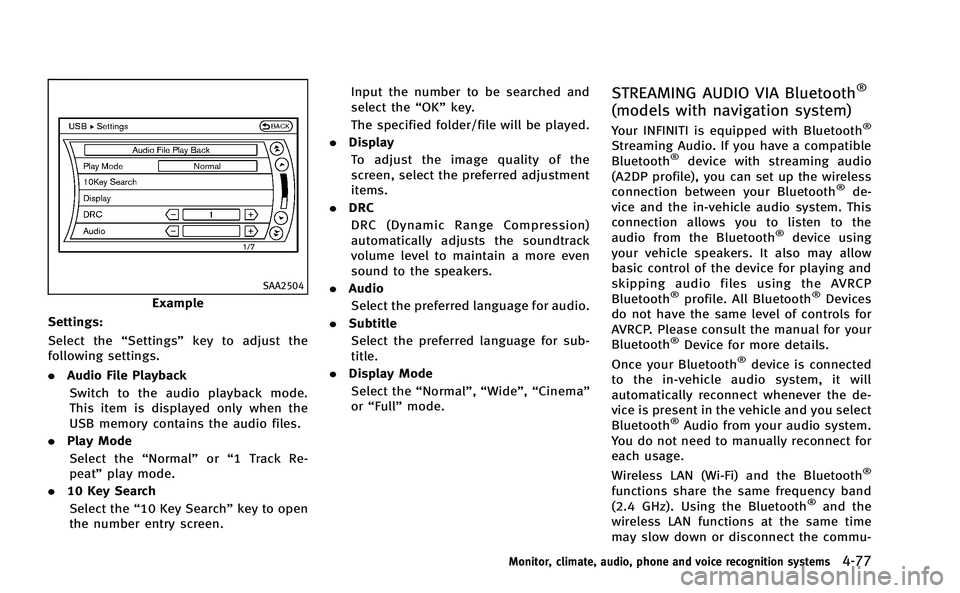
SAA2504
Example
Settings:
Select the “Settings”key to adjust the
following settings.
. Audio File Playback
Switch to the audio playback mode.
This item is displayed only when the
USB memory contains the audio files.
. Play Mode
Select the “Normal”or“1 Track Re-
peat” play mode.
. 10 Key Search
Select the “10 Key Search” key to open
the number entry screen. Input the number to be searched and
select the
“OK”key.
The specified folder/file will be played.
. Display
To adjust the image quality of the
screen, select the preferred adjustment
items.
. DRC
DRC (Dynamic Range Compression)
automatically adjusts the soundtrack
volume level to maintain a more even
sound to the speakers.
. Audio
Select the preferred language for audio.
. Subtitle
Select the preferred language for sub-
title.
. Display Mode
Select the “Normal”,“Wide”,“Cinema”
or “Full” mode.
STREAMING AUDIO VIA Bluetooth®
(models with navigation system)
Your INFINITI is equipped with Bluetooth®
Streaming Audio. If you have a compatible
Bluetooth®device with streaming audio
(A2DP profile), you can set up the wireless
connection between your Bluetooth
®de-
vice and the in-vehicle audio system. This
connection allows you to listen to the
audio from the Bluetooth
®device using
your vehicle speakers. It also may allow
basic control of the device for playing and
skipping audio files using the AVRCP
Bluetooth
®profile. All Bluetooth®Devices
do not have the same level of controls for
AVRCP. Please consult the manual for your
Bluetooth
®Device for more details.
Once your Bluetooth®device is connected
to the in-vehicle audio system, it will
automatically reconnect whenever the de-
vice is present in the vehicle and you select
Bluetooth
®Audio from your audio system.
You do not need to manually reconnect for
each usage.
Wireless LAN (Wi-Fi) and the Bluetooth
®
functions share the same frequency band
(2.4 GHz). Using the Bluetooth®and the
wireless LAN functions at the same time
may slow down or disconnect the commu-
Monitor, climate, audio, phone and voice recognition systems4-77
Page 269 of 530
4-82Monitor, climate, audio, phone and voice recognition systems
Connected Devices:
Registered devices are shown on the list.
Select a Bluetooth
®device from the list,
the following options will be available.
. Select
Select “Select” to connect the selected
device to the vehicle. If there is a
different device currently connected,
the selected device will replace the
current device.
. Edit
Rename the selected Bluetooth
®device
using the keypad displayed on the
screen. (See “How to use touch screen
(models with navigation system)” ear-
lier in this section.)
. Delete
Delete the selected Bluetooth
®device.
Edit Bluetooth Info:
Change the name broadcasted by this
system over Bluetooth
®. Change the PIN
code that is entered when connecting a
hands free device to this system.
Replace Connected Phone:
Replace the Bluetooth
®connection with a
connected Bluetooth®cellular phone. For
details about Hands-Free Phone System, see
“Bluetooth
®Hands-Free Phone System
(models with navigation system)” later in
this section.
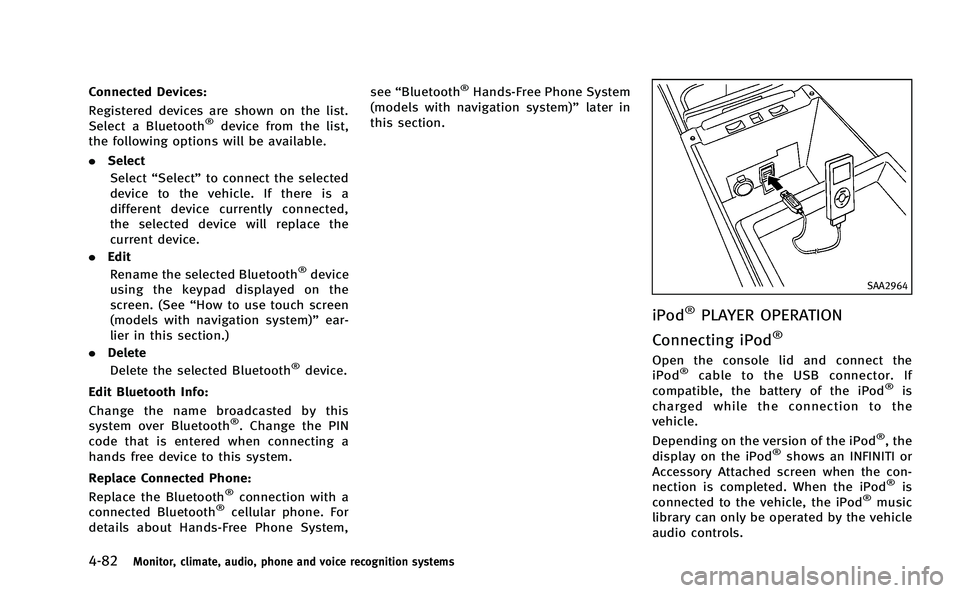
SAA2964
iPod®PLAYER OPERATION
Connecting iPod
®
Open the console lid and connect the
iPod®cable to the USB connector. If
compatible, the battery of the iPod®is
charged while the connection to the
vehicle.
Depending on the version of the iPod
®, the
display on the iPod®shows an INFINITI or
Accessory Attached screen when the con-
nection is completed. When the iPod
®is
connected to the vehicle, the iPod®music
library can only be operated by the vehicle
audio controls.
Page 270 of 530
* iPod®is a trademark of Apple Inc.,
registered in the U.S. and other
countries.
CAUTION
Do not close the tray lid with the iPod®
cable inserted. It may damage the tray lid
and the iPod®cable.
NOTE:
. Do not force the iPod®cable into the
USB port. Inserting the iPod®cable
tilted or up-side-down into the port
may damage the iPod
®cable and the
port. Make sure that the iPod®cable is
connected correctly into the USB port.
(Some iPod
®cable come with amark as a guide. Make sure that the
mark is facing the correct direction
before inserting the iPod
®cable.)
. Do not locate objects near the iPod®
cable to prevent the objects from
leaning on the iPod®cable and the
port. Pressure from the objects may
damage the iPod
®cable and the port.
Compatibility
The following models are available:
Models with navigation system:
. Fifth generation iPod
®(version 1.2.3 or
later)
. iPod Classic
®(version 1.1.1 or later)
. First generation iPod touch®(version
2.0.0 or later)
. Second generation iPod touch
®(firm-
ware version 1.2.3 or later)
. First generation iPod nano
®(firmware
version 1.3.1 or later)
. Second generation iPod nano
®(firm-
ware version 1.1.3 or later)
. Third generation iPod nano
®(firmware
version 1.1 or later)
. Fourth generation iPod nano
®(firmware
version 1.0.2 or later)
Models without navigation system:
. Fifth generation iPod
®(firmware ver-
sion 1.3)
. First generation iPod Classic
®(firmware
version 1.1.2 PC)
. Second generation iPod Classic
®(firm-
ware version 2.0 PC)
. First generation iPod touch
®(firmware
version 2.1) .
Second generation iPod touch
®(firm-
ware version 2.1.1)
. First generation iPod nano
®(firmware
version 1.3.1)
. Second generation iPod nano
®(firm-
ware version 1.1.3)
. Third generation iPod nano
®(firmware
version 1.1 PC)
. Third generation iPhone
®(firmware
version 2.1)
Make sure that the iPod
®version is
updated.
Audio main operation
Push the ignition switch to the ACC or ON
position. Then, push the DISC·AUX button
repeatedly to switch to the iPod
®mode.
If the system has been turned off while the
iPod
®was playing, pushing the ON·OFF
button will start the iPod®.
PLAY:
When the DISC·AUX button is pushed with
the system off and the iPod
®connected,
the system will turn on. If another audio
source is playing and the iPod
®is con-
nected, push the DISC·AUX button repeat-
edly until the center display changes to the
iPod
®mode.
Monitor, climate, audio, phone and voice recognition systems4-83
Page 272 of 530
trial use.
. A new disc may be rough on the inner
and outer edges. Remove the rough
edges by rubbing the inner and outer
edges with the side of a pen or pencil
as illustrated.
USB memory
. Never touch the terminal portion of the
USB memory.
. Do not place heavy objects on the USB
memory.
. Do not store the USB memory in highly
humid locations.
. Do not expose the USB memory to
direct sunlight.
. Do not spill any liquids on the USB
memory.
Refer to the USB memory Owner’s Manual
for the details.
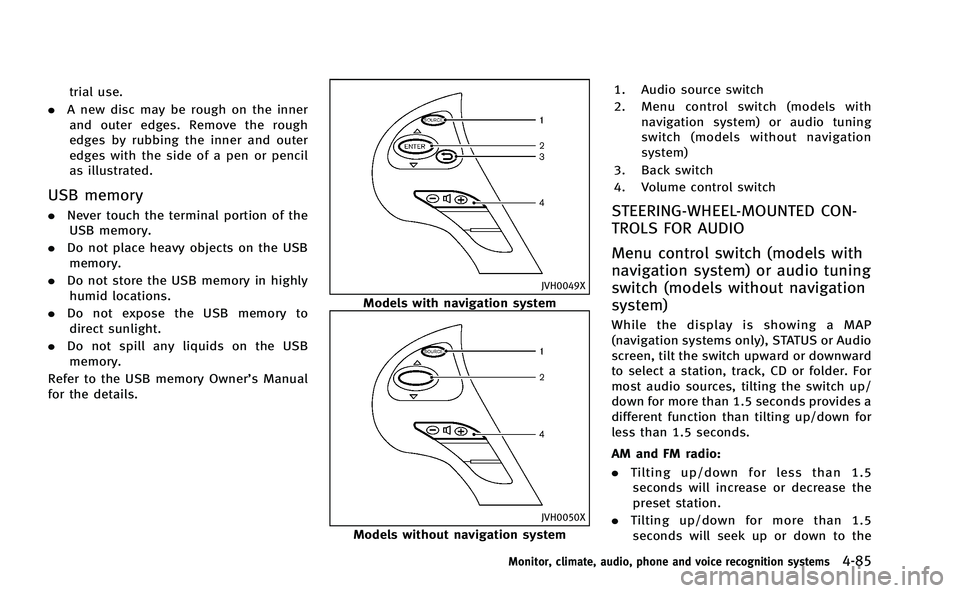
JVH0049X
Models with navigation system
JVH0050X
Models without navigation system 1. Audio source switch
2. Menu control switch (models with
navigation system) or audio tuning
switch (models without navigation
system)
3. Back switch
4. Volume control switch
STEERING-WHEEL-MOUNTED CON-
TROLS FOR AUDIO
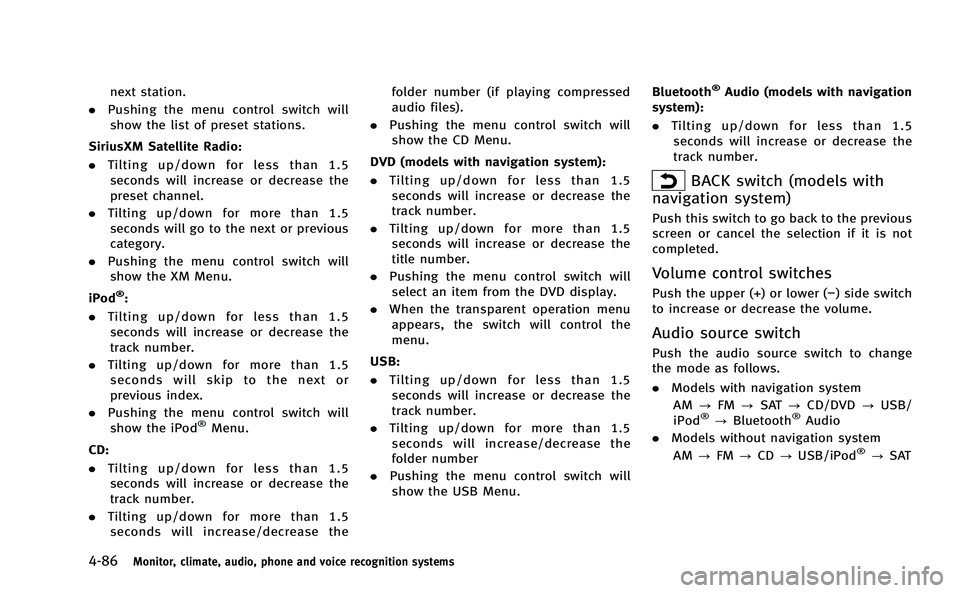
Menu control switch (models with
navigation system) or audio tuning
switch (models without navigation
system)
While the display is showing a MAP
(navigation systems only), STATUS or Audio
screen, tilt the switch upward or downward
to select a station, track, CD or folder. For
most audio sources, tilting the switch up/
down for more than 1.5 seconds provides a
different function than tilting up/down for
less than 1.5 seconds.
AM and FM radio:
. Tilting up/down for less than 1.5
seconds will increase or decrease the
preset station.
. Tilting up/down for more than 1.5
seconds will seek up or down to the
Monitor, climate, audio, phone and voice recognition systems4-85
Page 273 of 530
4-86Monitor, climate, audio, phone and voice recognition systems
next station.
. Pushing the menu control switch will
show the list of preset stations.
SiriusXM Satellite Radio:
. Tilting up/down for less than 1.5
seconds will increase or decrease the
preset channel.
. Tilting up/down for more than 1.5
seconds will go to the next or previous
category.
. Pushing the menu control switch will
show the XM Menu.
iPod
®:
. Tilting up/down for less than 1.5
seconds will increase or decrease the
track number.
. Tilting up/down for more than 1.5
seconds will skip to the next or
previous index.
. Pushing the menu control switch will
show the iPod
®Menu.
CD:
. Tilting up/down for less than 1.5
seconds will increase or decrease the
track number.
. Tilting up/down for more than 1.5
seconds will increase/decrease the folder number (if playing compressed
audio files).
. Pushing the menu control switch will
show the CD Menu.
DVD (models with navigation system):
. Tilting up/down for less than 1.5
seconds will increase or decrease the
track number.
. Tilting up/down for more than 1.5
seconds will increase or decrease the
title number.
. Pushing the menu control switch will
select an item from the DVD display.
. When the transparent operation menu
appears, the switch will control the
menu.
USB:
. Tilting up/down for less than 1.5
seconds will increase or decrease the
track number.
. Tilting up/down for more than 1.5
seconds will increase/decrease the
folder number
. Pushing the menu control switch will
show the USB Menu. Bluetooth
®Audio (models with navigation
system):
. Tilting up/down for less than 1.5
seconds will increase or decrease the
track number.
BACK switch (models with
navigation system)
Push this switch to go back to the previous
screen or cancel the selection if it is not
completed.
Volume control switches
Push the upper (+) or lower (−) side switch
to increase or decrease the volume.
Audio source switch
Push the audio source switch to change
the mode as follows.
. Models with navigation system
AM ?FM ?SAT ?CD/DVD ?USB/
iPod
®? Bluetooth®Audio
. Models without navigation system
AM ?FM ?CD ?USB/iPod
®?SAT
Page 275 of 530
4-88Monitor, climate, audio, phone and voice recognition systems
WARNING
.Use a phone after stopping your vehicle
in a safe location. If you have to use a
phone while driving, exercise extreme
caution at all times so full attention may
be given to vehicle operation.
. If you find yourself unable to devote full
attention to vehicle operation while
talking on the phone, pull off the road
to a safe location and stop your vehicle
before doing so.
CAUTION
To avoid draining the 12-volt battery, use a
phone after starting the INFINITI Direct
Response Hybrid
TMSystem.
Your INFINITI is equipped with Bluetooth®
Hands-Free Phone System. If you are an
owner of a compatible Bluetooth®enabled
cellular phone, you can set up the wireless
connection between your cellular phone
and the in-vehicle phone module. With
Bluetooth
®wireless technology, you can
make or receive a telephone call with your cellular phone in your pocket.
Once a cellular phone is connected to the
in-vehicle phone module, no phone con-
necting procedure is required anymore.
Your phone is automatically connected
with the in-vehicle phone module when
the ignition switch is pushed to the ON
position with the registered cellular phone
turned on and carried in the vehicle.
You can register up to 5 different Blue-
tooth
®cellular phones in the in-vehicle
phone module. However, you can talk on
only one cellular phone at a time.
The INFINITI Voice Recognition system
supports the phone commands, so dialing
a phone number using your voice is
possible. For more details, see “INFINITI
Voice Recognition system (models with
navigation system)” later in this section;
page 4-112.
Before using the Bluetooth
®Hands-Free
Phone System, refer to the following notes.
. Wireless LAN (Wi-Fi) and the Bluetooth
®
functions share the same frequency
band (2.4 GHz). Using the Bluetooth®
and the wireless LAN functions at the
same time may slow down or discon-
nect the communication and cause undesired noise. It is recommended
that you turn off the wireless LAN (Wi-
Fi) when using the Bluetooth
®func-
tions.
. Set up the wireless connection between
a compatible cellular phone and the in-
vehicle phone module before using the
Bluetooth
®Hands-Free Phone System.
. Some Bluetooth®enabled cellular
phones may not be recognized by the
in-vehicle phone module. Please visit
www.InfinitiUSA.com/bluetooth for a
recommended phone list.
. You will not be able to use a hands-free
phone under the following conditions:
— Your vehicle is outside of the tele-
phone service area.
— Your vehicle is in an area where it is
difficult to receive radio waves; such
as in a tunnel, in an underground
parking garage, behind a tall build-
ing or in a mountainous area.
— Your cellular phone is locked in
order not to be dialed.
. When the radio wave condition is not
ideal or ambient sound is too loud, it
may be difficult to hear the other
person’s voice during a call.
Bluetooth®HANDS-FREE PHONE SYSTEM
(models with navigation system)
Page 278 of 530
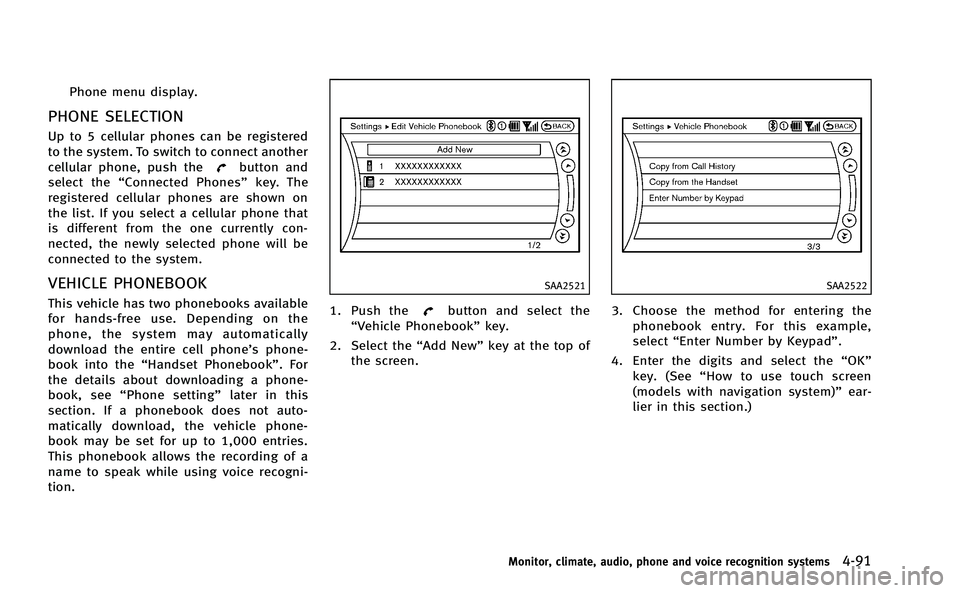
Phone menu display.
PHONE SELECTION
Up to 5 cellular phones can be registered
to the system. To switch to connect another
cellular phone, push the
button and
select the “Connected Phones” key. The
registered cellular phones are shown on
the list. If you select a cellular phone that
is different from the one currently con-
nected, the newly selected phone will be
connected to the system.
VEHICLE PHONEBOOK
This vehicle has two phonebooks available
for hands-free use. Depending on the
phone, the system may automatically
download the entire cell phone’s phone-
book into the “Handset Phonebook”. For
the details about downloading a phone-
book, see “Phone setting” later in this
section. If a phonebook does not auto-
matically download, the vehicle phone-
book may be set for up to 1,000 entries.
This phonebook allows the recording of a
name to speak while using voice recogni-
tion.
SAA2521
1. Push thebutton and select the
“Vehicle Phonebook” key.
2. Select the “Add New”key at the top of
the screen.
SAA2522
3. Choose the method for entering the
phonebook entry. For this example,
select “Enter Number by Keypad”.
4. Enter the digits and select the “OK”
key. (See “How to use touch screen
(models with navigation system)” ear-
lier in this section.)
Monitor, climate, audio, phone and voice recognition systems4-91
Page 280 of 530
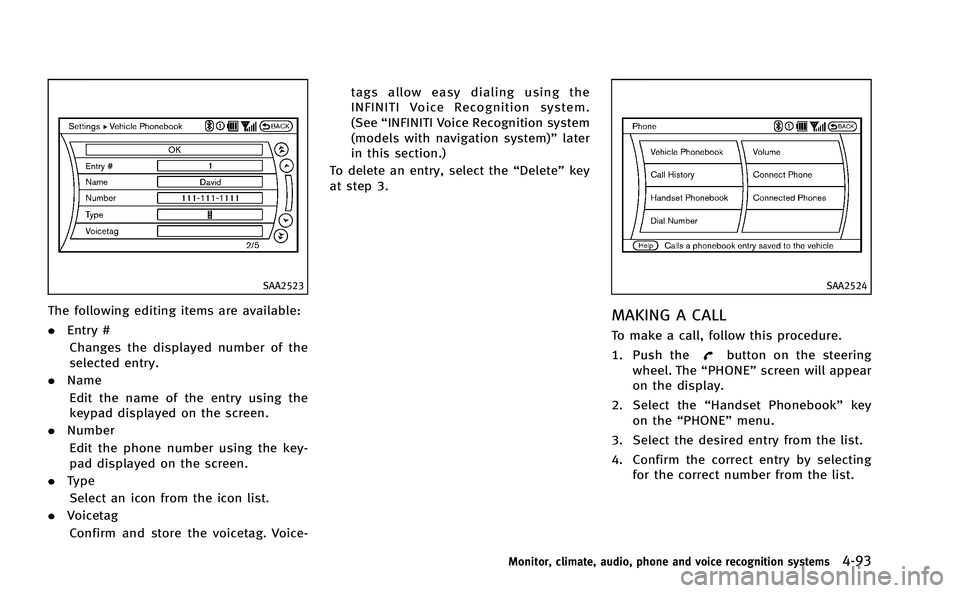
SAA2523
The following editing items are available:
.Entry #
Changes the displayed number of the
selected entry.
. Name
Edit the name of the entry using the
keypad displayed on the screen.
. Number
Edit the phone number using the key-
pad displayed on the screen.
. Type
Select an icon from the icon list.
. Voicetag
Confirm and store the voicetag. Voice- tags allow easy dialing using the
INFINITI Voice Recognition system.
(See
“INFINITI Voice Recognition system
(models with navigation system)” later
in this section.)
To delete an entry, select the “Delete”key
at step 3.
SAA2524
MAKING A CALL
To make a call, follow this procedure.
1. Push the
button on the steering
wheel. The “PHONE”screen will appear
on the display.
2. Select the “Handset Phonebook” key
on the “PHONE” menu.
3. Select the desired entry from the list.
4. Confirm the correct entry by selecting for the correct number from the list.
Monitor, climate, audio, phone and voice recognition systems4-93
Page 281 of 530
4-94Monitor, climate, audio, phone and voice recognition systems
SAA2621
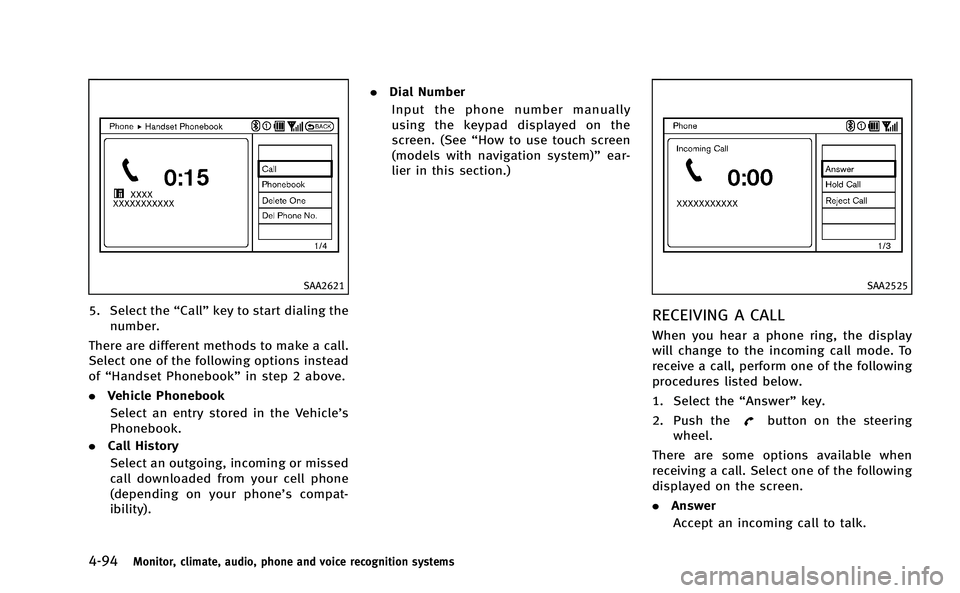
5. Select the“Call”key to start dialing the
number.
There are different methods to make a call.
Select one of the following options instead
of “Handset Phonebook” in step 2 above.
. Vehicle Phonebook
Select an entry stored in the Vehicle’s
Phonebook.
. Call History
Select an outgoing, incoming or missed
call downloaded from your cell phone
(depending on your phone’s compat-
ibility). .
Dial Number
Input the phone number manually
using the keypad displayed on the
screen. (See “How to use touch screen
(models with navigation system)” ear-
lier in this section.)
SAA2525
RECEIVING A CALL
When you hear a phone ring, the display
will change to the incoming call mode. To
receive a call, perform one of the following
procedures listed below.
1. Select the “Answer”key.
2. Push the
button on the steering
wheel.
There are some options available when
receiving a call. Select one of the following
displayed on the screen.
. Answer
Accept an incoming call to talk.
Page 284 of 530
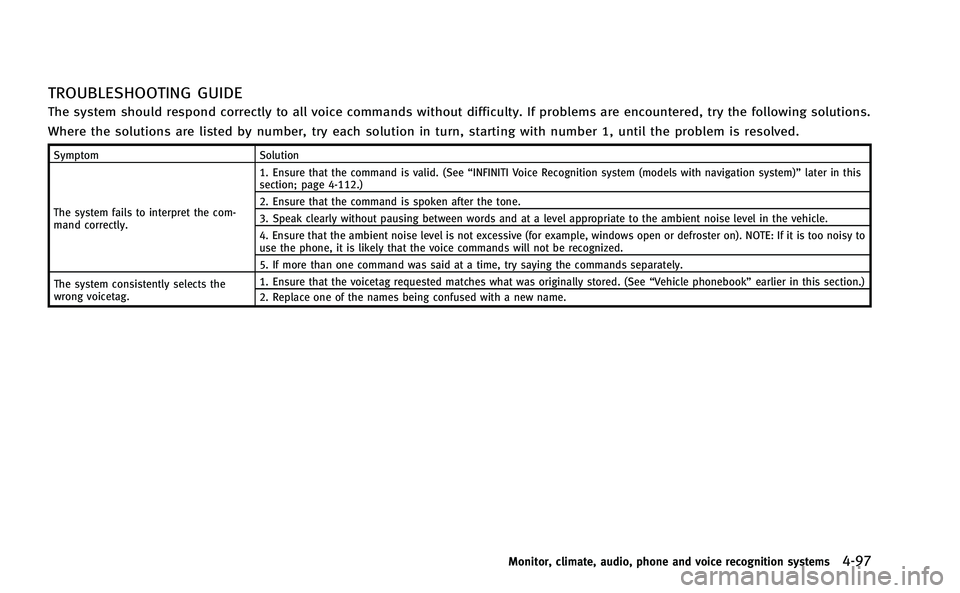
TROUBLESHOOTING GUIDE
The system should respond correctly to all voice commands without difficulty. If problems are encountered, try the following solutions.
Where the solutions are listed by number, try each solution in turn, starting with number 1, until the problem is resolved.
SymptomSolution
The system fails to interpret the com-
mand correctly. 1. Ensure that the command is valid. (See
“INFINITI Voice Recognition system (models with navigation system)” later in this
section; page 4-112.)
2. Ensure that the command is spoken after the tone.
3. Speak clearly without pausing between words and at a level appropriate to the ambient noise level in the vehicle.
4. Ensure that the ambient noise level is not excessive (for example, windows open or defroster on). NOTE: If it is too noisy to
use the phone, it is likely that the voice commands will not be recognized.
5. If more than one command was said at a time, try saying the commands separately.
The system consistently selects the
wrong voicetag. 1. Ensure that the voicetag requested matches what was originally stored. (See
“Vehicle phonebook”earlier in this section.)
2. Replace one of the names being confused with a new name.
Monitor, climate, audio, phone and voice recognition systems4-97