gas type INFINITI M35 2006 Factory Service Manual
[x] Cancel search | Manufacturer: INFINITI, Model Year: 2006, Model line: M35, Model: INFINITI M35 2006Pages: 5621, PDF Size: 65.56 MB
Page 454 of 5621
PRECAUTIONS
ATC-7
C
D
E
F
G
H
I
K
L
MA
B
AT C
Revision: 2006 January2006 M35/M45
CONTAMINATED REFRIGERANT
If a refrigerant other than pure HFC-134a (R-134a) is identified in a vehicle, take appropriate steps
shown below:
Explain to the customer that environmental regulations prohibit the release of contaminated refrigerant
into the atmosphere.
Explain that recovery of the contaminated refrigerant could damage service equipment and refrigerant
supply.
Suggest the customer return the vehicle to the location of previous service where the contamination may
have occurred.
In case of repairing, recover the refrigerant using only dedicated equipment and containers. Never
recover contaminated refrigerant into the existing service equipment. If the facility does not have
dedicated recovery equipment, contact a local refrigerant product retailer for available service. This refrig-
erant must be disposed of in accordance with all federal and local regulations. In addition, replacement of
all refrigerant system components on the vehicle is recommended.
If the vehicle is within the warranty period, the air conditioner warranty is void. Please contact Nissan Cus-
tomer Affairs for further assistance.
General Refrigerant PrecautionsNJS000FR
WAR NING :
Avoid breathing A/C refrigerant and lubricant vapor or mist. Exposure may irritate eyes, nose and
throat. Remove HFC-134a (R-134a) from the A/C system, using certified service equipment meet-
ing requirements of SAE J-2210 [HFC-134a (R-134a) recycling equipment], or J-2209 [HFC-134a (R-
134a) recovery equipment]. If accidental system discharge occurs, ventilate work area before
resuming service. Additional health and safety information may be obtained from refrigerant and
lubricant manufacturers.
Never release refrigerant into the air. Use approved recovery/recycling equipment to capture the
refrigerant every time an air conditioning system is discharged.
Always wear eye and hand protection (goggles and gloves) when working with any refrigerant or
air conditioning system.
Never store or heat refrigerant containers above 52C (126F).
Never heat a refrigerant container with an open flame; if container warming is required, place the
bottom of the container in a warm pail of water.
Never intentionally drop, puncture, or incinerate refrigerant containers.
Keep refrigerant away from open flames: poisonous gas will be produced if refrigerant burns.
Refrigerant will displace oxygen, therefore be certain to work in well ventilated areas to prevent
suffocation.
Never pressure test or leak test HFC-134a (R-134a) service equipment and/or vehicle air condition-
ing systems with compressed air during repair. Some mixtures of air and HFC-134a (R-134a) have
been shown to be combustible at elevated pressures. These mixtures, if ignited, may cause injury
or property damage. Additional health and safety information may be obtained from refrigerant
manufacturers.
Precautions for Refrigerant ConnectionNJS000FS
A new type refrigerant connection has been introduced to all refrigerant lines except the following location.
Expansion valve to evaporator
Refrigerant pressure sensor to liquid tank
ABOUT ONE-TOUCH JOINT
Description
One-touch joints are pipe joints which do not require tools during piping connection.
Unlike conventional connection methods using union nuts and flanges, controlling tightening torque at
connection point is not necessary.
When removing a pipe joint, use a disconnector.
Page 1249 of 5621
BL-310
BODY REPAIR
Revision: 2006 January2006 M35/M45
Read the Following Precautions When Repairing HSS:
1. Additional points to consider
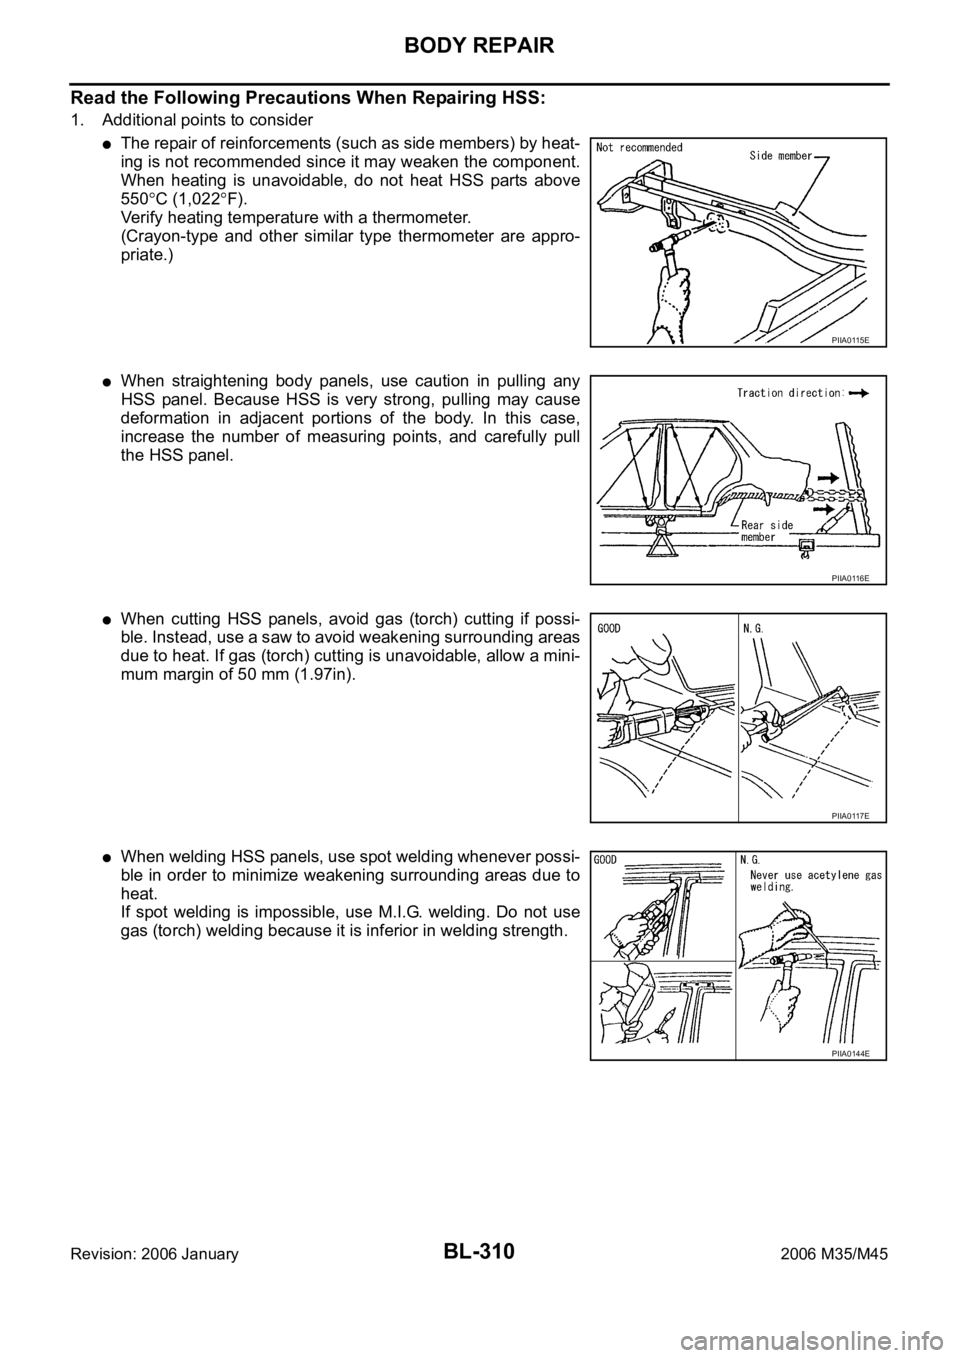
The repair of reinforcements (such as side members) by heat-
ing is not recommended since it may weaken the component.
When heating is unavoidable, do not heat HSS parts above
550
C (1,022F).
Verify heating temperature with a thermometer.
(Crayon-type and other similar type thermometer are appro-
priate.)
When straightening body panels, use caution in pulling any
HSS panel. Because HSS is very strong, pulling may cause
deformation in adjacent portions of the body. In this case,
increase the number of measuring points, and carefully pull
the HSS panel.
When cutting HSS panels, avoid gas (torch) cutting if possi-
ble. Instead, use a saw to avoid weakening surrounding areas
due to heat. If gas (torch) cutting is unavoidable, allow a mini-
mum margin of 50 mm (1.97in).
When welding HSS panels, use spot welding whenever possi-
ble in order to minimize weakening surrounding areas due to
heat.
If spot welding is impossible, use M.I.G. welding. Do not use
gas (torch) welding because it is inferior in welding strength.
PIIA0115E
PIIA0116E
PIIA0117E
PIIA0144E
Page 1278 of 5621
PRECAUTIONS
BR-3
C
D
E
G
H
I
J
K
L
MA
B
BR
Revision: 2006 January2006 M35/M45
PRECAUTIONSPFP:00001
Precautions for Supplemental Restraint System (SRS) “AIR BAG” and “SEAT
BELT PRE-TENSIONER”
NFS000ON
The Supplemental Restraint System such as “AIR BAG” and “SEAT BELT PRE-TENSIONER”, used along
with a front seat belt, helps to reduce the risk or severity of injury to the driver and front passenger for certain
types of collision. This system includes seat belt switch inputs and dual stage front air bag modules. The SRS
system uses the seat belt switches to determine the front air bag deployment, and may only deploy one front
air bag, depending on the severity of a collision and whether the front occupants are belted or unbelted.
Information necessary to service the system safely is included in the SRS and SB section of this Service Man-
ual.
WAR NING :
To avoid rendering the SRS inoperative, which could increase the risk of personal injury or death
in the event of a collision which would result in air bag inflation, all maintenance must be per-
formed by an authorized NISSAN/INFINITI dealer.
Improper maintenance, including incorrect removal and installation of the SRS, can lead to per-
sonal injury caused by unintentional activation of the system. For removal of Spiral Cable and Air
Bag Module, see the SRS section.
Do not use electrical test equipment on any circuit related to the SRS unless instructed to in this
Service Manual. SRS wiring harnesses can be identified by yellow and/or orange harnesses or
harness connectors.
Precautions for Procedures without Cowl Top CoverNFS000OO
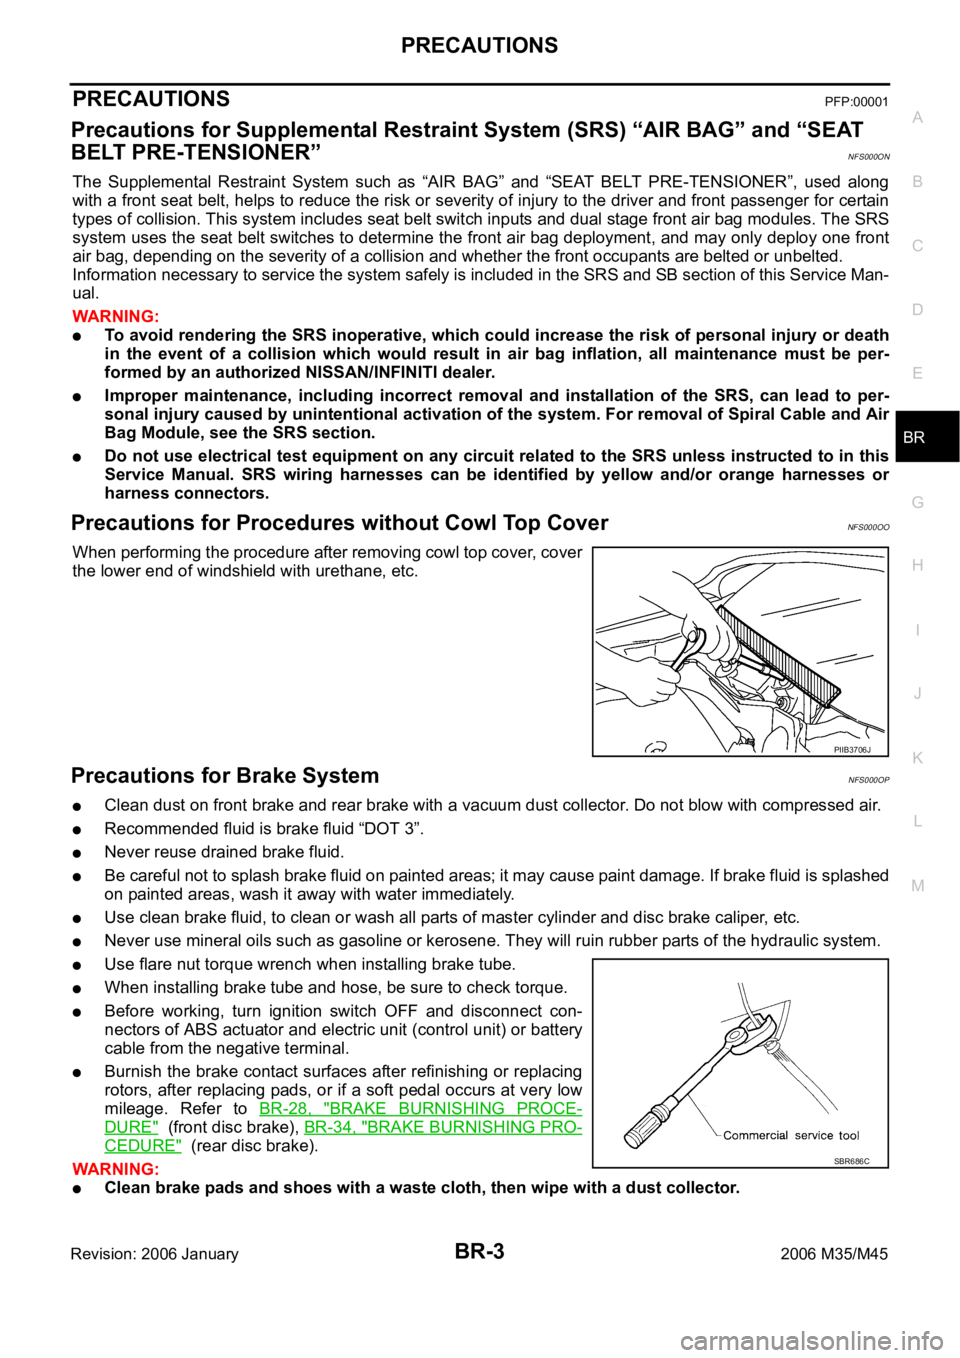
When performing the procedure after removing cowl top cover, cover
the lower end of windshield with urethane, etc.
Precautions for Brake SystemNFS000OP
Clean dust on front brake and rear brake with a vacuum dust collector. Do not blow with compressed air.
Recommended fluid is brake fluid “DOT 3”.
Never reuse drained brake fluid.
Be careful not to splash brake fluid on painted areas; it may cause paint damage. If brake fluid is splashed
on painted areas, wash it away with water immediately.
Use clean brake fluid, to clean or wash all parts of master cylinder and disc brake caliper, etc.
Never use mineral oils such as gasoline or kerosene. They will ruin rubber parts of the hydraulic system.
Use flare nut torque wrench when installing brake tube.
When installing brake tube and hose, be sure to check torque.
Before working, turn ignition switch OFF and disconnect con-
nectors of ABS actuator and electric unit (control unit) or battery
cable from the negative terminal.
Burnish the brake contact surfaces after refinishing or replacing
rotors, after replacing pads, or if a soft pedal occurs at very low
mileage. Refer to BR-28, "
BRAKE BURNISHING PROCE-
DURE" (front disc brake), BR-34, "BRAKE BURNISHING PRO-
CEDURE" (rear disc brake).
WAR NING :
Clean brake pads and shoes with a waste cloth, then wipe with a dust collector.
PIIB3706J
SBR686C
Page 1314 of 5621
![INFINITI M35 2006 Factory Service Manual PRECAUTIONS
BRC-3
[VDC/TCS/ABS]
C
D
E
G
H
I
J
K
L
MA
B
BRC
Revision: 2006 January2006 M35/M45
[VDC/TCS/ABS]PRECAUTIONSPFP:00001
Precautions for Supplemental Restraint System (SRS) “AIR BAG” and � INFINITI M35 2006 Factory Service Manual PRECAUTIONS
BRC-3
[VDC/TCS/ABS]
C
D
E
G
H
I
J
K
L
MA
B
BRC
Revision: 2006 January2006 M35/M45
[VDC/TCS/ABS]PRECAUTIONSPFP:00001
Precautions for Supplemental Restraint System (SRS) “AIR BAG” and �](/img/42/57023/w960_57023-1313.png)
PRECAUTIONS
BRC-3
[VDC/TCS/ABS]
C
D
E
G
H
I
J
K
L
MA
B
BRC
Revision: 2006 January2006 M35/M45
[VDC/TCS/ABS]PRECAUTIONSPFP:00001
Precautions for Supplemental Restraint System (SRS) “AIR BAG” and “SEAT
BELT PRE-TENSIONER”
NFS000PY
The Supplemental Restraint System such as “AIR BAG” and “SEAT BELT PRE-TENSIONER”, used along
with a front seat belt, helps to reduce the risk or severity of injury to the driver and front passenger for certain
types of collision. This system includes seat belt switch inputs and dual stage front air bag modules. The SRS
system uses the seat belt switches to determine the front air bag deployment, and may only deploy one front
air bag, depending on the severity of a collision and whether the front occupants are belted or unbelted.
Information necessary to service the system safely is included in the SRS and SB section of this Service Man-
ual.
WAR NING :
To avoid rendering the SRS inoperative, which could increase the risk of personal injury or death
in the event of a collision which would result in air bag inflation, all maintenance must be per-
formed by an authorized NISSAN/INFINITI dealer.
Improper maintenance, including incorrect removal and installation of the SRS, can lead to per-
sonal injury caused by unintentional activation of the system. For removal of Spiral Cable and Air
Bag Module, see the SRS section.
Do not use electrical test equipment on any circuit related to the SRS unless instructed to in this
Service Manual. SRS wiring harnesses can be identified by yellow and/or orange harnesses or
harness connectors.
Precautions for Procedures without Cowl Top CoverNFS000PZ
When performing the procedure after removing cowl top cover, cover
the lower end of windshield with urethane, etc.
Precautions for Brake SystemNFS000Q0
Recommended fluid is brake fluid “DOT 3”.
Never reuse drained brake fluid.
Be careful not to splash brake fluid on painted surface of body. If brake fluid is splashed on painted sur-
faces of body immediately wipe off then with cloth and then wash it away with water.
Never use mineral oils such as gasoline or kerosene. They will ruin rubber parts of the hydraulic system.
Use a flare nut wrench when removing flare nuts, and use a flare
nut torque wrench when tighten brake tube flare nuts.
When installing brake tubes, be sure to check torque.
Brake system is an important safety part. If a brake fluid leak is
detected, always disassemble the affected part. If a malfunction
is detected, replace part with a new one.
Before working, turn ignition switch OFF and disconnect con-
nectors of ABS actuator and electric unit (control unit) or the bat-
tery cable from the negative terminal.
WAR NING :
Clean brake pads and shoes with a waste cloth, then wipe with
a dust collector.
PIIB3706J
SBR686C
Page 1376 of 5621
CO-1
ENGINE COOLING SYSTEM
B ENGINE
CONTENTS
C
D
E
F
G
H
I
J
K
L
M
SECTION CO
A
CO
Revision: 2006 January2006 M35/M45
ENGINE COOLING SYSTEM
VQ35DE
PRECAUTIONS .......................................................... 3
Precautions for Supplemental Restraint System
(SRS) “AIR BAG” and “SEAT BELT PRE-TEN-
SIONER” .................................................................. 3
Precautions for Liquid Gasket .................................. 3
REMOVAL OF LIQUID GASKET SEALING .......... 3
LIQUID GASKET APPLICATION PROCEDURE ..... 3
PREPARATION ........................................................... 5
Special Service Tools ............................................... 5
Commercial Service Tools ........................................ 6
OVERHEATING CAUSE ANALYSIS .......................... 7
Troubleshooting Chart .............................................. 7
COOLING SYSTEM .................................................... 9
Cooling Circuit .......................................................... 9
System Chart ......................................................... 10
ENGINE COOLANT ...................................................11
Inspection ................................................................ 11
LEVEL CHECK .................................................... 11
LEAK CHECK ...................................................... 11
Changing Engine Coolant ....................................... 11
DRAINING ENGINE COOLANT .......................... 11
REFILLING ENGINE COOLANT ........................ 12
FLUSHING COOLING SYSTEM ......................... 13
RADIATOR ................................................................ 14
Components ........................................................... 14
Removal and Installation ........................................ 14
REMOVAL ........................................................
... 14
INSTALLATION ................................................... 16
INSPECTION AFTER INSTALLATION ............... 16
Checking Radiator Cap .......................................... 16
Checking Radiator .................................................. 16
RADIATOR (ALUMINUM TYPE) .............................. 18
Components ........................................................... 18
Disassembly and Assembly ................................... 18
PREPARATION ................................................... 18
DISASSEMBLY ................................................... 18
ASSEMBLY ......................................................... 19
INSPECTION ...................................................... 21COOLING FAN .......................................................... 22
Components ........................................................... 22
Removal and Installation ........................................ 22
REMOVAL ........................................................
... 22
INSTALLATION ................................................... 22
INSPECTION AFTER INSTALLATION ................ 22
Disassembly and Assembly .................................... 23
DISASSEMBLY ................................................... 23
INSPECTION AFTER DISASSEMBLY ................ 23
ASSEMBLY ......................................................... 23
WATER PUMP .......................................................... 24
Components ........................................................... 24
Removal and Installation ........................................ 24
REMOVAL ........................................................
... 24
INSPECTION AFTER REMOVAL ....................... 26
INSTALLATION ................................................... 26
INSPECTION AFTER INSTALLATION ................ 28
WATER INLET AND THERMOSTAT ASSEMBLY .... 29
Components ........................................................... 29
Removal and Installation ........................................ 29
REMOVAL ........................................................
... 29
INSPECTION AFTER REMOVAL ....................... 30
INSTALLATION ................................................... 30
INSPECTION AFTER INSTALLATION ................ 30
WATER OUTLET AND WATER PIPING ................... 31
Components ........................................................... 31
Removal and Installation ........................................ 31
REMOVAL ........................................................
... 31
INSTALLATION ................................................... 32
INSPECTION AFTER INSTALLATION ................ 32
SERVICE DATA AND SPECIFICATIONS (SDS) ...... 33
Standard and Limit .................................................. 33
ENGINE COOLANT CAPACITY (APPROXI-
MATE) .................................................................. 33
RADIATOR .......................................................
... 33
THERMOSTAT .................................................... 33
Page 1378 of 5621
![INFINITI M35 2006 Factory Service Manual PRECAUTIONS
CO-3
[VQ35DE]
C
D
E
F
G
H
I
J
K
L
MA
CO
Revision: 2006 January2006 M35/M45
[VQ35DE]PRECAUTIONSPFP:00001
Precautions for Supplemental Restraint System (SRS) “AIR BAG” and “SEAT
BELT INFINITI M35 2006 Factory Service Manual PRECAUTIONS
CO-3
[VQ35DE]
C
D
E
F
G
H
I
J
K
L
MA
CO
Revision: 2006 January2006 M35/M45
[VQ35DE]PRECAUTIONSPFP:00001
Precautions for Supplemental Restraint System (SRS) “AIR BAG” and “SEAT
BELT](/img/42/57023/w960_57023-1377.png)
PRECAUTIONS
CO-3
[VQ35DE]
C
D
E
F
G
H
I
J
K
L
MA
CO
Revision: 2006 January2006 M35/M45
[VQ35DE]PRECAUTIONSPFP:00001
Precautions for Supplemental Restraint System (SRS) “AIR BAG” and “SEAT
BELT PRE-TENSIONER”
NBS005RT
The Supplemental Restraint System such as “AIR BAG” and “SEAT BELT PRE-TENSIONER”, used along
with a front seat belt, helps to reduce the risk or severity of injury to the driver and front passenger for certain
types of collision. This system includes seat belt switch inputs and dual stage front air bag modules. The SRS
system uses the seat belt switches to determine the front air bag deployment, and may only deploy one front
air bag, depending on the severity of a collision and whether the front occupants are belted or unbelted.
Information necessary to service the system safely is included in the SRS and SB section of this Service Man-
ual.
WAR NING :
To avoid rendering the SRS inoperative, which could increase the risk of personal injury or death
in the event of a collision which would result in air bag inflation, all maintenance must be per-
formed by an authorized NISSAN/INFINITI dealer.
Improper maintenance, including incorrect removal and installation of the SRS, can lead to per-
sonal injury caused by unintentional activation of the system. For removal of Spiral Cable and Air
Bag Module, see the SRS section.
Do not use electrical test equipment on any circuit related to the SRS unless instructed to in this
Service Manual. SRS wiring harnesses can be identified by yellow and/or orange harnesses or
harness connectors.
Precautions for Liquid GasketNBS004QK
REMOVAL OF LIQUID GASKET SEALING
After removing mounting nuts and bolts, separate the mating
surface using the seal cutter (SST) and remove old liquid gasket
sealing.
CAUTION:
Be careful not to damage the mating surfaces.
Tap the seal cutter to insert it, and then slide it by tapping on the
side as shown in the figure.
In areas where seal cutter is difficult to use, use a plastic ham-
mer to lightly tap the parts, to remove it.
CAUTION:
If for some unavoidable reason tool such as a screwdriver
is used, be careful not to damage the mating surfaces.
LIQUID GASKET APPLICATION PROCEDURE
1. Using a scraper, remove old liquid gasket adhering to the liquid
gasket application surface and the mating surface.
Remove liquid gasket completely from the groove of the liquid
gasket application surface, mounting bolts, and bolt holes.
2. Wipe the liquid gasket application surface and the mating sur-
face with white gasoline (lighting and heating use) to remove
adhering moisture, grease and foreign materials.
PBIC0002E
PBIC0003E
Page 1910 of 5621
![INFINITI M35 2006 Factory Service Manual DTC P0300 - P0306 MULTIPLE CYLINDER MISFIRE, NO. 1 - 6 CYLINDER MIS-
FIRE
EC-367
[VQ35DE]
C
D
E
F
G
H
I
J
K
L
MA
EC
Revision: 2006 January2006 M35/M45
8. CHECK SPARK PLUG
Check the initial spark plug INFINITI M35 2006 Factory Service Manual DTC P0300 - P0306 MULTIPLE CYLINDER MISFIRE, NO. 1 - 6 CYLINDER MIS-
FIRE
EC-367
[VQ35DE]
C
D
E
F
G
H
I
J
K
L
MA
EC
Revision: 2006 January2006 M35/M45
8. CHECK SPARK PLUG
Check the initial spark plug](/img/42/57023/w960_57023-1909.png)
DTC P0300 - P0306 MULTIPLE CYLINDER MISFIRE, NO. 1 - 6 CYLINDER MIS-
FIRE
EC-367
[VQ35DE]
C
D
E
F
G
H
I
J
K
L
MA
EC
Revision: 2006 January2006 M35/M45
8. CHECK SPARK PLUG
Check the initial spark plug for fouling, etc.
OK or NG
OK >> Replace spark plug(s) with standard type one(s). For
spark plug type, refer to EM-43, "
SPARK PLUG (PLATI-
NUM-TIPPED TYPE)" .
NG >> 1. Repair or clean spark plug.
2. GO TO 9.
9. CHECK FUNCTION OF IGNITION COIL-III
1. Reconnect the initial spark plugs.
2. Crank engine for about 3 seconds, and recheck whether spark is generated between the spark plug and
the grounded portion.
OK or NG
OK >>INSPECTION END
NG >> Replace spark plug(s) with standard type one(s). For spark plug type, refer to MA-20, "
Changing
Spark Plugs (Platinum-Tipped Type)" .
10. CHECK COMPRESSION PRESSURE
Check compression pressure. Refer to EM-101, "
CHECKING COMPRESSION PRESSURE" .
OK or NG
OK >> GO TO 11.
NG >> Check pistons, piston rings, valves, valve seats and cylinder head gaskets.
11 . CHECK FUEL PRESSURE
1. Install all removed parts.
2. Release fuel pressure to zero. Refer to EC-98, "
FUEL PRESSURE RELEASE" .
3. Install fuel pressure gauge and check fuel pressure. Refer to EC-98, "
FUEL PRESSURE CHECK" .
OK or NG
OK >> GO TO 13.
NG >> GO TO 12.
12. DETECT MALFUNCTIONING PART
Check the following.
Fuel pump and circuit (Refer to EC-685, "FUEL PUMP" .)
Fuel pressure regulator (Refer to EC-98, "FUEL PRESSURE CHECK" .)
Fuel lines (Refer to FL-3, "FUEL SYSTEM" .)
Fuel filter for clogging
>> Repair or replace.
SEF156I
Spark should be generated.
At idle: Approximately 350 kPa (3.57 kg/cm
2 , 51 psi)
Page 2633 of 5621
![INFINITI M35 2006 Factory Service Manual EC-1090
[VK45DE]
DTC P0300 - P0308 MULTIPLE CYLINDER MISFIRE, NO. 1 - 8 CYLINDER MIS-
FIRE
Revision: 2006 January2006 M35/M45
8. CHECK SPARK PLUG
Check the initial spark plug for fouling, etc.
OK or N INFINITI M35 2006 Factory Service Manual EC-1090
[VK45DE]
DTC P0300 - P0308 MULTIPLE CYLINDER MISFIRE, NO. 1 - 8 CYLINDER MIS-
FIRE
Revision: 2006 January2006 M35/M45
8. CHECK SPARK PLUG
Check the initial spark plug for fouling, etc.
OK or N](/img/42/57023/w960_57023-2632.png)
EC-1090
[VK45DE]
DTC P0300 - P0308 MULTIPLE CYLINDER MISFIRE, NO. 1 - 8 CYLINDER MIS-
FIRE
Revision: 2006 January2006 M35/M45
8. CHECK SPARK PLUG
Check the initial spark plug for fouling, etc.
OK or NG
OK >> Replace spark plug(s) with standard type one(s). For
spark plug type, refer to EM-191, "
SPARK PLUG (PLAT-
INUM-TIPPED TYPE)" .
NG >> 1. Repair or clean spark plug.
2. GO TO 9.
9. CHECK FUNCTION OF IGNITION COIL-III
1. Reconnect the initial spark plugs.
2. Crank engine for about 3 seconds, and recheck whether spark is generated between the spark plug and
the grounded portion.
OK or NG
OK >>INSPECTION END
NG >> Replace spark plug(s) with standard type one(s). For spark plug type, refer to EM-191, "
SPARK
PLUG (PLATINUM-TIPPED TYPE)" .
10. CHECK COMPRESSION PRESSURE
Check compression pressure. Refer to EM-233, "
CHECKING COMPRESSION PRESSURE" .
OK or NG
OK >> GO TO 11.
NG >> Check pistons, piston rings, valves, valve seats and cylinder head gaskets.
11 . CHECK FUEL PRESSURE
1. Install all removed parts.
2. Release fuel pressure to zero. Refer to EC-809, "
FUEL PRESSURE RELEASE" .
3. Install fuel pressure gauge and check fuel pressure. Refer to EC-809, "
FUEL PRESSURE CHECK" .
OK or NG
OK >> GO TO 13.
NG >> GO TO 12.
12. DETECT MALFUNCTIONING PART
Check the following.
Fuel pump and circuit (Refer to EC-1427, "FUEL PUMP" .)
Fuel pressure regulator (Refer to EC-809, "FUEL PRESSURE CHECK" .)
Fuel lines
Fuel filter for clogging
>> Repair or replace.
SEF156I
Spark should be generated.
At idle: Approximately 350 kPa (3.57 kg/cm
2 , 51 psi)
Page 3066 of 5621
EM-3
C
D
E
F
G
H
I
J
K
L
M
EMA
Revision: 2006 January2006 M35/M45 ANCE ................................................................146
MAIN BEARING OIL CLEARANCE ..................147
MAIN BEARING CRUSH HEIGHT ....................148
CONNECTING ROD BEARING CRUSH
HEIGHT .............................................................148
MAIN BEARING CAP BOLT OUTER DIAMETER .148
CONNECTING ROD BOLT OUTER DIAMETER .149
DRIVE PLATE ...................................................149
OIL JET .............................................................149
OIL JET RELIEF VALVE ...................................149
SERVICE DATA AND SPECIFICATIONS (SDS) ....150
Standard and Limit ...............................................150
GENERAL SPECIFICATIONS ..........................150
DRIVE BELT .....................................................151
INTAKE MANIFOLD COLLECTOR, INTAKE
MANIFOLD AND EXHAUST MANIFOLD .........151
SPARK PLUG ...................................................151
CAMSHAFT AND CAMSHAFT BEARING ........152
CYLINDER HEAD .............................................154
CYLINDER BLOCK ...........................................157
PISTON, PISTON RING AND PISTON PIN ......158
CONNECTING ROD .........................................159
CRANKSHAFT ..................................................160
MAIN BEARING ................................................161
CONNECTING ROD BEARING ........................162
VK45DE
PRECAUTIONS ......................................................163
Precautions for Procedures without Cowl Top Cover .163
Precautions Necessary for Steering Wheel Rotation
After Battery Disconnect ......................................163
OPERATION PROCEDURE .............................163
Precautions for Drain Engine Coolant and Engine
Oil .........................................................................163
Precautions for Disconnecting Fuel Piping ..........163
Precautions for Removal and Disassembly .........163
Precautions for Inspection, Repair and Replace-
ment .....................................................................164
Precautions for Assembly and Installation ...........164
Parts Requiring Angle Tightening .........................164
Precautions for Liquid Gasket ..............................164
REMOVAL OF LIQUID GASKET SEALING ......164
LIQUID GASKET APPLICATION PROCEDURE .165
PREPARATION .......................................................166
Special Service Tools ...........................................166
Commercial Service Tools ....................................169
NOISE, VIBRATION AND HARSHNESS (NVH)
TROUBLESHOOTING ............................................171
NVH Troubleshooting — Engine Noise ................171
Use the Chart Below to Help You Find the Cause
of the Symptom. ...................................................172
ENGINE ROOM COVER ........................................173
Components .........................................................173
Removal and Installation ......................................173
REMOVAL ........................................................
.173
INSTALLATION .................................................173DRIVE BELTS .........................................................174
Components .........................................................174
Checking Drive Belts ............................................174
Tension Adjustment .............................................
.174
Removal and Installation ......................................174
REMOVAL ........................................................
.174
INSTALLATION .................................................175
Components .........................................................176
Drive Belt Auto Tensioner and Idler Pulley ...........176
REMOVAL ........................................................
.176
INSTALLATION .................................................176
AIR CLEANER AND AIR DUCT .............................177
Components .........................................................177
Removal and Installation ......................................177
REMOVAL ........................................................
.177
INSPECTION AFTER REMOVAL .....................178
INSTALLATION .................................................178
Changing Air Cleaner Filter ..................................178
REMOVAL ........................................................
.178
INSTALLATION .................................................178
INTAKE MANIFOLD ..............................................
.179
Components .........................................................179
Removal and Installation ......................................180
REMOVAL ........................................................
.180
INSPECTION AFTER REMOVAL .....................182
INSTALLATION .................................................182
INSPECTION AFTER INSTALLATION ..............182
EXHAUST MANIFOLD AND THREE WAY CATA-
LYST ........................................................................183
Components .........................................................183
Removal and Installation ......................................183
REMOVAL ........................................................
.183
INSPECTION AFTER REMOVAL .....................185
INSTALLATION .................................................185
OIL PAN AND OIL STRAINER ...............................187
Components .........................................................187
Removal and Installation ......................................187
REMOVAL ........................................................
.187
INSPECTION AFTER REMOVAL .....................188
INSTALLATION .................................................188
INSPECTION AFTER INSTALLATION ..............189
IGNITION COIL .......................................................190
Components .........................................................190
Removal and Installation ......................................190
REMOVAL ........................................................
.190
INSTALLATION .................................................190
SPARK PLUG (PLATINUM-TIPPED TYPE) ...........191
Components .........................................................191
Removal and Installation ......................................191
REMOVAL ........................................................
.191
INSPECTION AFTER REMOVAL .....................191
INSTALLATION .................................................192
FUEL INJECTOR AND FUEL TUBE ......................193
Components .........................................................193
Removal and Installation ......................................193
REMOVAL ........................................................
.193
INSTALLATION .................................................195
INSPECTION AFTER INSTALLATION ..............197
Page 3096 of 5621
![INFINITI M35 2006 Factory Service Manual OIL PAN AND OIL STRAINER
EM-33
[VQ35DE]
C
D
E
F
G
H
I
J
K
L
MA
EM
Revision: 2006 January2006 M35/M45
d. Apply a continuous bead of liquid gasket with the tube presser
[SST: WS39930000 ( � INFINITI M35 2006 Factory Service Manual OIL PAN AND OIL STRAINER
EM-33
[VQ35DE]
C
D
E
F
G
H
I
J
K
L
MA
EM
Revision: 2006 January2006 M35/M45
d. Apply a continuous bead of liquid gasket with the tube presser
[SST: WS39930000 ( �](/img/42/57023/w960_57023-3095.png)
OIL PAN AND OIL STRAINER
EM-33
[VQ35DE]
C
D
E
F
G
H
I
J
K
L
MA
EM
Revision: 2006 January2006 M35/M45
d. Apply a continuous bead of liquid gasket with the tube presser
[SST: WS39930000 ( — )] to the cylinder block mating sur-
face of oil pan (upper) to a limited portion as shown in the figure.
Use Genuine RTV Silicone Sealant or equivalent. Refer to
GI-48, "
RECOMMENDED CHEMICAL PRODUCTS AND
SEALANTS" .
CAUTION:
For bolt holes with marks (5 locations), apply liquid
gasket outside the holes.
Apply a bead of 4.5 to 5.5 mm (0.177 to 0.217 in) in diame-
ter to area “A”.
Attaching should be done within 5 minutes after coating.
e. Install oil pan (upper).
CAUTION:
Install avoiding misalignment of both oil pan gaskets and O-rings.
Tighten mounting bolts in numerical order as shown in the fig-
ure.
There are two types of mounting bolts. Refer to the following
for locating bolts.
f. Tighten transmission joint bolts. Refer to AT-271, "
TRANSMISSION ASSEMBLY" .
2. Install oil strainer to oil pump.
3. Install baffle plate.
4. Install oil pan (lower) as follows:
a. Use scraper to remove old liquid gasket from mating surfaces.
Also remove old liquid gasket from mating surface of oil pan
(upper).
Remove old liquid gasket from the bolt holes and thread.
CAUTION:
Do not scratch or damage the mating surfaces when clean-
ing off old liquid gasket.M8
100 mm (3.97 in) : 5, 7, 8, 11
M8
25 mm (0.98 in) : Except the above
PBIC2300E
PBIC0783E
SEM958F