INFINITI M35 2007 Factory Service Manual
M35 2007
INFINITI
INFINITI
https://www.carmanualsonline.info/img/42/57024/w960_57024-0.png
INFINITI M35 2007 Factory Service Manual
Trending: towing, seat memory, child restraint, open hood, brake, clips, gas type
Page 3011 of 4647
EI-40
BODY SIDE TRIM
Revision: 2007 April2007 M35/M45
REAR KICKING PLATE OUTER
Removal
Remove rear kicking plate outer mounting clips using a clip clamp
remover, and then remove kicking plate outer.
Installation
Install in the reverse order of removal.
REAR KICKING PLATE INNER
Removal
1. Remove rear seat cushion. Refer to SE-177, "Removal and Installation" .
2. Remove kicking plate inner mounting clips using a clip clamp
remover, and then remove kicking plate inner.
Installation
Install in the reverse order of removal.
REAR BODY SIDE WELT
Removal
1. Remove center pillar lower garnish.
2. Remove rear seat cushion. Refer to SE-177, "
Removal and Installation" .
3. Remove rear kicking plate inner.
4. Remove rear body side welt.
Installation
Install in the reverse order of removal.
PIIB2765J
PIIB2766J
Page 3012 of 4647

BODY SIDE TRIM
EI-41
C
D
E
F
G
H
J
K
L
MA
B
EI
Revision: 2007 April2007 M35/M45
REAR WHEEL HOUSE GARNISH
Removal
1. Remove rear seat cushion and rear seatback. Refer to SE-177, "Removal and Installation" .
2. Remove rear body side welt.
3. Remove clip of rear wheel house garnish.
4. Remove rear wheel house garnish.
Installation
Install in the reverse order of removal.
NOTE:
To install, check if all clips are matched over holes of panel on vehicle, then push on.
REAR PILLAR FINISHER
Removal
1. Remove rear seat cushion and rear seatback. Refer to SE-177, "Removal and Installation" .
2. Remove rear seat belt floor anchor bolt. Refer to SB-31, "
Removal and Installation of Rear Seat Belt" .
3. Remove rear kicking plate inner.
4. Remove rear wheel house garnish.
5. Remove pillar finisher mounting clips using a screwdriver, and
then remove pillar finisher.
CAUTION:
Insert a clip clamp remover wrapped with a shop cloth or
clip clamp remover into the part shown by the arrow
(between the clips and the body side panel). Remove clips.
Installation
Install in the reverse order of removal.
CAUTION:
Make sure that clips are securely fitted in panel holes on body when installing, and then press them in.
PIIB2769J
PIIB2768J
Page 3013 of 4647
EI-42
REAR PARCEL SHELF FINISHER
Revision: 2007 April2007 M35/M45
REAR PARCEL SHELF FINISHERPFP:79910
Removal and InstallationNIS0024W
REMOVAL
1. Remove rear seatback and rear seat cushion. Refer to SE-177, "Removal and Installation" .
2. Remove rear seat belt floor anchor bolt and rear seat belt shoulder anchor bolt. Refer to SB-31, "
Removal
and Installation of Rear Seat Belt" .
3. Disengage child anchor cover front pawls, and then pull out child anchor cover (LH/RH center) toward
front of vehicle. (Models with rear window sunshade)
1. Rear parcel shelf lid 2. High-mounted stop lamp 3. Child anchor cover
4. Rear parcel shelf finisher 5. Rear seat belt shoulder anchor cover 6. Rear window sunshade
7. Woofer grille 8. Rear speaker grille 9. Push on nut
Clip
PIIB8673E
Page 3014 of 4647

REAR PARCEL SHELF FINISHER
EI-43
C
D
E
F
G
H
J
K
L
MA
B
EI
Revision: 2007 April2007 M35/M45
4. Remove rear kicking plate inner, rear wheelhouse garnish, rear pillar finisher. Refer to EI-37, "BODY SIDE
TRIM" .
5. Disconnect high-mounted stop lamp harness connector from
front side of rear parcel shelf finisher. (Models with rear window
sunshade)
6. Remove rear parcel shelf finisher mounting clip using a clip clamp remover.
7. Remove the following parts after removing rear parcel shelf finisher.
�High-mounted stop lamp
�High-mounted stop lamp harness
�Rear speaker grille
�Woofer grille (Models with woofer)
INSTALLATION
Install in the reverse order of removal.
CAUTION:
Make sure that clips are securely fitted in panel holes on body when installing, and then press them in.
Rear Window SunshadeNIS0024X
REMOVAL AND INSTALLATION
CAUTION:
Be careful not to damage the rear window glass.
Removal
1. Remove rear parcel shelf finisher. Refer to EI-42, "REAR PARCEL SHELF FINISHER" .
2. Disconnect rear window sunshade harness connector.
3. Remove rear window sunshade mounting bolts.
4. Lift up rear window sunshade and pull out locating pin from body side panel hole, and then remove rear
window sunshade.
Installation
Install in the reverse order of removal.
PIIB5130E
Page 3015 of 4647
EI-44
SUNSHADE
Revision: 2007 April2007 M35/M45
SUNSHADEPFP:97580
Component Parts and Harness Connector LocationNIS0024Y
PIIB5864E
1. Fuse block (J/B) 2. Back-up lamp relay E19 3.Rear sunshade cancel relay B141
(View with the trunk side finisher RH
removed)
4.Rear sunshade unit (With built-in
motor) B474
(View with the rear parcel shelf fin-
isher removed)5.a: Rear sunshade front switch M137
b: Rear control cancel switch M1516. Rear sunshade rear switch B557
Page 3016 of 4647
SUNSHADE
EI-45
C
D
E
F
G
H
J
K
L
MA
B
EI
Revision: 2007 April2007 M35/M45
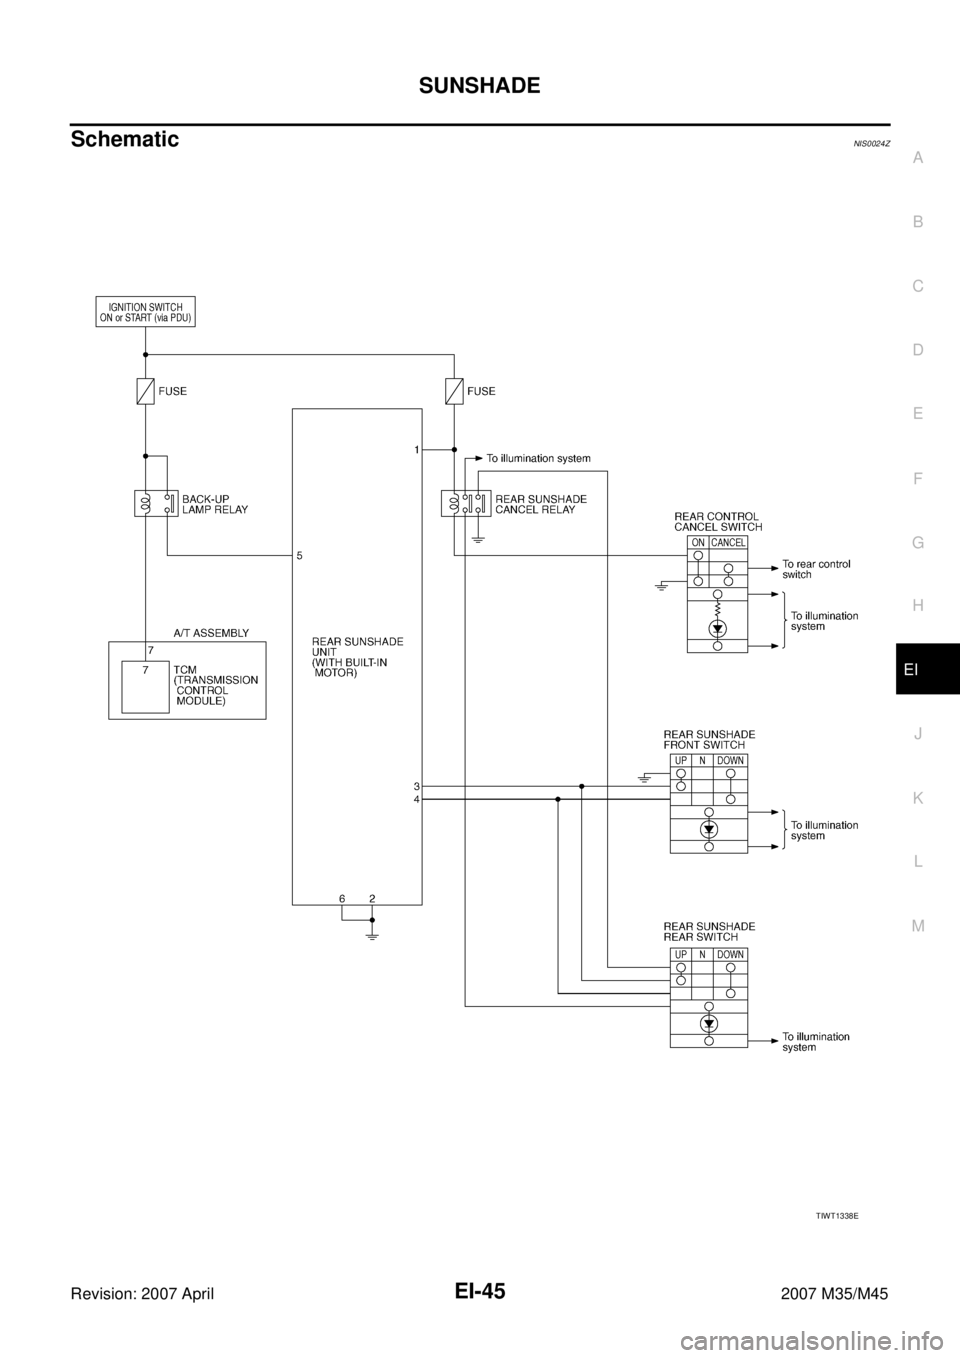
SchematicNIS0024Z
TIWT1338E
Page 3017 of 4647
EI-46
SUNSHADE
Revision: 2007 April2007 M35/M45
Wiring Diagram—SHADE—NIS00250
TIWT2122E
Page 3018 of 4647
SUNSHADE
EI-47
C
D
E
F
G
H
J
K
L
MA
B
EI
Revision: 2007 April2007 M35/M45
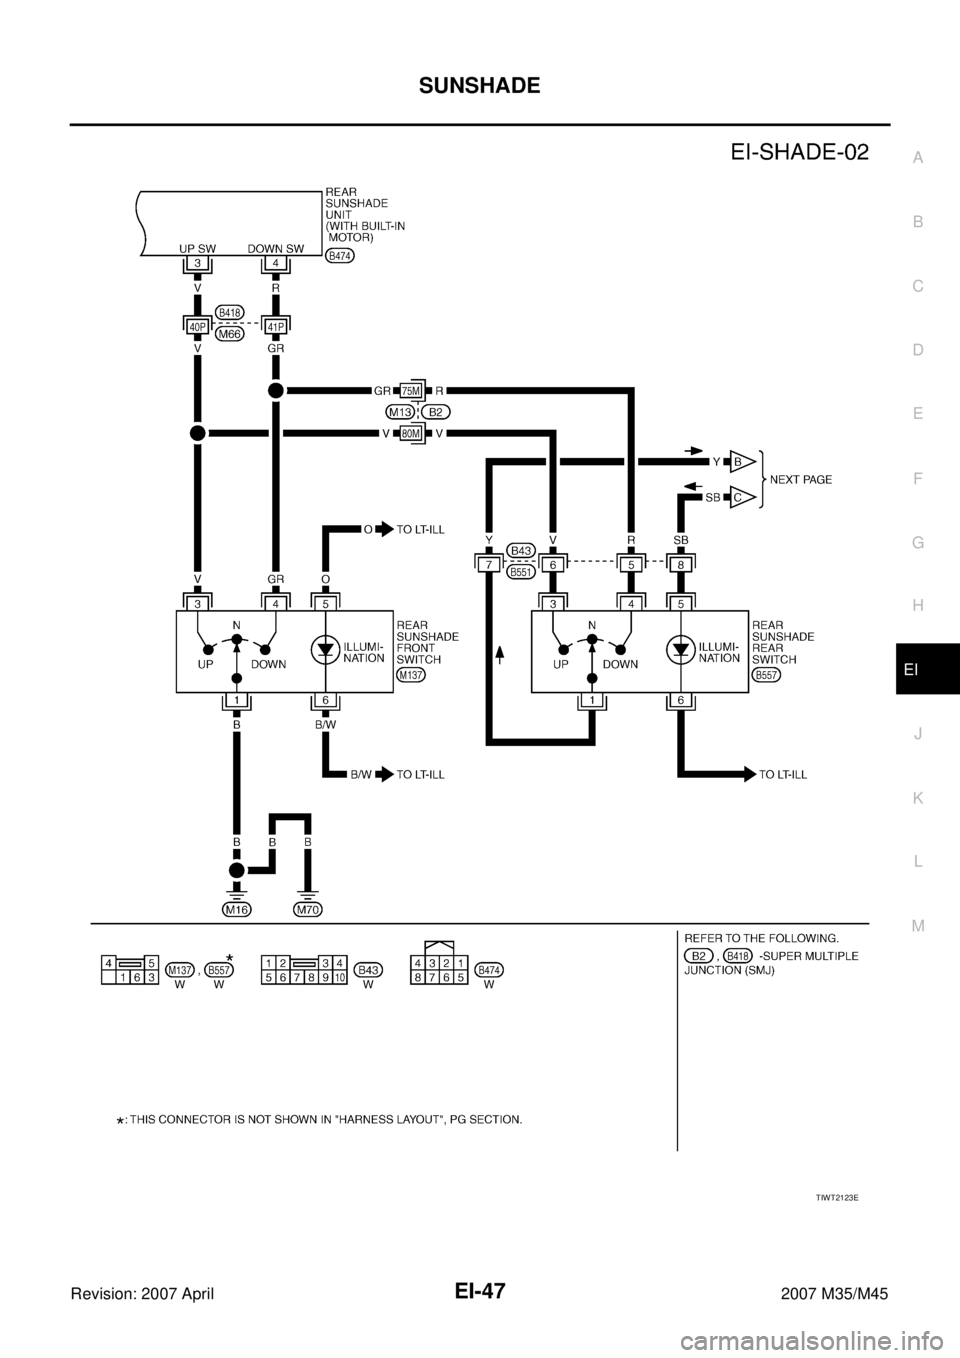
TIWT2123E
Page 3019 of 4647
EI-48
SUNSHADE
Revision: 2007 April2007 M35/M45
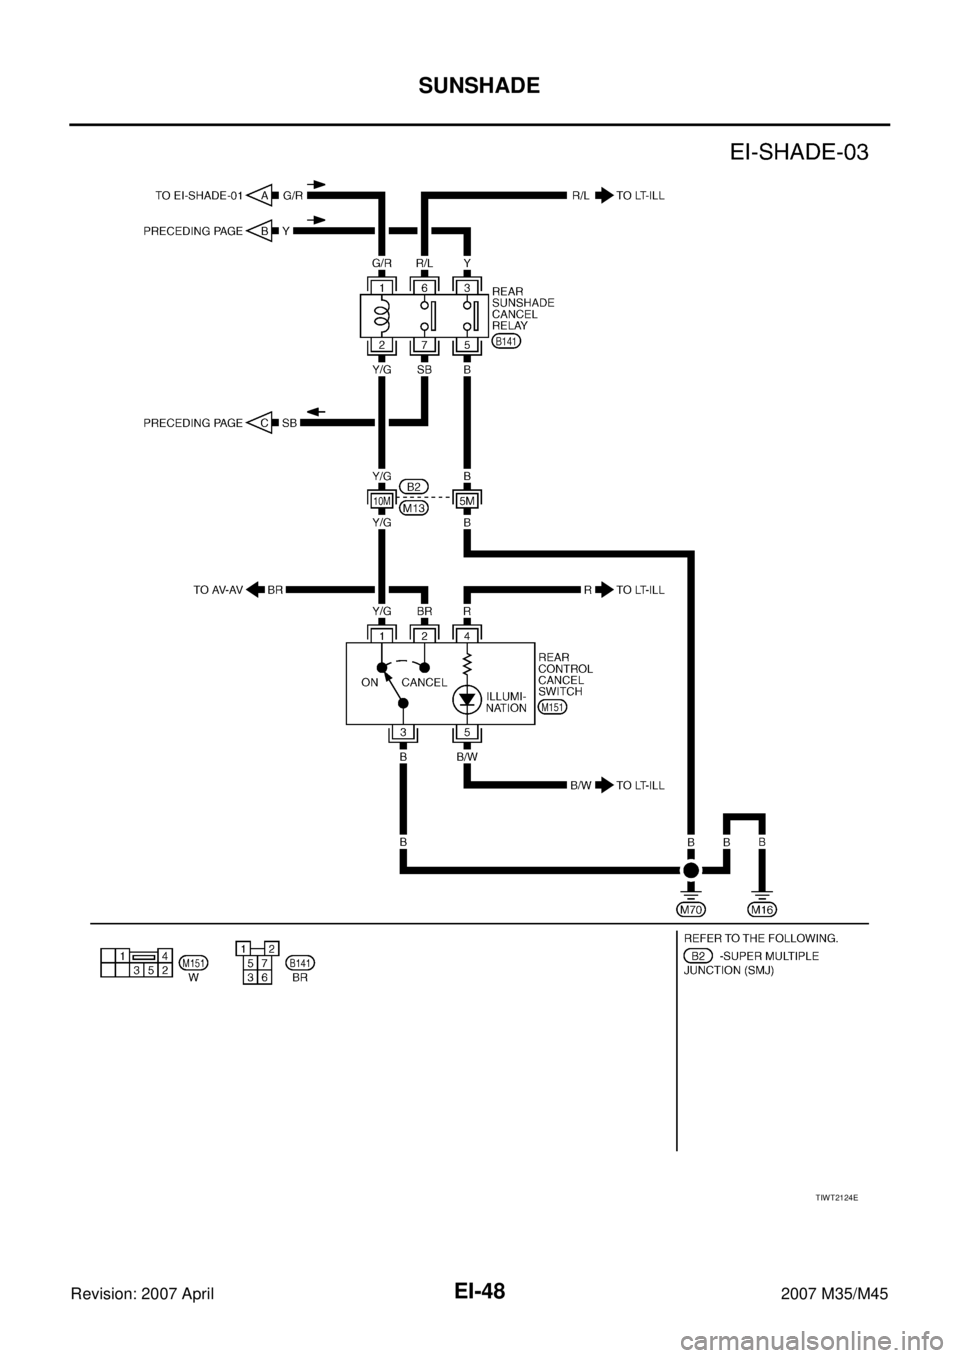
TIWT2124E
Page 3020 of 4647
SUNSHADE
EI-49
C
D
E
F
G
H
J
K
L
MA
B
EI
Revision: 2007 April2007 M35/M45
Terminals and Reference Values for Rear Sunshade UnitNIS00251
TerminalWire
colorItem ConditionVoltage (V)
(Approx.)
1 G/R Ignition switch (ON or START) Ignition switch is ON or START position Battery voltage
2 B Ground — 0
3 V Rear sunshade UP signalRear sunshade front or rear switch operates UP
position and rear control cancel switch operates ON
position0
Other than above Battery voltage
4 R Rear sunshade DOWN signalRear sunshade front or rear switch operates DOWN
position and rear control cancel switch operates ON
position0
Other than above Battery voltage
5 LG Shift R position signalWhen A/T shift lever is R position Battery voltage
When A/T shift lever is other than R position 0
6 B Ground — 0
Trending: ignition, idler pulley installation, Power seats, airbag, coolant capacity, washer fluid sensor, mirror controls


