key INFINITI Q50 2014 Infiniti Intouch
[x] Cancel search | Manufacturer: INFINITI, Model Year: 2014, Model line: Q50, Model: INFINITI Q50 2014Pages: 274, PDF Size: 1.43 MB
Page 83 of 274
![INFINITI Q50 2014 Infiniti Intouch 5. Hands-Free Phone
5-4
Making a call
1. Push<MENU>and touch [Phone].
2. Select one of the following methods and make a call.
Available methods
.[Favorites]:
Select a telephone number from a
list of p INFINITI Q50 2014 Infiniti Intouch 5. Hands-Free Phone
5-4
Making a call
1. Push<MENU>and touch [Phone].
2. Select one of the following methods and make a call.
Available methods
.[Favorites]:
Select a telephone number from a
list of p](/img/42/34966/w960_34966-82.png)
5. Hands-Free Phone
5-4
Making a call
1. Push
Page 87 of 274
![INFINITI Q50 2014 Infiniti Intouch 5. Hands-Free Phone
5-8
Sending a text message
1. Push<>on the steering wheel.
2. Touch [Text Message].
3. Touch [Compose Message].
The following items are available.
Available item Action
[To] [Keypa INFINITI Q50 2014 Infiniti Intouch 5. Hands-Free Phone
5-8
Sending a text message
1. Push<>on the steering wheel.
2. Touch [Text Message].
3. Touch [Compose Message].
The following items are available.
Available item Action
[To] [Keypa](/img/42/34966/w960_34966-86.png)
5. Hands-Free Phone
5-8
Sending a text message
1. Push<>on the steering wheel.
2. Touch [Text Message].
3. Touch [Compose Message].
The following items are available.
Available item Action
[To] [Keypad]
Type in the address of the recipient using the keypad. Touch
[OK] to confirm the address.
[Phonebook] Select a recipient from the phonebook and touch [OK] to confirm.
[Template] Select from list Select an item from the message list. The selected text will be
added to the message to be sent.
[Edit Template] Select an item in the message list to be edited. Use the keypad to edit the text and touch [OK] to complete editing.
[Send] Touch to send the message.
Page 92 of 274
![INFINITI Q50 2014 Infiniti Intouch BLUETOOTH®INFORMATION
Information of the connected Bluetooth®
device can be viewed.
1. Push<MENU>and touch [Settings].
2. Touch [Bluetooth].
3. Touch [Vehicle Bluetooth Device Info.].
The following INFINITI Q50 2014 Infiniti Intouch BLUETOOTH®INFORMATION
Information of the connected Bluetooth®
device can be viewed.
1. Push<MENU>and touch [Settings].
2. Touch [Bluetooth].
3. Touch [Vehicle Bluetooth Device Info.].
The following](/img/42/34966/w960_34966-91.png)
BLUETOOTH®INFORMATION
Information of the connected Bluetooth®
device can be viewed.
1. Push
Page 111 of 274

7. Monitor system
7-8
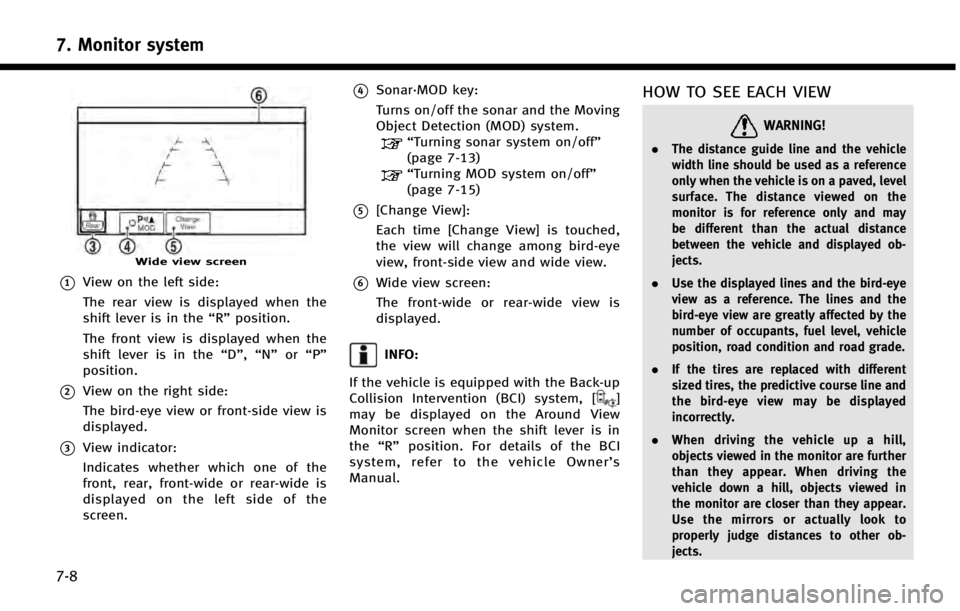
Wide view screen
*1View on the left side:
The rear view is displayed when the
shift lever is in the“R”position.
The front view is displayed when the
shift lever is in the “D”,“N”or“P”
position.
*2View on the right side:
The bird-eye view or front-side view is
displayed.
*3View indicator:
Indicates whether which one of the
front, rear, front-wide or rear-wide is
displayed on the left side of the
screen.
*4Sonar·MOD key:
Turns on/off the sonar and the Moving
Object Detection (MOD) system.
“Turning sonar system on/off”
(page 7-13)
“Turning MOD system on/off”
(page 7-15)
*5[Change View]:
Each time [Change View] is touched,
the view will change among bird-eye
view, front-side view and wide view.
*6Wide view screen:
The front-wide or rear-wide view is
displayed.
INFO:
If the vehicle is equipped with the Back-up
Collision Intervention (BCI) system, [
]
may be displayed on the Around View
Monitor screen when the shift lever is in
the “R” position. For details of the BCI
system, refer to the vehicle Owner’ s
Manual.
HOW TO SEE EACH VIEW
WARNING!
. The distance guide line and the vehicle
width line should be used as a reference
only when the vehicle is on a paved, level
surface. The distance viewed on the
monitor is for reference only and may
be different than the actual distance
between the vehicle and displayed ob-
jects.
. Use the displayed lines and the bird-eye
view as a reference. The lines and the
bird-eye view are greatly affected by the
number of occupants, fuel level, vehicle
position, road condition and road grade.
. If the tires are replaced with different
sized tires, the predictive course line and
the bird-eye view may be displayed
incorrectly.
. When driving the vehicle up a hill,
objects viewed in the monitor are further
than they appear. When driving the
vehicle down a hill, objects viewed in
the monitor are closer than they appear.
Use the mirrors or actually look to
properly judge distances to other ob-
jects.
Page 116 of 274

6 MPH (10 km/h). It is reactivated at lower
speeds.
Warning tone and indicator
As the vehicle approaches the detected
objects, the color of the warning indicator
and the tone will change from green to
yellow and then to red.
IndicatorTone
green
(blink slow) intermittent (slow)
yellow
(blink fast) intermittent (fast)
red
(no blinking) continuous
The intermittent tone will stop after three
seconds when an object is detected by
only the corner sonar and the distance
does not change.
The tone will stop when the object is away
from the vehicle.
Turning sonar system on/off
When the Sonar·MOD key is touched, the
indicator light on the key will turn off and
the sonar will turn off temporarily. The
Moving Object Detection (MOD) system will
also be turned off at the same time.
“Moving Object Detection (MOD)”
(page 7-13)
When the switch is touched again, the
indicator light will illuminate and the sonar
will turn back on.
In the cases below, the sonar will be turned
back on automatically: . When the shift lever is in the R
(Reverse) position.
. When
screen other than the camera view is
shown on the display.
. When the vehicle speed decreases
below approximately 6 MPH (10 km/h).
. When the ignition switch is placed in
the “OFF” position and turned back to
the “ON” position again.
. When the switch is selected, the MOD
function will also be turned off.
To prevent the sonar system from activat- ing altogether, change the status the
camera settings menu.
“Around View Monitor settings”
(page 7-16)
INFO:
Touching the sonar switch will also turn on/off
the sonar system temporarily.
MOVING OBJECT DETECTION (MOD)
The Moving Object Detection (MOD) system
informs the driver of any moving objects
surrounding the vehicle with images and a
chime when driving out of garages, man-
euvering into parking lots and in other
such instances.
The MOD system operates in the following
conditions when the camera view is
displayed:
. When the shift lever is in the P (Park) or
N (Neutral) position and the vehicle is
stopped, the MOD system detects the
moving objects in the bird-eye view.
The MOD system will not operate if the
outside mirror is moving in or out or if
either door is opened.
. When the shift lever is in the D (Drive)
position and the vehicle speed is below
7. Monitor system
7-13
Page 118 of 274

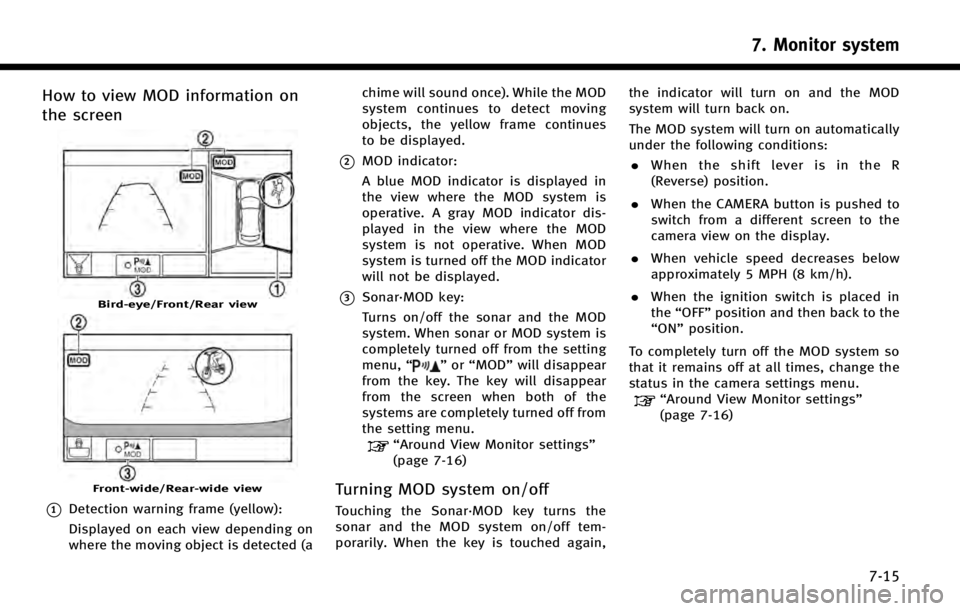
How to view MOD information on
the screen
Bird-eye/Front/Rear view
Front-wide/Rear-wide view
*1Detection warning frame (yellow):
Displayed on each view depending on
where the moving object is detected (achime will sound once). While the MOD
system continues to detect moving
objects, the yellow frame continues
to be displayed.
*2MOD indicator:
A blue MOD indicator is displayed in
the view where the MOD system is
operative. A gray MOD indicator dis-
played in the view where the MOD
system is not operative. When MOD
system is turned off the MOD indicator
will not be displayed.
*3Sonar·MOD key:
Turns on/off the sonar and the MOD
system. When sonar or MOD system is
completely turned off from the setting
menu,
“
”or “MOD” will disappear
from the key. The key will disappear
from the screen when both of the
systems are completely turned off from
the setting menu.
“Around View Monitor settings”
(page 7-16)
Turning MOD system on/off
Touching the Sonar·MOD key turns the
sonar and the MOD system on/off tem-
porarily. When the key is touched again, the indicator will turn on and the MOD
system will turn back on.
The MOD system will turn on automatically
under the following conditions:
. When the shift lever is in the R
(Reverse) position.
. When the CAMERA button is pushed to
switch from a different screen to the
camera view on the display.
. When vehicle speed decreases below
approximately 5 MPH (8 km/h).
. When the ignition switch is placed in
the “OFF” position and then back to the
“ON” position.
To completely turn off the MOD system so
that it remains off at all times, change the
status in the camera settings menu.
“Around View Monitor settings”
(page 7-16)
7. Monitor system
7-15
Page 145 of 274
![INFINITI Q50 2014 Infiniti Intouch 8. Information and settings
8-22
SETTINGS SCREEN
The system can be customized to make it easier for you to use.
Step 1Step 2 Setting item Result
Push <Menu> [Settings] [Bluetooth] Set the Bluetooth®A INFINITI Q50 2014 Infiniti Intouch 8. Information and settings
8-22
SETTINGS SCREEN
The system can be customized to make it easier for you to use.
Step 1Step 2 Setting item Result
Push <Menu> [Settings] [Bluetooth] Set the Bluetooth®A](/img/42/34966/w960_34966-144.png)
8. Information and settings
8-22
SETTINGS SCREEN
The system can be customized to make it easier for you to use.
Step 1Step 2 Setting item Result
Push
Page 148 of 274
![INFINITI Q50 2014 Infiniti Intouch Step 1Step 2 Setting item Result
Push <Menu> [Settings] [Meter] [Main Menu Selection] [Energy Flow]* Select the preferred item to display on the meter.
[EV Odometer]* Refer to the vehicle Owner’s Ma INFINITI Q50 2014 Infiniti Intouch Step 1Step 2 Setting item Result
Push <Menu> [Settings] [Meter] [Main Menu Selection] [Energy Flow]* Select the preferred item to display on the meter.
[EV Odometer]* Refer to the vehicle Owner’s Ma](/img/42/34966/w960_34966-147.png)
Step 1Step 2 Setting item Result
Push
Page 149 of 274
![INFINITI Q50 2014 Infiniti Intouch 8. Information and settings
8-26
Step 1Step 2 Setting item Result
Push <Menu> [Settings] [Clock Setting] Set the Clock to your preferred settings.
“Clock settings”(page 2-20)
[Infiniti Connection] INFINITI Q50 2014 Infiniti Intouch 8. Information and settings
8-26
Step 1Step 2 Setting item Result
Push <Menu> [Settings] [Clock Setting] Set the Clock to your preferred settings.
“Clock settings”(page 2-20)
[Infiniti Connection]](/img/42/34966/w960_34966-148.png)
8. Information and settings
8-26
Step 1Step 2 Setting item Result
Push
Page 151 of 274

8. Information and settings
8-28
FULLY CUSTOMIZABLE DIGITAL ENVIR-
ONMENT
The system will automatically recognize
the user upon turning on the vehicle, after
Setting up the user information. There will
be a personalized welcome greeting and a
prompt to log-in.
This feature allows 3 drivers to use their
own registration, drive mode, driving posi-
tion, air conditioner and audio settings,
and memorizes these custom settings.
Log-in user can be changed from welcome
greeting screen or User List screen.
NOTE:
.
Vehicle Apps feature can not linked to the
Intelligent Keys.
.A maximum of four Intelligent Keys can be
registered to memorize settings for three
profiled users and one guest.
.When the ignition switch is pushed to the
“OFF” position, the user settings at that
point will be memorized by the Intelligent
Key that is used.
USER REGISTRATION
The driving position, navigation, and air
conditioner, etc., settings can be memorize
for each user. The settings can be restored
when deactivating the system.
Up to 3 settings can be registered.
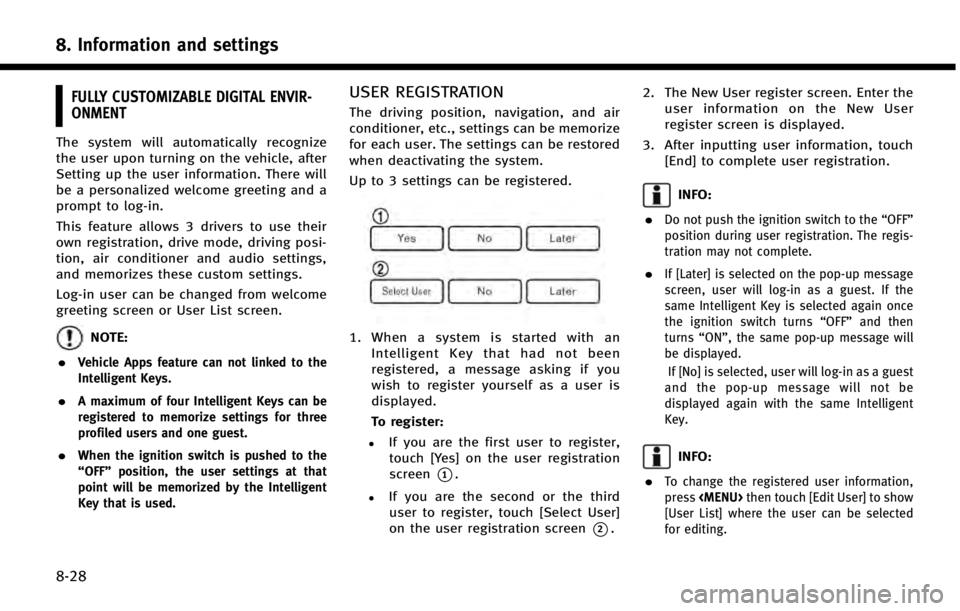
1. When a system is started with an
Intelligent Key that had not been
registered, a message asking if you
wish to register yourself as a user is
displayed.
To register:
.If you are the first user to register,touch [Yes] on the user registration
screen
*1.
.If you are the second or the third
user to register, touch [Select User]
on the user registration screen
*2. 2. The New User register screen. Enter the
user information on the New User
register screen is displayed.
3. After inputting user information, touch [End] to complete user registration.
INFO:
.
Do not push the ignition switch to the “OFF”
position during user registration. The regis-
tration may not complete.
.If [Later] is selected on the pop-up message
screen, user will log-in as a guest. If the
same Intelligent Key is selected again once
the ignition switch turns “OFF”and then
turns “ON”, the same pop-up message will
be displayed.
If [No] is selected, user will log-in as a guest
and the pop-up message will not be
displayed again with the same Intelligent
Key.
INFO:
.
To change the registered user information,
press