window INFINITI Q50 2014 Infiniti Intouch
[x] Cancel search | Manufacturer: INFINITI, Model Year: 2014, Model line: Q50, Model: INFINITI Q50 2014Pages: 274, PDF Size: 1.43 MB
Page 74 of 274
![INFINITI Q50 2014 Infiniti Intouch AUDIO SETTINGS
Audio settings can be adjusted or audio
related functions can be turned on/off with
the following procedure.
1. Touch<MENU>.
2. Touch [Settings].
3. Touch [Audio].
Setting items Action
INFINITI Q50 2014 Infiniti Intouch AUDIO SETTINGS
Audio settings can be adjusted or audio
related functions can be turned on/off with
the following procedure.
1. Touch<MENU>.
2. Touch [Settings].
3. Touch [Audio].
Setting items Action](/img/42/34966/w960_34966-73.png)
AUDIO SETTINGS
Audio settings can be adjusted or audio
related functions can be turned on/off with
the following procedure.
1. Touch
Page 105 of 274
7. Monitor system
7-2
REARVIEW MONITOR (if so equipped)
When the shift lever is shifted into the R
(Reverse) position, the upper touch screen
display (upper display) shows the view to
the rear of the vehicle.
The system is designed as an aid to the
driver in situations such as slot parking or
parallel parking.
REARVIEW MONITOR OPERATION
PRECAUTIONS
The distance between the vehicle and the
objects viewed on the monitor may be
different from the actual distances.
“Difference between predictive and
actual distances” (page 7-19)
WARNING!
Failure to follow the warnings and instruc-
tions for proper use of the RearView Monitor
could result in serious injury or death.
. The RearView Monitor is a convenience
but it is not a substitute for proper
backing. Always turn and look out the
windows, and check mirrors to be sure
that it is safe to move before operating
the vehicle. Always back up slowly. .
The system is designed as an aid to the
driver in detecting large stationary ob-
jects directly behind the vehicle, to help
avoid damaging the vehicle.
. The system cannot completely eliminate
blind spots and may not detect every
object. It does not warn of moving
objects.
. Underneath the bumper and the corner
areas of the bumper cannot be viewed on
the RearView Monitor because of its
monitoring range limitation. The system
will not detect small objects below the
bumper, and may not detect objects
close to the bumper or on the ground.
. Objects viewed in the RearView Monitor
differ from actual distance because a
wide-angle lens is used.
. Objects in the RearView Monitor will
appear visually opposite, similar to than
when viewed in the rear view and outside
mirrors
. Make sure that the trunk is securely
closed when backing up.
. Do not put anything on the RearView
camera. The RearView camera is installed
above the license plate. .
When washing the vehicle with high-
pressure water, be sure not to spray it
around the camera. Otherwise, water
may enter the camera unit causing water
condensation on the lens, a malfunction,
fire or an electric shock.
. Do not strike the camera. It is a precision
instrument. Otherwise, it may malfunc-
tion or cause damage resulting in a fire
or an electric shock.
CAUTION!
Do not scratch the camera lens when
cleaning dirt or snow from the front of the
camera.
Page 108 of 274
![INFINITI Q50 2014 Infiniti Intouch Setting ItemsAction
[Camera Menu] [Predictive Course Lines] When this item is turned on, the predictive
course line is displayed on the rear view
screen.
[Display Settings]
(Available only when camera INFINITI Q50 2014 Infiniti Intouch Setting ItemsAction
[Camera Menu] [Predictive Course Lines] When this item is turned on, the predictive
course line is displayed on the rear view
screen.
[Display Settings]
(Available only when camera](/img/42/34966/w960_34966-107.png)
Setting ItemsAction
[Camera Menu] [Predictive Course Lines] When this item is turned on, the predictive
course line is displayed on the rear view
screen.
[Display Settings]
(Available only when camera
screen is displayed on the
upper display.) [Brightness]
Adjust display settings by touching [+]/[-].
[Contrast]
[Tint]
[Color]
[Black Level]
[Default Settings] Return all settings to default.
OPERATING TIPS
. When the shift lever is shifted to the R
(Reverse) position, the upper screen
automatically changes to the RearView
Monitor mode.
. The following conditions may occur, but
it does not indicate a malfunction.
—
When the view is switched, the images
on the screen may be displayed with
some delay.
—When the temperature is extremely highor low, the screen may not clearly
display objects.
—When strong light directly comes on tothe camera, objects may not be dis- played clearly.
—Vertical lines may be seen in objects on
the screen due to strong reflected light
from the bumper.
—The screen may flicker under fluorescent
light.
—The colors of objects on the RearViewMonitor may differ somewhat from the
actual color of objects.
—Objects on the monitor may not be clearin a dark environment.
. If dirt, rain or snow accumulates on the
camera, the RearView Monitor may not
display object clearly. Clean the camera
if this happens. .
Do not use alcohol, benzine or thinner
to clean the camera. This will cause
discoloration. To clean the camera,
wipe with a cloth dampened with
diluted mild cleaning agent and then
wipe with a dry cloth.
. Do not damage the camera as the
monitor screen may be adversely af-
fected.
. Do not use wax on the camera window.
Wipe off any wax with a clean cloth
dampened with mild detergent diluted
with water.
7. Monitor system
7-5
Page 109 of 274
7. Monitor system
7-6
AROUND VIEW®MONITOR (AVM) (if so
equipped)
When you push the
INFINITI Controller or shift the shift lever
into the R (Reverse) position while the
ignition switch is in the ON position, the
Around View Monitor operates with the
sonar system. The upper touch screen
display (upper display) shows the view to
the Around View Monitor. The Around View
Monitor shows various views of the posi-
tion of the vehicle.
Available views:
. Bird-Eye View
The surrounding view of the vehicle.
. Front-Side View
The view around and ahead of the front
passenger’s side wheel.
. Front View
An approximately 150-degree view of
the front of the vehicle.
. Front-Wide View
An approximately 180-degree view of
the front of the vehicle. .
Rear View
An approximately 150-degree view of
the rear of the vehicle.
. Rear-Wide View
An approximately 180-degree view of
the rear of the vehicle.
AROUND VIEW MONITOR OPERA-
TION PRECAUTIONS
The system is designed as an aid to the
driver in situations such as slot parking or
parallel parking.
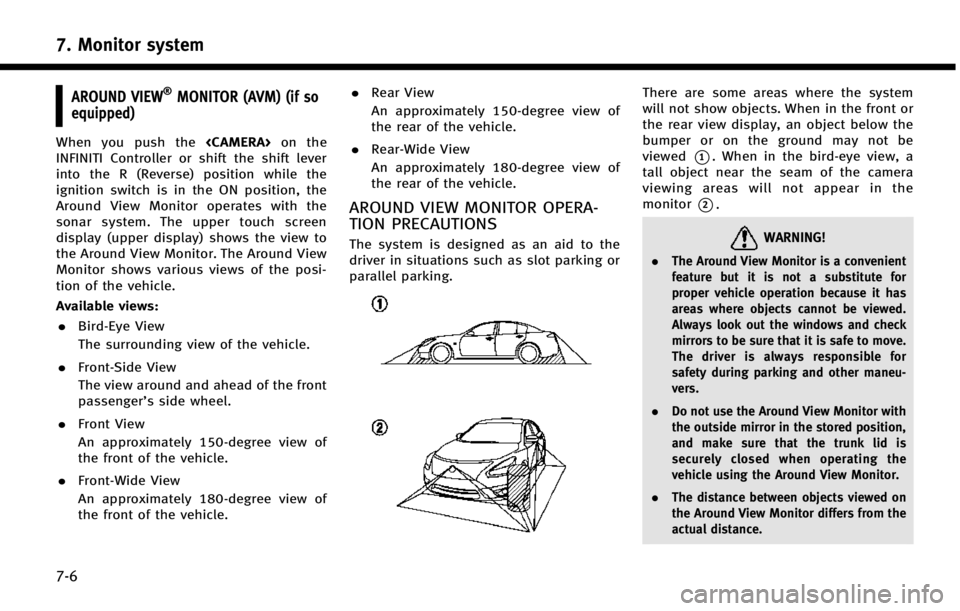
There are some areas where the system
will not show objects. When in the front or
the rear view display, an object below the
bumper or on the ground may not be
viewed
*1. When in the bird-eye view, a
tall object near the seam of the camera
viewing areas will not appear in the
monitor
*2.
WARNING!
. The Around View Monitor is a convenient
feature but it is not a substitute for
proper vehicle operation because it has
areas where objects cannot be viewed.
Always look out the windows and check
mirrors to be sure that it is safe to move.
The driver is always responsible for
safety during parking and other maneu-
vers.
. Do not use the Around View Monitor with
the outside mirror in the stored position,
and make sure that the trunk lid is
securely closed when operating the
vehicle using the Around View Monitor.
. The distance between objects viewed on
the Around View Monitor differs from the
actual distance.
Page 115 of 274
7. Monitor system
7-12
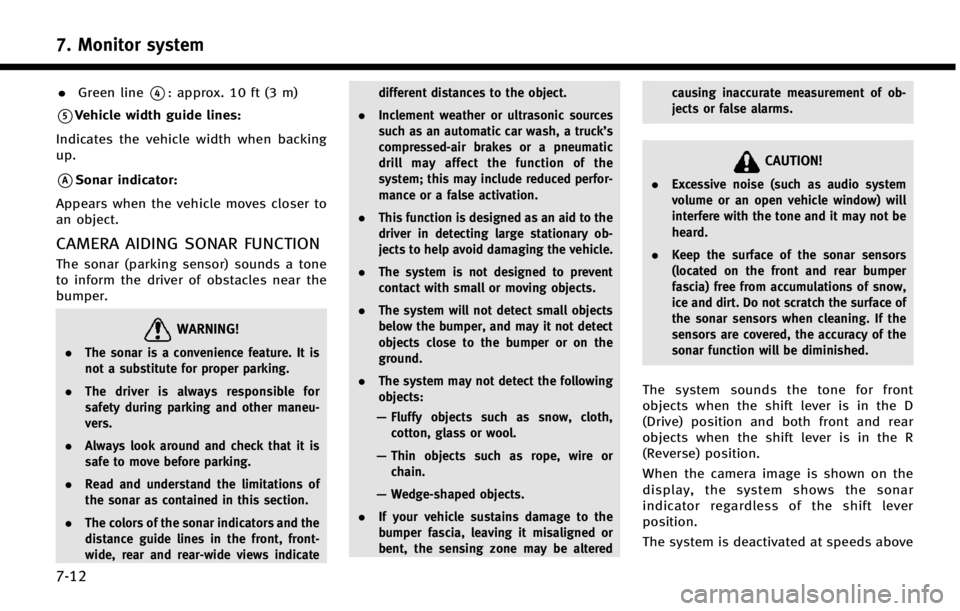
.Green line*4: approx. 10 ft (3 m)
*5Vehicle width guide lines:
Indicates the vehicle width when backing
up.
*ASonar indicator:
Appears when the vehicle moves closer to
an object.
CAMERA AIDING SONAR FUNCTION
The sonar (parking sensor) sounds a tone
to inform the driver of obstacles near the
bumper.
WARNING!
. The sonar is a convenience feature. It is
not a substitute for proper parking.
. The driver is always responsible for
safety during parking and other maneu-
vers.
. Always look around and check that it is
safe to move before parking.
. Read and understand the limitations of
the sonar as contained in this section.
. The colors of the sonar indicators and the
distance guide lines in the front, front-
wide, rear and rear-wide views indicate different distances to the object.
. Inclement weather or ultrasonic sources
such as an automatic car wash, a truck’s
compressed-air brakes or a pneumatic
drill may affect the function of the
system; this may include reduced perfor-
mance or a false activation.
. This function is designed as an aid to the
driver in detecting large stationary ob-
jects to help avoid damaging the vehicle.
. The system is not designed to prevent
contact with small or moving objects.
. The system will not detect small objects
below the bumper, and may it not detect
objects close to the bumper or on the
ground.
. The system may not detect the following
objects:
— Fluffy objects such as snow, cloth,
cotton, glass or wool.
— Thin objects such as rope, wire or
chain.
— Wedge-shaped objects.
. If your vehicle sustains damage to the
bumper fascia, leaving it misaligned or
bent, the sensing zone may be altered causing inaccurate measurement of ob-
jects or false alarms.
CAUTION!
.
Excessive noise (such as audio system
volume or an open vehicle window) will
interfere with the tone and it may not be
heard.
. Keep the surface of the sonar sensors
(located on the front and rear bumper
fascia) free from accumulations of snow,
ice and dirt. Do not scratch the surface of
the sonar sensors when cleaning. If the
sensors are covered, the accuracy of the
sonar function will be diminished.
The system sounds the tone for front
objects when the shift lever is in the D
(Drive) position and both front and rear
objects when the shift lever is in the R
(Reverse) position.
When the camera image is shown on the
display, the system shows the sonar
indicator regardless of the shift lever
position.
The system is deactivated at speeds above
Page 117 of 274
7. Monitor system
7-14
approximately 5 MPH (8 km/h), the
MOD system detects moving objects in
the front view or front-wide view.
. When the shift lever is in the R
(Reverse) position and the vehicle
speed is below approximately 5 MPH
(8 km/h), the MOD system detects
moving objects in the rear view or
rear-wide view. The MOD system will
not operate if the trunk lid is open.
INFO:
.
The MOD system does not detect moving
objects in the front-side view. The MOD
indicator is not displayed on the screen
when in this view.
.While the sonar/BCI warning tone is beep-
ing, the MOD system does not chime.
WARNING!
. The MOD system is not a substitute for
proper vehicle operation and is not
designed to prevent contact with the
objects surrounding the vehicle. When
maneuvering, always use the outside
mirror and rearview mirror and turn and
check the surrounding area to ensure it is safe to maneuver.
. The MOD system does not have the
function to detect the surrounding sta-
tionary objects.
. Do not use the MOD system when towing
a trailer. The system may not function
properly.
. Excessive noise (for example, audio
system volume or open vehicle window)
will interfere with the chime sound, and
it may not be heard.
. The MOD system performance will be
limited according to environmental con-
ditions and surrounding objects such as:
— When there is low contrast between
background and the moving objects.
— When there is a blinking source of
light.
— When strong light such as another
vehicle’s headlight or sunlight is pre-
sent.
— When camera orientation is not in its
usual position, such as when a mirror
is folded.
— When there is dirt, water drops or
snow on the camera lens. —
When the position of the moving
objects in the display is not changed.
. The MOD system might detect something
like flowing water droplets on the camera
lens, white smoke from the muffler,
moving shadows, etc.
. The MOD system may not function
properly depending on the speed, direc-
tion, distance or shape of the moving
objects.
. If your vehicle sustains damage to the
parts where the camera is installed,
leaving it misaligned or bent, the sensing
zone may be altered and the MOD system
may not detect objects properly.
Page 229 of 274
10. Voice recognition
10-2
INFINITI VOICE RECOGNITION
USING VOICE RECOGNITION SYS-
TEM
Initialization
When the ignition switch is turned on,
Voice Recognition is initialized. When
completed, the system is ready to accept
voice commands. If<
>on the steering-
wheel is pushed before the initialization
completes, the display will show a mes-
sage to wait until the system has been
ready.
BEFORE STARTING
To get the best recognition performance
from Voice Recognition, observe the follow-
ing items.
. The interior of the vehicle should be as
quiet as possible. Close the windows to
eliminate the surrounding noises (traf-
fic noise, vibration sounds, etc.), which
may prevent the system from correctly
recognizing the voice commands.
. Wait until the tone sounds before
speaking a command. .
Speak in a natural conversational voice
without pausing between words.
GIVING VOICE COMMANDS
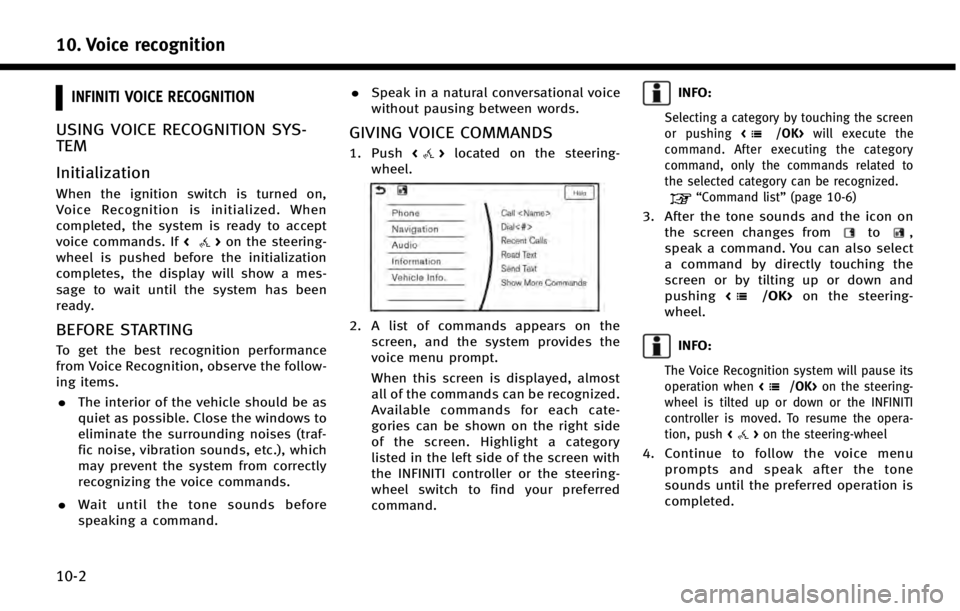
1. Push <>located on the steering-
wheel.
2. A list of commands appears on the screen, and the system provides the
voice menu prompt.
When this screen is displayed, almost
all of the commands can be recognized.
Available commands for each cate-
gories can be shown on the right side
of the screen. Highlight a category
listed in the left side of the screen with
the INFINITI controller or the steering-
wheel switch to find your preferred
command.
INFO:
Selecting a category by touching the screen
or pushing will execute the
command. After executing the category
command, only the commands related to
the selected category can be recognized.
“Command list” (page 10-6)
3. After the tone sounds and the icon on
the screen changes fromto,
speak a command. You can also select
a command by directly touching the
screen or by tilting up or down and
pushing <
/OK>on the steering-
wheel.
INFO:
The Voice Recognition system will pause its
operation when on the steering-
wheel is tilted up or down or the INFINITI
controller is moved. To resume the opera-
tion, push <
>on the steering-wheel
4. Continue to follow the voice menu
prompts and speak after the tone
sounds until the preferred operation is
completed.
Page 257 of 274

11. Troubleshooting guide
11-14
SymptomPossible cause Possible solution
The system does not recognize the connection
of a cellular phone. The system does not
receive or make a call. The cellular phone is not compatible with the in-
vehicle hands-free phone system.
Use a cellular phone compatible with the system. Visit the
website (www.infinitiusa.com/bluetooth) for model com-
patibility.
The cellular phone is not connected. Check the registration procedure, and then register the
cellular phone again.
The phone operation is limited by the functions
(such as dial lock, etc.) of the registered cellular
phone. Remove any settings that are limiting use of the cellular
phone, and then perform registration again.
The other party cannot hear your voice. The
other party can hear your voice, but it cracks or
cuts out. The cellular phone is not connected.
Check the registration procedure, and then register the
cellular phone again.
The fan speed of the air conditioner is too fast. Decrease the fan speed of the air conditioner.
The ambient noise level is excessive. (For example:
heavy rain, construction sites, inside a tunnel,
oncoming vehicles, etc.) Close the windows to shut out ambient noise.
The noise generated by driving the vehicle is too
loud. Reduce the vehicle speed, and then speak a command.
The incoming or outgoing voice level is too loud. Adjust the incoming or outgoing voice level properly.
The voice is cut out or noise is heard during a
call. The wireless Bluetooth
®connection may be dis-
rupted depending on the location of the cellular
phone. Do not place the cellular phone in an area surrounded by
metal or far away from the in-vehicle hands-free phone
system. Do not place a cellular phone close to the seats
or your body.
When a cellular phone is operated to make a
call, the hands-free function becomes una-
vailable. Some models of a cellular phone do not switch to
the hands-free mode when they are operated to
make a call. This is not a malfunction. Make a call again using the
hands-free function.
The other party’s voice cannot be heard. There
is no ring tone. The volume level is set to the minimum.
Adjust the volume level.
A cellular phone is not connected. Check the registration procedure, and then register the
cellular phone again.
Page 268 of 274

VOICE RECOGNITION
SymptomPossible cause Possible solution
The system does not operate or fails to interpret the
command correctly. The interior of the vehicle is too noisy.
Close the windows or have the other occupants be
quiet.
The fan speed of the air conditioner is too fast. Decrease the fan speed of the air conditioner.
The noise generated by driving the vehicle is too
loud. Reduce the vehicle speed, and then speak the
command.
The voice command is spoken in a low voice. Speak the command in a louder voice.
The timing of speaking a command is too fast. Speak the command after confirming the following: a voice guidance is announced, a tone sounds, and
an icon on the screen changes from white to orange.
The command is spoken too slowly. Speak in a natural voice without pausing between
words.
The system prompt to say command again. Pronunciation is unclear. Speak clearly.
The command is spoken too late after the tone. Speak the command within 5 seconds after con- firming the following: a voice guidance is an-
nounced, a tone sounds, and an icon on the screen
changes from white to orange.
An improper command is spoken. Speak the command or a number that is displayed
in white on the screen.
Speak a command that is shown in the command
list.
The system does not correctly recognize a number
spoken. Many numbers are spoken at once.
Place a pause between the appropriate digits for
correct recognition by the system. When speaking a
telephone number, place a pause between area
codes, dial codes, etc.
11. Troubleshooting guide
11-25
Page 270 of 274

A
About route guidance............................... 9-29
Adjusting volume and settings .................. 2-9
Advanced Climate Control system ............. 3-7
Air conditioner
In-cabin microfilter .................................... 3-8
Air filter
In-cabin microfilter .................................... 3-8
App Garage screen.................................... 6-3
App Garage Settings screen ...................... 6-4
Around View Monitor (AVM) ...................... 7-6
Audio operation precautions ..................... 4-2
Audio operations .................................... 4-11
Audio Source bar setting......................... 4-12
Audio system
Steering-wheel audio controls ................. 4-11
Automatic
Automatic climate control system .............. 3-6
Auxiliary (AUX) devices............................ 4-30
B
Bluetooth®Hands-Free Phone System....... 5-2
Bluetooth®information ........................... 5-13
Bluetooth®streaming audio............. 4-9, 4-26
Building graphics ....................................... 9-6
C
Cabin air filter........................................... 3-8
Canceling Route ....................................... 9-34
CD/USB memory device care
and cleaning ........................................... 4-33
Changing map view
DirectionBird view2D view .......................... 9-9
Changing order of destination
and waypoints ......................................... 9-37
Changing region ...................................... 9-14
Changing scale of map .............................. 9-8
Clock settings ......................................... 2-20
Command list.......................................... 10-6
Compact Disc (CD) player ................. 4-4, 4-18
Compressed Audio
Files (MP3/WMA/AAC) ............................... 4-7
Connecting Bluetooth
®audio device ....... 2-21
Connecting Bluetooth®device ................. 2-21
Connecting Bluetooth Hands-free Phone ... 5-3
Connecting cellular phone ....................... 2-21
Connecting to Interactive Voice Menu ...... 8-15
Control buttons and functions ................... 2-2
Current vehicle location ........................... 9-59
Customer assistance ............................... 11-2
D
Defroster switch
Rear window and outside mirror defroster
switch ..................................................... 3-11
Deleting stored item ................................ 9-53
Destination screen ................................... 9-15
Display Settings ...................................... 2-17
Display urgent traffic information ............. 9-46
Display View Bar ..................................... 2-11
Displaying current vehicle location ............. 9-6
Download application ............................... 6-3
Driver Assistance settings ....................... 8-31
Dual Display ............................................. 2-2
During a call ............................................. 5-5
E
Editing route ............................................ 9-35
Editing stored information........................ 9-50
Editing user settings ............................... 8-29
Emergency support ................................. 8-20
Examples of how Vehicle Apps is used ..... 6-7
F
Favorites ................................................. 5-12
Index
12-1