oil INFINITI Q50 2014 User Guide
[x] Cancel search | Manufacturer: INFINITI, Model Year: 2014, Model line: Q50, Model: INFINITI Q50 2014Pages: 394, PDF Size: 1.99 MB
Page 313 of 394

7-4Appearance and care
ambient temperature.
. Rinse the wheel to completely remove
the cleaner within 15 minutes after the
cleaner is applied.
Bright wheels (if so equipped)
The bright wheels use a different coating
process than typical aluminum alloy wheel
and they are not plated wheels. These
wheels are clear-coated and require the
following special cleaning. They should be
regularly washed with a soft sponge
soaked in a lot of water. After washing
with water, wipe clean with a dry, soft cloth
and dry completely. When there is chemical
or tire wax, or dirt such as an antifreeze
agent on the surface, wash them with
water as soon as possible.
CAUTION
.The surfaces of the wheels use a
different coating process than typical
aluminum alloy wheels. Do not use
aluminum alloy wheel cleaners or abra-
sive cleaners to clean the wheels. Using
such cleaners could damage the wheel
surfaces. .
Do not use an automatic car wash if the
vehicle is equipped with bright wheels.
The wheel coating may be damaged.
. Do not use a brush to wash the wheels if
the vehicle is equipped with bright
wheels. The wheel coating may be
damaged.
CHROME PARTS
Clean chrome parts regularly with a non-
abrasive chrome polish to maintain the
finish.
TIRE DRESSING
INFINITI does not recommend the use of
tire dressings. Tire manufacturers apply a
coating to the tires to help reduce dis-
coloration of the rubber. If a tire dressing is
applied to the tires, it may react with the
coating and form a compound. This com-
pound may come off the tire while driving
and stain the vehicle paint.
If you choose to use a tire dressing, take
the following precautions:
.Use a water-based tire dressing. The
coating on the tire dissolves more
easily with an oil-based tire dressing. .
Apply a light coat of tire dressing to
help prevent it from entering the tire
tread/grooves (where it would be diffi-
cult to remove).
. Wipe off excess tire dressing using a
dry towel. Make sure the tire dressing
is completely removed from the tire
tread/grooves.
. Allow the tire dressing to dry as
recommended by tire dressing manu-
facturer.
Page 314 of 394

Occasionally remove loose dust from the
interior trim, plastic parts and seats using
a vacuum cleaner or soft bristled brush.
Wipe the vinyl and leather surfaces with a
clean, soft cloth dampened in mild soap
solution, then wipe clean with a dry soft
cloth.
Regular care and cleaning is required in
order to maintain the appearance of the
leather.
Before using any fabric protector, read the
manufacturer’s recommendations. Some
fabric protectors contain chemicals that
may stain or bleach the seat material.
Use a cloth dampened only with water, to
clean the meter and gauge lens.
WARNING
Do not use water or acidic cleaners (hot
steam cleaners) on the seat. This can
damage the seat or occupant classification
sensors. This can also affect the operation
of the air bag system and result in serious
personal injury.
CAUTION
. Never use benzine, thinner, or any
similar material.
. For cleaning, use a soft cloth, dampened
with water. Never use a rough cloth,
alcohol, benzine, thinner or any kind of
solvent or paper towel with a chemical
cleaning agent. They will scratch or
cause discoloration to the lens.
. Do not spray any liquid such as water on
the meter lens. Spraying liquid may
cause the system to malfunction.
. Small dirt particles can be abrasive and
damaging to the leather surfaces and
should be removed promptly. Do not use
saddle soap, car waxes, polishes, oils,
cleaning fluids, solvents, detergents or
ammonia-based cleaners as they may
damage the leather’s natural finish.
. Only use fabric protectors approved by
INFINITI.
. Do not use glass or plastic cleaner on
meter or gauge lens covers. It may
damage the lens cover.
AIR FRESHENERS
Most air fresheners use a solvent that
could affect the vehicle interior. If you use
an air freshener, take the following pre-
cautions:
.Hanging-type air fresheners can cause
permanent discoloration when they
contact vehicle interior surfaces. Place
the air freshener in a location that
allows it to hang free and not contact
an interior surface.
. Liquid-type air fresheners typically clip
on the vents. These products can cause
immediate damage and discoloration
when spilled on interior surfaces.
Carefully read and follow the manufac-
turer’s instructions before using air fresh-
eners.
MOONROOF SUNSHADE (if so
equipped)
The moonroof sunshade is made from a
suede material.
Clean the sunshade material as follows:
Appearance and care7-5
CLEANING INTERIOR
Page 315 of 394

7-6Appearance and care
CAUTION
To help prevent damaging the sunshade
while cleaning:
.Do not rub the material with a cloth.
Doing so can damage the surface of the
material or cause a stain to spread.
. Never use benzine, thinner or any similar
chemical to clean the suede. This may
discolor the sunshade and damage the
surface.
. Clean water based stains by patting the
surface with a clean soft cloth dampened
in warm water. Press a clean dry cloth
onto the surface to remove as much
dampness as possible and then let air
dry.
. Clean oil based stains by patting the
surface with a clean soft cloth dampened
in warm water. Press a clean dry cloth
onto the surface to remove as much
dampness as possible and then let air
dry.
FLOOR MATS
WARNING
To avoid potential pedal interference that
may result in a collision or injury:
.NEVER place a floor mat on top of
another floor mat in the driver front
position.
. Use only genuine NISSAN floor mats
specifically designed for use in your
vehicle model. See your INFINITI retailer
for more information.
. Properly position the mats in the floor-
well using the floor mat positioning aid.
See “Floor mat positioning aid” (P.7-6).
The use of INFINITI floor mats can extend
the life of your vehicle carpet and make it
easier to clean the interior. Mats should be
maintained with regular cleaning and
replaced if they become excessively worn.
SAI0050
Front (example)
Floor mat positioning aid
This model includes front floor mat brack-
ets to act as floor mat positioning aid.
INFINITI floor mats have been specially
designed for your vehicle model. The front
floor mats have grommet holes in them. To
install, simply position the mat by placing
the floor mat bracket through the floor mat
grommet hole while centering the mat in
the floor pan contour.
Periodically check to make certain that the
mats are properly positioned.
Page 318 of 394

8 Maintenance and do-it-yourself
Maintenance requirement .................................... 8-2Scheduled maintenance .................................. 8-2
General maintenance....................................... 8-2
Where to go for service ................................... 8-2
General maintenance ........................................... 8-2 Explanation of maintenance items ................... 8-2
Maintenance precautions ..................................... 8-5
Engine compartment check locations ................... 8-6 VQ37VHR engine ............................................. 8-6
Engine cooling system ......................................... 8-8
Checking engine coolant level ......................... 8-9
Changing engine coolant ................................. 8-9
Engine oil .......................................................... 8-10
Checking engine oil level............................... 8-10
Changing engine oil and filter ....................... 8-10
Automatic transmission fluid ............................. 8-12
Power steering fluid (if so equipped) ................. 8-13
Brake fluid......................................................... 8-13
Window washer fluid ......................................... 8-14
Battery .............................................................. 8-15
Jump starting ................................................ 8-16
Variable voltage control system ......................... 8-17
Drive belts ......................................................... 8-17 Spark plugs ...................................................... 8-18
Replacing spark plugs ................................. 8-18
Air cleaner ........................................................ 8-19
Windshield wiper blades ................................... 8-20 Cleaning ...................................................... 8-20
Replacing..................................................... 8-20
Brakes .............................................................. 8-21 Self-adjusting brakes ................................... 8-21
Brake pad wear warning .............................. 8-21
Fuses ................................................................ 8-22
Engine compartment .................................... 8-22
Passenger compartment............................... 8-23
Intelligent Key battery replacement ................... 8-24
Lights................................................................ 8-26 Headlights ................................................... 8-27
Exterior and interior lights ........................... 8-27
Wheels and tires ............................................... 8-29 Tire pressure ............................................... 8-29
Tire labeling ................................................ 8-33
Types of tires............................................... 8-35
Tire chains ................................................... 8-37
Changing wheels and tires........................... 8-38
Page 321 of 394

8-4Maintenance and do-it-yourself
seat adjusters, seatback recliner, etc. to
ensure they operate smoothly and that all
latches lock securely in every position.
Check that the head restraints move up
and down smoothly and that the locks (if
so equipped) hold securely in all latched
positions.
Steering wheel:Check for changes in the
steering conditions, such as excessive free
play, hard steering or strange noises.
Warning lights and chimes: Make sure that
all warning lights and chimes are operating
properly.
Windshield defroster: Check that the air
comes out of the defroster outlets properly
and in sufficient quantity when operating
the heater or air conditioner.
Windshield wiper and washer*: Check that
the wipers and washer operate properly
and that the wipers do not streak.
Under the hood and vehicle
The maintenance items listed here should
be checked periodically (for example, each
time you check the engine oil or refuel).
Battery*: Check the fluid level in each cell.
It should be between the MAX and MIN
lines. Vehicles operated in high tempera- tures or under severe condition require
frequent checks of the battery fluid level.
NOTE:
Care should be taken to avoid situations
that can lead to potential battery dis-
charge and potential no-start conditions
such as:
1.
Installation or extended use of electro-
nic accessories that consume battery
power when the engine is not running
(Phone chargers, GPS, DVD players,
etc.)
2. Vehicle is not driven regularly and/or
only driven short distances.
In these cases, the battery may need to be
charged to maintain battery health.
Brake fluid level*: Make sure that the
brake fluid level is between the MAX and
MIN lines on the reservoir.
Engine coolant level*: Check the coolant
level when the engine is cold.
Engine drive belts*: Make sure that no belt
is frayed, worn, cracked or oily.
Engine oil level*: Check the level after
parking the vehicle on a level spot and
turning off the engine. Wait more than 15
minutes for the oil to drain back into the oil pan.
Exhaust system:
Make sure there are no
loose supports, cracks or holes. If the
sound of the exhaust seems unusual or
there is a smell of exhaust fumes, im-
mediately have the exhaust system in-
spected by an INFINITI retailer. (See
“Precautions when starting and driving”
(P.5-3).)
Fluid leaks: Check under the vehicle for
fuel, oil, water or other fluid leaks after the
vehicle has been parked for a while. Water
dripping from the air conditioner after use
is normal. If you should notice any leaks or
if gasoline fumes are evident, check for the
cause and have it corrected immediately.
Power steering fluid level* and lines:
Check the level when the fluid is cold,
with the engine off. Check the lines for
proper attachment, leaks, cracks, etc.
Radiator and hoses: Check the front of the
radiator and clean off any dirt, insects,
leaves, etc., that may have accumulated.
Make sure the hoses have no cracks,
deformation, rot or loose connections.
Underbody: The underbody is frequently
exposed to corrosive substances such as
those used on icy roads or to control dust.
Page 323 of 394

8-6Maintenance and do-it-yourself
even when the engine is off.
CAUTION
.Do not work under the hood while the
engine is hot. Turn the engine off and
wait until it cools down.
. Avoid direct contact with used engine oil
and coolant. Improperly disposed engine
oil, coolant, and/or other vehicle fluids
can damage the environment. Always
conform to local regulations for disposal
of vehicle fluid.
This “8. Maintenance and do-it-yourself”
section gives instructions regarding only
those items which are relatively easy for an
owner to perform.
A genuine INFINITI Service Manual is also
available. (See “Owner’s Manual/Service
Manual order information” (P.9-23).)
You should be aware that incomplete or
improper servicing may result in operating
difficulties or excessive emissions, and
could affect your warranty coverage. If in
doubt about any servicing, we recommend
that it be done by an INFINITI retailer.
JVM0249X
VQ37VHR ENGINE
To remove the engine compartment cover,
unhook the clips located as illustrated.
ENGINE COMPARTMENT CHECK LOCATIONS
Page 324 of 394

JVM0250X
1. Battery
2. Engine oil filler cap
3. Brake fluid reservoir
4. Power steering fluid reservoir (if soequipped)
5. Air cleaner
6. Radiator filler cap
7 Engine coolant reservoir
8 Engine oil dipstick
9 Engine drive belt location
10 Fuse/fusible link holder
11 Window washer fluid reservoir
Maintenance and do-it-yourself8-7
Page 327 of 394
8-10Maintenance and do-it-yourself
SDI2045
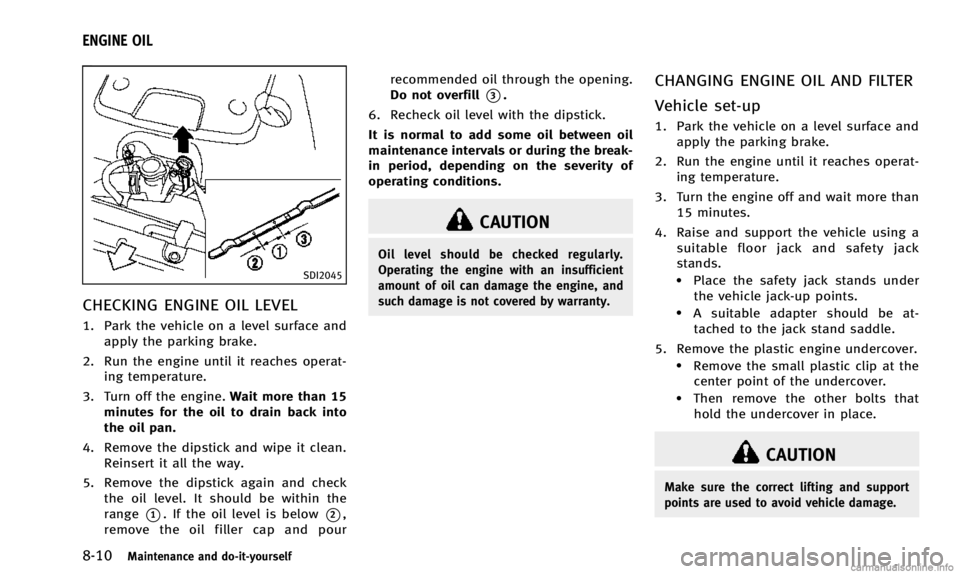
CHECKING ENGINE OIL LEVEL
1. Park the vehicle on a level surface andapply the parking brake.
2. Run the engine until it reaches operat- ing temperature.
3. Turn off the engine. Wait more than 15
minutes for the oil to drain back into
the oil pan.
4. Remove the dipstick and wipe it clean. Reinsert it all the way.
5. Remove the dipstick again and check the oil level. It should be within the
range
*1. If the oil level is below*2,
remove the oil filler cap and pour recommended oil through the opening.
Do not overfill
*3.
6. Recheck oil level with the dipstick.
It is normal to add some oil between oil
maintenance intervals or during the break-
in period, depending on the severity of
operating conditions.
CAUTION
Oil level should be checked regularly.
Operating the engine with an insufficient
amount of oil can damage the engine, and
such damage is not covered by warranty.
CHANGING ENGINE OIL AND FILTER
Vehicle set-up
1. Park the vehicle on a level surface and apply the parking brake.
2. Run the engine until it reaches operat- ing temperature.
3. Turn the engine off and wait more than 15 minutes.
4. Raise and support the vehicle using a suitable floor jack and safety jack
stands.
.Place the safety jack stands underthe vehicle jack-up points.
.A suitable adapter should be at-tached to the jack stand saddle.
5. Remove the plastic engine undercover.
.Remove the small plastic clip at the center point of the undercover.
.Then remove the other bolts thathold the undercover in place.
CAUTION
Make sure the correct lifting and support
points are used to avoid vehicle damage.
ENGINE OIL
Page 328 of 394

SDI2335
2WD models
SDI2047
AWD models
Engine oil and filter
1. Place a large drain pan under the drainplug.
2. Remove the oil filler cap.
3. Remove the drain plug
*1with a
wrench and completely drain the oil.
CAUTION
Be careful not to burn yourself, as the
engine oil is hot.
.Waste oil must be disposed of
properly.
.Check your local regulations.
4. (Perform steps 4 to 7 only when the engine oil filter change is needed.)
Loosen the oil filter
*2with an oil filter
wrench. Remove the oil filter by turning
it by hand.
5. Wipe the engine oil filter mounting surface with a clean rag.
CAUTION
Be sure to remove any old rubber gasket
remaining on the mounting surface of the engine. Failure to do so could lead to engine
damage.
6. Coat the gasket on the new filter with
clean engine oil.
7. Screw in the oil filter clockwise until a slight resistance is felt, then tighten
additionally more than 2/3 turn.
Oil filter tightening torque:11 to 15 ft-lb
(14.7 to 20.5 N·m)
8. Clean and re-install the drain plug with a new washer. Securely tighten the
drain plug with a wrench.
Drain plug tightening torque:22 to 29 ft-lb
(29 to 39 N·m)
Do not use excessive force.
9. Refill engine with recommended oil and install the oil filler cap securely.
See “Capacities and recommended
fuel/lubricants” (P.9-2) for drain and
refill capacity. The drain and refill
capacity depends on the oil tempera-
ture and drain time. Use these specifi-
cations for reference only. Always use
the dipstick to determine the proper
Maintenance and do-it-yourself8-11
Page 329 of 394

8-12Maintenance and do-it-yourself
amount of oil in the engine.
10. Start the engine and check for leakage around the drain plug and the oil filter.
Correct as required.
11. Turn the engine off and wait more than 15 minutes. Check the oil level with the
dipstick. Add engine oil if necessary.
After the operation
1. Install the engine undercover intoposition as the following steps.
a. Pull the center of the small plasticclip out.
b. Hold the engine undercover into position.
c. Insert the clip through the under- cover into the hole in the frame, then
push the center of the clip in to lock
the clip in place.
d. Install the other bolts that hold the undercover in place. Be careful not
to strip the bolts or over-tighten
them.
2. Lower the vehicle carefully to the ground.
3. Dispose of waste oil and filter properly.
WARNING
. Prolonged and repeated contact with
used engine oil may cause skin cancer.
. Try to avoid direct skin contact with used
oil. If skin contact is made, wash
thoroughly with soap or hand cleaner
as soon as possible.
. Keep used engine oil out of reach of
children.
When checking or replacement is required,
we recommend an INFINITI retailer for
servicing.
CAUTION
.Use only Genuine NISSAN Matic S ATF.
Do not mix with other fluids.
. Using automatic transmission fluid other
than Genuine NISSAN Matic S ATF will
cause deterioration in driveability and
automatic transmission durability, and
may damage the automatic transmis-
sion, which is not covered by the INFINITI
new vehicle limited warranty.
AUTOMATIC TRANSMISSION FLUID