engine INFINITI Q50 HYBRID 2014 Owner's Guide
[x] Cancel search | Manufacturer: INFINITI, Model Year: 2014, Model line: Q50 HYBRID, Model: INFINITI Q50 HYBRID 2014Pages: 402, PDF Size: 2.83 MB
Page 163 of 402
3-14Pre-driving checks and adjustments
LOG-IN FUNCTION
After setting up the user information, the
system will automatically recognize the
user upon turning on the vehicle.
There will be a personalized welcome
greeting and screen prompt to log-in.
This feature allows 4 drivers to use their
own registration, drive mode, driving posi-
tion, air conditioner, and auto settings and
memorizes these custom settings.
The log-in user can be changed on the
welcome greeting screen or the User List
screen. For more details, see the Infiniti
InTouch Owner’s Manual.
The log-in function is linked to the follow-
ing items:
.Meter
. Audio
. Navigation system display (if so
equipped)
. Navigation settings (if so equipped)
. Air conditioner
. Automatic drive positioner (if so
equipped)
. Engine·Transmission
. Steering .
Active trace control
. Driver assistance (if so equipped)WARNING
The Intelligent Key transmits radio waves
when the buttons are pushed. The FAA
advises that the radio waves may affect
aircraft navigation and communication sys-
tems. Do not operate the Intelligent Key
while on an airplane. Make sure the buttons
are not operated unintentionally when the
unit is stored during a flight.
It is possible to lock/unlock all doors and
fuel-filler door, open the trunk lid, activate
the panic alarm and open the windows by
pushing the buttons on the Intelligent Key
from outside the vehicle.
Before locking the doors, make sure the
Intelligent Key is not left in the vehicle.
The remote keyless entry function can
operate at a distance of approximately 33
ft (10 m) from the vehicle. (The effective
distance depends upon the conditions
around the vehicle.)
As many as 4 Intelligent Keys can be used
with one vehicle. For information concern-
ing the purchase and use of additional
Intelligent Keys, contact an INFINITI retai-
ler.
REMOTE KEYLESS ENTRY SYSTEM
Page 167 of 402

3-18Pre-driving checks and adjustments
Switching procedure:
To switch the hazard indicator and horn
(chime) operation, push the LOCK
*1
and UNLOCK*2buttons on the In-
telligent Key simultaneously for more than
2 seconds.
. When the hazard indicator mode is set,
the hazard indicator flashes 3 times.
. When the hazard indicator and horn
mode is set, the hazard indicator
flashes once and the horn chirps once.
JVP0234X
1. Pull the hood lock release handle*1
located below the instrument panel;
the hood will then spring up slightly.
2. Pull the lever
*2up at the front of the
hood with your fingertips and raise the
hood.
3. When closing the hood, slowly close the hood down to latch both the right
and left locks. Push the hood down to
lock the hood securely into place.
WARNING
. Make sure the hood is completely closed
and latched before driving. Failure to do
so could cause the hood to fly open and
result in an accident.
. If you see steam or smoke coming from
the engine compartment, to avoid injury
do not open the hood.
HOOD
Page 187 of 402
Cruise control (if so equipped)........................... 5-56
Precautions on cruise control ........................ 5-56
Cruise control operations .............................. 5-56
Intelligent Cruise Control (ICC) system (if
so equipped) ..................................................... 5-58 Selecting the vehicle-to-vehicle distance
control mode ................................................. 5-59
Vehicle-to-vehicle distance control mode ....... 5-59
Precautions on vehicle-to-vehicle distance
control mode ................................................. 5-60
Vehicle-to-vehicle distance control
mode operation ............................................. 5-61
Conventional (fixed speed) cruise
control mode ................................................. 5-74
Distance Control Assist (DCA) system (if
so equipped) ..................................................... 5-79 Precautions on DCA system ........................... 5-79
DCA system operation ................................... 5-81
Forward emergency braking system (if
so equipped) ..................................................... 5-89 System operation .......................................... 5-90
Predictive forward collision warning system (if
so equipped) ..................................................... 5-94 System operation .......................................... 5-95
Break-in schedule .............................................. 5-99
Fuel Efficient Driving Tips................................... 5-99
Increasing fuel economy .................................. 5-100
Intelligent All-Wheel Drive (AWD) (if
so equipped) ................................................... 5-101 Parking/parking on hills.................................. 5-103
Power steering ................................................ 5-104
Direct adaptive steering type ..................... 5-104
Brake system .................................................. 5-106
Braking precautions ................................... 5-106
Parking brake break-in............................... 5-106
Brake assist .................................................... 5-107 Brake assist............................................... 5-107
Anti-lock Braking System (ABS) .................. 5-107
Vehicle Dynamic Control (VDC) system ............ 5-108 Rise-up and build-up ................................. 5-109
Brake force distribution ............................. 5-109
Active trace control ......................................... 5-110
Hill Start Assist system ................................... 5-112
Chassis control ............................................... 5-112
Cold weather driving ....................................... 5-113 Freeing a frozen door lock ......................... 5-113
Antifreeze .................................................. 5-113
12-volt Battery ........................................... 5-113
Draining of coolant water........................... 5-113
Tire equipment .......................................... 5-113
Special winter equipment .......................... 5-113
Driving on snow or ice ............................... 5-113
Engine block heater (if so equipped).......... 5-114
Active noise control/Active sound control ........ 5-115 Active noise control ................................... 5-115
Active sound control .................................. 5-115
Page 188 of 402

WARNING
.Do not leave children or adults who
would normally require the support of
others alone in your vehicle. Pets should
not be left alone either. They could
accidentally injure themselves or others
through inadvertent operation of the
vehicle. Also, on hot, sunny days,
temperatures in a closed vehicle could
quickly become high enough to cause
severe or possibly fatal injuries to
people or animals.
. Closely supervise children when they are
around cars to prevent them from play-
ing and becoming locked in the trunk
where they could be seriously injured.
Keep the car locked, with the rear
seatback and trunk lid securely latched
when not in use, and prevent children’s
access to car keys.
EXHAUST GAS (carbon monoxide)
WARNING
.Do not breathe exhaust gases; they
contain colorless and odorless carbon
monoxide. Carbon monoxide is danger-
ous. It can cause unconsciousness or
death.
. If you suspect that exhaust fumes are
entering the vehicle, drive with all
windows fully open, and have the
vehicle inspected immediately.
. Do not run the engine in closed spaces
such as a garage.
. Do not park the vehicle with the INFINITI
Direct Response Hybrid
®System run-
ning for any extended length of time.
. Keep the trunk lid closed while driving,
otherwise exhaust gases could be drawn
into the passenger compartment. If you
must drive with the trunk lid open,
follow these precautions:
1) Open all the windows.
2) Set the air recirculation mode to off and the fan control to high to
circulate the air. .
If electrical wiring or other cable con-
nections must pass to a trailer through
the seal on the trunk lid or the body,
follow the manufacturer’s recommenda-
tion to prevent carbon monoxide entry
into the vehicle.
. The exhaust system and body should be
inspected by a qualified mechanic when-
ever:
—The vehicle is raised for service.
—You suspect that exhaust fumes are
entering into the passenger compart-
ment.
—You notice a change in the sound of
the exhaust system.
—You have had an accident involvingdamage to the exhaust system,
underbody, or rear of the vehicle.
Starting and driving5-3
PRECAUTIONS WHEN STARTING AND
DRIVING
Page 189 of 402
5-4Starting and driving
THREE-WAY CATALYST
The three-way catalyst is an emission
control device installed in the exhaust
system. Exhaust gases in the three-way
catalyst are burned at high temperatures to
help reduce pollutants.
WARNING
.The exhaust gas and the exhaust system
are very hot. Keep people, animals or
flammable materials away from the
exhaust system components.
. Do not stop or park the vehicle over
flammable materials such as dry grass,
waste paper or rags. They may ignite and
cause a fire.
CAUTION
.Do not use leaded gasoline. Deposits
from leaded gasoline seriously reduce
the three-way catalyst’s ability to help
reduce exhaust pollutants.
. Keep your engine tuned up. Malfunctions
in the ignition, fuel injection, or elec-
trical systems can cause overrich fuel flow into the three-way catalyst, causing
it to overheat. Do not keep driving if the
engine misfires, or if noticeable loss of
performance or other unusual operating
conditions are detected. Have the vehicle
inspected promptly by an INFINITI retai-
ler.
. Avoid driving with an extremely low fuel
level. Running out of fuel could cause
the engine to misfire, damaging the
three-way catalyst.
. Do not race the engine while warming it
up.
. Do not push or tow your vehicle to start
the hybrid system.
TIRE PRESSURE MONITORING SYS-
TEM (TPMS)
Each tire, including the spare (if provided),
should be checked monthly when cold and
inflated to the inflation pressure recom-
mended by the vehicle manufacturer on the
vehicle placard or tire inflation pressure
label. (If your vehicle has tires of a different
size than the size indicated on the vehicle
placard or tire inflation pressure label, you
should determine the proper tire inflation
pressure for those tires.) As an added safety feature, your vehicle
has been equipped with a Tire Pressure
Monitoring System (TPMS) that illuminates
a low tire pressure telltale when one or
more of your tires is significantly under-
inflated. Accordingly, when the low tire
pressure telltale illuminates, you should
stop and check your tires as soon as
possible, and inflate them to the proper
pressure. Driving on a significantly under-
inflated tire causes the tire to overheat and
can lead to tire failure. Under-inflation also
reduces fuel efficiency and tire tread life,
and may affect the vehicle’s handling and
stopping ability.
If the vehicle is being driven with one or
more flat tires, the low tire pressure
warning light will illuminate continuously
and a chime will sound for 10 seconds. The
“Flat Tire - Visit dealer”
warning will also
appear in the vehicle information display.
The chime will only sound at the first
indication of a flat tire, and the warning
light will illuminate continuously. When the
flat tire warning is activated, have the
system reset and the tire checked and
replaced if necessary by an INFINITI retai-
ler. Even if the tire is inflated to the
specified COLD tire pressure, the warning
Page 198 of 402
JVS0264X
INTELLIGENT KEY BATTERY DIS-
CHARGE
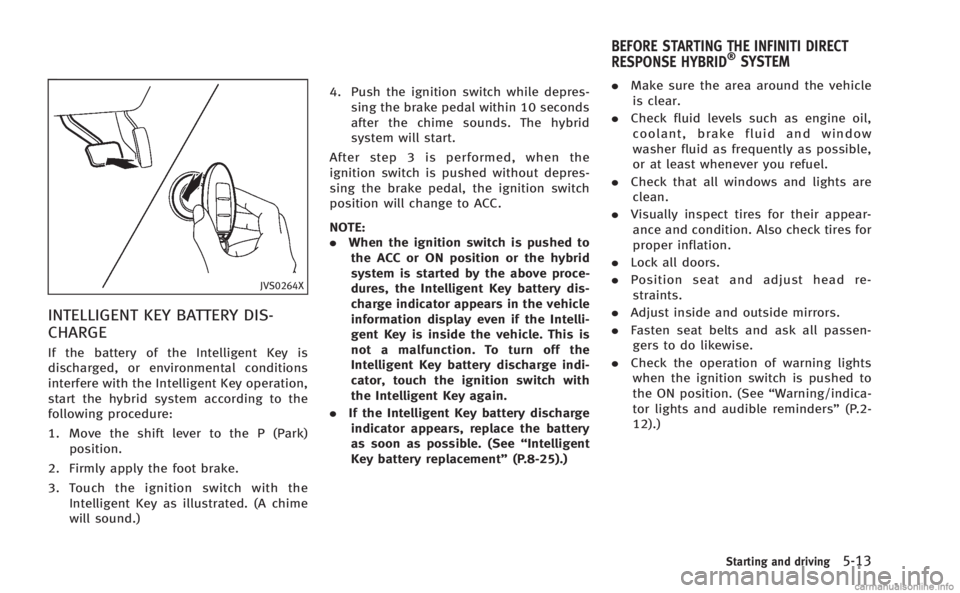
If the battery of the Intelligent Key is
discharged, or environmental conditions
interfere with the Intelligent Key operation,
start the hybrid system according to the
following procedure:
1. Move the shift lever to the P (Park)position.
2. Firmly apply the foot brake.
3. Touch the ignition switch with the Intelligent Key as illustrated. (A chime
will sound.) 4. Push the ignition switch while depres-
sing the brake pedal within 10 seconds
after the chime sounds. The hybrid
system will start.
After step 3 is performed, when the
ignition switch is pushed without depres-
sing the brake pedal, the ignition switch
position will change to ACC.
NOTE:
. When the ignition switch is pushed to
the ACC or ON position or the hybrid
system is started by the above proce-
dures, the Intelligent Key battery dis-
charge indicator appears in the vehicle
information display even if the Intelli-
gent Key is inside the vehicle. This is
not a malfunction. To turn off the
Intelligent Key battery discharge indi-
cator, touch the ignition switch with
the Intelligent Key again.
. If the Intelligent Key battery discharge
indicator appears, replace the battery
as soon as possible. (See “Intelligent
Key battery replacement” (P.8-25).).
Make sure the area around the vehicle
is clear.
. Check fluid levels such as engine oil,
coolant, brake fluid and window
washer fluid as frequently as possible,
or at least whenever you refuel.
. Check that all windows and lights are
clean.
. Visually inspect tires for their appear-
ance and condition. Also check tires for
proper inflation.
. Lock all doors.
. Position seat and adjust head re-
straints.
. Adjust inside and outside mirrors.
. Fasten seat belts and ask all passen-
gers to do likewise.
. Check the operation of warning lights
when the ignition switch is pushed to
the ON position. (See “Warning/indica-
tor lights and audible reminders” (P.2-
12).)
Starting and driving5-13
BEFORE STARTING THE INFINITI DIRECT
RESPONSE HYBRID®SYSTEM
Page 199 of 402

5-14Starting and driving
1. Apply the parking brake.
2. Move the shift lever to P (Park) posi-tion.
The INFINITI Direct Response Hybrid
®
System is designed not to operate if
the shift lever is not in the P (Park)
position.
3. Depress the brake pedal and push the ignition switch to start the hybrid
system. The READY to drive indicator
light will illuminate on the meter.
When starting the hybrid system at
very low outside temperatures, the
READY to drive indicator light will flash
and it may take longer for the READY to
drive indicator light to illuminate.
. The hybrid system may not start even
with the READY to drive indicator light
illuminated. Once the READY to drive
indicator light is illuminated you may
begin driving the vehicle.
. You may hear a sound in the engine
compartment when the brake pedal is
depressed with the hybrid system off.
This does not indicate a problem.
NOTE:
Care should be taken to avoid situations
that can lead to potential 12-volt battery discharge and potential no-start condi-
tions such as:
1.
Installation or extended use of electro-
nic accessories that consume 12-volt
battery power when the hybrid system
is not running (Phone chargers, GPS,
DVD players, etc.)
2. Vehicle is not driven regularly and/or
only driven short distances.
In these cases, the 12-volt battery may
need to be charged to maintain 12-volt
battery health.
AUTOMATIC TRANSMISSION
The automatic transmission in your vehicle
is electronically controlled by a transmis-
sion control module to produce maximum
efficiency and smooth operation.
Shown on the following pages are the
recommended operating procedures for
this transmission. Follow these procedures
for maximum vehicle performance and
driving enjoyment.
Starting the vehicle
After starting the INFINITI Direct Response
Hybrid®System, fully depress the foot
brake pedal and push the shift lever button
before shifting the shift lever to the R
(Reverse), N (Neutral), D (Drive) or Manual
shift mode position. Be sure the vehicle is
fully stopped before attempting to shift the
shift lever.
This Automatic Transmission (AT) model is
designed so that the foot brake pedal
must be depressed before shifting from P
(Park) to any drive position while the
ignition switch is in the ON position.
The shift lever cannot be moved out of the
P (Park) position and into any of the other
gear positions if the ignition switch is
pushed to the LOCK, OFF or ACC position.
STARTING THE INFINITI DIRECT RESPONSE
HYBRID®SYSTEM DRIVING THE VEHICLE
Page 200 of 402

1. Keep the foot brake pedal depressedand push the shift lever button to shift
into a driving gear.
2. Release the parking brake and foot brake, then gradually start the vehicle
in motion.
WARNING
. Do not depress the accelerator pedal
while shifting from P (Park) or N
(Neutral) to R (Reverse), D (Drive) or
manual shift mode. Always depress the
brake pedal until shifting is completed.
Failure to do so could cause you to lose
control and have an accident.
. Cold engine idle speed is high, so use
caution when shifting into a forward or
reverse gear before the engine has
warmed up.
. Never shift to P (Park) or R (Reverse)
while vehicle is moving forward. Never
shift to P (Park) or D (Drive) while vehicle
is moving rearward. Failure to do so
could cause you to lose control and have
an accident.
CAUTION
.When stopping the vehicle on an uphill
grade, do not hold the vehicle by
depressing the accelerator pedal. The
foot brake should be used for this
purpose.
. Do not downshift abruptly on slippery
roads. This may cause a loss of control.
. Except in an emergency, do not shift to
the N (Neutral) position while driving.
Coasting with the transmission in the N
(Neutral) position may cause serious
damage to the transmission.
JVS0186X
Shift lever
To move the shift lever,
: Push the button while depressing the brake pedal,
: Push the button,
: Just move the shift lever.
Shifting
After starting the hybrid system, fully
depress the brake pedal and shift the shift
lever from P (Park) to R (Reverse), N
(Neutral), D (Drive) or Manual shift mode
position.
Push the button to shift into P (Park) or R
(Reverse). All other positions can be
selected without pushing the button.
Starting and driving5-15
Page 202 of 402

transmission shifts to the lower range.
When canceling the manual shift mode,
return the shift lever to the D (Drive)
position. The transmission returns to the
normal driving mode.
When you pull the paddle shifter (if so
equipped) while in the D (Drive) position,
the transmission will shift to the upper or
lower range temporarily. The transmission
will automatically return to the D (Drive)
position after a short period of time. If you
want to return to the D (Drive) position
manually, pull and hold the paddle shifter
for about 1.5 seconds.
In the manual shift mode, the shift range is
displayed in the vehicle information dis-
play.
Shift ranges up or down one by one as
follows:
1M?
/2M?
/3M?
/ 4M?
/5M?
/ 6M?
/7M
7M(7th):
Use this position for all normal forward
driving at highway speeds.
6
M(6th) and 5M(5th):
Use these positions when driving up long
slopes, or for engine braking when driving down long slopes.
4
M(4th), 3M(3rd) and 2M(2nd):
Use these positions for hill climbing or
engine braking on downhill grades.
1
M(1st):
Use this position when climbing steep hills
slowly or driving slowly through deep
snow, or for maximum engine braking on
steep downhill grades.
. Remember not to drive at high speeds
for extended periods of time in lower
than 7th gear. This reduces fuel econ-
omy.
. Moving the shift lever rapidly to the
same side twice will shift the ranges in
succession.
. In the manual shift mode, the transmis-
sion may not shift to the selected gear
or may automatically shift to the other
gear. This helps maintain driving per-
formance and reduces the chance of
vehicle damage or loss of control.
. When the transmission does not shift
to the selected gear, the Automatic
Transmission (AT) position indicator (in
the vehicle information display) will
blink and the buzzer will sound. .
In the manual shift mode, the transmis-
sion automatically shifts down to 1st
gear before the vehicle comes to a
stop. When accelerating again, it is
necessary to shift up to the desired
range.
Accelerator downshift —In D (Drive)
position —
For passing or hill climbing, fully depress
the accelerator pedal to the floor. This
shifts the transmission down into the lower
gear, depending on the vehicle speed.
Fail-safe
When the fail-safe operation occurs, note
that the transmission will be locked in any
of the forward gears according to the
condition.
If the vehicle is driven under extreme
conditions, such as excessive wheel spin-
ning and subsequent hard braking, the
fail-safe system may be activated. This will
occur even if all electrical circuits are
functioning properly. In this case, push
the ignition switch to the OFF position and
wait for 3 seconds. Then push the ignition
switch back to the ON position. The vehicle
should return to its normal operating
condition. If it does not return to its
Starting and driving5-17
Page 204 of 402
Control on winding roads:
A low gear is maintained on continuous
curves that involve repeated acceleration
and deceleration, so that smooth accelera-
tion is available instantly when the accel-
erator pedal is depressed.
NOTE:
.Adaptive shift control may not operate
when the transmission oil temperature
is low immediately after the start of
driving or when it is very hot.
. During some driving situations, hard
braking for example, the adaptive shift
control may automatically operate. The
transmission may automatically shift
to a lower gear for re-acceleration. This
increases engine speed but not vehicle
speed. Vehicle speed is controlled by
the accelerator pedal when the vehicle
is in the Adaptive shift control mode.
. When the adaptive shift control oper-
ates, the transmission sometimes
maintains a lower gear for a longer
period of time than when adaptive shift
control is not operating. Engine speed
will be higher for a specific vehicle
speed while ASC system is operating
than when ASC is not operating.NAVI Shift Control (if so equipped)
NAVI Shift Control automatically adjusts
the Automatic Transmission (AT) gear posi-
tion in certain situations based on road
information from the navigation system.
When the navigation system detects that
the vehicle is approaching a curved road,
NAVI Shift Control will adjust the gear
position if needed to help the driver run
through the curve smoothly.
Precaution on NAVI Shift Control:
. The NAVI Shift Control does not provide
steering input or automated driving on
a curve. It is not a speed limit support
system and will not modify your speed
according to local speed limits.
. The NAVI Shift Control is a convenient
system intended to help the vehicle
move through a curve smoothly. How-
ever, the driver must always drive
safely and use the brake pedal if
needed.
. The NAVI Shift Control may be delayed
or not operate properly in the following
situations, because this function uses
the road information provided by the
navigation system. —
When the navigation system cannot
accurately detect the location of the
vehicle.
— When the vehicle is driving on a
roadway that is not recognized by
the navigation system.
— When the actual roadway differs
from the map information on the
navigation system due to road con-
struction, traffic lane obstructions,
etc.
. The NAVI Shift Control may not operate
properly in the following situations:
— If the vehicle’s transmission, engine,
hybrid system and/or navigation
system, and/or GPS is malfunction-
ing.
— If the vehicle speed is higher than
74 MPH (120 km/h) or lower than
37 MPH (60 km/h) and/or transmis-
sion gear is outside the operating
range of the system.
— When the vehicle is driving on a
freeway.
— When the vehicle is driving on a
gentle curve
— When the vehicle is driving with the
shift lever except in the D (Drive)
position.
Starting and driving5-19