recommended oil INFINITI Q50-HYBRID 2018 Owners Manual
[x] Cancel search | Manufacturer: INFINITI, Model Year: 2018, Model line: Q50-HYBRID, Model: INFINITI Q50-HYBRID 2018Pages: 442, PDF Size: 2.9 MB
Page 99 of 442

2-14Instruments and controls
.SHIFT “P” warning
. Shift to Park - Li-ion battery low warning
. Shift to Park - Press brake and start
warning
. PUSH warning
. Key ID Incorrect warning
. Parking brake release warning
. Low washer fluid warning
. Door/trunk open warning
. Loose Fuel Cap warning
. Tire Pressure Low - Add Air warning
. Flat Tire - Visit dealer warning
. All-Wheel Drive (AWD) warning (if so
equipped)
. Headlight warning
. Hybrid system overheat warning
. Low oil pressure warning
. High temperature warning
. Adaptive Front lighting System (AFS)
warning (if so equipped)
. Intelligent Key system warning
. Chassis control warning
See “Vehicle information display” (P.2-18).
If the driver assist system warnings appear
in the vehicle information display, the master
warning light also illuminates. See “Lane
Departure Warning (LDW)/Lane Departure
Prevention (LDP)” (P.5-32), “Blind Spot
Warning (BSW)” (P.5-39), “Blind Spot Inter- vention®(BSI)” (P.5-47), “Back-up Collision
Intervention (BCI)” (P.5-59), “Distance Con-
trol Assist (DCA)” (P.5-93), “Forward Emer-
gency Braking (FEB)” (P.5-104) and
“Predictive Forward Collision Warning
(PFCW)” (P.5-112).
Power steering warning light
When the ignition switch is in the ON
position, the power steering warning light
illuminates. After starting the hybrid system,
the power steering warning light stays on for
a few seconds and turns off. This indicates
that Direct Adaptive Steering is operational.
Drive the vehicle after the power steering
warning light turns off.
If the power steering warning light illumi-
nates while driving, pull off the road to a
safe location and stop the vehicle. If the
power steering warning light turns off, you
can drive again. If the power steering
warning light continues to illuminate, it is
recommended you have Direct Adaptive
Steering checked by an INFINITI retailer.
(See “Power steering” (P.5-126).)
Seat belt warning light and
chime
The light and chime remind you to fasten
seat belts. The light illuminates whenever the ignition switch is pushed to the ON
position, and will remain illuminated until the
driver’s seat belt is fastened. At the same
time, the chime will sound for about 6
seconds unless the driver’s seat belt is
securely fastened.
The seat belt warning light for the front
passenger will illuminate if the seat belt is
not fastened when the front passenger’s
seat is occupied.
See “Seat belts” (P.1-9) for precautions on
seat belt usage.
Supplemental air bag warning
light
After pushing the ignition switch to the ON
position, the supplemental air bag warning
light will illuminate. The supplemental air bag
warning light will turn off after about 7
seconds if the supplemental front air bag
and supplemental side air bag, curtain side-
impact air bag systems and/or pretensioner
seat belt are operational.
If any of the following conditions occur, the
supplemental front air bag, supplemental
side air bag, supplemental curtain side-
impact air bag and pretensioner seat belt
needs servicing.
. The supplemental air bag warning light
remains on after approximately 7 sec-
Page 107 of 442
2-22Instruments and controls
as the low tire pressure warning light
remains illuminated. If this warning appears,
stop the vehicle and adjust the pressure to
the recommended COLD tire pressure
shown on the Tire and Loading Information
label. (See “Low tire pressure warning light”
(P.2-12) and “Tire Pressure Monitoring
System (TPMS)” (P.5-5).)
18. Flat Tire - Visit dealer warning
This warning appears when the low tire
pressure warning light in the meter illumi-
nates and one or more flat tires are detected
while driving. A chime also sounds for
approximately 10 seconds. (See “Low tire
pressure warning light” (P.2-12) and “Tire
Pressure Monitoring System (TPMS)” (P.5-
5).)
19. Low oil pressure warning
This warning appears if low engine oil
pressure is detected. If the warning appears
during normal driving, pull off the road in a
safe area, stop the engine immediately and
call an INFINITI retailer or other authorized
repair shop.
The low oil pressure warning is not designed
to indicate a low oil level. Use the dipstick to
check the oil level. (See “Engine oil” (P.8-9).)
20. High temperature warning
This warning appears when the engine
coolant temperature is extremely high.
CAUTION
If the high temperature warning appears
when the ignition switch is in the ON
position, stop the vehicle safely as soon
as possible.
If the vehicle is overheated, continuing
vehicle operation may seriously damage
the engine. (See “If your vehicle over-
heats” (P.6-8) for the immediate action
required.)
21. Hybrid system overheat warning
This warning appears when the temperature
of the hybrid system is extremely high. Stop
the vehicle in a safe location as soon as
possible. Avoid quick starting or abrupt
acceleration. When the warning turns off,
the vehicle can be driven.
If the warning appears again soon after it
turns off, it is recommended that you have
the vehicle checked by an INFINITI retailer.
WARNING
Do not hold the vehicle in a stopped
position on an uphill grade by depressing
the accelerator or by slowly creeping
forward. This may cause damage to the
transmission or the vehicle may enter
traffic causing serious injury or death.
Always use the brake pedal when stop-
ping on an uphill grade.
CAUTION
.If you continue to drive the vehicle
while the warning is displayed, the
vehicle may become undriveable. If
this occurs, place the shift lever in the
“P” position and wait for a short
period of time with the vehicle
stopped until the display goes out.
In this case, the warning will be
displayed alternately with the SHIFT
“P” warning. (See “3. SHIFT “P”
warning” (P.2-20).)
. Do not drive the vehicle with the
warning on. Doing so could cause a
hybrid system malfunction.
Page 307 of 442
5-122Starting and driving
4. Drive at economical speeds and dis-tances.
.Observing the speed limit and notexceeding 60 MPH (97 km/h) (where
legally allowed) can improve fuel
efficiency due to reduced aerody-
namic drag.
.Maintaining a safe following distance
behind other vehicles reduces unne-
cessary braking.
.Safely monitoring traffic to anticipatechanges in speed permits reduced
braking and smooth acceleration
changes.
.Select a gear range suitable to roadconditions.
5. Use cruise control.
.Using cruise control during highway driving helps maintain a steady speed.
.Cruise control is particularly effectivein providing fuel savings when driving
on flat terrains.
6. Plan for the shortest route.
.Utilize a map or navigation system to determine the best route to save time.
7. Avoid idling.
.Shutting off your engine when safe for stops exceeding 30-60 seconds
saves fuel and reduces emissions. 8. Buy an automated pass for toll roads.
.Automated passes permit drivers to
use special lanes to maintain cruising
speed through the toll and avoid
stopping and starting.
9. Winter warm up.
.Limit idling time to minimize impact to fuel economy.
.Vehicles typically need no more than30 seconds of idling at start-up to
effectively circulate the engine oil
before driving.
.Your vehicle will reach its ideal oper-ating temperature more quickly while
driving versus idling.
10. Keeping your vehicle cool.
.Park your vehicle in a covered parking area or in the shade whenever possi-
ble.
.When entering a hot vehicle, openingthe windows will help to reduce the
inside temperature faster, resulting in
reduced demand on your A/C system. .
Keep your engine tuned up.
. Follow the recommended scheduled
maintenance.
. Keep the tires inflated to the correct
pressure. Low tire pressure increases tire
wear and lowers fuel economy.
. Keep the wheels in correct alignment.
Improper alignment increases tire wear
and lowers fuel economy.
. Use the recommended viscosity engine
oil. (See “Engine oil and oil filter recom-
mendation” (P.10-6).)
INCREASING FUEL ECONOMY
Page 308 of 442
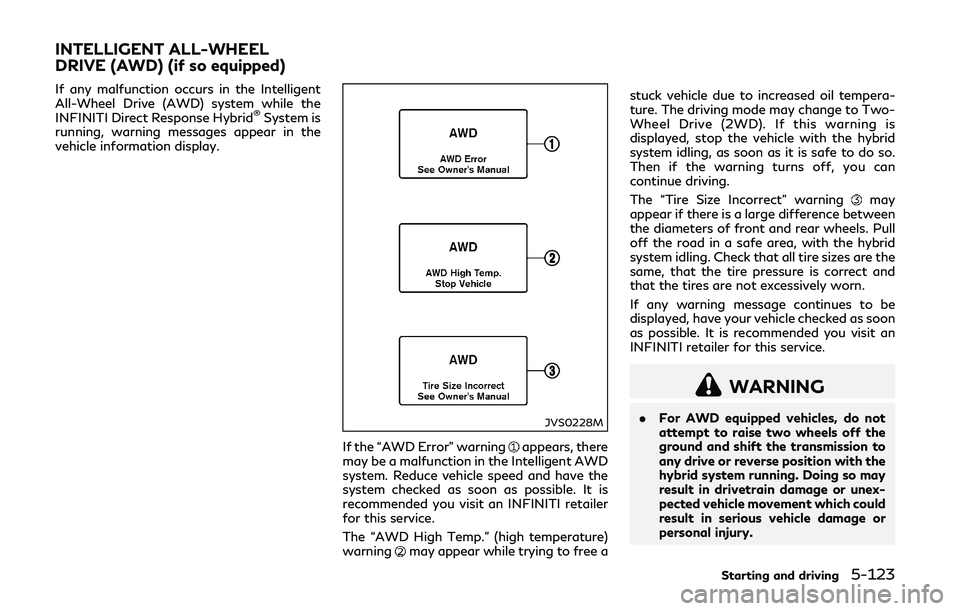
If any malfunction occurs in the Intelligent
All-Wheel Drive (AWD) system while the
INFINITI Direct Response Hybrid
®System is
running, warning messages appear in the
vehicle information display.
JVS0228M
If the “AWD Error” warningappears, there
may be a malfunction in the Intelligent AWD
system. Reduce vehicle speed and have the
system checked as soon as possible. It is
recommended you visit an INFINITI retailer
for this service.
The “AWD High Temp.” (high temperature)
warning
may appear while trying to free a stuck vehicle due to increased oil tempera-
ture. The driving mode may change to Two-
Wheel Drive (2WD). If this warning is
displayed, stop the vehicle with the hybrid
system idling, as soon as it is safe to do so.
Then if the warning turns off, you can
continue driving.
The “Tire Size Incorrect” warning
may
appear if there is a large difference between
the diameters of front and rear wheels. Pull
off the road in a safe area, with the hybrid
system idling. Check that all tire sizes are the
same, that the tire pressure is correct and
that the tires are not excessively worn.
If any warning message continues to be
displayed, have your vehicle checked as soon
as possible. It is recommended you visit an
INFINITI retailer for this service.
WARNING
. For AWD equipped vehicles, do not
attempt to raise two wheels off the
ground and shift the transmission to
any drive or reverse position with the
hybrid system running. Doing so may
result in drivetrain damage or unex-
pected vehicle movement which could
result in serious vehicle damage or
personal injury.
Starting and driving5-123
INTELLIGENT ALL-WHEEL
DRIVE (AWD) (if so equipped)
Page 348 of 442

.Avoid direct contact with used en-
gine oil and coolant. Improperly dis-
posed engine oil, coolant, and/or
other vehicle fluids can damage the
environment. Always conform to lo-
cal regulations for disposal of vehicle
fluid.
. Never leave the engine or the trans-
mission related component harness
connector disconnected while the
ignition switch is in the ON position.
. Never connect or disconnect the 12-
volt battery or any transistorized
component while the ignition switch
is in the ON position.
This “8. Do-it-yourself” section gives in-
structions regarding only those items which
are relatively easy for an owner to perform.
A genuine INFINITI Service Manual is also
available. (See “Owner’s Manual/Service
Manual order information” (P.10-22).)
You should be aware that incomplete or
improper servicing may result in operating
difficulties or excessive emissions, and could
affect your warranty coverage. If in doubt
about any servicing, it is recommended you
have it done by an INFINITI retailer.
JVM0249X
VQ35HR ENGINE
To remove the engine compartment cover,
unhook the clips located as illustrated.
Do-it-yourself8-3
ENGINE COMPARTMENT CHECK
LOCATIONS
Page 354 of 442
CHANGING INVERTER COOLANT
An INFINITI ratailer can change the inverter
coolant. The service procedure can be found
in the INFINITI Service Manual.
Improper servicing can result in inverter
overheating.
WARNING
.To avoid the danger of being scalded,
never change the coolant when the
inverter is hot.
. Never remove the cap when the
inverter is hot. Serious burns could
be caused by high pressure fluid
escaping from the inverter coolant
reservoir.
. Avoid direct skin contact with used
coolant. If skin contact is made, wash
thoroughly with soap or hand cleaner
as soon as possible.
. Keep coolant out of the reach of
children and pets.
Inverter coolant must be disposed of prop-
erly. Check your local regulations.
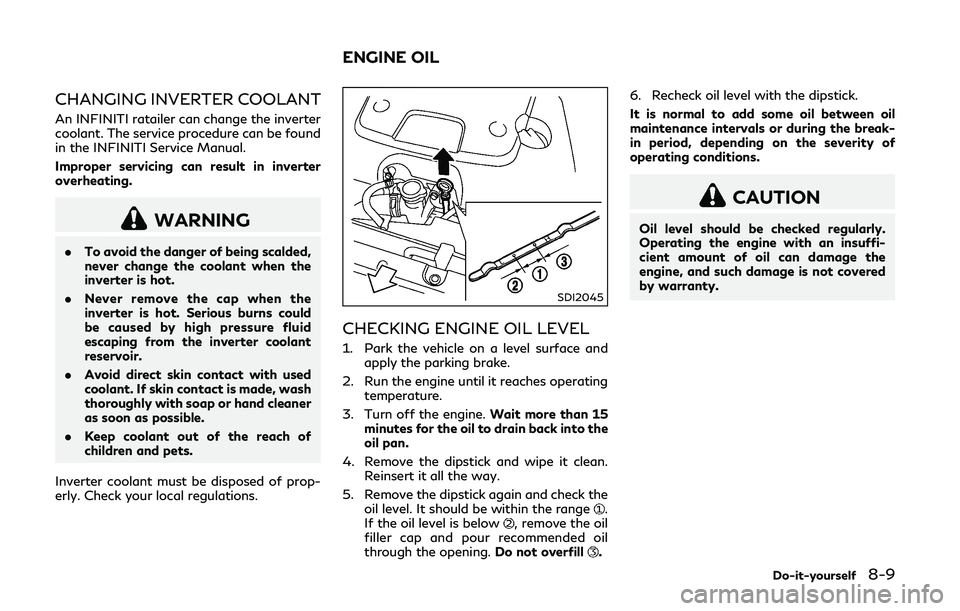
SDI2045
CHECKING ENGINE OIL LEVEL
1. Park the vehicle on a level surface and apply the parking brake.
2. Run the engine until it reaches operating temperature.
3. Turn off the engine. Wait more than 15
minutes for the oil to drain back into the
oil pan.
4. Remove the dipstick and wipe it clean. Reinsert it all the way.
5. Remove the dipstick again and check the oil level. It should be within the range
.
If the oil level is below, remove the oil
filler cap and pour recommended oil
through the opening. Do not overfill
.6. Recheck oil level with the dipstick.
It is normal to add some oil between oil
maintenance intervals or during the break-
in period, depending on the severity of
operating conditions.
CAUTION
Oil level should be checked regularly.
Operating the engine with an insuffi-
cient amount of oil can damage the
engine, and such damage is not covered
by warranty.
Do-it-yourself8-9
ENGINE OIL
Page 356 of 442

engine damage.
6. Coat the gasket on the new filter with clean engine oil.
7. Screw in the oil filter clockwise until a slight resistance is felt, then tighten
additionally more than 2/3 turn.
Oil filter tightening torque:11 to 15 ft-lb
(14.7 to 20.5 N·m)
8. Clean and re-install the drain plug with a new washer. Securely tighten the drain
plug with a wrench.
Drain plug tightening torque:
22 to 29 ft-lb
(29 to 39 N·m)
Do not use excessive force.
9. Refill engine with recommended oil and install the oil filler cap securely.
CAUTION
The dipstick must be inserted in place to
prevent oil spillage from the dipstick
hole while filling the engine with oil.
See “Capacities and recommended
fluids/lubricants” (P.10-2) for drain and refill capacity. The drain and refill capa-
city depends on the oil temperature and
drain time. Use these specifications for
reference only. Always use the dipstick
to determine the proper amount of oil in
the engine.
10. Start the engine and check for leakage around the drain plug and the oil filter.
Correct as required.
11. Turn the engine off and wait more than 15 minutes. Check the oil level with the
dipstick. Add engine oil if necessary.
After the operation
1. Install the engine undercover into posi-
tion as the following steps.
a. Pull the center of the small plastic clipout.
b. Hold the engine undercover into posi- tion.
c. Insert the clip through the undercover into the hole in the frame, then push
the center of the clip in to lock the clip
in place.
d. Install the other bolts that hold the undercover in place. Be careful not to
strip the bolts or over-tighten them.
2. Lower the vehicle carefully to the ground. 3. Dispose of waste oil and filter properly.
WARNING
.
Prolonged and repeated contact with
used engine oil may cause skin cancer.
. Try to avoid direct skin contact with
used oil. If skin contact is made, wash
thoroughly with soap or hand cleaner
as soon as possible.
. Keep used engine oil out of reach of
children.
Do-it-yourself8-11
Page 386 of 442
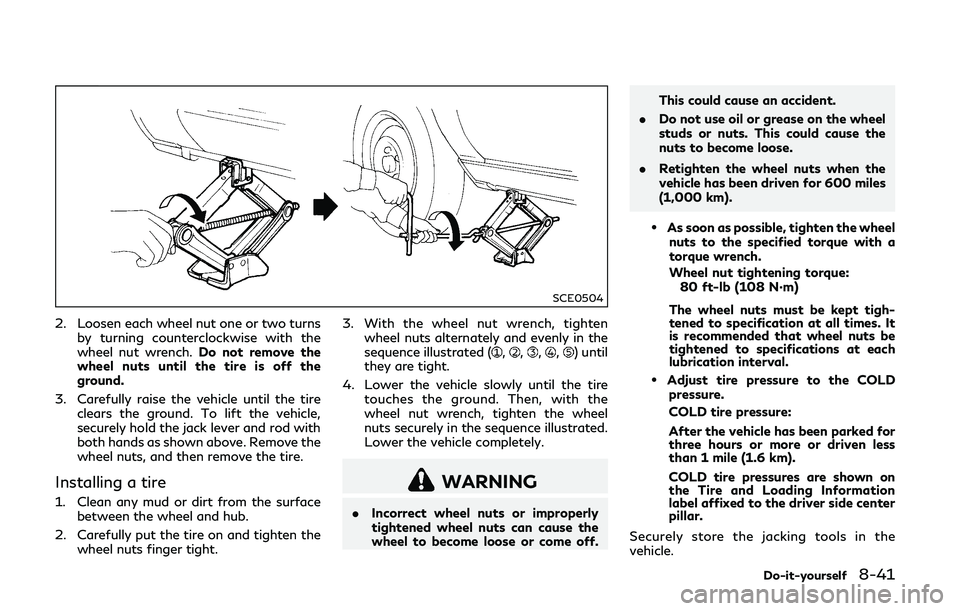
SCE0504
2. Loosen each wheel nut one or two turnsby turning counterclockwise with the
wheel nut wrench. Do not remove the
wheel nuts until the tire is off the
ground.
3. Carefully raise the vehicle until the tire clears the ground. To lift the vehicle,
securely hold the jack lever and rod with
both hands as shown above. Remove the
wheel nuts, and then remove the tire.
Installing a tire
1. Clean any mud or dirt from the surface
between the wheel and hub.
2. Carefully put the tire on and tighten the wheel nuts finger tight. 3. With the wheel nut wrench, tighten
wheel nuts alternately and evenly in the
sequence illustrated (
,,,,) until
they are tight.
4. Lower the vehicle slowly until the tire touches the ground. Then, with the
wheel nut wrench, tighten the wheel
nuts securely in the sequence illustrated.
Lower the vehicle completely.
WARNING
.Incorrect wheel nuts or improperly
tightened wheel nuts can cause the
wheel to become loose or come off. This could cause an accident.
. Do not use oil or grease on the wheel
studs or nuts. This could cause the
nuts to become loose.
. Retighten the wheel nuts when the
vehicle has been driven for 600 miles
(1,000 km).
.As soon as possible, tighten the wheel
nuts to the specified torque with a
torque wrench.
Wheel nut tightening torque: 80 ft-lb (108 N·m)
The wheel nuts must be kept tigh-
tened to specification at all times. It
is recommended that wheel nuts be
tightened to specifications at each
lubrication interval.
.Adjust tire pressure to the COLD pressure.
COLD tire pressure:
After the vehicle has been parked for
three hours or more or driven less
than 1 mile (1.6 km).
COLD tire pressures are shown on
the Tire and Loading Information
label affixed to the driver side center
pillar.
Securely store the jacking tools in the
vehicle.
Do-it-yourself8-41
Page 392 of 442

The following descriptions are provided to
give you a better understanding of the
scheduled maintenance items that should
be regularly checked or replaced. The main-
tenance schedule indicates at which mile-
age/time intervals each item requires
service.
In addition to scheduled maintenance, your
vehicle requires that some items be checked
during normal day-to-day operation. Refer
to “General maintenance” (P.9-2).
Items marked with “*” are recommended by
INFINITI for reliable vehicle operation. You
are not required to perform maintenance on
these items in order to maintain the warran-
ties which come with your vehicle. Other
maintenance items and intervals are re-
quired.
When applicable, additional information can
be found in the “8. Do-it-yourself” section of
this manual.
NOTE:
INFINITI does not advocate the use of non-
OEM approved aftermarket flushing sys-
tems and strongly advises against perform-
ing these services on an INFINITI product.
Many of the aftermarket flushing systems
use non-OEM approved chemicals or sol-
vents, the use of which has not been
validated by INFINITI.For recommended fuel, lubricants, fluids,
grease, and refrigerant, refer to “Capacities
and recommended fluids/lubricants” (P.10-
2) of this manual.
EMISSION CONTROL SYSTEM
MAINTENANCE
Engine air filter:
Replace at specified intervals. When driving
for prolonged periods in dusty conditions,
check/replace the filter more frequently.
Engine coolant*:
Replace coolant at the specified interval.
When adding or replacing coolant, be sure to
use only Genuine NISSAN Long Life Anti-
freeze/Coolant (blue) or equivalent with the
proper mixture. (Refer to “Engine cooling
system” (P.8-5) to determine the proper
mixture for your area.)
NOTE:
Mixing any other type of coolant or the use
of non-distilled water may reduce the
recommended service interval of the cool-
ant.
Hybrid Electronic Vehicle (HEV) inverter
coolant:
Replace inverter coolant at the specified
interval. When adding or replacing coolant,
be sure to use only Genuine NISSAN Long
Life Antifreeze/Coolant (blue) or equivalentwith the proper mixture. (Refer to “Inverter
cooling system” (P.8-7) to determine the
proper mixture for your area.)
NOTE:
Mixing any other type of coolant or the use
of non-distilled water may reduce the
recommended service interval of the cool-
ant.
Engine oil and oil filter:
Replace engine oil and oil filter at the
specified intervals. For recommended oil
grade and viscosity refer to “Capacities and
recommended fluids/lubricants” (P.10-2).
Engine valve clearance*:
Inspect only if valve noise increases. Adjust
valve clearance if necessary.
Evaporative emissions control vapor lines*:
Check vapor lines for leaks or looseness.
Tighten connections or replace parts as
necessary.
Fuel lines*:
Check the fuel hoses, piping and connections
for leaks, looseness, or deterioration. Tight-
en connections or replace parts as necessary.
Spark plugs:
Replace at specified intervals. Install new
plugs of the type as originally equipped.
Maintenance and schedules9-5
EXPLANATION OF SCHEDULED
MAINTENANCE ITEMS
Page 396 of 442

MAINTENANCE OP-
ERATION
Perform at number of
miles, kilometers or
months, whichever
comes first.Miles × 1,000
(km × 1,000) Months MAINTENANCE INTERVAL
65
(104) 78 70
(112) 84 75
(120) 90 80
(128) 96 85
(136) 102 90
(144) 108 95
(152) 114 100
(160) 120 105
(168) 126 110
(176) 132 115
(184) 138 120
(192) 144
Air cleaner filter See NOTE (1) RR
EVAP vapor lines I*I* I*
Fuel lines I*I* I*
Fuel filter See NOTE (2)
Engine coolant* See NOTE (3) (4)
HEV inverter coolant See NOTE (4) (5)
Engine oil R R R R R R R R R R R R
Engine oil filter R R R R R R R R R R R R
Spark plugs See NOTE (6) Replace every 105,000 miles (168,000 km)
Intake and exhaust valve
clearance* See NOTE (7)
NOTE:
(1) If operating mainly in dusty conditions,
more frequent maintenance may be re-
quired.
(2) Periodic maintenance is not required.
(3) First replacement interval is 105,000
miles (168,000 km) or 84 months. After
first replacement, replace every 75,000
miles (120,000 km) or 60 months.
(4) Use only Genuine NISSAN Long Life Antifreeze/Coolant (blue) or equivalent
with proper mixture ratio of 50% anti-
freeze and 50% demineralized or distilled
water. Mixing any other type of coolant or
the use of non-distilled water may reduce
the life expectancy of the factory fill cool-
ant.
(5) First replacement interval is 12,5000
miles (200,000 km) or 180 months. After
first replacement, replace every 75,000
miles (120,000 km) or 60 months.
(6) Replace spark plug when the plug gap
exceeds 0.055 in (1.4 mm) even if within
specified replacement mileage.
(7) Periodic maintenance is not required.
However, if valve noise increases, inspect
valve clearance.
*: Maintenance items and intervals with “*”
are recommended by INFINITI for reliable
vehicle operation. The owner need not to
perform such maintenance in order to
maintain the emission warranty or manu-
Maintenance and schedules9-9