wheel INFINITI Q60 2018 Owners Manual
[x] Cancel search | Manufacturer: INFINITI, Model Year: 2018, Model line: Q60, Model: INFINITI Q60 2018Pages: 466, PDF Size: 2.47 MB
Page 401 of 466
8-42Do-it-yourself
tire/wheel on the front of the
vehicle. Doing so can damage
the vehicle or tire. Damage to
the tire may result in a sudden
loss of air pressure which may
cause loss of vehicle control in
some driving conditions and
cause a collision and personal
injury.
.Retighten the wheel nuts when
the vehicle has been driven for
600 miles (1,000 km) (also in
cases of a flat tire, etc.).
.For additional information re-
garding tires, refer to “Impor-
tant Tire Safety Information”
(US) or “Tire Safety Informa-
tion” (Canada) in the Warranty
Information Booklet.
After the ignition switch is placed in
the ON position, it may take a period
of time for the tire pressure to be
displayed in the vehicle information
display while the vehicle is driven.
Depending on the radio wave circum-
stance, tire pressure may not cor-rectly be displayed.
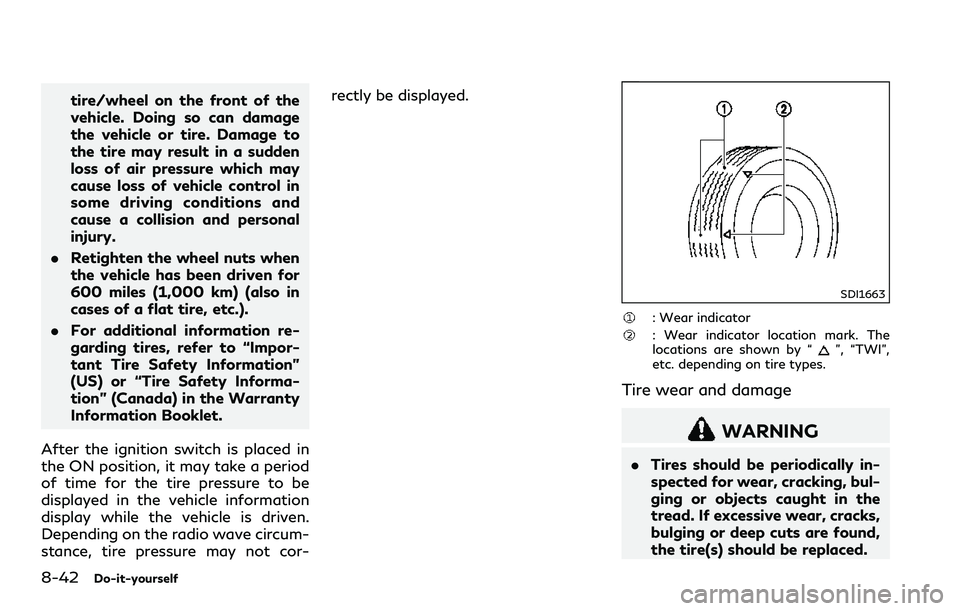
SDI1663
: Wear indicator
: Wear indicator location mark. The
locations are shown by “”, “TWI”,
etc. depending on tire types.
Tire wear and damage
WARNING
.Tires should be periodically in-
spected for wear, cracking, bul-
ging or objects caught in the
tread. If excessive wear, cracks,
bulging or deep cuts are found,
the tire(s) should be replaced.
Page 402 of 466

.The original tires have built-in
tread wear indicators. When
wear indicators are visible, the
tire(s) should be replaced.
.Tires degrade with age and use.
Have tires, including the spare,
over 6 years old checked by a
qualified technician, because
some tire damage may not be
obvious. Replace the tires as
necessary to prevent tire failure
and possible personal injury.
.Improper service of the spare
tire may result in serious perso-
nal injury. If it is necessary to
repair the spare tire, it is re-
commended you visit an
INFINITI retailer for this ser-
vice.
.For additional information re-
garding tires, refer to “Impor-
tant Tire Safety Information”
(US) or “Tire Safety Informa-
tion” (Canada) in the Warranty
Information Booklet.Replacing wheels and tires
When replacing a tire, use the same size,
tread design, speed rating and load carrying
capacity as originally equipped. (See “Speci-
fications” (P.10-11) for recommended types
and sizes of tires and wheels.)
After the ignition switch is placed in the ON
position, it may take a period of time for the
tire pressure to be displayed while the
vehicle is driven. Depending on the radio
wave circumstance, tire pressure may not
correctly be displayed.
WARNING
.The use of tires other than those
recommended or the mixed use of
tires of different brands, construc-
tion (bias, bias-belted, radial or run-
flat), or tread patterns can adversely
affect the ride, braking, handling,
ground clearance, body-to-tire clear-
ance, tire chain clearance, speed-
ometer calibration, headlight aim
and bumper height. Some of these
effects may lead to accidents and
could result in serious personal injury.
.For Two-Wheel Drive (2WD) models,
if your vehicle was originally
equipped with 4 tires that were thesame size and you are only replacing
2 of the 4 tires, install the new tires
on the rear axle. Placing new tires on
the front axle may cause loss of
vehicle control in some driving condi-
tions and cause an accident and
personal injury.
.If the wheels are changed for any
reason, always replace with wheels
which have the same off-set dimen-
sion. Wheels of a different off-set
could cause premature tire wear,
degrade vehicle handling character-
istics and/or interference with the
brake discs/drums. Such interference
can lead to decreased braking effi-
ciency and/or early brake pad/shoe
wear. See “Wheels and tires” (P.10-
12) of this manual for wheel off-set
dimensions.
.Since the spare tire is not equipped
with the TPMS, when a spare tire is
mounted or a wheel is replaced, the
TPMS will not function and the low
tire pressure warning light will flash
for approximately 1 minute. The light
will remain on after 1 minute. Have
your tires replaced and/or TPMS
system reset as soon as possible. It
is recommended you visit an INFINITI
retailer for these services.
Do-it-yourself8-43
Page 403 of 466
8-44Do-it-yourself
.Replacing tires with those not origin-
ally specified by INFINITI could affect
the proper operation of the TPMS.
.The TPMS sensor may be damaged if
it is not handled correctly. Be careful
when handling the TPMS sensor.
.When replacing the TPMS sensor, the
ID registration may be required. It is
recommended you contact an
INFINITI retailer for ID registration.
.Do not use a valve stem cap that is
not specified by INFINITI. The valve
stem cap may become stuck.
.Be sure that the valve stem caps are
correctly fitted. Otherwise the valve
may be clogged up with dirt and
cause a malfunction or loss of pres-
sure.
.Do not install a damaged or deformed
wheel or tire even if it has been
repaired. Such wheels or tires could
have structural damage and could fail
without warning.
.The use of retread tire is not recom-
mended.
.For additional information regarding
tires, refer to “Important Tire Safety
Information” (US) or “Tire Safety
Information” (Canada) in the War-ranty Information Booklet.
Intelligent All-Wheel Drive (AWD)
models
CAUTION
.Always use tires of the same type,
size, brand, construction (bias, bias-
belted or radial), and tread pattern
on all four wheels. Failure to do so
may result in a circumference differ-
ence between tires on the front and
rear axles which will cause excessive
tire wear and may damage the trans-
mission, transfer case and differential
gears.
.ONLY use spare tires specified for
the Intelligent AWD model.
If excessive tire wear is found, it is recom-
mended that all four tires be replaced with
tires of the same size, brand, construction
and tread pattern. The tire pressure and
wheel alignment should also be checked and
corrected as necessary. It is recommended
you visit an INFINITI retailer for this service.
Wheel balance
Unbalanced wheels may affect vehicle hand-
ling and tire life. Even with regular use,
wheels can get out of balance. Therefore,
they should be balanced as required.
Wheel balance service should be performed
with the wheels off the vehicle. Spin
balancing the wheels on the vehicle could
lead to mechanical damage.
For additional information regarding tires,
refer to “Important Tire Safety Information”
(US) or “Tire Safety Information” (Canada) in
the INFINITI Warranty Information Booklet.
Care of wheels
See “Cleaning exterior” (P.7-2) for details
about care of the wheels.
Spare tire (TEMPORARY USE
ONLY (T-type) spare tire) (if so
equipped)
Since the spare tire is not equipped with the
TPMS, when a spare tire is mounted (TEM-
PORARY USE ONLY), the Tire Pressure
Monitoring System (TPMS) will not function.
Observe the following precautions if the
TEMPORARY USE ONLY spare tire must be
used, otherwise your vehicle could be da-
maged or involved in an accident.
Page 404 of 466
WARNING
.The TEMPORARY USE ONLY spare
tire should be used for emergency
use. It should be replaced with the
standard tire at the first opportunity
to avoid possible tire or differential
damage.
.Drive carefully while the TEMPOR-
ARY USE ONLY spare tire is installed.
Avoid sharp turns and abrupt braking
while driving.
.Periodically check spare tire inflation
pressure. Always keep the pressure
of the TEMPORARY USE ONLY
spare tire at 60 psi (420 kPa, 4.2
bar). Always keep the pressure of the
full size spare tire (if so equipped) at
the recommended pressure for stan-
dard tires, as indicated on the Tire
and Loading Information label. For
Tire and Loading Information label
location, see “Tire and loading infor-
mation label” (P.10-16).
.With the TEMPORARY USE ONLY
spare tire installed do not drive your
vehicle at speeds faster than 50 MPH
(80 km/h).
.When driving on roads covered with
snow or ice, the TEMPORARY USEONLY spare tire should be used on
the front wheels and original tire
used on the rear wheels (drive
wheels). Use tire chains only on the
two rear original tires.
.Tire tread of the TEMPORARY USE
ONLY spare tire will wear at a faster
rate than the standard tire. Replace
the spare tire as soon as the tread
wear indicators appear.
.Do not use the spare tire on other
vehicles.
.Do not use more than one spare tire
at the same time.
CAUTION
.Do not use tire chains on a TEM-
PORARY USE ONLY spare tire. Tire
chains will not fit properly and may
cause damage to the vehicle.
.Because the TEMPORARY USE
ONLY spare tire is smaller than the
original tire, ground clearance is re-
duced. To avoid damage to the
vehicle, do not drive over obstacles.
Also do not drive the vehicle through
an automatic car wash since it may
get caught.
Emergency tire puncture repair kit
(if so equipped)
The emergency tire puncture repair kit
(Emergency Tire Sealant) is supplied with
the vehicle instead of a spare tire. It can be
used to temporarily repair minor tire punc-
tures. If possible, have the vehicle towed to a
facility that can repair or replace the flat tire.
Using the emergency tire puncture repair kit
may cause a malfunction of the tire pressure
sensor and cause the low tire pressure
warning light to illuminate.
See “Flat tire” (P.6-3) for more details.
Do-it-yourself8-45
Page 408 of 466
other corrosive materials, check lubrication
frequently.
Lights*:Clean the headlights on a regular
basis. Make sure that the headlights, stop
lights, tail lights, turn signal lights, and other
lights are all operating properly and installed
securely. Also check headlight aim.
Road wheel nuts (lug nuts)*:When checking
the tires, make sure no wheel nuts are
missing, and check for any loose wheel nuts.
Tighten if necessary.
Tire rotation*:Tires should be rotated every
5,000 miles (8,000 km). If your vehicle is
equipped with different sized tires in the
front and rear, tires cannot be rotated.
Tires*:Check the pressure with a gauge
often and always prior to long distance trips.
If necessary, adjust the pressure in all tires,
including the spare, to the pressure speci-
fied. Check carefully for damage, cuts or
excessive wear.
Tire Pressure Monitoring System (TPMS)
transmitter components:Replace the TPMS
transmitter grommet seal, valve core and
cap when the tires are replaced due to wear
or age.
Wheel alignment and balance:If the vehicle
should pull to either side while driving on a
straight and level road, or if you detect
uneven or abnormal tire wear, there may be
a need for wheel alignment.If the steering wheel or seat vibrates at
normal highway speeds, wheel balancing
may be needed.
For additional information regarding tires,
refer to “Important Tire Safety Information”
(US) or “Tire Safety Information” (Canada) in
the INFINITI Warranty Information Booklet.
Windshield:Clean the windshield on a
regular basis. Check the windshield at least
every six months for cracks or other damage.
Have a damaged windshield repaired by a
qualified repair facility.
Windshield wiper blades*:Check for cracks
or wear if they do not wipe properly.
Inside the vehicle
The maintenance items listed here should be
checked on a regular basis, such as when
performing scheduled maintenance, cleaning
the vehicle, etc.
Accelerator pedal:Check the pedal for
smooth operation and make sure the pedal
does not catch or require uneven effort.
Keep the floor mat away from the pedal.
Automatic transmission P (Park) mechan-
ism:On a fairly steep hill, check that your
vehicle is held securely with the shift lever in
the P (Park) position without applying any
brakes.
Brake pedal:Check the pedal for smooth
operation. If the brake pedal suddenly goesdown further than normal, the pedal feels
spongy or the vehicle seems to take longer to
stop, have your vehicle checked immediately.
It is recommended you visit an INFINITI
retailer for this service. Keep the floor mat
away from the pedal.
Brakes:Check that the brakes do not pull the
vehicle to one side when applied.
Parking brake:Check the parking brake
operation regularly. The vehicle should be
securely held on a fairly steep hill with only
the parking brake applied. If the parking
brake needs adjusted, it is recommended you
visit an INFINITI retailer for this service.
Seats:Check seat position controls such as
seat adjusters, seatback recliner, etc. to
ensure they operate smoothly and that all
latches lock securely in every position. Check
that the head restraints move up and down
smoothly and that the locks (if so equipped)
hold securely in all latched positions.
Seat belts:Check that all parts of the seat
belt system (for example, buckles, anchors,
adjuster and retractors) operate properly
and smoothly, and are installed securely.
Check the belt webbing for cuts, fraying,
wear or damage.
Steering wheel:Check for changes in the
steering conditions, such as excessive free
play, hard steering or strange noises.
Maintenance and schedules9-3
Page 426 of 466
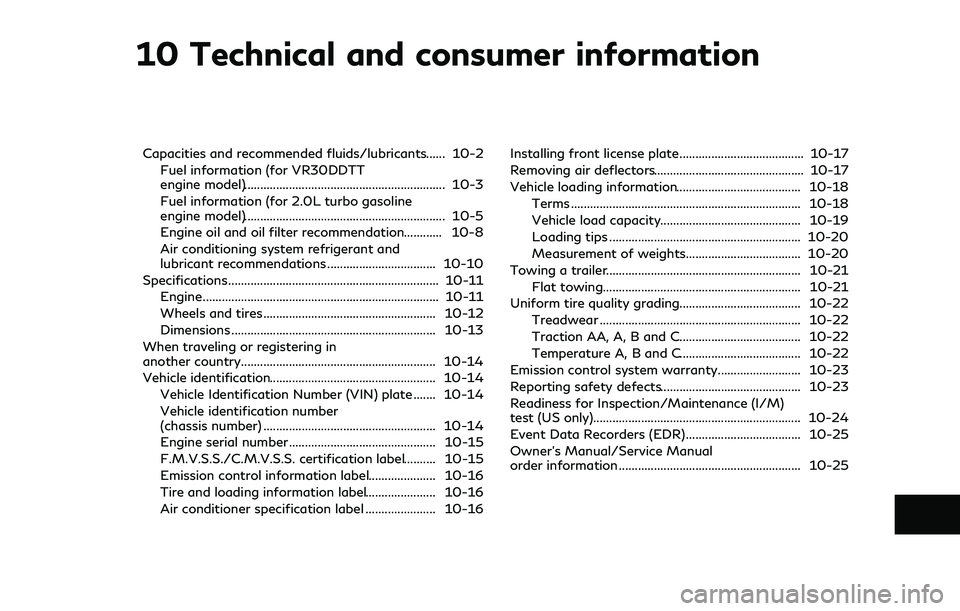
10 Technical and consumer information
Capacities and recommended fluids/lubricants...... 10-2
Fuel information (for VR30DDTT
engine model)............................................................... 10-3
Fuel information (for 2.0L turbo gasoline
engine model)............................................................... 10-5
Engine oil and oil filter recommendation............ 10-8
Air conditioning system refrigerant and
lubricant recommendations .................................. 10-10
Specifications.................................................................. 10-11
Engine.......................................................................... 10-11
Wheels and tires ...................................................... 10-12
Dimensions ................................................................ 10-13
When traveling or registering in
another country............................................................. 10-14
Vehicle identification.................................................... 10-14
Vehicle Identification Number (VIN) plate ....... 10-14
Vehicle identification number
(chassis number) ...................................................... 10-14
Engine serial number .............................................. 10-15
F.M.V.S.S./C.M.V.S.S. certification label.......... 10-15
Emission control information label..................... 10-16
Tire and loading information label...................... 10-16
Air conditioner specification label ...................... 10-16Installing front license plate....................................... 10-17
Removing air deflectors............................................... 10-17
Vehicle loading information....................................... 10-18
Terms ........................................................................ 10-18
Vehicle load capacity............................................ 10-19
Loading tips ............................................................ 10-20
Measurement of weights.................................... 10-20
Towing a trailer............................................................. 10-21
Flat towing.............................................................. 10-21
Uniform tire quality grading...................................... 10-22
Treadwear ............................................................... 10-22
Traction AA, A, B and C...................................... 10-22
Temperature A, B and C...................................... 10-22
Emission control system warranty.......................... 10-23
Reporting safety defects............................................ 10-23
Readiness for Inspection/Maintenance (I/M)
test (US only)................................................................. 10-24
Event Data Recorders (EDR) .................................... 10-25
Owner’s Manual/Service Manual
order information ......................................................... 10-25
Page 427 of 466
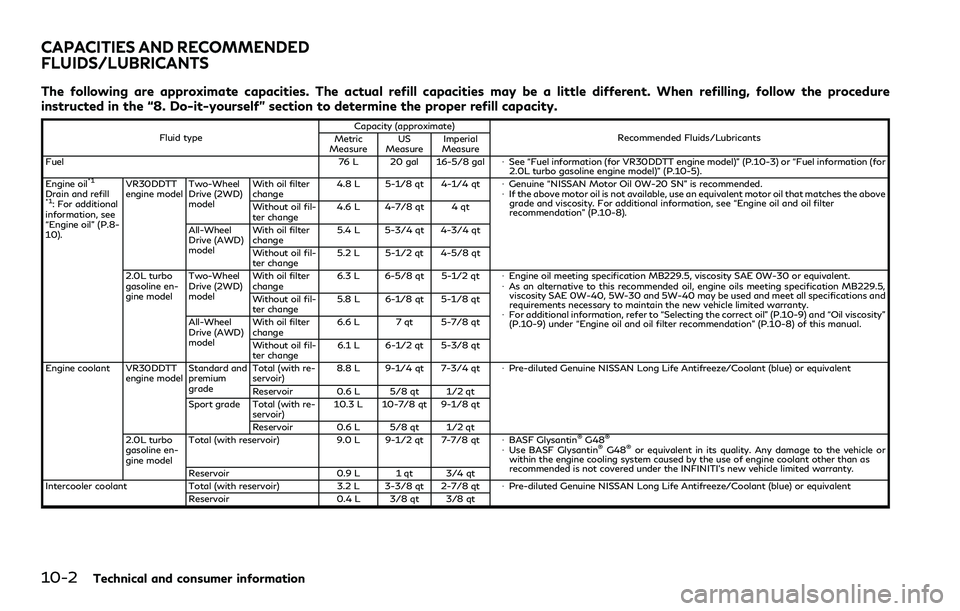
10-2Technical and consumer information
The following are approximate capacities. The actual refill capacities may be a little different. When refilling, follow the procedure
instructed in the “8. Do-it-yourself” section to determine the proper refill capacity.
Fluid typeCapacity (approximate)
Recommended Fluids/Lubricants
Metric
MeasureUS
MeasureImperial
Measure
Fuel 76 L 20 gal 16-5/8 galÂSee “Fuel information (for VR30DDTT engine model)” (P.10-3) or “Fuel information (for
2.0L turbo gasoline engine model)” (P.10-5).
Engine oil
*1Drain and refill*1: For additional
information, see
“Engine oil” (P.8-
10).VR30DDTT
engine modelTwo-Wheel
Drive (2WD)
modelWith oil filter
change4.8 L 5-1/8 qt 4-1/4 qtÂGenuine “NISSAN Motor Oil 0W-20 SN” is recommended.
ÂIf the above motor oil is not available, use an equivalent motor oil that matches the above
grade and viscosity. For additional information, see “Engine oil and oil filter
recommendation” (P.10-8). Without oil fil-
ter change4.6 L 4-7/8 qt 4 qt
All-Wheel
Drive (AWD)
modelWith oil filter
change5.4 L 5-3/4 qt 4-3/4 qt
Without oil fil-
ter change5.2 L 5-1/2 qt 4-5/8 qt
2.0L turbo
gasoline en-
gine modelTwo-Wheel
Drive (2WD)
modelWith oil filter
change6.3 L 6-5/8 qt 5-1/2 qtÂEngine oil meeting specification MB229.5, viscosity SAE 0W-30 or equivalent.
ÂAs an alternative to this recommended oil, engine oils meeting specification MB229.5,
viscosity SAE 0W-40, 5W-30 and 5W-40 may be used and meet all specifications and
requirements necessary to maintain the new vehicle limited warranty.
ÂFor additional information, refer to “Selecting the correct oil” (P.10-9) and “Oil viscosity”
(P.10-9) under “Engine oil and oil filter recommendation” (P.10-8) of this manual. Without oil fil-
ter change5.8 L 6-1/8 qt 5-1/8 qt
All-Wheel
Drive (AWD)
modelWith oil filter
change6.6 L 7 qt 5-7/8 qt
Without oil fil-
ter change6.1 L 6-1/2 qt 5-3/8 qt
Engine coolant VR30DDTT
engine modelStandard and
premium
gradeTotal (with re-
servoir)8.8 L 9-1/4 qt 7-3/4 qtÂPre-diluted Genuine NISSAN Long Life Antifreeze/Coolant (blue) or equivalent
Reservoir 0.6 L 5/8 qt 1/2 qt
Sport grade Total (with re-
servoir)10.3 L 10-7/8 qt 9-1/8 qt
Reservoir 0.6 L 5/8 qt 1/2 qt
2.0L turbo
gasoline en-
gine modelTotal (with reservoir) 9.0 L 9-1/2 qt 7-7/8 qtÂBASF Glysantin
®G48®ÂUse BASF Glysantin®G48®or equivalent in its quality. Any damage to the vehicle or
within the engine cooling system caused by the use of engine coolant other than as
recommended is not covered under the INFINITI’s new vehicle limited warranty.
Reservoir 0.9 L 1 qt 3/4 qt
Intercooler coolant Total (with reservoir) 3.2 L 3-3/8 qt 2-7/8 qtÂPre-diluted Genuine NISSAN Long Life Antifreeze/Coolant (blue) or equivalent
Reservoir 0.4 L 3/8 qt 3/8 qt
CAPACITIES AND RECOMMENDED
FLUIDS/LUBRICANTS
Page 437 of 466
10-12Technical and consumer information
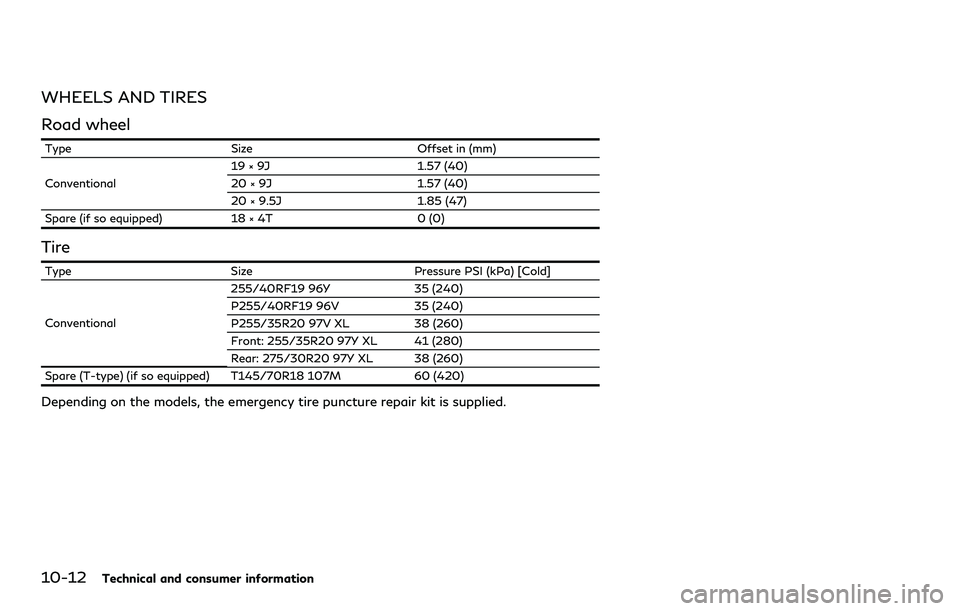
WHEELS AND TIRES
Road wheel
Type Size Offset in (mm)
Conventional19 × 9J 1.57 (40)
20 × 9J 1.57 (40)
20 × 9.5J 1.85 (47)
Spare (if so equipped) 18 × 4T 0 (0)
Tire
Type Size Pressure PSI (kPa) [Cold]
Conventional255/40RF19 96Y 35 (240)
P255/40RF19 96V 35 (240)
P255/35R20 97V XL 38 (260)
Front: 255/35R20 97Y XL 41 (280)
Rear: 275/30R20 97Y XL 38 (260)
Spare (T-type) (if so equipped) T145/70R18 107M 60 (420)
Depending on the models, the emergency tire puncture repair kit is supplied.
Page 438 of 466
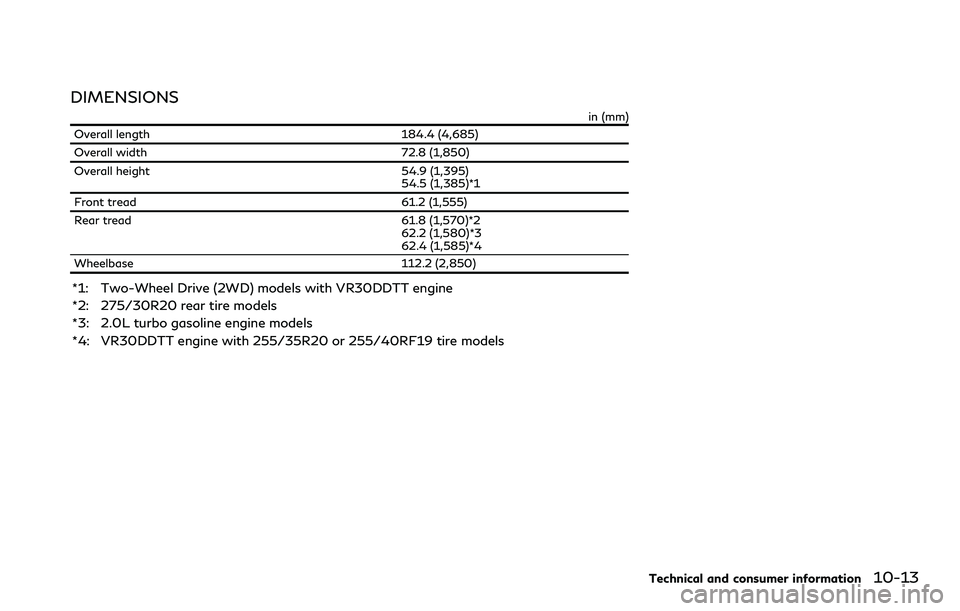
DIMENSIONS
in (mm)
Overall length 184.4 (4,685)
Overall width 72.8 (1,850)
Overall height 54.9 (1,395)
54.5 (1,385)*1
Front tread 61.2 (1,555)
Rear tread 61.8 (1,570)*2
62.2 (1,580)*3
62.4 (1,585)*4
Wheelbase 112.2 (2,850)
*1: Two-Wheel Drive (2WD) models with VR30DDTT engine
*2: 275/30R20 rear tire models
*3: 2.0L turbo gasoline engine models
*4: VR30DDTT engine with 255/35R20 or 255/40RF19 tire models
Technical and consumer information10-13
Page 442 of 466
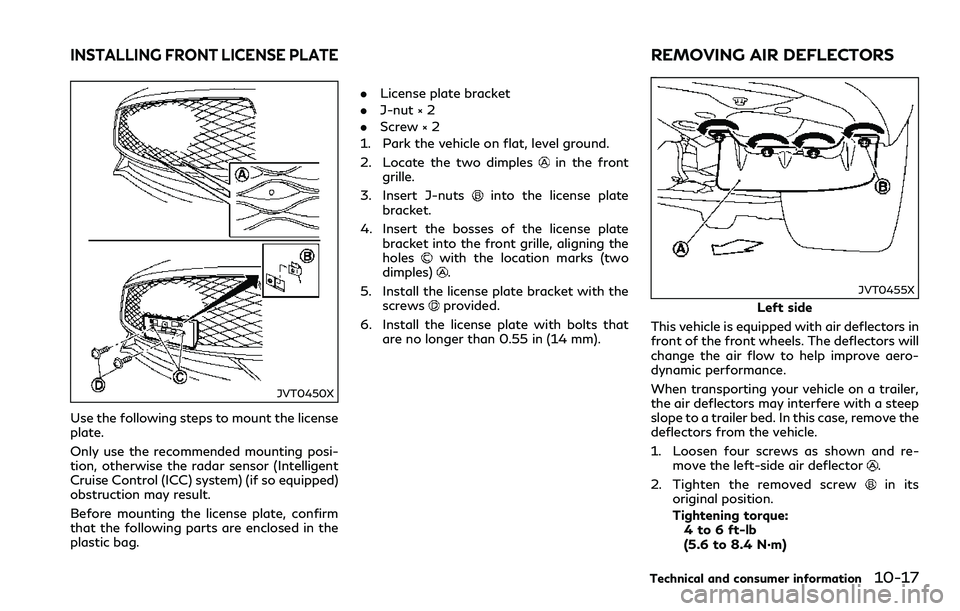
JVT0450X
Use the following steps to mount the license
plate.
Only use the recommended mounting posi-
tion, otherwise the radar sensor (Intelligent
Cruise Control (ICC) system) (if so equipped)
obstruction may result.
Before mounting the license plate, confirm
that the following parts are enclosed in the
plastic bag..License plate bracket
.J-nut × 2
.Screw × 2
1. Park the vehicle on flat, level ground.
2. Locate the two dimples
in the front
grille.
3. Insert J-nuts
into the license plate
bracket.
4. Insert the bosses of the license plate
bracket into the front grille, aligning the
holes
with the location marks (two
dimples).
5. Install the license plate bracket with the
screws
provided.
6. Install the license plate with bolts that
are no longer than 0.55 in (14 mm).
JVT0455X
Left side
This vehicle is equipped with air deflectors in
front of the front wheels. The deflectors will
change the air flow to help improve aero-
dynamic performance.
When transporting your vehicle on a trailer,
the air deflectors may interfere with a steep
slope to a trailer bed. In this case, remove the
deflectors from the vehicle.
1. Loosen four screws as shown and re-
move the left-side air deflector
.
2. Tighten the removed screw
in its
original position.
Tightening torque:
4 to 6 ft-lb
(5.6 to 8.4 N·m)
Technical and consumer information10-17
INSTALLING FRONT LICENSE PLATEREMOVING AIR DEFLECTORS